鸿蒙开发之Button按钮类型及如何通过代码设置(HarmonyOS鸿蒙开发基础知识)
AbilitySlice 是什么 (HarmonyOS鸿蒙开发基础知识)
AbilitySlice 是什么
AbilitySlice主要用于承载Ability的具体逻辑实现和界面UI,是应用显示、运行和跳转的最小单元。AbilitySlice通过setUIContent()为界面设置布局
本文重点给大家介绍鸿蒙开发之Button按钮类型及如何通过代码设置(HarmonyOS鸿蒙开发基础知识),具体内容如下所示:
Button类型分类
按照按钮的形状,按钮可以分为:
- 普通按钮
- 椭圆按钮
- 胶囊按钮
- 圆形按钮
- 其它
Button类型效果和代码
普通按钮
普通按钮和其他按钮的区别在于不需要设置任何形状,只设置文本和背景颜色即可,例如:
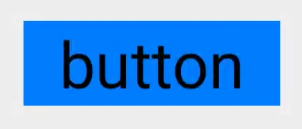
<Button
 ohos:width="150vp"
 ohos:height="50vp"
 ohos:text_size="27fp"
 ohos:text="button"
 ohos:background_element="$graphic:color_blue_element"
 ohos:left_margin="15vp"
 ohos:bottom_margin="15vp"
 ohos:right_padding="8vp"
 ohos:left_padding="8vp"
/>
椭圆按钮
椭圆按钮是通过设置background_element的来实现的,background_element的shape设置为椭圆(oval),例如:

<Button
 ohos:width="150vp"
 ohos:height="50vp"
 ohos:text_size="27fp"
 ohos:text="button"
 ohos:background_element="$graphic:oval_button_element"
 ohos:left_margin="15vp"
 ohos:bottom_margin="15vp"
 ohos:right_padding="8vp"
 ohos:left_padding="8vp"
 ohos:element_left="$graphic:ic_btn_reload"
/>
胶囊按钮
胶囊按钮是一种常见的按钮,设置按钮背景时将背景设置为矩形形状,并且设置ShapeElement的radius的半径,例如:

<Button
 ohos:id="$+id:button"
 ohos:width="match_content"
 ohos:height="match_content"
 ohos:text_size="27fp"
 ohos:text="button"
 ohos:background_element="$graphic:capsule_button_element"
 ohos:left_margin="15vp"
 ohos:bottom_margin="15vp"
 ohos:right_padding="15vp"
 ohos:left_padding="15vp"
/>
圆形按钮
圆形按钮和椭圆按钮的区别在于组件本身的宽度和高度需要相同,例如:
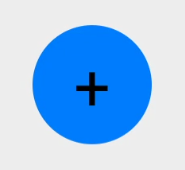
<Button
 ohos:id="$+id:button4"
 ohos:width="50vp"
 ohos:height="50vp"
 ohos:text_size="27fp"
 ohos:background_element="$graphic:circle_button_element"
 ohos:text="+"
 ohos:left_margin="15vp"
 ohos:bottom_margin="15vp"
 ohos:right_padding="15vp"
 ohos:left_padding="15vp"
/>
场景示例
利用圆形按钮,胶囊按钮,文本组件可以绘制出如下拨号盘的UI界面。

<?xml version="1.0" encoding="utf-8"?>
<DirectionalLayout
 xmlns:ohos="http://schemas.huawei.com/res/ohos"
 ohos:width="match_parent"
 ohos:height="match_parent"
 ohos:background_element="$graphic:color_light_gray_element"
 ohos:orientation="vertical">
 <Text
 ohos:width="match_content"
 ohos:height="match_content"
 ohos:text_size="20fp"
 ohos:text="0123456789"
 ohos:background_element="$graphic:green_text_element"
 ohos:text_alignment="center"
 ohos:layout_alignment="horizontal_center"
 />
 <DirectionalLayout
 ohos:width="match_parent"
 ohos:height="match_content"
 ohos:alignment="horizontal_center"
 ohos:orientation="horizontal"
 ohos:top_margin="5vp"
 ohos:bottom_margin="5vp">
 <Button
  ohos:width="40vp"
  ohos:height="40vp"
  ohos:text_size="15fp"
  ohos:background_element="$graphic:green_circle_button_element"
  ohos:text="1"
  ohos:text_alignment="center"
 />
 <Button
  ohos:width="40vp"
  ohos:height="40vp"
  ohos:text_size="15fp"
  ohos:background_element="$graphic:green_circle_button_element"
  ohos:text="2"
  ohos:left_margin="5vp"
  ohos:right_margin="5vp"
  ohos:text_alignment="center"
 />
 <Button
  ohos:width="40vp"
  ohos:height="40vp"
  ohos:text_size="15fp"
  ohos:background_element="$graphic:green_circle_button_element"
  ohos:text="3"
  ohos:text_alignment="center"
 />
 </DirectionalLayout>
 <DirectionalLayout
 ohos:width="match_parent"
 ohos:height="match_content"
 ohos:alignment="horizontal_center"
 ohos:orientation="horizontal"
 ohos:bottom_margin="5vp">
 <Button
  ohos:width="40vp"
  ohos:height="40vp"
  ohos:text_size="15fp"
  ohos:background_element="$graphic:green_circle_button_element"
  ohos:text="4"
  ohos:text_alignment="center"
 />
 <Button
  ohos:width="40vp"
  ohos:height="40vp"
  ohos:text_size="15fp"
  ohos:left_margin="5vp"
  ohos:right_margin="5vp"
  ohos:background_element="$graphic:green_circle_button_element"
  ohos:text="5"
  ohos:text_alignment="center"
 />
 <Button
  ohos:width="40vp"
  ohos:height="40vp"
  ohos:text_size="15fp"
  ohos:background_element="$graphic:green_circle_button_element"
  ohos:text="6"
  ohos:text_alignment="center"
 />
 </DirectionalLayout>
 <DirectionalLayout
 ohos:width="match_parent"
 ohos:height="match_content"
 ohos:alignment="horizontal_center"
 ohos:orientation="horizontal"
 ohos:bottom_margin="5vp">
 <Button
  ohos:width="40vp"
  ohos:height="40vp"
  ohos:text_size="15fp"
  ohos:background_element="$graphic:green_circle_button_element"
  ohos:text="7"
  ohos:text_alignment="center"
 />
 <Button
  ohos:width="40vp"
  ohos:height="40vp"
  ohos:text_size="15fp"
  ohos:left_margin="5vp"
  ohos:right_margin="5vp"
  ohos:background_element="$graphic:green_circle_button_element"
  ohos:text="8"
  ohos:text_alignment="center"
 />
 <Button
  ohos:width="40vp"
  ohos:height="40vp"
  ohos:text_size="15fp"
  ohos:background_element="$graphic:green_circle_button_element"
  ohos:text="9"
  ohos:text_alignment="center"
 />
 </DirectionalLayout>
 <DirectionalLayout
 ohos:width="match_parent"
 ohos:height="match_content"
 ohos:alignment="horizontal_center"
 ohos:orientation="horizontal"
 ohos:bottom_margin="5vp">
 <Button
  ohos:width="40vp"
  ohos:height="40vp"
  ohos:text_size="15fp"
  ohos:background_element="$graphic:green_circle_button_element"
  ohos:text="*"
  ohos:text_alignment="center"
 />
 <Button
  ohos:width="40vp"
  ohos:height="40vp"
  ohos:text_size="15fp"
  ohos:left_margin="5vp"
  ohos:right_margin="5vp"
  ohos:background_element="$graphic:green_circle_button_element"
  ohos:text="0"
  ohos:text_alignment="center"
 />
 <Button
  ohos:width="40vp"
  ohos:height="40vp"
  ohos:text_size="15fp"
  ohos:background_element="$graphic:green_circle_button_element"
  ohos:text="#"
  ohos:text_alignment="center"
 />
 </DirectionalLayout>
 <Button
 ohos:width="match_content"
 ohos:height="match_content"
 ohos:text_size="15fp"
 ohos:text="CALL"
 ohos:background_element="$graphic:green_capsule_button_element"
 ohos:bottom_margin="5vp"
 ohos:text_alignment="center"
 ohos:layout_alignment="horizontal_center"
 ohos:left_padding="10vp"
 ohos:right_padding="10vp"
 ohos:top_padding="2vp"
 ohos:bottom_padding="2vp"
 />
</DirectionalLayout>
总结
到此这篇关于鸿蒙开发之Button按钮类型及如何通过代码设置(HarmonyOS鸿蒙开发基础知识)的文章就介绍到这了,更多相关鸿蒙开发Button按钮类型内容请搜索我们以前的文章或继续浏览下面的相关文章希望大家以后多多支持我们!
相关推荐
-
HarmonyOS开发基础知识之Component和ComponentContainer区别(鸿蒙教程)
实战需求 HarmonyOS鸿蒙开发小知识之Component和ComponentContainer区别 Component 是什么? Component:提供内容显示,是界面中所有组件的基类,开发者可以给Component设置事件处理回调来创建一个可交互的组件.Java UI框架提供了一些常用的界面元素,也可称之为组件,组件一般直接继承Component或它的子类,如Text.Image等. ComponentContainer 是什么? ComponentContainer:作为容器容纳Co
-
HarmonyOS 基本控件的实现
感谢关注HarmonyOS,为了便于大家学习特将鸿蒙2.0基础教学内容整理如下: 1.HarmonyOS应用开发-视频播放 https://developer.huawei.com/consumer/cn/codelab/HarmonyOS-hap1/index.html#0 2.HarmonyOS应用开发-基本控件 https://developer.huawei.com/consumer/cn/codelab/HarmonyOS-hap2/index.html#0 3.HarmonyOS应用
-
鸿蒙开发之Button按钮类型及如何通过代码设置(HarmonyOS鸿蒙开发基础知识)
AbilitySlice 是什么 (HarmonyOS鸿蒙开发基础知识) AbilitySlice 是什么 AbilitySlice主要用于承载Ability的具体逻辑实现和界面UI,是应用显示.运行和跳转的最小单元.AbilitySlice通过setUIContent()为界面设置布局 本文重点给大家介绍鸿蒙开发之Button按钮类型及如何通过代码设置(HarmonyOS鸿蒙开发基础知识),具体内容如下所示: Button类型分类 按照按钮的形状,按钮可以分为: 普通按钮 椭圆按钮 胶囊按钮
-
Android开发之Button事件实现与监听方法总结
本文实例总结了Android开发之Button事件实现与监听方法.分享给大家供大家参考,具体如下: 先来介绍Button事件实现的两种方法 main.xml <?xml version="1.0" encoding="utf-8"?> <LinearLayout xmlns:android="http://schemas.android.com/apk/res/android" android:orientation="
-
Android开发之button事件监听简单实例
本文实例讲述了Android开发之button事件监听用法.分享给大家供大家参考.具体如下: 事件监听的listener,有以下几种方式: 1.声明一个普通的class,实现OnClickListener接口,然后在button的setOnClickListener中new该类的一个对象. 2.使用匿名内部类,直接 btn.setOnClickListener(new OnClickListener() { @Override public void onClick(View arg0) { S
-
鸿蒙开发之处理图片位图操作的方法详解(HarmonyOS鸿蒙开发基础知识)
位图操作开发指导 图操作就是指对PixelMap图像进行相关的操作,比如创建.查询信息.读写像素数据等. 1.创建位图对象PixelMap // 指定初始化选项创建 PixelMap pixelMap2 = PixelMap.create(initializationOptions); // 从像素颜色数组创建 int[] defaultColors = new int[] {5, 5, 5, 5, 6, 6, 3, 3, 3, 0}; PixelMap.InitializationOption
-
浅析鸿蒙基础之Permanent 持久性内存对象(HarmonyOS鸿蒙开发基础知识)
HarmonyOS是一款"面向未来".面向全场景(移动办公.运动健康.社交通信.媒体娱乐等)的分布式操作系统.在传统的单设备系统能力的基础上,HarmonyOS提出了基于同一套系统能力.适配多种终端形态的分布式理念,能够支持多种终端设备. Permanent 持久性内存对象 注释持久性内存对象. 您可以使用此类在新语句中将一个对象注释为持久性内存对象,这样该对象将不会被Ark编译器的RC回收. 参考代码 以" Integer.java"文件中的" Inte
-
python GUI库图形界面开发之PyQt5简单绘图板实例与代码分析
在PyQt中常用的图像类有四种,QPixmap,QImage,QPicture,QBitmap 类型 描述 QPixmap 专门为绘图设计的,在绘制图片时需要使用QPixmap QImage 提供了一个与硬件无关的图像表示函数,可以用于图片像素级访问 QPicture 是一个绘图设备类,它继承自QPainter类,可以使用QPainter的begin()函数在QPicture上绘图,使用end()函数结束绘图,使用QPicture的save()函数将QPainter所使用的绘图指令保存在文件中
-

iOS开发之(APNS)远程推送实现代码 附证书与真机调试
远程推送通知 什么是远程推送通知 顾名思义,就是从远程服务器推送给客户端的通知(需要联网)远程推送服务,又称为APNs(ApplePush Notification Services) 为什么需要远程推送通知传统获取数据的局限性只要用户关闭了app,就无法跟app的服务器沟通,无法从服务器上获得最新的数据内容远程推送通知可以解决以上问题不管用户打开还是关闭app,只要联网了,都能接收到服务器推送的远程通知远程推送通知使用须知所有的苹果设备,在联网状态下,都会与苹果的服务器建立长连接什么是长连接只
-
Android开发之HTTP访问网络
本文实例为大家详细介绍了Android开发之HTTP访问网络的相关代码,供大家参考,具体内容如下 代码1: package com.ywhttpurlconnection; import android.app.Activity; import android.content.Intent; import android.os.Bundle; import android.view.View; import android.widget.Button; public class Ywhttpur
-
Android开发之PopupWindow实现弹窗效果
本文实例为大家分享了Android开发之PopupWindow实现弹窗的具体代码,供大家参考,具体内容如下 基本框架 在activity_main.xml中设置一个按钮,用于唤出弹窗; <?xml version="1.0" encoding="utf-8"?> <LinearLayout xmlns:android="http://schemas.android.com/apk/res/android" android