Android 实现夜间模式的快速简单方法实例详解
ChangeMode
项目地址:ChangeMode
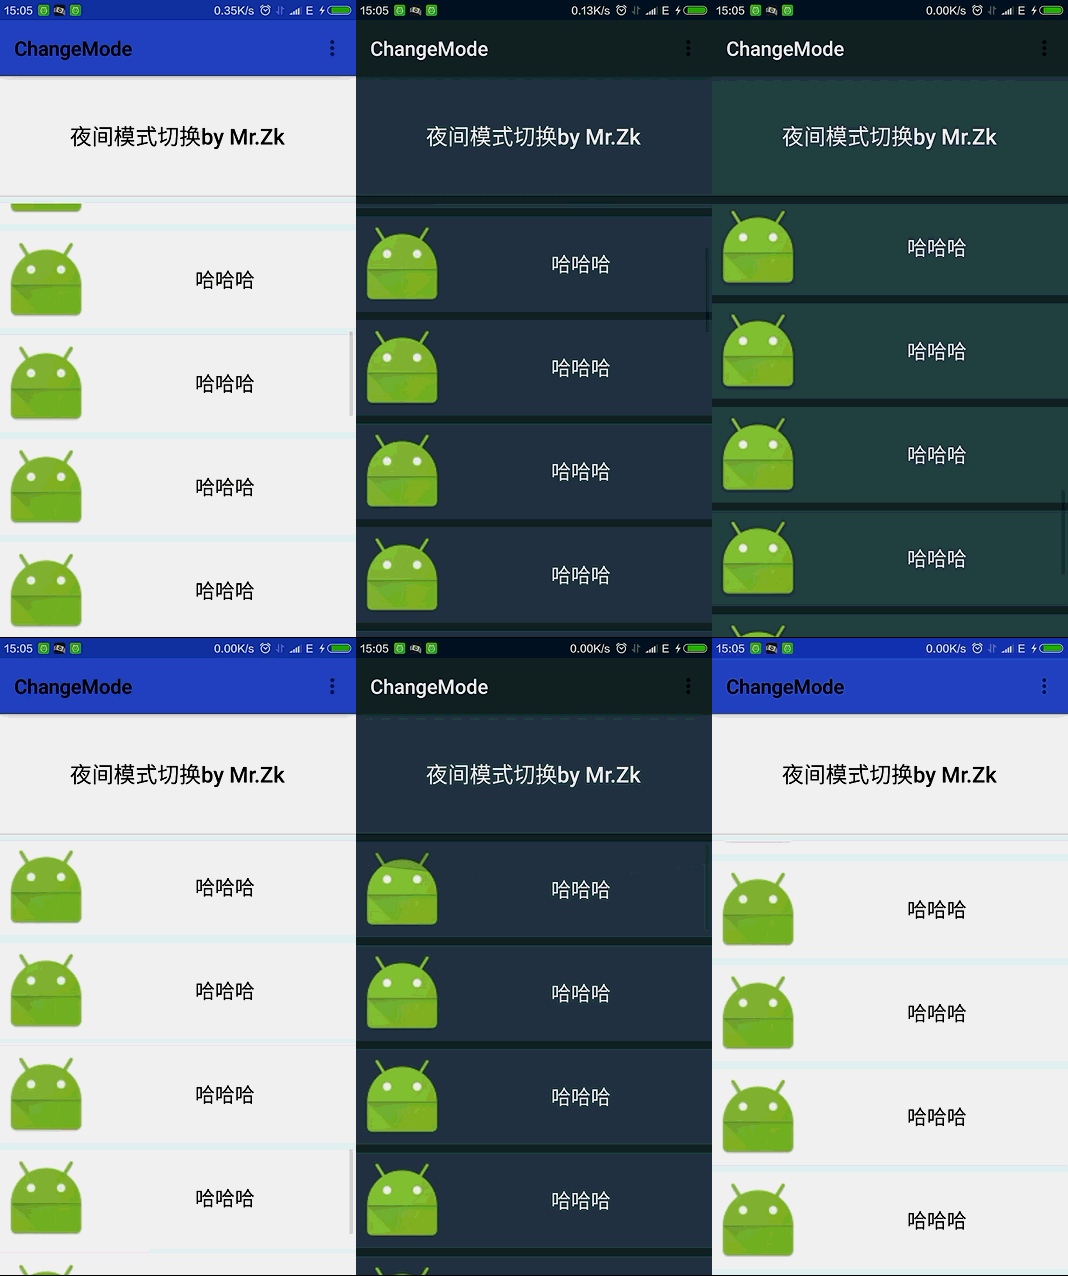
Implementation of night mode for Android.
用最简单的方式实现夜间模式,支持ListView、RecyclerView。
Preview

Usage xml
android:background="?attr/zzbackground"
app:backgroundAttr="zzbackground"//如果当前页面要立即刷新,这里传入属性名称 比如 R.attr.zzbackground 传 zzbackground 即可
android:textColor="?attr/zztextColor"
app:textColorAttr="zztextColor"//如需立即刷新页面效果 同上
java
@Override
protected void onCreate(Bundle savedInstanceState) {
//1. 在要立即切换效果的页面调用此方法
ChangeModeController.getInstance().init(this,R.attr.class).setTheme(this, R.style.DayTheme, R.style.NightTheme);
//在其他页面调用此方法
//ChangeModeController.setTheme(this, R.style.DayTheme, R.style.NightTheme);
super.onCreate(savedInstanceState);
setContentView(R.layout.activity_main);
//添加额外 view 至夜间管理
// ChangeModeController.getInstance().addBackgroundColor(toolbar, R.attr.colorPrimary);
//ChangeModeController.getInstance().addBackgroundDrawable(view,R.attr.colorAccent);
// ChangeModeController.getInstance().addTextColor(view,R.attr.colorAccent);
//2. 设置切换
//ChangeModeController.changeDay(this, R.style.DayTheme);
//ChangeModeController.changeNight(this, R.style.NightTheme);
}
@Override
protected void onDestroy() {
super.onDestroy();
//3. 在 onDestroy 调用
ChangeModeController.onDestory();
}
详细操作描述
第一步:自定义属性
<?xml version="1.0" encoding="utf-8"?>
<resources>
<attr name="zzbackground" format="color|reference"/>
<attr name="zzbackgroundDrawable" format="reference"/>
<attr name="zztextColor" format="color"/>
<attr name="zzItemBackground" format="color"/>
</resources>
第二步:配置夜间 style 文件
<resources>
<!-- Base application theme. -->
<style name="AppTheme" parent="Theme.AppCompat.Light.DarkActionBar">
<!-- Customize your theme here. -->
<item name="colorPrimary">@color/colorPrimary</item>
<item name="colorPrimaryDark">@color/colorPrimaryDark</item>
<item name="colorAccent">@color/colorAccent</item>
<item name="windowActionBar">false</item>
<item name="android:windowNoTitle">true</item>
<item name="windowNoTitle">true</item>
</style>
<!--日间模式 -->
<style name="DayTheme" parent="AppTheme">
<item name="zzbackground">@color/dayBackground</item>
<item name="zzbackgroundDrawable">@drawable/ic_launcher</item>
<item name="zztextColor">@color/dayTextColor</item>
<item name="zzItemBackground">@color/dayItemBackground</item>
</style>
<!--夜间模式 -->
<style name="NightTheme" parent="AppTheme">
<item name="zzbackground">@color/nightBackground</item>
<item name="zzbackgroundDrawable">@color/nightBackground</item>
<item name="zztextColor">@color/nightTextColor</item>
<item name="zzItemBackground">@color/nightItemBackground</item>

<item name="colorPrimary">@color/colorPrimaryNight</item>
<item name="colorPrimaryDark">@color/colorPrimaryDarkNight</item>
<item name="colorAccent">@color/colorAccentNight</item>
</style>
<style name="AppTheme.AppBarOverlay" parent="ThemeOverlay.AppCompat.Dark.ActionBar" />
<style name="AppTheme.PopupOverlay" parent="ThemeOverlay.AppCompat.Light" />
</resources>
为相关属性设置对应模式的属性值:
<?xml version="1.0" encoding="utf-8"?>
<resources>
<color name="dayBackground">#F2F4F7</color>
<color name="dayTextColor">#000</color>
<color name="dayItemBackground">#fff</color>
<color name="nightItemBackground">#37474F</color>
<color name="nightBackground">#263238</color>
<color name="nightTextColor">#fff</color>
</resources>
第三步:在布局文件中配置使用对应属性
<?xml version="1.0" encoding="utf-8"?>
<LinearLayout xmlns:android="http://schemas.android.com/apk/res/android"
xmlns:tools="http://schemas.android.com/tools"
android:layout_width="match_parent"
android:layout_height="match_parent"
xmlns:app="http://schemas.android.com/apk/res-auto"
android:orientation="vertical"
android:background="?attr/zzbackground"
app:backgroundAttr="zzbackground"
tools:context="com.thinkfreely.changemode.MainActivity">
<android.support.design.widget.AppBarLayout
android:layout_width="match_parent"
android:layout_height="wrap_content"
app:theme="@style/AppTheme.AppBarOverlay">
<android.support.v7.widget.Toolbar
android:id="@+id/toolbar"
android:layout_width="match_parent"
android:layout_height="?attr/actionBarSize"
android:background="?attr/colorPrimary"
app:backgroundAttr="colorPrimary"
app:titleTextColor="?attr/zztextColor"
app:popupTheme="@style/AppTheme.PopupOverlay"
/>
</android.support.design.widget.AppBarLayout>
<Button
android:layout_width="match_parent"
android:layout_height="120dp"
android:gravity="center"
android:textColor="?attr/zztextColor"
app:textColorAttr="zztextColor"
android:background="?attr/zzItemBackground"
app:backgroundAttr="zzItemBackground"
android:padding="10dp"
android:layout_marginBottom="8dp"
android:textSize="22sp"
android:textAllCaps="false"
android:text="夜间模式切换 by Mr.Zk" />
<android.support.v7.widget.RecyclerView
android:id="@+id/recyclerView"
android:layout_width="match_parent"
android:layout_height="match_parent"
android:scrollbars="vertical"/>
</LinearLayout>
注意textColorAttr、backgroundAttr、backgroundDrawableAttr三个属性。如需当前页面立即刷新,需填加相应属性。
属性 描述
textColorAttr 修改字体颜色时设置。如 R.attr.zztextColor 传 zztextColor 即可。例:app:textColorAttr="zztextColor"
backgroundAttr 修改背景颜色/背景图片时设置。同上。例: app:backgroundAttr="zzbackground"
backgroundDrawableAttr 修改背景颜色/背景图片时设置。同上。例: app:backgroundDrawableAttr="zzbackground"
第四步:页面调用 java 代码
@Override
protected void onCreate(Bundle savedInstanceState) {
//1. 在要立即切换效果的页面调用此方法
ChangeModeController.getInstance().init(this,R.attr.class).setTheme(this, R.style.DayTheme, R.style.NightTheme);
//在其他页面调用此方法
//ChangeModeController.setTheme(this, R.style.DayTheme, R.style.NightTheme);
super.onCreate(savedInstanceState);
setContentView(R.layout.activity_main);
//2.设置切换夜间活日间模式
//ChangeModeController.changeDay(this, R.style.DayTheme);//切换日间模式
//ChangeModeController.changeNight(this, R.style.NightTheme);//切换夜间模式
}
@Override
protected void onDestroy() {
super.onDestroy();
//3. 在 onDestroy 调用
ChangeModeController.onDestory();
}
代码调用三步,即可开始夜间之旅。 如果页面有新创建的视图要加入夜间模式控制,代码调用:
//添加额外 view 至夜间管理
// ChangeModeController.getInstance().addBackgroundColor(toolbar, R.attr.colorPrimary);
//ChangeModeController.getInstance().addBackgroundDrawable(view,R.attr.colorAccent);
// ChangeModeController.getInstance().addTextColor(view,R.attr.colorAccent);
如果在改变夜间模式时有其他非标准定义的属性时,可在ChangeModeController.changeDay或ChangeModeController.changeNight之后调用如下代码给相关属性赋值:
TypedValue attrTypedValue = ChangeModeController.getAttrTypedValue(this, R.attr.zztextColor);
toolbar.setTitleTextColor(getResources().getColor(attrTypedValue.resourceId));
About me
An Android Developer in ZhengZhou.
License
======= Copyright 2016 zhangke
Licensed under the Apache License, Version 2.0 (the "License"); you may not use this file except in compliance with the License. You may obtain a copy of the License at http://www.apache.org/licenses/LICENSE-2.0 Unless required by applicable law or agreed to in writing, software distributed under the License is distributed on an "AS IS" BASIS, WITHOUT WARRANTIES OR CONDITIONS OF ANY KIND, either express or implied. See the License for the specific language governing permissions and limitations under the License.
以上所述是小编给大家介绍的Android 实现夜间模式的快速简单方法实例详解,希望对大家有所帮助,如果大家有任何疑问欢迎给我留言,小编会及时回复大家的,在此也非常感谢大家对我们网站的支持!

