在ASP.NET 2.0中操作数据之五十一:从GridView的页脚插入新记录
导言:
正如教程《概述插入、更新和删除数据》里探讨过的一样, GridView, DetailsView和FormView Web控件都有内置的修改数据的功能。当声明绑定到数据源控件时,可以快速而方便地修改数据——甚至不用写一行代码。不幸的是,只有DetailsView和FormView控件提供了内置的插入、编辑、删除功能,而 GridView控件只支持编辑、删除功能。不过,稍许努力,我们就能使GridView控件包含一个插入界面。
为了给GridView添加插入功能,我们要决定如何添加新记录:创建插入界面,编码插入数据。在本教程,我们将为GridView的页脚行(footer row )添加插入界面(见图1)。其中每一列包含相应的用户界面元件(比如在TextBox里输入产品名称,在DropDownLis里选择供应商等等),同时我们需要一个"Add"按钮,当点击时,发生页面回传,将新记录添加到表Products里。
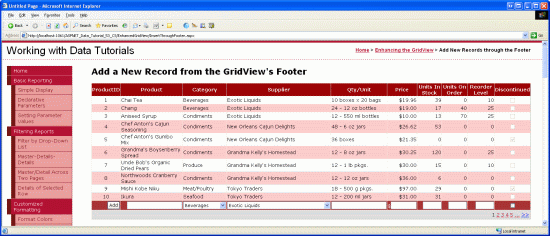
图1:页脚行提供了一个添加新记录的界面
第一步:在GridView控件里展示产品信息
首先添加一个展示产品的GridView控件。打开EnhancedGridView文件夹里的InsertThroughFooter.aspx页面,在上面添加一个GridView控件,设其ID为Products,然后,在其智能标签里绑定到一个名为ProductsDataSource的ObjectDataSource 。
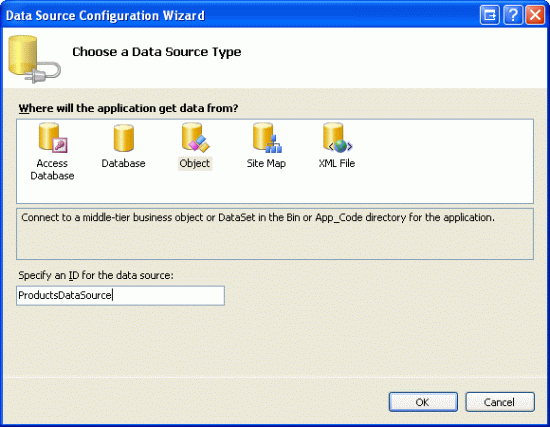
图2:创建一个名为ProductsDataSource的新ObjectDataSource
设置该ObjectDataSource调用ProductsBLL类的GetProducts()方法获取产品信息。在本教程里,我们只关注于添加插入功能,与编辑和删除无关。所以,确保在“插入”选项卡里选AddProduct()方法。而在“编辑”和“删除”里选“(None)”。

图3:将 ObjectDataSource的Insert()方法设置为AddProduct()
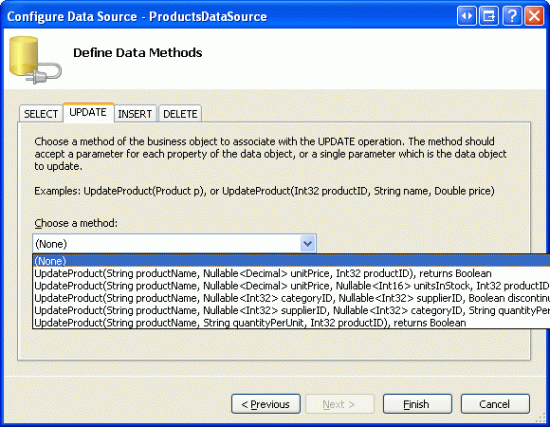
图4:在UPDATE和DELETE选项里选“(None)”
完成设置后,Visual Studio会自动添加相关列。现在,我们暂时不管这些列,在教程后续部分,我们将移除一些列,因为在添加新记录时我们不需指定这些列的值。
因为数据库中大概有80个产品,所以我们最好还是启用分页功能,以便使插入界面更直观、更易操作。回到页面,在GridView的智能标签里启用分页。
现在,GridView和ObjectDataSource的声明代码看起来和下面的差不多:
<asp:GridView ID="Products" runat="server" AutoGenerateColumns="False"
 DataKeyNames="ProductID" DataSourceID="ProductsDataSource"
 AllowPaging="True" EnableViewState="False">
 <Columns>
 <asp:BoundField DataField="ProductID" HeaderText="ProductID"
  InsertVisible="False" ReadOnly="True"
  SortExpression="ProductID" />
 <asp:BoundField DataField="ProductName" HeaderText="ProductName"
  SortExpression="ProductName" />
 <asp:BoundField DataField="SupplierID" HeaderText="SupplierID"
  SortExpression="SupplierID" />
 <asp:BoundField DataField="CategoryID" HeaderText="CategoryID"
  SortExpression="CategoryID" />
 <asp:BoundField DataField="QuantityPerUnit" HeaderText="QuantityPerUnit"
  SortExpression="QuantityPerUnit" />
 <asp:BoundField DataField="UnitPrice" HeaderText="UnitPrice"
  SortExpression="UnitPrice" />
 <asp:BoundField DataField="UnitsInStock" HeaderText="UnitsInStock"
  SortExpression="UnitsInStock" />
 <asp:BoundField DataField="UnitsOnOrder" HeaderText="UnitsOnOrder"
  SortExpression="UnitsOnOrder" />
 <asp:BoundField DataField="ReorderLevel" HeaderText="ReorderLevel"
  SortExpression="ReorderLevel" />
 <asp:CheckBoxField DataField="Discontinued" HeaderText="Discontinued"
  SortExpression="Discontinued" />
 <asp:BoundField DataField="CategoryName" HeaderText="CategoryName"
  ReadOnly="True" SortExpression="CategoryName" />
 <asp:BoundField DataField="SupplierName" HeaderText="SupplierName"
  ReadOnly="True" SortExpression="SupplierName" />
 </Columns>
</asp:GridView>

<asp:ObjectDataSource ID="ProductsDataSource" runat="server"
 InsertMethod="AddProduct" OldValuesParameterFormatString="original_{0}"
 SelectMethod="GetProducts" TypeName="ProductsBLL">
 <InsertParameters>
 <asp:Parameter Name="productName" Type="String" />
 <asp:Parameter Name="supplierID" Type="Int32" />
 <asp:Parameter Name="categoryID" Type="Int32" />
 <asp:Parameter Name="quantityPerUnit" Type="String" />
 <asp:Parameter Name="unitPrice" Type="Decimal" />
 <asp:Parameter Name="unitsInStock" Type="Int16" />
 <asp:Parameter Name="unitsOnOrder" Type="Int16" />
 <asp:Parameter Name="reorderLevel" Type="Int16" />
 <asp:Parameter Name="discontinued" Type="Boolean" />
 </InsertParameters>
</asp:ObjectDataSource>
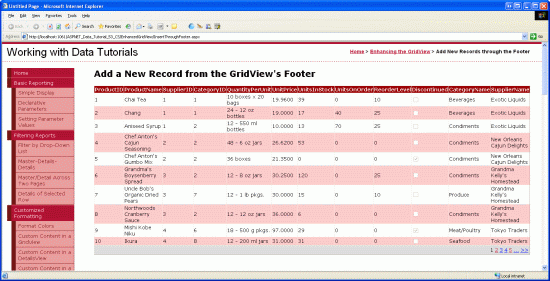
图5:在一个启用了分页功能的GridView里,显示产品的所有数据项
第2步:添加一个页脚行
GridView控件包含页眉行、数据行和页脚行。GridView控件ShowHeader和ShowFooter属性决定了是否显示页眉行和页脚行。如果要显示页脚行,我们需要将 ShowFooter属性设置为true。如图6所示:
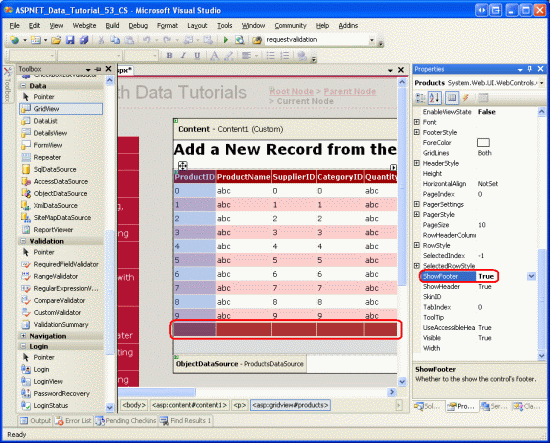
图6:设ShowFooter属性为True,添加页脚行
我们注意到页脚行的背景色是深红色,这是由于我们在教程《使用ObjectDataSource展现数据》里创建了一个名为DataWebControls的主题,并将其应用为所有的页面底色。特别的,皮肤文件GridView.skin设置FooterStyle属性使用FooterStyle CSS ,其代码如下:
.FooterStyle
{
 background-color: #a33;
 color: White;
 text-align: right;
}
注意:在以前的教程我们提到过使用GridView的页脚行。如果不清楚的话,请查阅教程第15章《在GridView的页脚中显示统计信息》
设置ShowFooter属性为true后,在浏览器里观看效果。当前的页脚行并不包含任何的文字或Web控件。在第3步,我们将修改其包含相应的插入界面。
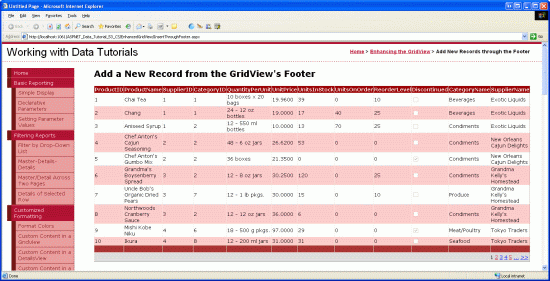
图7:页脚行显示为空白
第3步:自定义页脚行
回顾教程《在GridView控件中使用TemplateField》,在那篇教程我们探讨了如何对GridView的某一列使用TemplateFields(而不是BoundFields或CheckBoxFields) ,从而实现自定义显示样式;而在教程《定制数据修改界面》里我们看到如何在GridView里使用TemplateFields定制编辑界面。一个TemplateField是由诸如ItemTemplate、EditItemTemplate等模板构成的。比如,ItemTemplate模板显示的数据行为只读状态;而EditItemTemplate模板定制了一个编辑行界面。
除了ItemTemplate、EditItemTemplate等模板外,TemplateField也包含一个名为FooterTemplate的模板,它为容器指定页脚行。所以我们可以在FooterTemplate模板里添加插入界面要用到的Web控件。让我们开始吧,首先,我们将GridView控件里的所有列转换成TemplateFields。在GridView控件的智能标签里点击“编辑列”,在左边选中每个域,再点击“Convert this field into a TemplateField” 。
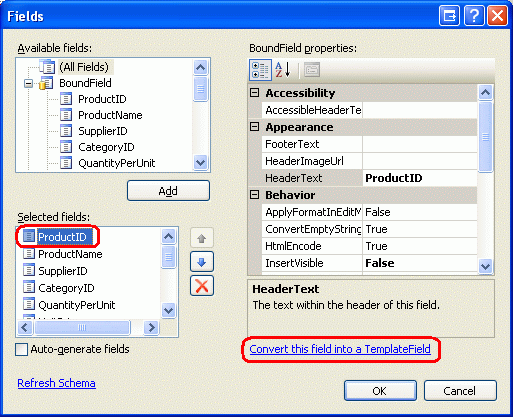
图8:将每个域转换为一个TemplateField
点击“Convert this field into a TemplateField”的话,将当前类型的域转换成相应的TemplateField。比如,每个BoundField将转换成这样的TemplateField,它的ItemTemplate包含一个Label控件来显示相应的数据域;它的EditItemTemplate使用一个TextBox控件来显示相应的数据域。例如,在这里,名为ProductName的BoundField将被转换为如下所示的TemplateField :
<asp:TemplateField HeaderText="ProductName" SortExpression="ProductName">
 <EditItemTemplate>
 <asp:TextBox ID="TextBox1" runat="server"
  Text='<%# Bind("ProductName") %>'></asp:TextBox>
 </EditItemTemplate>
 <ItemTemplate>
 <asp:Label ID="Label2" runat="server"
  Text='<%# Bind("ProductName") %>'></asp:Label>
 </ItemTemplate>
</asp:TemplateField>
同样的,名为Discontinued的CheckBoxField转换为TemplateField后,其ItemTemplate 和 EditItemTemplate 模板都将包含一个CheckBox Web控件(只是ItemTemplate模板里的CheckBox不可用);而处于“只读”状态的ProductID BoundField转换成TemplateField后,其ItemTemplate 和 EditItemTemplate 模板都包含一个Label控件。简而言之,将GridView里的某一列转换为一个 TemplateField,是定制自定义模板的一种又快又容易的方法,且不会丧失该列应有的功能。
由于我们不需要GridView支持编辑功能,将每个TemplateField的EditItemTemplate模板删除,只留下ItemTemplate模板。完成后, GridView的代码看起来应和下面的差不多:
<asp:GridView ID="Products" runat="server" AutoGenerateColumns="False"
 DataKeyNames="ProductID" DataSourceID="ProductsDataSource"
 AllowPaging="True" EnableViewState="False" ShowFooter="True">
 <Columns>
 <asp:TemplateField HeaderText="ProductID" InsertVisible="False"
  SortExpression="ProductID">
  <ItemTemplate>
  <asp:Label ID="Label1" runat="server"
   Text='<%# Bind("ProductID") %>'></asp:Label>
  </ItemTemplate>
 </asp:TemplateField>
 <asp:TemplateField HeaderText="ProductName" SortExpression="ProductName">
  <ItemTemplate>
  <asp:Label ID="Label2" runat="server"
   Text='<%# Bind("ProductName") %>'></asp:Label>
  </ItemTemplate>
 </asp:TemplateField>
 <asp:TemplateField HeaderText="SupplierID" SortExpression="SupplierID">
  <ItemTemplate>
  <asp:Label ID="Label3" runat="server"
   Text='<%# Bind("SupplierID") %>'></asp:Label>
  </ItemTemplate>
 </asp:TemplateField>
 <asp:TemplateField HeaderText="CategoryID" SortExpression="CategoryID">
  <ItemTemplate>
  <asp:Label ID="Label4" runat="server"
   Text='<%# Bind("CategoryID") %>'></asp:Label>
  </ItemTemplate>
 </asp:TemplateField>
 <asp:TemplateField HeaderText="QuantityPerUnit"
  SortExpression="QuantityPerUnit">
  <ItemTemplate>
  <asp:Label ID="Label5" runat="server"
   Text='<%# Bind("QuantityPerUnit") %>'></asp:Label>
  </ItemTemplate>
 </asp:TemplateField>
 <asp:TemplateField HeaderText="UnitPrice" SortExpression="UnitPrice">
  <ItemTemplate>
  <asp:Label ID="Label6" runat="server"
   Text='<%# Bind("UnitPrice") %>'></asp:Label>
  </ItemTemplate>
 </asp:TemplateField>
 <asp:TemplateField HeaderText="UnitsInStock"
  SortExpression="UnitsInStock">
  <ItemTemplate>
  <asp:Label ID="Label7" runat="server"
   Text='<%# Bind("UnitsInStock") %>'></asp:Label>
  </ItemTemplate>
 </asp:TemplateField>
 <asp:TemplateField HeaderText="UnitsOnOrder"
  SortExpression="UnitsOnOrder">
  <ItemTemplate>
  <asp:Label ID="Label8" runat="server"
   Text='<%# Bind("UnitsOnOrder") %>'></asp:Label>
  </ItemTemplate>
 </asp:TemplateField>
 <asp:TemplateField HeaderText="ReorderLevel"
  SortExpression="ReorderLevel">
  <ItemTemplate>
  <asp:Label ID="Label9" runat="server"
   Text='<%# Bind("ReorderLevel") %>'></asp:Label>
  </ItemTemplate>
 </asp:TemplateField>
 <asp:TemplateField HeaderText="Discontinued"
  SortExpression="Discontinued">
  <ItemTemplate>
  <asp:CheckBox ID="CheckBox1" runat="server"
   Checked='<%# Bind("Discontinued") %>' Enabled="false" />
  </ItemTemplate>
 </asp:TemplateField>
 <asp:TemplateField HeaderText="CategoryName"
  SortExpression="CategoryName">
  <ItemTemplate>
  <asp:Label ID="Label10" runat="server"
   Text='<%# Bind("CategoryName") %>'></asp:Label>
  </ItemTemplate>
 </asp:TemplateField>
 <asp:TemplateField HeaderText="SupplierName"
  SortExpression="SupplierName">
  <ItemTemplate>
  <asp:Label ID="Label11" runat="server"
   Text='<%# Bind("SupplierName") %>'></asp:Label>
  </ItemTemplate>
 </asp:TemplateField>
 </Columns>
</asp:GridView>
现在, 每个GridView列都已经转换成一个TemplateField,我们在其FooterTemplate里添加适当的插入界面。然而,有些列没有插入界面(比如ProductID),其它列的TemplateField模板将包含Web控件,供用户输入产品信息。
在GridView的智能标签里点击“Edit Templates”,从下拉列表里选择某列的 FooterTemplate模板,从工具箱里拖一个适当的控件到页面上。
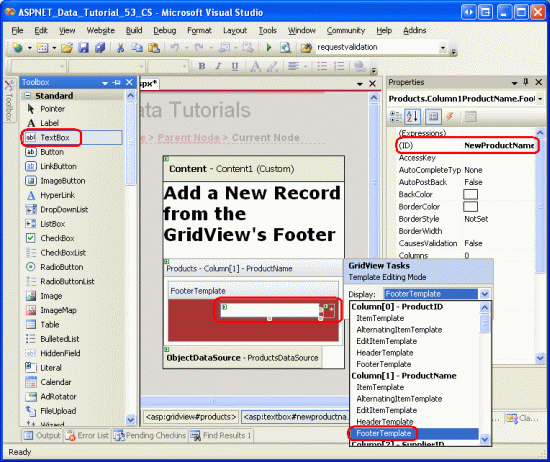
图9:在每列的FooterTemplate里添加适当的插入界面。
下面列出了GridView的所有列,并指定每列添加哪些插入界面:
ProductID – 无
ProductName –添加一个TextBox,ID为NewProductName;再添加一个
RequiredFieldValidator控件,防止用户未输入产品名。
SupplierID –无
CategoryID – 无
QuantityPerUnit – 添加一个TextBox,ID为NewQuantityPerUnit
UnitPrice – 添加一个TextBox,ID为NewUnitPrice,再添加一个CompareValidator控件,确保用户输入的是货币值,且>=0
UnitsInStock –添加一个TextBox,ID为NewUnitsInStock,再添加一个CompareValidator控件,确保用户输入的是整数值,且>=0
UnitsOnOrder – 添加一个TextBox,ID为NewUnitsOnOrder,再添加一个CompareValidator控件,确保用户输入的是整数值,且>=0
ReorderLevel –添加一个TextBox,ID为NewReorderLevel,再添加一个CompareValidator控件,确保用户输入的是整数值,且>=0
Discontinued–添加一个CheckBox,ID为NewDiscontinued
CategoryName ––添加一个DropDownList控件,ID为NewCategoryID。将其绑定到一个名为CategoriesDataSource的ObjectDataSource控件,设置它调用CategoriesBLL类的GetCategories() 方法。设置DropDownList控件显示CategoryName,并将DropDownList控件的values设置为CategoryID
SupplierName –添加一个DropDownList控件,ID为NewSupplierID.将其绑定到一个名为SuppliersDataSource的ObjectDataSource控件,设置它调用SuppliersBLL类的GetSuppliers()方法.设置DropDownList控件显示CompanyName ,并将DropDownList控件的values设置为SupplierID.
将每个validation控件的ForeColor属性清空,以便用在FooterStyle CSS类定义的白色背景色取代默认的红色;同时将ErrorMessage设置为详细的错误提示;将Text属性设置为星号。在每个FooterTemplates里,只要包含有validation控件,将其Wrap属性设置为false。最后,在GridView控件下面添加一个ValidationSummary 控件,设ShowMessageBox属性为true;ShowSummary属性为false。
当添加一个新产品时,我们需要给出CategoryID和SupplierID值。页面上的2个DropDownList控件显示的是CategoryName 和SupplierName,但传递的是我们需要的
CategoryID和SupplierID值。为什么不直接显示CategoryID和SupplierID值呢?因为最终用户对CategoryName 和SupplierName更感兴趣。既然现在可以在显示CategoryName 和SupplierName的插入界面获取对应的CategoryID和SupplierID值,我们将CategoryID 和SupplierID 2个TemplateFields从GridView移除。
同样,当添加新产品时我们不需要ProductID,那么我们也可以删除ProductID TemplateField,不过,在这里我们保留它。除了TextBoxes,DropDownLists、
CheckBoxes以及validation控件外,我们还需要在插入界面添加一个“Add”按钮。当点击该按钮时,将新记录添加到数据库。在第4步,我们将在ProductID TemplateField的FooterTemplate模板添加一个“Add”按钮。
按你喜欢的方式改进外观。比如,将UnitPrice值格式化为货币形式;将UnitsInStock, UnitsOnOrder和ReorderLevel三列放在右边;修改TemplateFields的HeaderText属性等。
在FooterTemplates里完成插入界面的修改后,移除SupplierID 和 CategoryID TemplateFields,最终,你的GridView控件的声明代码看起来应该和下面的差不多:
<asp:GridView ID="Products" runat="server" AutoGenerateColumns="False"
 DataKeyNames="ProductID" DataSourceID="ProductsDataSource"
 AllowPaging="True" EnableViewState="False" ShowFooter="True">
 <Columns>
 <asp:TemplateField HeaderText="ProductID" InsertVisible="False"
  SortExpression="ProductID">
  <ItemTemplate>
  <asp:Label ID="Label1" runat="server"
   Text='<%# Bind("ProductID") %>'></asp:Label>
  </ItemTemplate>
  <ItemStyle HorizontalAlign="Center" />
 </asp:TemplateField>
 <asp:TemplateField HeaderText="Product" SortExpression="ProductName">
  <ItemTemplate>
  <asp:Label ID="Label2" runat="server"
   Text='<%# Bind("ProductName") %>'></asp:Label>
  </ItemTemplate>
  <FooterTemplate>
  <asp:TextBox ID="NewProductName" runat="server"></asp:TextBox>
  <asp:RequiredFieldValidator ID="RequiredFieldValidator1"
   runat="server" ControlToValidate="NewProductName"
   Display="Dynamic" ForeColor=""
   ErrorMessage="You must enter a name for the new product.">
   * </asp:RequiredFieldValidator>
  </FooterTemplate>
  <FooterStyle Wrap="False" />
 </asp:TemplateField>
 <asp:TemplateField HeaderText="Category" SortExpression="CategoryName">
  <ItemTemplate>
  <asp:Label ID="Label10" runat="server"
   Text='<%# Bind("CategoryName") %>'></asp:Label>
  </ItemTemplate>
  <FooterTemplate>
  <asp:DropDownList ID="NewCategoryID" runat="server"
   DataSourceID="CategoriesDataSource"
   DataTextField="CategoryName" DataValueField="CategoryID">
  </asp:DropDownList>
  <asp:ObjectDataSource ID="CategoriesDataSource" runat="server"
   OldValuesParameterFormatString="original_{0}"
   SelectMethod="GetCategories" TypeName="CategoriesBLL">
  </asp:ObjectDataSource>
  </FooterTemplate>
 </asp:TemplateField>
 <asp:TemplateField HeaderText="Supplier" SortExpression="SupplierName">
  <ItemTemplate>
  <asp:Label ID="Label11" runat="server"
   Text='<%# Bind("SupplierName") %>'></asp:Label>
  </ItemTemplate>
  <FooterTemplate>
  <asp:DropDownList ID="NewSupplierID" runat="server"
   DataSourceID="SuppliersDataSource"
   DataTextField="CompanyName" DataValueField="SupplierID">
  </asp:DropDownList><asp:ObjectDataSource ID="SuppliersDataSource"
   runat="server" OldValuesParameterFormatString="original_{0}"
   SelectMethod="GetSuppliers" TypeName="SuppliersBLL">
  </asp:ObjectDataSource>
  </FooterTemplate>
 </asp:TemplateField>
 <asp:TemplateField HeaderText="Qty/Unit" SortExpression="QuantityPerUnit">
  <ItemTemplate>
  <asp:Label ID="Label5" runat="server"
   Text='<%# Bind("QuantityPerUnit") %>'></asp:Label>
  </ItemTemplate>
  <FooterTemplate>
  <asp:TextBox ID="NewQuantityPerUnit" runat="server"></asp:TextBox>
  </FooterTemplate>
 </asp:TemplateField>
 <asp:TemplateField HeaderText="Price" SortExpression="UnitPrice">
  <ItemTemplate>
  <asp:Label ID="Label6" runat="server"
   Text='<%# Bind("UnitPrice", "{0:c}") %>'></asp:Label>
  </ItemTemplate>
  <FooterTemplate>
  $<asp:TextBox ID="NewUnitPrice" runat="server" Columns="8" />
  <asp:CompareValidator ID="CompareValidator1" runat="server"
   ControlToValidate="NewUnitPrice"
   ErrorMessage="You must enter a valid currency value greater than
   or equal to 0.00. Do not include the currency symbol."
   ForeColor="" Operator="GreaterThanEqual" Type="Currency"
   ValueToCompare="0" Display="Dynamic">
   * </asp:CompareValidator>
  </FooterTemplate>
  <ItemStyle HorizontalAlign="Right" />
  <FooterStyle Wrap="False" />
 </asp:TemplateField>
 <asp:TemplateField HeaderText="Units In Stock"
  SortExpression="Units In Stock">
  <ItemTemplate>
  <asp:Label ID="Label7" runat="server"
   Text='<%# Bind("UnitsInStock") %>'></asp:Label>
  </ItemTemplate>
  <FooterTemplate>
  <asp:TextBox ID="NewUnitsInStock" runat="server" Columns="5" />
  <asp:CompareValidator ID="CompareValidator2" runat="server"
   ControlToValidate="NewUnitsInStock" Display="Dynamic"
   ErrorMessage="You must enter a valid numeric value for units
   in stock that's greater than or equal to zero."
   ForeColor="" Operator="GreaterThanEqual" Type="Integer"
   ValueToCompare="0">*</asp:CompareValidator>
  </FooterTemplate>
  <ItemStyle HorizontalAlign="Right" />
  <FooterStyle Wrap="False" />
 </asp:TemplateField>
 <asp:TemplateField HeaderText="Units On Order" SortExpression="UnitsOnOrder">
  <ItemTemplate>
  <asp:Label ID="Label8" runat="server"
   Text='<%# Bind("UnitsOnOrder") %>'></asp:Label>
  </ItemTemplate>
  <FooterTemplate>
  <asp:TextBox ID="NewUnitsOnOrder" runat="server" Columns="5" />
  <asp:CompareValidator ID="CompareValidator3" runat="server"
   ControlToValidate="NewUnitsOnOrder" Display="Dynamic"
   ErrorMessage="You must enter a valid numeric value for units on
   order that's greater than or equal to zero."
   ForeColor="" Operator="GreaterThanEqual" Type="Integer"
   ValueToCompare="0">*</asp:CompareValidator>
  </FooterTemplate>
  <ItemStyle HorizontalAlign="Right" />
  <FooterStyle Wrap="False" />
 </asp:TemplateField>
 <asp:TemplateField HeaderText="Reorder Level" SortExpression="ReorderLevel">
  <ItemTemplate>
  <asp:Label ID="Label9" runat="server"
   Text='<%# Bind("ReorderLevel") %>'></asp:Label>
  </ItemTemplate>
  <FooterTemplate>
  <asp:TextBox ID="NewReorderLevel" runat="server" Columns="5" />
  <asp:CompareValidator ID="CompareValidator4" runat="server"
   ControlToValidate="NewReorderLevel" Display="Dynamic"
   ErrorMessage="You must enter a valid numeric value for reorder
   level that's greater than or equal to zero."
   ForeColor="" Operator="GreaterThanEqual" Type="Integer"
   ValueToCompare="0">*</asp:CompareValidator>
  </FooterTemplate>
  <ItemStyle HorizontalAlign="Right" />
  <FooterStyle Wrap="False" />
 </asp:TemplateField>
 <asp:TemplateField HeaderText="Discontinued" SortExpression="Discontinued">
  <ItemTemplate>
  <asp:CheckBox ID="CheckBox1" runat="server"
   Checked='<%# Bind("Discontinued") %>' Enabled="false" />
  </ItemTemplate>
  <FooterTemplate>
  <asp:CheckBox ID="NewDiscontinued" runat="server" />
  </FooterTemplate>
  <ItemStyle HorizontalAlign="Center" />
  <FooterStyle HorizontalAlign="Center" />
 </asp:TemplateField>
 </Columns>
</asp:GridView>
在浏览器里查看该页面时,GridView控件的页脚行显示为一个比较完善的插入界面(如图10所示)。此时,插入界面并不包含一种方法将输入的数据添加进数据库。并将我们也没有阐述那些键入的数据是如何转换成一条记录的。在第4步,我们将看到如何添加一个“Add ”按钮,在页面回传后如何执行代码。在第5步,我们看如何将键入的数据转换成一条记录添加到数据库。
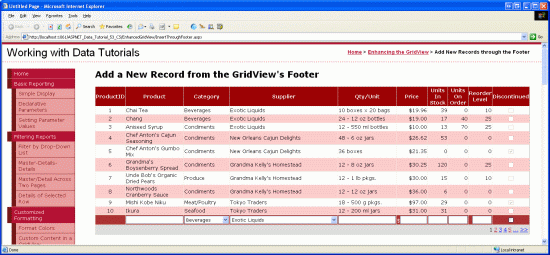
图10:GridView的页脚行提供了添加新记录的界面
第4步:在插入界面添加Add按钮
如前所述我们需要在界面添加一个Add按钮,我们可以在某个FooterTemplate里或另外增加一列来放置该按钮来达到这个目的。在本教程,我们在ProductID TemplateField的FooterTemplate里添加该按钮。
点击GridView的智能标签中的“编辑模板”,选择ProductID对应的 FooterTemplate ,添加一个Button Web控件(LinkButton 或是ImageButton,只要你喜欢), 设ID为AddProduct;CommandName属性为Insert;Text属性为“Add”,如图11所示:
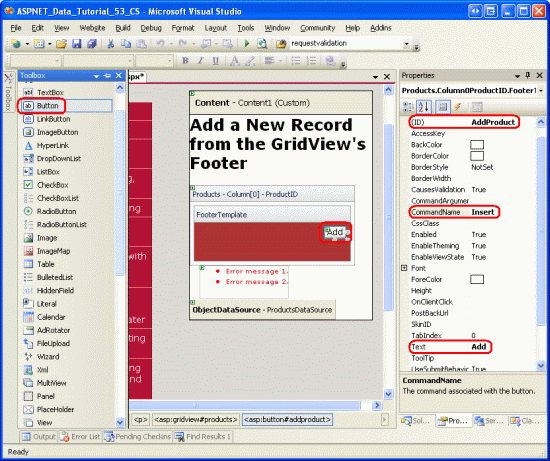
图11:将Add Button放在ProductID TemplateField的FooterTemplate模板
添加按钮后,在浏览器查看该页面。如果我们在界面输入无效的数据,再点Add按钮时,页面回转中断,同时ValidationSummary控件详细的列出了那些无效数据(如图12)。当输入适当的数据后,再点按钮,将引发页面回传,但是没有记录添加到数据库里。我们需要编写代码实现插入数据的功能。
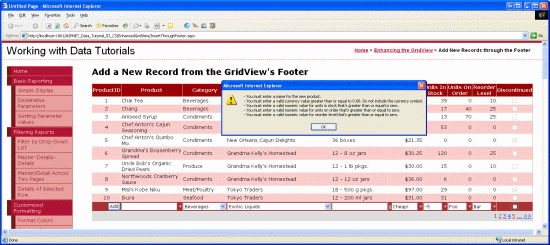
图12:如果输入的是无效数据,将会使页面回转中断
注意:界面里的validation控件未被设置为一组,当页面中只有插入界面包含validation控件的话,运行没问题。但是,如果在页面中还有其它的validation控件的话(比如,如果还存在一个编辑界面,其中也包含validation控件),我们应该将插入界面里的validation控件和Add按钮的ValidationGroup属性设置为同一个值,使其为一个特定的确认组。
第5步:向表Products添加一条新记录
当使用GridView控件的内置的编辑功能时,GridView会自动的处理编辑产品所必要的工作。当点击编辑按钮时,它把在编辑页面键入的数据拷贝到ObjectDataSource的UpdateParameters参数集包含的参数,再调用ObjectDataSource控件的Update()方法执行更新。由于GridView没有提供内置的功能供插入数据,我们必须编写代码调用ObjectDataSource控件的Insert()方法,将在插入界面键入的数据复制到 ObjectDataSource控件的InsertParameters集合里。
就像在教程28章《GridView里的Button》里探讨的一样,任何时候,只要点击 GridView控件里的Button, LinkButton或ImageButton,发生页面回转时引发GridView的RowCommand事件。不管这些Button, LinkButton、ImageButton控件是显式添加的(比如,在页脚行添加的Add按钮),或者是GridView控件自动添加的(比如启用分页功能或排序功能时,顶部的出现的那些LinkButton)。
为相应用户点击Add按钮,我们要为GridView的RowCommand事件创建一个事件处理器。由于任何时候点击GridView控件的任何Button, LinkButton或ImageButton都会触发该事件,我们必须指定当传入事件处理器的CommandName属性值与Add按钮的一致时(即:“Insert”),并且键入的数据无误时,才执行插入操作。代码如下:
protected void Products_RowCommand(object sender, GridViewCommandEventArgs e)
{
 // Insert data if the CommandName == "Insert"
 // and the validation controls indicate valid data...
 if (e.CommandName == "Insert" && Page.IsValid)
 {
 // TODO: Insert new record...
 }
}
注意:你可能会很奇怪为什么还要检查Page.IsValid属性呢?毕竟,如果在插入界面输入了无效的数据时,页面回传会中断。检查Page.IsValid属性是为了防止用户未启用JavaScript或巧妙的绕过客户端验证的情况。简而言之,如果没有进行客户端进行有效性验证的话,在处理数据以前必须在服务器端再进行一次有效性验证。
在第1步,ObjectDataSource控件ProductsDataSource的Insert()方法映射的是ProductsBLL类的AddProduct方法。为了在表Products里添加新记录,我们只需要简单的调用ObjectDataSource的Insert()方法:
protected void Products_RowCommand(object sender, GridViewCommandEventArgs e)
{
 // Insert data if the CommandName == "Insert"
 // and the validation controls indicate valid data...
 if (e.CommandName == "Insert" && Page.IsValid)
 {
 // Insert new record
 ProductsDataSource.Insert();
 }
}
现在可以调用Insert()方法,剩下的步骤是把在插入界面键入的值传递给ProductsBLL类的AddProduct方法中的参数。就像在教程17章《研究插入、更新和删除的关联事件》探讨的一样,可以通过ObjectDataSource控件的Inserting事件来实现。在Inserting事件里,我们需要编程访问页脚行里的控件,将其值赋给e.InputParameters集合。当用户忽略了某个值时——比如使ReorderLevel文本框为空,我们应该指定该值为NULL。因为AddProducts方法允许那些nullable类型的列接收NULL值。代码如下:
protected void ProductsDataSource_Inserting
 (object sender, ObjectDataSourceMethodEventArgs e)
{
 // Programmatically reference Web controls in the inserting interface...
 TextBox NewProductName =
 (TextBox)Products.FooterRow.FindControl("NewProductName");
 DropDownList NewCategoryID =
 (DropDownList)Products.FooterRow.FindControl("NewCategoryID");
 DropDownList NewSupplierID =
 (DropDownList)Products.FooterRow.FindControl("NewSupplierID");
 TextBox NewQuantityPerUnit =
 (TextBox)Products.FooterRow.FindControl("NewQuantityPerUnit");
 TextBox NewUnitPrice =
 (TextBox)Products.FooterRow.FindControl("NewUnitPrice");
 TextBox NewUnitsInStock =
 (TextBox)Products.FooterRow.FindControl("NewUnitsInStock");
 TextBox NewUnitsOnOrder =
 (TextBox)Products.FooterRow.FindControl("NewUnitsOnOrder");
 TextBox NewReorderLevel =
 (TextBox)Products.FooterRow.FindControl("NewReorderLevel");
 CheckBox NewDiscontinued =
 (CheckBox)Products.FooterRow.FindControl("NewDiscontinued");

 // Set the ObjectDataSource's InsertParameters values...
 e.InputParameters["productName"] = NewProductName.Text;

 e.InputParameters["supplierID"] =
 Convert.ToInt32(NewSupplierID.SelectedValue);
 e.InputParameters["categoryID"] =
 Convert.ToInt32(NewCategoryID.SelectedValue);

 string quantityPerUnit = null;
 if (!string.IsNullOrEmpty(NewQuantityPerUnit.Text))
 quantityPerUnit = NewQuantityPerUnit.Text;
 e.InputParameters["quantityPerUnit"] = quantityPerUnit;

 decimal? unitPrice = null;
 if (!string.IsNullOrEmpty(NewUnitPrice.Text))
 unitPrice = Convert.ToDecimal(NewUnitPrice.Text);
 e.InputParameters["unitPrice"] = unitPrice;

 short? unitsInStock = null;
 if (!string.IsNullOrEmpty(NewUnitsInStock.Text))
 unitsInStock = Convert.ToInt16(NewUnitsInStock.Text);
 e.InputParameters["unitsInStock"] = unitsInStock;

 short? unitsOnOrder = null;
 if (!string.IsNullOrEmpty(NewUnitsOnOrder.Text))
 unitsOnOrder = Convert.ToInt16(NewUnitsOnOrder.Text);
 e.InputParameters["unitsOnOrder"] = unitsOnOrder;

 short? reorderLevel = null;
 if (!string.IsNullOrEmpty(NewReorderLevel.Text))
 reorderLevel = Convert.ToInt16(NewReorderLevel.Text);
 e.InputParameters["reorderLevel"] = reorderLevel;

 e.InputParameters["discontinued"] = NewDiscontinued.Checked;
}
添加完Inserting事件处理器后,我们就可以通过GridView控件的页脚行添加记录了。开始吧,尝试添加几个产品。
优化并自定义Add操作
一般来说,点击Add按钮后,就将为数据库添加一个新记录。但是没有任何直观的提示反映成功地添加了记录。的确,应该用一个Label Web控件或客户端的消息框提示用户已经成功地添加了产品,我把它作为一个练习留给读者。
本文使用的GridView控件没有对所显示的产品进行任何排序,也未允许最终用户对数据排序。因此,产品依它们在数据库中的次序排序——依主键值顺序。由于每条新添加的记录的ProductID值比上一条的值大,所以,当添加新记录时,它就自然地排到最后一位了。因此,当添加新记录时,你希望自动地转到GridView控件的最后一页。怎么才能办到呢?在RowCommand事件处理器里,调用ProductsDataSource.Insert()方法后,紧接着添加如下一行代码,它说明当数据绑定到GridView后将转到最后一页:
// Indicate that the user needs to be sent to the last page
SendUserToLastPage = true;
其中SendUserToLastPage是页面层(page-level)的布尔变量,其初始值为false。在GridView控件的DataBound事件处理器中,如果SendUserToLastPage为false(译注:应该是true),PageIndex属性将使用户转到最后一页。
protected void Products_DataBound(object sender, EventArgs e)
{
 // Send user to last page of data, if needed
 if (SendUserToLastPage)
 Products.PageIndex = Products.PageCount - 1;
}
为什么我们要在DataBound事件处理器(而不是在RowCommand事件处理器)里设置PageIndex属性呢?如果在RowCommand里设置PageIndex属性的话,它返回的是在添加新记录之前的PageIndex值。在大多数情况下,这样做是没有问题的,但是,如果新添加的记录刚好落到新的一页(译注:比如原本有80个产品,分为8页显示,此时末页的PageIndex为7,当添加第81条记录时,新添加的产品变成第9页第1条记录了,此时末页的PageIndex为8,而不是添加产品前的7),而我们使用RowCommand里设置的PageIndex值话,页面将跳往倒数第2页,而不是我们期望的末页。而DataBound事件是在添加产品且重新绑定以后才发生,我们在DataBound事件处理器里设置的PageIndex值才是真正的末页的PageIndex值。
最后,本文用到的GridView看起来相当宽,因为添加产品信息要用到很多列。因此,最好将它设置为竖向排列。另外我们可以减少输入列来缩小整体宽度,也许我们添加新产品时用不到UnitsOnOrder、UnitsInStock、ReorderLevel这几项,那么在GridView里将其移除即可。
删除UnitsOnOrder、UnitsInStock、ReorderLevel列后需要做调整,有2种方法:
1.仍然使用AddProduct方法,不过其需要传入UnitsOnOrder、UnitsInStock、ReorderLevel列的值。我们可以在Inserting事件处理器中,对上述3列使用“硬编码”值或默认值。
2.在ProductsBLL类里对AddProduct方法重载,使其不需要传入UnitsOnOrder、UnitsInStock、ReorderLevel列的值。然后,在ASP.NET page页面设置ObjectDataSource使用重载的AddProduct方法。
以上2种方法都能奏效。在以前的教程里我们使用的是后者,对ProductsBLL类的UpdateProduct方法多次重载。
总结:
DetailsView和FormView控件拥有内置的inserting插入数据功能,而GridView没有。不过我们可以使用GridView控件的页脚行来达到此目的。要显示页脚行只需要设置ShowFooter属性为true。我们可以这样对页脚行进行用户定制:将每一列转换成TemplateField,并在其FooterTemplate模板定制插入界面。正如我们在本章看到的那样,FooterTemplate 模板可以包含Buttons,TextBoxes, DropDownLists,CheckBoxes, data source controls,validation controls等控件,除此以外,为了便于用户输入,Add按钮, LinkButton或ImageButton等也是必需的。
当点击Add按钮后,将调用ObjectDataSource控件的Insert()方法,进而使用其映射的插入数据方法(具体到本文,即为ProductsBLL类的AddProduct方法),在调用具体的插入数据方法前,我们需要将插入界面里键入的数据传递ObjectDataSource控件的InsertParameters集合。要达到该目的,我们应该在ObjectDataSource控件的Inserting事件处理器里,编程访问插入界面的Web控件。
本教程探讨了优化GridView外观的技巧。接下来的一系列教程,我们看如何使用2进制数据——比如images, PDFs, Word documents等等,当然还有data Web控件。
祝编程快乐!
作者简介
本系列教程作者 Scott Mitchell,著有六本ASP/ASP.NET方面的书,是4GuysFromRolla.com的创始人,自1998年以来一直应用 微软Web技术。大家可以点击查看全部教程《[翻译]Scott Mitchell 的ASP.NET 2.0数据教程》,希望对大家的学习ASP.NET有所帮助。

