Java SpringBoot整合shiro-spring-boot-starterqi项目报错解决

目录
  • 1、项目启动时报错如下
  • 2、原因分析
  • 3、测试@ConditionalOnMissingBean注解

1、项目启动时报错如下

Description:
The bean 'securityManager', defined in class path resource [org/apache/shiro/spring/config/web/autoconfigure/ShiroWebAutoConfiguration.class], could not be registered. A bean with that name has already been defined in class path resource [com/ncwu/common/infrastructure/config/ShiroConfig.class] and overriding is disabled.
Action:
Consider renaming one of the beans or enabling overriding by setting spring.main.allow-bean-definition-overriding=true

2、原因分析

我的自定义ShiroConfig配置类中添加的安全管理器,

代码如下:

@Bean
public SecurityManager securityManager(JwtRealm jwtRealm) {
    DefaultWebSecurityManager securityManager = new DefaultWebSecurityManager();
    //配置realm
    securityManager.setRealm(jwtRealm);
    return securityManager;
}

根据异常信息查看ShiroWebAutoConfiguration源码时发现其中已经定义了securityManager方法,我们在ShiroConfig配置类中再次定义securityManager方法,因返回的类与其不一样导致出错,

ShiroWebAutoConfiguration类中定义的securityManager方法代码如下:

@Bean
@ConditionalOnMissingBean
@Override
protected SessionsSecurityManager securityManager(List<Realm> realms) {
    return super.securityManager(realms);
}

下面这些为补充知识:我们都知道@ConditionalOnBean作用是根据value属性按bean的类型或则bean的名称判断bean是否在IOC容器中,如果在就返回true,否则返回false。而@ConditionalOnMissingBean的作用与@ConditionalOnBean相反。如果@ConditionalOnBean和@ConditionalOnMissingBean这两个注解没有参数,那这两个注解以何种方式来判断呢?在Spring Boot官方文档中找出了答案。

意思是:在@ConditionalOnMissingBean没有参数的情况下,目标类型默认为方法的返回类型,如果IOC容器中没有类型为MyService及其子类的Bean,那么myServiceBean将被创建。

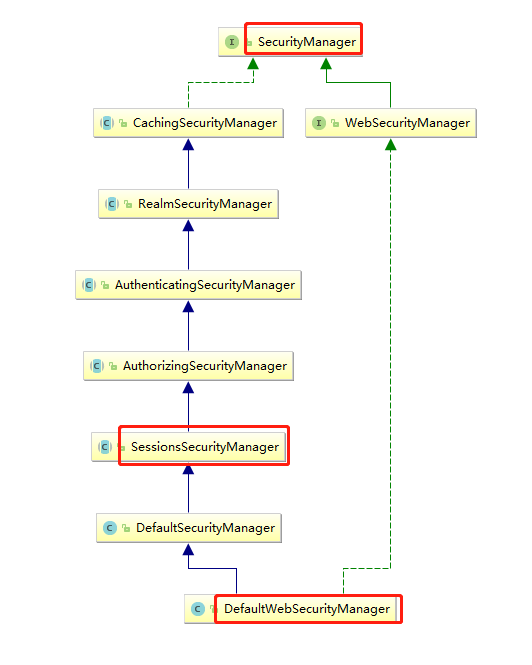
从源代码中可以看出@ConditionalOnMissingBean没有参数,那么如果IOC容器中没有类型为SessionsSecurityManager及其子类的Bean,那么该方法则会执行,并且源码securityManager方法返回的是SessionsSecurityManager,而自己定义的ShiroConfig中返回的是SecurityManager(因为@Bean注解会指定改bean的类型为该方法的返回类型),所以它会判断出IOC容器中没有类型为SessionsSecurityManager及其子类的Bean,源码中的方法执行,故IOC容器中有两个名为securityManager的Bean,因而报错。所以如果要自定义securityManager方法,返回类型只能是SessionsSecurityManager及其子类,而SessionsSecurityManager的子类是DefaultSecurityManager,DefaultWebSecurityManager又继承DefaultSecurityManager,

相关类图如下:
故而正确的代码应该是:

@Bean
public SessionsSecurityManager securityManager(JwtRealm jwtRealm) {
    DefaultWebSecurityManager securityManager = new DefaultWebSecurityManager();
    //配置realm
    securityManager.setRealm(jwtRealm);
    return securityManager;
}

//或者如下,将方法返回类型改为DefaultWebSecurityManager
/*@Bean
public DefaultWebSecurityManager securityManager(JwtRealm jwtRealm) {
    DefaultWebSecurityManager securityManager = new DefaultWebSecurityManager();
    //配置realm
    securityManager.setRealm(jwtRealm);
    return securityManager;
}*/

3、测试@ConditionalOnMissingBean注解

新建下面3个类:

//动物
@Data
public class Animal {
    private String name;
    private Integer age;
}

//狗
@EqualsAndHashCode(callSuper = true)
@Data
public class Dog extends Animal {
    private String type;
}

//二哈
@EqualsAndHashCode(callSuper = true)
@Data
public class TwoHa extends Dog {
    private String a;
}

启动类:

@SpringBootApplication
//扫描下面的接口生成代理实现类
@MapperScan("com.ncwu.**.domain.mapper")
public class ShiroApplication {
    public static void main(String[] args) {
        SpringApplication.run(ShiroApplication.class, args);
    }

    //若IOC容器中没有Animal类型及其子类Dog类型的bean时,该方法才会执行
    @Bean
    @ConditionalOnMissingBean
    public Animal twoHa(JwtRealm realm) {
        TwoHa twoHa = new TwoHa();
        twoHa.setType("twoHa1");
        twoHa.setAge(10);
        twoHa.setName("twoHa1");
        return twoHa;
    }

    @Bean
    public Dog twoHa() {
        TwoHa twoHa = new TwoHa();
        twoHa.setType("twoHa2");
        twoHa.setAge(20);
        twoHa.setName("twoHa2");
        return twoHa;
    }
}

测试类:

@RunWith(SpringRunner.class)
@SpringBootTest(classes = ShiroApplication.class)
public class TestDao {
    @Autowired
    private ApplicationContext appContext;
    @Test
    public void test() throws Exception{
        /*String[] beanNamesForType = appContext.getBeanNamesForType(Animal.class);
        for (String s : beanNamesForType) {
            System.out.println(s);
        }*/
        appContext.getBean(Animal.class);
        //appContext.getBean("dog");
    }
}

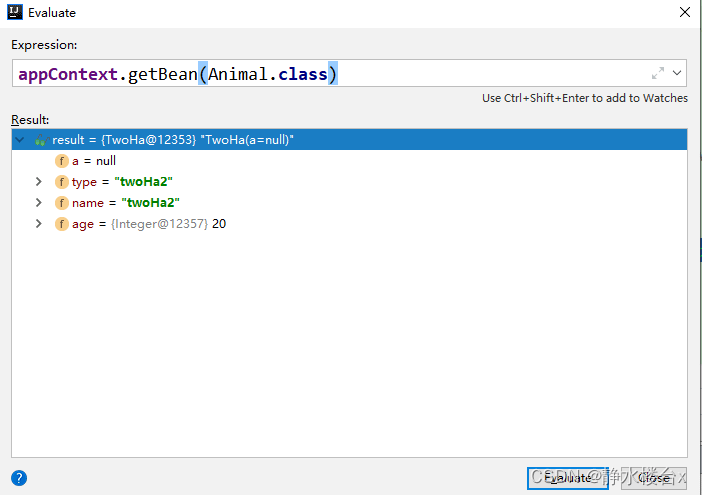
测试结果:
到此这篇关于Java SpringBoot整合shiro-spring-boot-starterqi项目报错解决的文章就介绍到这了,更多相关Java SpringBoot 内容请搜索我们以前的文章或继续浏览下面的相关文章希望大家以后多多支持我们!

(0)

相关推荐

  • SpringBoot项目找不到javax.servlet.Filter的问题及解决

    目录 SpringBoot找不到javax.servlet.Filter的问题 启动SpringBoot项目找不到报错 这是我配置的(有问题的) 正确的配置(在远程maven仓库中搜索的配置) SpringBoot找不到javax.servlet.Filter的问题 新创建一个SpringBoot项目,编译时出现了找不到javax.servlet.Filter的异常. 这个类位于tomcat-embed这个jar下面,这里的解决方法并不是像网上大部分所说的手动添加这个jar,因为这是由于没有添加

  • Java安全框架——Shiro的使用详解(附springboot整合Shiro的demo)

    Shiro简介 Apache Shiro是一个强大且易用的Java安全框架,执行身份验证.授权.密码和会话管理 三个核心组件:Subject, SecurityManager 和 Realms Subject代表了当前用户的安全操作 SecurityManager管理所有用户的安全操作,是Shiro框架的核心,Shiro通过SecurityManager来管理内部组件实例,并通过它来提供安全管理的各种服务. Realm充当了Shiro与应用安全数据间的"桥梁"或者"连接器&q

  • Java SpringBoot实现文件上传功能的示例代码

    测试代码 pom.xml: <?xml version="1.0" encoding="UTF-8"?> <project xmlns="http://maven.apache.org/POM/4.0.0" xmlns:xsi="http://www.w3.org/2001/XMLSchema-instance" xsi:schemaLocation="http://maven.apache.org

  • SpringBoot整合WxJava开启消息推送的实现

    目录 1.引入 WxJava 依赖 2.申请微信小程序 3.微信小程序配置信息 4.消息推送配置 5.接收消息推送的 API 6.消息推送测试 接入微信小程序消息推送服务,可以3种方式选择其一: 1.开发者服务器接收消息推送2.云函数接收消息推送3.微信云托管服务接收消息推送 开发者服务器接收消息推送,开发者需要按照如下步骤完成: 1.填写服务器配置2.验证服务器地址的有效性3.据接口文档实现业务逻辑,接收消息和事件 1.引入 WxJava 依赖 <!-- web支持 --> <depe

  • 详解Java springboot 整合Shiro框架

    目录 Shiro介绍 Springboot整合Shiro Shiro整合Thymeleaf 总结 Shiro介绍 Shiro是一款安全框架,主要的三个类Subject.SecurityManager.Realm Subject:表示当前用户 SecurityManager:安全管理器,即所有与安全有关的操作都会与SecurityManager交互:且其管理着所有Subject:可以看出它是Shiro的核心,它负责与Shiro的其他组件进行交互,它相当于SpringMVC中DispatcherSe

  • java SpringBoot注解@Async不生效的解决方法

    目录 问题描述: 解决方案: 总结: SpringBoot 注解@Async不生效的解决方法 问题描述: 这里虽然加了@EnableAsync和@Async,但是异步请求依然没有生效 解决方案: 方法一: 同一个类中调用需要先获取代理对象,也就是手动获取对象 @Service @EnableAsync public class DemoService { public void add(){ DemoService bean = SpringUtil.getBean(DemoService.cl

  • Java SpringBoot整合shiro-spring-boot-starterqi项目报错解决

    目录 1.项目启动时报错如下 2.原因分析 3.测试@ConditionalOnMissingBean注解 1.项目启动时报错如下 Description: The bean 'securityManager', defined in class path resource [org/apache/shiro/spring/config/web/autoconfigure/ShiroWebAutoConfiguration.class], could not be registered. A b

  • 基于spring boot 日志(logback)报错的解决方式

    记录一次报错解决方法: No converter found capable of converting from type [java.lang.String] to type [java.util.Map<java.lang.String, java.lang.String>] org.springframework.boot.context.properties.bind.BindException: Failed to bind properties under 'logging.le

  • eclipse导入appcompat项目报错解决办法

    eclipse导入appcompat项目报错解决办法 我们在eclipse导入开源项目后,经常会发现找不到类似Theme.AppCompat.Light.DarkActionBar的style,解决办法也比较简单,就是导入com.android.support:appcompat-v7包,不过又两点需要注意: 不能只导入appcompat-v7.jar包,而是要导入appcompat-v7项目 因为这个项目包含有资源文件,只导入jar包没有效果,这个项目地址是在: -\android-sdk\e

  • android studio 新建项目报错的解决之路

    android studio 新建工程报错 Error:Could not resolve all files for configuration ':app:debugCompileClasspath'. > Could not resolve com.android.support:appcompat-v7:26.0.0-beta1.   Required by:       project :app    > Could not resolve com.android.support:a

  • Maven项目报错:“ SLF4J: Failed to load class “org.slf4j.impl.StaticLoggerBinder”的解决方案

    目录 发现错误: 问题分析: 官网给出的解决思路如下: 解决方案: 总结 发现错误: 运行Maven项目时,控制台出现如下图所示的报错信息: 问题分析: 根据报错提示,我们可以知道出错的原因是“加载类文件org.slf4j.impl.StaticLoggerBinder时失败”,而出错的地方主要是在于slf4j的jar包. 官网给出的解决思路如下: This error is reported when the org.slf4j.impl.StaticLoggerBinder class co

  • SpringBoot整合Shiro的代码详解

    shiro是一个权限框架,具体的使用可以查看其官网 http://shiro.apache.org/  它提供了很方便的权限认证和登录的功能. 而springboot作为一个开源框架,必然提供了和shiro整合的功能!接下来就用springboot结合springmvc,mybatis,整合shiro完成对于用户登录的判定和权限的验证. 1.准备数据库表结构 这里主要涉及到五张表:用户表,角色表(用户所拥有的角色),权限表(角色所涉及到的权限),用户-角色表(用户和角色是多对多的),角色-权限表

  • Springboot 整合shiro实现权限控制的方法

    Author:jeffrey Date:2019-04-08 一.开发环境: 1.mysql - 5.7 2.navicat(mysql客户端管理工具) 3.idea 2017.2 4.jdk8 5.tomcat 8.5 6.springboot2.1.3 7.mybatis 3 8.shiro1.4 9.maven3.3.9 二.数据库设计 [外链图片转存失败,源站可能有防盗链机制,建议将图片保存下来直接上传(img-CB46ByC1-1604249108144)(img/shiro01.pn

  • springboot整合Shiro的步骤

    1.创建一个springboot项目 选中web和thymeleaf 1.1新建index.html <!DOCTYPE html> <html lang="en" xmlns:th="http://www.thymeleaf.org"> <head>     <meta charset="UTF-8">     <title>Title</title> </head&

随机推荐