Android仿IOS自定义AlertDialog提示框
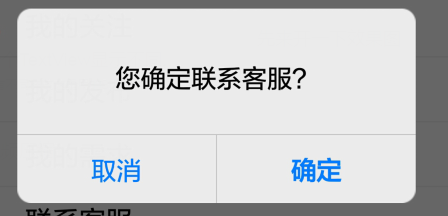
本文介绍的仿IOS对话框的实现,先来看一下效果图

具体代码如下:
public class AlertDialog {
 private Context context;
 private Dialog dialog;
 private LinearLayout lLayout_bg;
 private TextView txt_title;
 private TextView txt_msg;
 private Button btn_neg;
 private Button btn_pos;
 private ImageView img_line;
 private Display display;
 private boolean showTitle = false;
 private boolean showMsg = false;
 private boolean showPosBtn = false;
 private boolean showNegBtn = false;

 public AlertDialog(Context context) {
  this.context = context;
  WindowManager windowManager = (WindowManager) context
    .getSystemService(Context.WINDOW_SERVICE);
  display = windowManager.getDefaultDisplay();
 }

 public AlertDialog builder() {
  View view = LayoutInflater.from(context).inflate(
    R.layout.view_alertdialog, null);

  lLayout_bg = (LinearLayout) view.findViewById(R.id.lLayout_bg);
  txt_title = (TextView) view.findViewById(R.id.txt_title);
  txt_title.setVisibility(View.GONE);
  txt_msg = (TextView) view.findViewById(R.id.txt_msg);
  txt_msg.setVisibility(View.GONE);
  btn_neg = (Button) view.findViewById(R.id.btn_neg);
  btn_neg.setVisibility(View.GONE);
  btn_pos = (Button) view.findViewById(R.id.btn_pos);
  btn_pos.setVisibility(View.GONE);
  img_line = (ImageView) view.findViewById(R.id.img_line);
  img_line.setVisibility(View.GONE);

  dialog = new Dialog(context, R.style.AlertDialogStyle);
  dialog.setContentView(view);

  lLayout_bg.setLayoutParams(new FrameLayout.LayoutParams((int) (display
    .getWidth() * 0.80), LayoutParams.WRAP_CONTENT));

  return this;
 }

 public AlertDialog setTitle(String title) {
  showTitle = true;
  if ("".equals(title)) {
   txt_title.setText("标题");
  } else {
   txt_title.setText(title);
  }
  return this;
 }

 public AlertDialog setMsg(String msg) {
  showMsg = true;
  if ("".equals(msg)) {
   txt_msg.setText("内容");
  } else {
   txt_msg.setText(msg);
  }
  return this;
 }

 public AlertDialog setCancelable(boolean cancel) {
  dialog.setCancelable(cancel);
  return this;
 }

 public AlertDialog setPositiveButton(String text,
   final OnClickListener listener) {
  showPosBtn = true;
  if ("".equals(text)) {
   btn_pos.setText("确定");
  } else {
   btn_pos.setText(text);
  }
  btn_pos.setOnClickListener(new OnClickListener() {
   @Override
   public void onClick(View v) {
    listener.onClick(v);
    dialog.dismiss();
   }
  });
  return this;
 }

 public AlertDialog setNegativeButton(String text,
   final OnClickListener listener) {
  showNegBtn = true;
  if ("".equals(text)) {
   btn_neg.setText("取消");
  } else {
   btn_neg.setText(text);
  }
  btn_neg.setOnClickListener(new OnClickListener() {
   @Override
   public void onClick(View v) {
    listener.onClick(v);
    dialog.dismiss();
   }
  });
  return this;
 }

 private void setLayout() {
  if (!showTitle && !showMsg) {
   txt_title.setText("提示");
   txt_title.setVisibility(View.VISIBLE);
  }

  if (showTitle) {
   txt_title.setVisibility(View.VISIBLE);
  }

  if (showMsg) {
   txt_msg.setVisibility(View.VISIBLE);
  }

  if (!showPosBtn && !showNegBtn) {
   btn_pos.setText("确定");
   btn_pos.setVisibility(View.VISIBLE);
//   btn_pos.setBackgroundResource(R.drawable.alertdialog_single_selector);
   btn_pos.setOnClickListener(new OnClickListener() {
    @Override
    public void onClick(View v) {
     dialog.dismiss();
    }
   });
  }

  if (showPosBtn && showNegBtn) {
   btn_pos.setVisibility(View.VISIBLE);
//   btn_pos.setBackgroundResource(R.drawable.alertdialog_right_selector);
   btn_neg.setVisibility(View.VISIBLE);
//   btn_neg.setBackgroundResource(R.drawable.alertdialog_left_selector);
   img_line.setVisibility(View.VISIBLE);
  }

  if (showPosBtn && !showNegBtn) {
   btn_pos.setVisibility(View.VISIBLE);
//   btn_pos.setBackgroundResource(R.drawable.alertdialog_single_selector);
  }

  if (!showPosBtn && showNegBtn) {
   btn_neg.setVisibility(View.VISIBLE);
//   btn_neg.setBackgroundResource(R.drawable.alertdialog_single_selector);
  }
 }

 public void show() {
  setLayout();
  dialog.show();
 }
}
布局文件view_alertdialog.xml
<?xml version="1.0" encoding="utf-8"?>
<LinearLayout xmlns:android="http://schemas.android.com/apk/res/android"
 android:id="@+id/lLayout_bg"
 android:layout_width="match_parent"
 android:layout_height="wrap_content"
 android:background="@drawable/alert_bg"
 android:orientation="vertical" >

 <TextView
  android:id="@+id/txt_title"
  android:layout_width="match_parent"
  android:layout_height="wrap_content"
  android:layout_marginLeft="15dp"
  android:layout_marginRight="15dp"
  android:layout_marginTop="15dp"
  android:gravity="center"
  android:textColor="@color/black"
  android:textSize="18sp"
  android:text="提示"
  android:textStyle="bold" />

 <TextView
  android:id="@+id/txt_msg"
  android:layout_width="match_parent"
  android:layout_height="wrap_content"
  android:layout_marginLeft="15dp"
  android:layout_marginRight="15dp"
  android:layout_marginTop="32dp"
  android:gravity="center"
  android:text="提示信息"
  android:textColor="@color/black"
  android:textSize="16sp" />

 <ImageView
  android:layout_width="match_parent"
  android:layout_height="0.5dp"
  android:layout_marginTop="25dp"
  android:background="@color/alertdialog_line" />

 <LinearLayout
  android:layout_width="match_parent"
  android:layout_height="wrap_content"
  android:orientation="horizontal" >

  <Button
   android:id="@+id/btn_neg"
   android:layout_width="wrap_content"
   android:layout_height="43dp"
   android:layout_weight="1"
   android:background="@drawable/alertdialog_left_selector"
   android:gravity="center"
   android:textColor="@color/actionsheet_blue"
   android:textSize="16sp"
   />

  <ImageView
   android:id="@+id/img_line"
   android:layout_width="0.5dp"
   android:layout_height="43dp"
   android:background="@color/alertdialog_line" />

  <Button
   android:id="@+id/btn_pos"
   android:layout_width="wrap_content"
   android:layout_height="43dp"
   android:layout_weight="1"
   android:background="@drawable/alertdialog_right_selector"
   android:gravity="center"
   android:textColor="@color/actionsheet_blue"
   android:textSize="16sp"
   android:textStyle="bold"
   />
 </LinearLayout>

</LinearLayout>
alertdialog_left_selector.xml
<?xml version="1.0" encoding="utf-8"?>
<selector xmlns:android="http://schemas.android.com/apk/res/android">

 <item android:drawable="@drawable/alert_btn_left_pressed" android:state_pressed="true"/>
 <item android:drawable="@drawable/trans_bg"/>

</selector>
alertdialog_right_selector.xml
<?xml version="1.0" encoding="utf-8"?>
<selector xmlns:android="http://schemas.android.com/apk/res/android">

 <item android:drawable="@drawable/alert_btn_right_pressed" android:state_pressed="true"/>
 <item android:drawable="@drawable/trans_bg"/>

</selector>
alertdialog_single_selector.xml
<?xml version="1.0" encoding="utf-8"?>
<selector xmlns:android="http://schemas.android.com/apk/res/android">

 <item android:drawable="@drawable/alert_btn_single_pressed" android:state_pressed="true"/>
 <item android:drawable="@drawable/trans_bg"/>

</selector>
<style name="AlertDialogStyle" parent="@android:style/Theme.Dialog">
  <item name="android:windowBackground">@android:color/transparent</item>
  <item name="android:windowContentOverlay">@null</item>
  <item name="android:windowIsFloating">true</item>
  <item name="android:windowFrame">@null</item>
  <item name="android:backgroundDimEnabled">true</item>
  <item name="android:windowNoTitle">true</item>
  <item name="android:windowIsTranslucent">true</item>
 </style>
用到的.9图片


调用方式:
  new AlertDialog(this).builder().setMsg(msg)
  .setPositiveButton("确定", new OnClickListener() {
   @Override
   public void onClick(View v) {

   }
  }).setNegativeButton("取消", new OnClickListener() {

   @Override
   public void onClick(View arg0) {
    // TODO Auto-generated method stub
   }
  }).show();
以上就是本文的全部内容,希望对大家的学习有所帮助,也希望大家多多支持我们。
赞 (0)

