Android点击Button实现功能的几种方法总结

Android中Button控件应该算作是比较简单的控件,然而,它的使用频率却是非常的高,今天,我在这里总结了三种常用的点击Button实现其功能的方法。

1.很多时候,我们在用到Button控件时,往往都是“一次性”使用,这时,为了方便起见,我们一般采用的是匿名内部类的方法,形如这样:


代码如下:

button1.setOnClickListener(new OnClickListener() {

@Override
   public void onClick(View v) {
    // TODO Auto-generated method stub
    System.out.println("您点击了Button1");
   }
  });

我们可以看到,这样的代码不仅简短,而且清晰易懂,不过,这样的方法一般只是适用于这个Button使用的次数不多或是“一次性”使用

2.当Button有多个或者Button的使用次数很多时,我们需要采用绑定监听器的做法,其实,绑定监听器也有几种方法,不过,我在这里就不一一列举了,毕竟那些方法在实际的应用中也不常见。

我们一般的方法是实现OnClickListener接口,并实现其中的方法,正如这样:


代码如下:

@Override
 public void onClick(View v) {
  // TODO Auto-generated method stub
  switch (v.getId()) {
  case R.id.button2:
   System.out.println("您点击了Button2");
   break;

default:
   break;
  }
 }

注:onClick方法是OnClickListen接口中的方法,我们实现这个接口就必须实现它的方法。

3.这是一种最为简单的方法,我们需要做的就是添加一个方法并为Button添加一个属性:


代码如下:

<Button
        android:id="@+id/button3"
        android:layout_width="match_parent"
        android:layout_height="wrap_content"
        android:text="Button3 测试"
        android:onClick="clickHandler"
        />

其中,我们比平时多添加了onClick属性。

那么,我们需要在代码中添加我们在属性中声明的方法:


代码如下:

public void clickHandler(View view) {
  System.out.println("您点击了Button3");
 }

最后,贴出完整的源代码和实现效果截图:

1.布局文件


代码如下:

<LinearLayout xmlns:android="http://schemas.android.com/apk/res/android"
    xmlns:tools="http://schemas.android.com/tools"
    android:layout_width="match_parent"
    android:layout_height="match_parent"
    tools:context=".MainActivity"
    android:orientation="vertical"
    >

<TextView
        android:layout_width="wrap_content"
        android:layout_height="wrap_content"
        android:text="@string/hello_world" />

<Button
        android:id="@+id/button1"
        android:layout_width="match_parent"
        android:layout_height="wrap_content"
        android:text="Button1 测试"
        />
     <Button
        android:id="@+id/button2"
        android:layout_width="match_parent"
        android:layout_height="wrap_content"
        android:text="Button2 测试"
        />
      <Button
        android:id="@+id/button3"
        android:layout_width="match_parent"
        android:layout_height="wrap_content"
        android:text="Button3 测试"
        android:onClick="clickHandler"
        />

</LinearLayout>

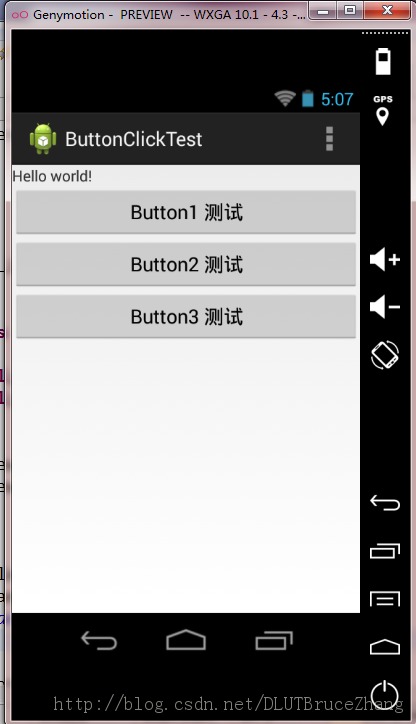
效果形如:
2.测试源代码


代码如下:

package com.example.buttonclicktest;

import android.app.Activity;
import android.os.Bundle;
import android.view.Menu;
import android.view.View;
import android.view.View.OnClickListener;
import android.widget.Button;

public class MainActivity extends Activity implements OnClickListener{

private Button button1 = null;
 private Button button2 = null;

public void findButton() {
  button1 = (Button)findViewById(R.id.button1);
  button2 = (Button)findViewById(R.id.button2);
 }

@Override
 protected void onCreate(Bundle savedInstanceState) {
  super.onCreate(savedInstanceState);
  setContentView(R.layout.activity_main);

findButton();
  button2.setOnClickListener(this);

button1.setOnClickListener(new OnClickListener() {

@Override
   public void onClick(View v) {
    // TODO Auto-generated method stub
    System.out.println("您点击了Button1");
   }
  });
 }

@Override
 public boolean onCreateOptionsMenu(Menu menu) {
  // Inflate the menu; this adds items to the action bar if it is present.
  getMenuInflater().inflate(R.menu.activity_main, menu);
  return true;
 }

@Override
 public void onClick(View v) {
  // TODO Auto-generated method stub
  switch (v.getId()) {
  case R.id.button2:
   System.out.println("您点击了Button2");
   break;

default:
   break;
  }
 }

public void clickHandler(View view) {
  System.out.println("您点击了Button3");
 }

}

当我们点击按钮后,在Logcat中我们可以查看到结果如下所示:

从结果中我们可以看出,三种方法都可以实现按钮点击的功能,我们可以根据情况的不同选择相应的方法。

(0)

相关推荐

  • android自定义按钮示例(重写imagebutton控件实现图片按钮)

    由于项目这种类型的图片按钮比较多,所以重写了ImageButton类. 复制代码 代码如下: package me.henji.widget; import android.content.Context;import android.graphics.ColorMatrix;import android.graphics.ColorMatrixColorFilter;import android.util.AttributeSet;import android.view.MotionEvent

  • Android控件ToggleButton多状态按钮使用详解

    什么是ToggleButton? ToggleButton一般有两种状态:选中和未选中 并且需要为不同状态设置不同的文本 ToggleButton属性 android:checked="true"--当前按钮状态,选中为"true",未选中为"false" android:textOn="开" android:checked="true"的时候,显示 取决于checked的状态,即当checked=&quo

  • Android ImageButton自定义按钮的按下效果的代码实现方法分享

    使用Button时为了让用户有"按下"的效果,有两种实现方式:1.在代码里面. 复制代码 代码如下: imageButton.setOnTouchListener(new OnTouchListener(){ @Override                          public boolean onTouch(View v, MotionEvent event) {                                  if(event.getAction()

  • android RadioButton和CheckBox组件的使用方法

    RadioButton是单选按钮,多个RadioButton放在一个RadioGroup控件中,也就是说每次只能有1个RadioButton被选中.而CheckBox是多选按钮,Toatst是android中带的一个用于显示提示小窗口消息的控件,其提示的内容过一会儿会自动消失.RadioGroup和CheckBox控件设置监听器都是用的setOnCheckedChangeListener函数,其输入参数是一个函数,且函数内部要实现1个内部类.RadioGroup监听器的输入参数用的是RadioG

  • Android控件系列之RadioButton与RadioGroup使用方法

    学习目的: 1.掌握在Android中如何建立RadioGroup和RadioButton 2.掌握RadioGroup的常用属性 3.理解RadioButton和CheckBox的区别 4.掌握RadioGroup选中状态变换的事件(监听器) RadioButton和CheckBox的区别: 1.单个RadioButton在选中后,通过点击无法变为未选中 单个CheckBox在选中后,通过点击可以变为未选中 2.一组RadioButton,只能同时选中一个 一组CheckBox,能同时选中多个

  • Android控件之ToggleButton的使用方法

    ToggleButton的状态只能是选中和未选中,并且需要为不同的状态设置不同的显示文本. 以下案例为ToggleButton的用法 目录结构 main.xml布局文件 复制代码 代码如下: <?xml version="1.0" encoding="utf-8"?><LinearLayout xmlns:android="http://schemas.android.com/apk/res/android"    androi

  • android基本控件ToggleButton&Switch使用指南

    ToggleButton(开关按钮)和Switch(开关)讲解: 一.核心属性讲解: (1)ToggleButton textOn:按钮被选中的时候文字显示 textOff:按钮没有被选中的时候文字显示 ToggleButton的状态只能是选中和未选中,并且需要为不同的状态设置不同的显示文本. 以下案例为ToggleButton的用法 目录结构 main.xml布局文件 <?xml version="1.0" encoding="utf-8"?> <

  • Android定制RadioButton样式三种实现方法

    三种方法 1.使用XML文件进行定义 res/drawable/radio.xml 复制代码 代码如下: <?xml version="1.0" encoding="utf-8"?> <selector xmlns:android="http://schemas.android.com/apk/res/android"> <!-- 未选中-> <item android:state_checked=&qu

  • Android ToggleButton 详解及实例代码

    Android ToggleButton 详解 在Android的开发过程中,对于ToggleButton的使用频率也是相当的高的,下面我就来说一下,这个组件的两种使用方式. 第一种是简单的使用,利用Toast的方式弹出提示语句 需要注意的是要想自定义ToggleButton的显示的内容,就需要设置其TextOn和TextOff的内容. <ToggleButton android:id="@+id/toggleButton1" android:layout_width="

  • Android开发悬浮按钮 Floating ActionButton的实现方法

    一.介绍 这个类是继承自ImageView的,所以对于这个控件我们可以使用ImageView的所有属性 android.support.design.widget.FloatingActionButton 二.使用准备, 在as 的 build.grade文件中写上 compile 'com.android.support:design:22.2.0' 三.使用说明 xml文件中,注意蓝色字体部分 <android.support.design.widget.FloatingActionButt

  • Android RadioButton单选框的使用方法

    复制代码 代码如下: public class MainActivity extends Activity { public RadioGroup mRadioGroup1; public RadioButton mRadio1, mRadio2; @Override protected void onCreate(Bundle savedInstanceState) {  super.onCreate(savedInstanceState);  setContentView(R.layout.

  • Android开发之ToggleButton实现开关效果示例

    本文实例讲述了Android使用ToggleButton实现开关效果的方法.分享给大家供大家参考,具体如下: activity_main.xml <?xml version="1.0" encoding="utf-8"?> <LinearLayout xmlns:android="http://schemas.android.com/apk/res/android" android:layout_width="matc

随机推荐