使用Feign logging 开启调用日志
目录
- Feign logging开启调用日志
- Feign启用日志
- 需求
- 实现步骤
Feign logging开启调用日志
application.yml 配置
logging:
  level:
    yourproject.userClient: debug
FeignConfiguration
@Configuration
public class FeignConfiguration {
    @Bean
    Logger.Level feignLoggerLevel() {
        return Logger.Level.FULL;
    }
}
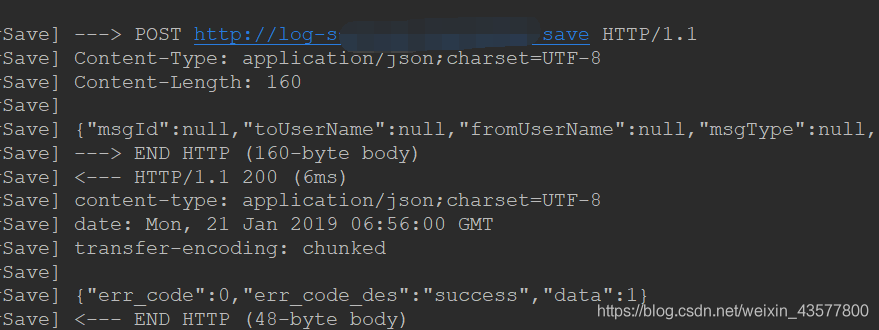
效果

参考官方:http://cloud.spring.io/spring-cloud-openfeign/single/spring-cloud-openfeign.html#_feign_logging
Feign启用日志
需求
想追踪Feign客户端发送的数据.
Feign在构建被@FeignClient注解修饰的服务客户端时,会为每一个客户端都创建一个feign.Logger实例,这样就可以利用该日志对象的DEBUG模式来帮助分析Feign的请求细节。
实现步骤
1. 在application.yml中使用 logging.level.<Feign客户端对应的接口的全限定名> 的参数配置格式来开启指定客户端日志.
logging:
  level:
    com:
      yc:
        springcloud2:
          service:
            IProductClientService: DEBUG   #注意这里是Feign客户端接口的完整路径,这是我们要监控日志的接口
2. 但由于Feign客户端默认的Logger.Level对象定义为NONE级别,因此需要对它进行调整. Logger.Level的源码中规定了以下几个级别:
  public enum Level {
    // 不记录日志 (默认)。
    NONE,
    //只记录请求方法和URL以及响应状态代码和执行时间
    BASIC,
    //记录请求和应答的头的基本信息
    HEADERS,
    //记录请求和响应的头信息,正文和元数据
    FULL
  }
那么如何将级别从NONE修改过来呢?这里有两种方式:
1. 全局配置: 在应用主配置类中加入 Logger.Level的Bean的创建和托管,这里这个应用中所有的Feign客户端都会按这个日志级别.
@SpringBootConfiguration
public class FeignLogConfig {
    @Bean
    Logger.Level feignLoggerLevel(){
        return Logger.Level.FULL;
    }
}

运行 程序 [microservice-consumer-feign],查看输出结果。
2020-10-16 15:14:45.634 DEBUG 15604 --- [nio-9999-exec-1] c.y.s.service.IProductClientService : [IProductClientService#listProduct] <--- HTTP/1.1 200 (799ms)
2020-10-16 15:14:45.634 DEBUG 15604 --- [nio-9999-exec-1] c.y.s.service.IProductClientService : [IProductClientService#listProduct] cache-control: no-cache, no-store, max-age=0, must-revalidate
2020-10-16 15:14:45.634 DEBUG 15604 --- [nio-9999-exec-1] c.y.s.service.IProductClientService : [IProductClientService#listProduct] connection: keep-alive
2020-10-16 15:14:45.634 DEBUG 15604 --- [nio-9999-exec-1] c.y.s.service.IProductClientService : [IProductClientService#listProduct] content-type: application/json;charset=UTF-8
2020-10-16 15:14:45.634 DEBUG 15604 --- [nio-9999-exec-1] c.y.s.service.IProductClientService : [IProductClientService#listProduct] date: Fri, 16 Oct 2020 07:14:45 GMT
2020-10-16 15:14:45.634 DEBUG 15604 --- [nio-9999-exec-1] c.y.s.service.IProductClientService : [IProductClientService#listProduct] expires: 0
2020-10-16 15:14:45.634 DEBUG 15604 --- [nio-9999-exec-1] c.y.s.service.IProductClientService : [IProductClientService#listProduct] keep-alive: timeout=60
2020-10-16 15:14:45.634 DEBUG 15604 --- [nio-9999-exec-1] c.y.s.service.IProductClientService : [IProductClientService#listProduct] pragma: no-cache
2020-10-16 15:14:45.634 DEBUG 15604 --- [nio-9999-exec-1] c.y.s.service.IProductClientService : [IProductClientService#listProduct] transfer-encoding: chunked
2020-10-16 15:14:45.634 DEBUG 15604 --- [nio-9999-exec-1] c.y.s.service.IProductClientService : [IProductClientService#listProduct] x-content-type-options: nosniff
2020-10-16 15:14:45.634 DEBUG 15604 --- [nio-9999-exec-1] c.y.s.service.IProductClientService : [IProductClientService#listProduct] x-frame-options: DENY
2020-10-16 15:14:45.634 DEBUG 15604 --- [nio-9999-exec-1] c.y.s.service.IProductClientService : [IProductClientService#listProduct] x-xss-protection: 1; mode=block
2020-10-16 15:14:45.635 DEBUG 15604 --- [nio-9999-exec-1] c.y.s.service.IProductClientService : [IProductClientService#listProduct]
2020-10-16 15:14:45.636 DEBUG 15604 --- [nio-9999-exec-1] c.y.s.service.IProductClientService : [IProductClientService#listProduct] [{"productId":1,"productName":"a","productDesc":"good"}]
2020-10-16 15:14:45.637 DEBUG 15604 --- [nio-9999-exec-1] c.y.s.service.IProductClientService : [IProductClientService#listProduct] <--- END HTTP (56-byte body)
2. 针对一个具体的Feign客户端单独配置. 比如这里对一个Feign客户端进行日志配置.
@Configuration
public class FeignClientConfig {
    //加入安全配置
    @Bean
    public BasicAuthRequestInterceptor getBasicAuthRequestInterceptor(){
        return new BasicAuthRequestInterceptor("admin","a");
    }

    @Bean
    Logger.Level feignLoggerLevel(){
        return Logger.Level.FULL;
    }
}

重启应用程序,查看输出:
2020-10-16 15:20:21.856 DEBUG 15620 --- [nio-9999-exec-1] c.y.s.service.IProductClientService : [IProductClientService#listProduct] <--- HTTP/1.1 200 (476ms)
2020-10-16 15:20:21.856 DEBUG 15620 --- [nio-9999-exec-1] c.y.s.service.IProductClientService : [IProductClientService#listProduct] cache-control: no-cache, no-store, max-age=0, must-revalidate
2020-10-16 15:20:21.856 DEBUG 15620 --- [nio-9999-exec-1] c.y.s.service.IProductClientService : [IProductClientService#listProduct] connection: keep-alive
2020-10-16 15:20:21.856 DEBUG 15620 --- [nio-9999-exec-1] c.y.s.service.IProductClientService : [IProductClientService#listProduct] content-type: application/json;charset=UTF-8
2020-10-16 15:20:21.856 DEBUG 15620 --- [nio-9999-exec-1] c.y.s.service.IProductClientService : [IProductClientService#listProduct] date: Fri, 16 Oct 2020 07:20:21 GMT
2020-10-16 15:20:21.856 DEBUG 15620 --- [nio-9999-exec-1] c.y.s.service.IProductClientService : [IProductClientService#listProduct] expires: 0
2020-10-16 15:20:21.856 DEBUG 15620 --- [nio-9999-exec-1] c.y.s.service.IProductClientService : [IProductClientService#listProduct] keep-alive: timeout=60
2020-10-16 15:20:21.856 DEBUG 15620 --- [nio-9999-exec-1] c.y.s.service.IProductClientService : [IProductClientService#listProduct] pragma: no-cache
2020-10-16 15:20:21.856 DEBUG 15620 --- [nio-9999-exec-1] c.y.s.service.IProductClientService : [IProductClientService#listProduct] transfer-encoding: chunked
2020-10-16 15:20:21.857 DEBUG 15620 --- [nio-9999-exec-1] c.y.s.service.IProductClientService : [IProductClientService#listProduct] x-content-type-options: nosniff
2020-10-16 15:20:21.857 DEBUG 15620 --- [nio-9999-exec-1] c.y.s.service.IProductClientService : [IProductClientService#listProduct] x-frame-options: DENY
2020-10-16 15:20:21.857 DEBUG 15620 --- [nio-9999-exec-1] c.y.s.service.IProductClientService : [IProductClientService#listProduct] x-xss-protection: 1; mode=block
2020-10-16 15:20:21.857 DEBUG 15620 --- [nio-9999-exec-1] c.y.s.service.IProductClientService : [IProductClientService#listProduct]
2020-10-16 15:20:21.859 DEBUG 15620 --- [nio-9999-exec-1] c.y.s.service.IProductClientService : [IProductClientService#listProduct] [{"productId":1,"productName":"a","productDesc":"good"}]
2020-10-16 15:20:21.859 DEBUG 15620 --- [nio-9999-exec-1] c.y.s.service.IProductClientService : [IProductClientService#listProduct] <--- END HTTP (56-byte body)
以上为个人经验,希望能给大家一个参考,也希望大家多多支持我们。

