基于Nginx禁止指定IP、国外IP访问我的网站
目录
- 用Nginx禁止指定IP、国外IP访问我的网站
- ①安装 geoip2 扩展依赖:
- ②下载 ngx_http_geoip2_module 模块:
- ③解压模块到指定路径
- ④安装 nginx 模块
- ⑤下载最新的 IP 地址数据库文件
- ⑥配置 nginx 配置文件
- ⑦模拟测试验证
- 总结
用Nginx禁止指定IP、国外IP访问我的网站

想要实现这个功能有很多方法,下面我就来介绍基于 Nginx 的 ngx_http_geoip2 模块来禁止国外 IP 访问网站。
①安装 geoip2 扩展依赖:
[root@fxkj ~]# yum install libmaxminddb-devel -y
②下载 ngx_http_geoip2_module 模块:
[root@fxkj tmp]#  git clone https://github.com/leev/ngx_http_geoip2_module.git
[ro tmp]#
③解压模块到指定路径
我这里解压到 /usr/local 目录下:
[root@fxkj tmp]# mv ngx_http_geoip2_module/ /usr/local/
[root@fxkj local]# ll ngx_http_geoip2_module/
total 60
-rw-r--r-- 1 root root  1199 Aug 13 17:20 config
-rw-r--r-- 1 root root  1311 Aug 13 17:20 LICENSE
-rw-r--r-- 1 root root 23525 Aug 13 17:20 ngx_http_geoip2_module.c
-rw-r--r-- 1 root root 21029 Aug 13 17:20 ngx_stream_geoip2_module.c
-rw-r--r-- 1 root root  3640 Aug 13 17:20 README.md

④安装 nginx 模块
首先说明下环境,我的 nginx 版本是 1.16,在网上查了下安装 ngx_http_geoip2 模块至少需要 1.18 版本及以上,因此此次安装我是升级 nginx1.18,添加 ngx_http_geoip2 模块。
下载 nginx 1.18 版本:
[root@fxkj ~]# yum install libmaxminddb-devel -y
解压 nginx1.18 软件包,并升级为 nginx1.18,添加 ngx_http_geoip2 模块。
需要注意:
- 升级 nginx,添加 nginx 模块,只需要编译,然后 make。不需要 make instll,不然线上的 nginx 会被新版本 nginx 完完整整的替换掉。
- 编译前需要看下 nginx 当前安装了哪些模块。
[root@fxkj tmp]# /usr/local/nginx/sbin/nginx -V
nginx version: nginx/1.16.0
built by gcc 4.8.5 20150623 (Red Hat 4.8.5-39) (GCC)
built with OpenSSL 1.0.2k-fips 26 Jan 2017
TLS SNI support enabled
configure arguments: –with-http_stub_status_module –prefix=/usr/local/nginx –user=nginx –group=nginx –with-http_ssl_module –with-stream
编译安装:
[root@fxkj tmp]# tar -xf nginx-1.18.0.tar.gz
[root@fxkj tmp]# cd nginx-1.18.0/
[root@fxkj nginx-1.18.0]# ./configure --with-http_stub_status_module \
 --prefix=/usr/local/nginx \
 --user=nginx --group=nginx --with-http_ssl_module --with-stream \
 --add-module=/usr/local/ngx_http_geoip2_module
[root@fxkj nginx-1.18.0]# make
[root@fxkj nginx-1.18.0]# cp /usr/loca/nginx/sbin/nginx /usr/loca/nginx/sbin/nginx1.16    #备份
[root@fxkj nginx-1.18.0]# cp objs/nginx /usr/local/nginx/sbin/    #用新的去覆盖旧的
[root@fxkj nginx-1.18.0]# pkill nginx     #杀死nginx
[root@fxkj nginx-1.18.0]# /usr/local/nginx/sbin/nginx    #再次启动Nginx
查看 nginx 版本,以及安装的模块:
[root@fxkj nginx-1.18.0]# /usr/local/nginx/sbin/nginx -V
nginx version: nginx/1.18.0
built by gcc 4.8.5 20150623 (Red Hat 4.8.5-39) (GCC)
built with OpenSSL 1.0.2k-fips 26 Jan 2017
TLS SNI support enabled
configure arguments: –with-http_stub_status_module –prefix=/usr/local/nginx –user=nginx –group=nginx –with-http_ssl_module –with-stream –add-module=/usr/local/ngx_http_geoip2_module
⑤下载最新的 IP 地址数据库文件
模块安装成功后,还要在 Nginx 里指定数据库,在安装运行库时默认安装了两个,位于 /usr/share/GeoIP/ 目录下,一个只有 IPv4,一个包含 IPv4 和 IPv6。
登录 www.maxmind.com 网址,创建账户,下载最新的库文件。(账户创建就不演示了)点击左侧,Download Files:

选择 GeoLite2 Country,点击 Download GZIP 下载即可:

上传到 /usr/share/GeoIP/ 下并解压:
[root@fxkj local]# cd /usr/share/GeoIP/
[root@fxkj GeoIP]# ll
total 69612
lrwxrwxrwx. 1 root root       17 Mar  7  2019 GeoIP.dat -> GeoIP-initial.dat
-rw-r--r--. 1 root root  1242574 Oct 30  2018 GeoIP-initial.dat
lrwxrwxrwx. 1 root root       19 Mar  7  2019 GeoIPv6.dat -> GeoIPv6-initial.dat
-rw-r--r--. 1 root root  2322773 Oct 30  2018 GeoIPv6-initial.dat
-rw-r--r--  1 root root  3981623 Aug 12 02:37 GeoLite2-Country.mmdb
⑥配置 nginx 配置文件
修改前先备份配置文件:
[root@fxkj ~]# cp /usr/local/nginx/conf/nginx.conf /usr/local/nginx/conf/nginx.conf-bak
[root@fxkj ~]# vim /usr/local/nginx/conf/nginx.conf
在 http 中添加几行,定义数据库文件位置:
geoip2 /usr/share/GeoIP/GeoLite2-City.mmdb {
auto_reload 5m;
$geoip2_data_country_code country iso_code;
}
  map $geoip2_data_country_code $allowed_country {
                default yes;
                CN no;
}

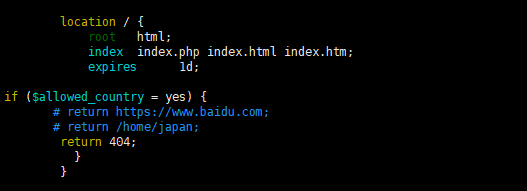
在 server 中的 location 下添加条件,如果满足 IP 是国外 IP,就执行下面的 return 动作,我这里定义了 3 种,注释了其中两个。
当访问 IP 是国外 IP,直接返回 404:
if ($allowed_country = yes) {
       # return https://www.baidu.com;
       # return /home/japan;
        return 404;
 }
修改完毕后,检测下配置文件,重新加载下 nginx:
[root@fxkj ~]# /usr/local/nginx/sbin/nginx -t
nginx: the configuration file /usr/local/nginx/conf/nginx.conf syntax is ok
nginx: configuration file /usr/local/nginx/conf/nginx.conf test is successful
[roo@fxkj ~]# /usr/local/nginx/sbin/nginx -s reload
⑦模拟测试验证
使用海外节点的服务器去访问网站,这里我的 IP 是来自于韩国:
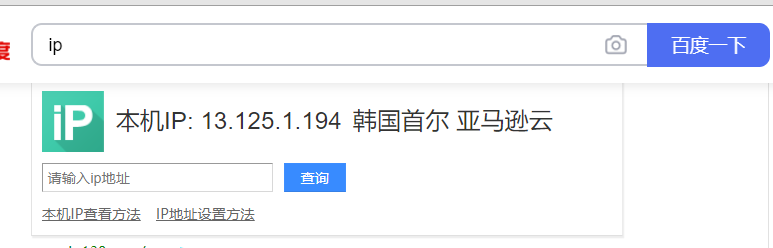
可以看到访问网站报错 404 Not Found:

我们再来看下 nginx 的访问日志:
“13.125.1.194 – – [14/Aug/2020:16:15:51 +0800] “GET /favicon.ico HTTP/1.1” 404 548 “https://www.fxkjnj.com/” “Mozilla/5.0 (Windows NT 10.0; Win64; x64) AppleWebKit/537.36 (KHTML, like Gecko) Chrome/84.0.4147.125 Safari/537.36”

至此,我们通过 Nginx 来实现禁止国外 IP 访问网站就结束了~

总结
到此这篇关于用Nginx禁止指定IP、国外IP访问我的网站的文章就介绍到这了,更多相关nginx禁止国外IP访问网站内容请搜索我们以前的文章或继续浏览下面的相关文章希望大家以后多多支持我们!
相关推荐
-
Nginx中禁止使用IP访问网站的配置实例
国内因为备案的原因,所有服务器都要禁止使用IP访问网站.否则,如果允许使用IP访问网站,那随便解析一个域名到该IP,访问该域名就可以打开网站了.这是一个极大的风险!Nginx中可以很方便的来解决这个问题,小菜鸟来跟大家一起探讨一下. 国内因为备案的原因,所有服务器都要禁止使用IP访问网站.否则,如果允许使用IP访问网站,那随便解析一个域名到该IP,访问该域名就可以打开网站了.这是一个极大的风险!Nginx中可以很方便的来解决这个问题,小菜鸟来跟大家一起探讨一下. 如下的配置项,可以设置允许使用I
-

基于Nginx禁止指定IP、国外IP访问我的网站
目录 用Nginx禁止指定IP.国外IP访问我的网站 ①安装 geoip2 扩展依赖: ②下载 ngx_http_geoip2_module 模块: ③解压模块到指定路径 ④安装 nginx 模块 ⑤下载最新的 IP 地址数据库文件 ⑥配置 nginx 配置文件 ⑦模拟测试验证 总结 用Nginx禁止指定IP.国外IP访问我的网站 想要实现这个功能有很多方法,下面我就来介绍基于 Nginx 的 ngx_http_geoip2 模块来禁止国外 IP 访问网站. ①安装 geoip2 扩展依赖: [
-
基于Nginx 反向代理获取真实IP的问题详解
一.前言 前文Nginx 解决WebApi跨域二次请求以及Vue单页面问题 当中虽然解决了跨域问题带来的二次请求,但也产生了一个新的问题,就是如果需要获取用户IP的时候,获取的IP地址总是本机地址. 二.原因 由于Nginx反向代理后,在应用中取得的IP都是反向代理服务器的IP,取得的域名也是反向代理配置的Url的域名. 三.解决方案 解决该问题,需要在Nginx反向代理配置中添加一些配置信息,目的将客户端的真实IP和域名传递到应用程序中.同时,也要修改获取IP地址的方法. 但是需要注意的是,通
-
Nginx禁止指定UA访问的方法
本文介绍 Nginx 禁止指定 UA 访问的配置. UA,即 Http User Agent,在 Nginx 中使用内置变量 $http_user_agent 表示,该信息作为 request header 的一部分被发往 webserver.因此,对 webserver 来说,有一种禁止访问的方式,就是对 UA 进行判断. 禁止搜索引擎爬虫 因为你懂的原因,并不是太希望 Baidu 这类爬虫来我的网站,所以在 Nginx 中使用 if 对 UA 进行判断: if ($http_user_age
-
Nginx 禁止IP访问 只允许域名访问
我们在使用的时候会遇到很多的恶意IP攻击,这个时候就要用到Nginx 禁止IP访问了.下面我们就先看看Nginx的默认虚拟主机在用户通过IP访问,或者通过未设置的域名访问(比如有人把他自己的域名指向了你的ip)的时 候生效最关键的一点是,在server的设置里面添加这一行: listen 80 default; 后面的default参数表示这个是默认虚拟主机. Nginx 禁止IP访问这个设置非常有用. 比如别人通过ip或者未知域名访问你的网站的时候,你希望禁止显示任何有效内容,可以给他返回50
-
通过ASP禁止指定IP和只允许指定IP访问网站的代码
一.禁止指定IP防问网站,并执行相应操作: 复制代码 代码如下: <% Dim IP,IPString,VisitIP '设置IP地址,用"|"隔开 IPString="|192.168.0.42|192.168.0.43|" '获取IP地址 IP = Request.ServerVariables("HTTP_X_FORWARDED_FOR") If IP = "" Then IP = Request.ServerVa
-
Nginx 禁止IP访问如何实现
Nginx 禁止IP访问 我们在使用的时候会遇到很多的恶意IP攻击,这个时候就要用到Nginx 禁止IP访问了.下面我们就先看看Nginx的默认虚拟主机在用户通过IP访问,或者通过未设置的域名访问(比如有人把他自己的域名指向了你的ip)的时候生效最关键的一点是,在server的设置里面添加这一行: listen 80 default; 后面的default参数表示这个是默认虚拟主机. Nginx 禁止IP访问这个设置非常有用. 比如别人通过ip或者未知域名访问你的网站的时候,你希望禁止显示任何有
-
利用.Htaccess阻止IP恶意攻击网站,禁止指定域名访问,禁止机器爬虫,禁止盗链
前几天发现我的网站被一些IP发起了大量恶意的.有针对性的扫描,企图通过暴力探测方式获取网站中一些内部配置文件和信息.我是用.Htaccess来化解攻击的,就是在.Htaccess文件里添加了下面这段配置: order allow,deny deny from 180.97.106. allow from all .Htaccess对与一个网站来说是一种功能非常强大的配置文件.对它的功能了解的越多,你就越容易掌控你的网站配置.利用.Htaccess来禁止某个IP对网站的访问是它是基本功能之一.上面
-
nginx禁止直接通过ip进行访问并跳转到自定义500页面的操作
直接上配置文件 server { listen 80 default; # 要禁止直接访问ip,需要加上default server_name ~.*; error_page 404 400 402 401 /404.html; # 定义错误状态码对应的html文件 location = /404.html { # 如果使用相对路径一般将文件放在nginx安装目录下的html/下,比如:/usr/local/nginx/html/404.html root html; } error_page
-
教你如何解决Nginx禁止ip加端口访问的问题
Nginx禁止IP加端口访问 使用iptables 限制对应端口,再利用Nginx将80端口转发到对应端口 CentOS7默认的防火墙是 firewalle,先看看服务器中有没有安装 iptables [root@VM-0-3-centos ~]# service iptables statusRedirecting to /bin/systemctl status iptables.serviceUnit iptables.service could not be found. 安装 ipta
-
Nginx禁止ip访问或非法域名访问
在生产环境中,为了网站的安全访问,需要Nginx禁止一些非法访问,如恶意域名解析,直接使用IP访问网站.下面记录一些常用的配置示例: 1)禁止IP访问 如果没有匹配上server name就会找default默认,返回501错误. server { listen 80 default_server; server_name _; return 501; } 2)通过301跳转到主页 server { listen 80 default_server; server_name _; rewrite