Shiro:自定义Realm实现权限管理方式
目录
- Shiro权限管理
- 1、基于JavaSe的Shiro的基本使用
- 1、导入shiro依赖
- 2、创建shiro配置文件:shiro.ini
- 3、shiro的基本使用
- 4、shiro认证授权流程
- 2、SpringBoot整合shiro
- 1. 导入依赖
- 2. 配置shiro过滤器
- 3. 进行认证测试
- 3、JdbcRealm实现权限管理
- 1. JdbcRealm表结构
- 2. 整合JdbcRealm
- 4、实现前端的权限菜单展示
- 1. 在Thymeleaf中使用标签
- 2. 常用标签
- 3. 认证流程回顾
- 5、自定义Realm实现权限管理
- 1. 表结构的设计
- 2. Dao层实现
- 3. 整合Shiro
Shiro权限管理
1、权限管理
权限管理:不同角色的用户进入到系统能够完成的操作是不同的,对不同角色的用户进行的可执行操作的管理称为权限管理。
2、如何实现权限管理
基于主页的权限管理:不同的用户使用不同的主页,权限通过主页功能菜单进行限制
基于用户权限的访问控制:统权限表、用户权限表、用户表,比较冗余
基于用户角色的访问控制(RBAC):系统权限表、用户权限表、用户表、角色表、用户角色表
1、基于JavaSe的Shiro的基本使用
1、导入shiro依赖
<dependency>
    <groupId>org.apache.shiro</groupId>
    <artifactId>shiro-core</artifactId>
    <version>1.5.1</version>
</dependency>
但是出现了一点问题:就是引入这个依赖后pom文件就会报错,可以在pom文件中加入加入阿里云的代理仓库:
<repositories><!-- 阿里云代码库 -->
    <repository>
        <id>maven-ali</id>
        <url>http://maven.aliyun.com/nexus/content/repositories/central</url>
        <releases>
            <enabled>true</enabled>
        </releases>
        <snapshots>
            <enabled>true</enabled>
            <updatePolicy>always</updatePolicy>
            <checksumPolicy>fail</checksumPolicy>
        </snapshots>
    </repository>
</repositories>
2、创建shiro配置文件:shiro.ini
[users]
zhangsan=123456,seller
lisi=666666,ckmgr
admin=222222,admin
[roles]
admin=*
seller=order-add,order-del,order-list
ckmgr=ck-add,ck-del,ck-list
3、shiro的基本使用
public class TestShiro {
    public static void main(String[] args) {
        Scanner sc = new Scanner(System.in);
        System.out.println("请输入用户名:");
        String username = sc.nextLine();
        System.out.println("请输入密码:");
        String password = sc.nextLine();
        //创建安全管理器
        DefaultSecurityManager securityManager = new DefaultSecurityManager();
        //创建realm
        IniRealm realm = new IniRealm("classpath:shiro.ini");
        //将realm设置给安全管理器
        securityManager.setRealm(realm);
        //将realm设置给SecurityUtils工具
        SecurityUtils.setSecurityManager(securityManager);
        //通过SecurityUtils获取subject对象
        Subject subject = SecurityUtils.getSubject();
        //认证流程
        UsernamePasswordToken token = new UsernamePasswordToken(username, password);
        System.out.println(subject.isAuthenticated());//false
        //完成认证
        subject.login(token);
        System.out.println(subject.isAuthenticated());//true
        //授权
        //判断是否有某个角色
        subject.hasRole("seller");//true
        //判断是否有某个权限
        boolean permitted = subject.isPermitted("oredr-del");
        System.out.println(permitted);//true
    }
}
4、shiro认证授权流程

(1) 通过subject.login(token)进行登录,就会将token包含的用户信息(账号和密码)传递给SecurityManager
(2) SecurityManager会调用Authentication进行认证
(3) Authentication就会根据Realm安全信息进行认证校验
(4) Realm根据得到的token,调用doGetAuthenticationInfo()方法进行认证
(5) 认证完成后一层层返回到subject
2、SpringBoot整合shiro
- 1、导入shiro依赖:
- 2、配置shiro过滤器:拦截进行认证和授权的用户
- 3、配置SecurityManager到Spring容器
- 4、配置Realm(SecurityManager需要Realm)
1. 导入依赖
<dependency>
    <groupId>org.apache.shiro</groupId>
    <artifactId>shiro-spring</artifactId>
    <version>1.4.1</version>
</dependency>
2. 配置shiro过滤器
/**
 * Shiro的配置类
 */
@Configuration
public class ShiroConfig {
    //将Realm交给Spring容器创建
    @Bean
    public IniRealm getRealm() {
        IniRealm iniRealm = new IniRealm("classpath:shiro.ini");
        return iniRealm;
    }
    //将DefaultSecurityManager交给Spring容器来创建和管理
    @Bean
    public DefaultSecurityManager getDefaultSecurityManager(IniRealm iniRealm) {
        //SecurityManager要完成认证和校验需要Realm
        DefaultWebSecurityManager securityManager = new DefaultWebSecurityManager();
        securityManager.setRealm(iniRealm);
        return securityManager;
    }
    //配置shiro的过滤器
    @Bean
    public ShiroFilterFactoryBean shiroFilter(DefaultSecurityManager securityManager) {
        //过滤器工厂
        ShiroFilterFactoryBean filter = new ShiroFilterFactoryBean();
        //过滤器是进行权限校验的核心,进行认证和授权需要SecurityManager
        filter.setSecurityManager(securityManager);
        //设置拦截规则
        //anon:匿名用户可以访问,authc:授权用户可以访问
        Map<String, String> filterMap = new HashMap<>();
        filterMap.put("/","anon");              //项目个根路径不拦截
        filterMap.put("/login.html","anon");    //登录页面不拦截
        filterMap.put("/register.html","anon"); //注册页面不拦截
        filterMap.put("/user/login","anon");    //登录不拦截
        filterMap.put("/user/regist","anon");   //注册不拦截
        filterMap.put("/static/**","anon");     //静态页面不拦截
        filterMap.put("/**","authc");           //除了上面的请求路径,其他路径都要拦截
        filter.setFilterChainDefinitionMap(filterMap);
        //设置默认的登录页面
        filter.setLoginUrl("/login.html");
        //设置未授权访问的页面路径(一个页面如果未授权让其跳转到登录页面)
        filter.setUnauthorizedUrl("/login.html");
        return filter;
    }
}
3. 进行认证测试
1、UserService:
@Service
public class UserService {
    public void check(String username,String password){
        Subject subject = SecurityUtils.getSubject();
        UsernamePasswordToken token = new UsernamePasswordToken(username,password);
        subject.login(token);
    }
}
2、UserController:
@Controller
@RequestMapping("/user")
public class UserController {
    @Autowired
    private UserService userService;
    @RequestMapping("/login")
    public String login(String username,String password){
        try {
            userService.check(username,password);
            System.out.println("登录成功");
            return "index";
        } catch (Exception e) {
            System.out.println("登录失败");
            return "login";
        }
    }
}
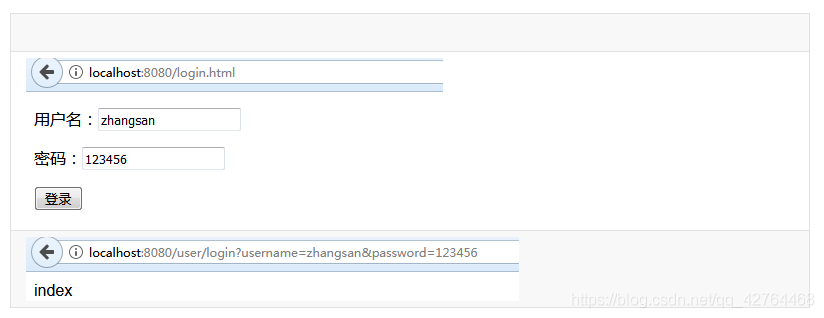
3、login.html登录页面:
<form action="user/login">
<p>用户名:<input type="text" name="username"/></p>
<p>密码:<input type="text" name="password"/></p>
<p><input type="submit" value="登录"/></p>
</form>
4、shiro.ini配置文件:
[users]
zhangsan=123456
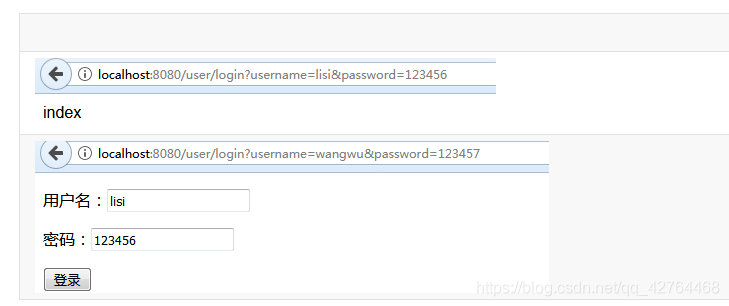
5、认证成功:跳到index首页
6、认证失败,跳到登录页面
3、JdbcRealm实现权限管理

1. JdbcRealm表结构
这些表名和表结构都是固定的不能更改:
用户信息表:users
create table users(
    id int primary key auto_increment,
    username varchar(60) not null unique,
    password varchar(20) not null,
    password_salt varchar(20)
)
insert into users(username,password) values("zhangsan","123456");
insert into users(username,password) values("lisi","123456");
insert into users(username,password) values("wangwu","123456");
insert into users(username,password) values("zhaoliu","123456");
insert into users(username,password) values("chenqi","123456");
角色信息表:user_roles
create table user_roles(
    id int primary key auto_increment,
    username varchar(60) not null,
    role_name varchar(100) not null
)
insert into user_roles(username,role_name) values("zhangsan","admin");
insert into user_roles(username,role_name) values("lisi","cmanager"); -- 库管人员
insert into user_roles(username,role_name) values("wangwu","xmanager");-- 销售人员
insert into user_roles(username,role_name) values("zhaoliu","kmanager");-- 客服人员
insert into user_roles(username,role_name) values("chenqi","zmanager"); -- 行政人员
权限信息表:roles_permissions
create table roles_permissions(
    id int primary key auto_increment,
    role_name varchar(60) not null,
    permission varchar(100) not null
)
-- 管理员具备所有权限
insert into roles_permissions(role_name,permission) values("admin","*");
-- 库管人员
insert into roles_permissions(role_name,permission) values("cmanager","sys:c:save");
insert into roles_permissions(role_name,permission) values("cmanager","sys:c:delete");
insert into roles_permissions(role_name,permission) values("cmanager","sys:c:find");
insert into roles_permissions(role_name,permission) values("cmanager","sys:c:update");
-- 销售人员
insert into roles_permissions(role_name,permission) values("xmanager","sys:c:save");
insert into roles_permissions(role_name,permission) values("xmanager","sys:x:find");
insert into roles_permissions(role_name,permission) values("xmanager","sys:x:delete");
insert into roles_permissions(role_name,permission) values("xmanager","sys:x:update");
insert into roles_permissions(role_name,permission) values("xmanager","sys:k:save");
insert into roles_permissions(role_name,permission) values("xmanager","sys:k:find");
insert into roles_permissions(role_name,permission) values("xmanager","sys:k:delete");
insert into roles_permissions(role_name,permission) values("xmanager","sys:k:update");
-- 客服人员
insert into roles_permissions(role_name,permission) values("kmanager","sys:k:find");
insert into roles_permissions(role_name,permission) values("kmanager","sys:k:update");
-- 行政人员
insert into roles_permissions(role_name,permission) values("zmanager","sys:k:find");

2. 整合JdbcRealm
1、整合Druid和MyBatis:
# 数据库配置
spring.datasource.druid.driver-class-name=com.mysql.cj.jdbc.Driver
spring.datasource.druid.url=jdbc:mysql://localhost:3306/db_shiro1?useUnicode=true&characterEncoding=utf-8&useSSL=false&serverTimezone=UTC
spring.datasource.druid.username=root
spring.datasource.druid.password=root
# 连接池配置
#连接池建立时创建的初始化连接数
spring.datasource.druid.initial-size=5
#连接池中最大的活跃连接数
spring.datasource.druid.max-active=20
#连接池中最小的活跃连接数
spring.datasource.druid.min-idle=5
# 配置获取连接等待超时的时间
spring.datasource.druid.max-wait=60000
# mybatis 配置
 mybatis.mapper-locations=classpath:mappers/*Mapper.xml
 mybatis.type-aliases-package=com.hh.beans
2、导入shiro依赖:
<dependency>
    <groupId>org.apache.shiro</groupId>
    <artifactId>shiro-spring</artifactId>
    <version>1.4.1</version>
</dependency>
3、配置shiro过滤器:只需要将IniRealm 更改为JdbcRealm
@Configuration
public class ShiroConfig {
    @Bean
    public JdbcRealm getJDBCRealm(DataSource dataSource){
        JdbcRealm jdbcRealm = new JdbcRealm();
        //JdbcRealm会自行从数据库中查询用户和权限数据(前提是数据库表结构要符合JdbcRealm表结构)
        jdbcRealm.setDataSource(dataSource);
        //jdbcRealm默认开启认证功能,如果想要开启授权功能,需要手动开启
        jdbcRealm.setPermissionsLookupEnabled(true);
        return jdbcRealm;
    }
    //将DefaultSecurityManager交给Spring容器来创建和管理
    @Bean
    public DefaultSecurityManager getDefaultSecurityManager(JdbcRealm jdbcRealm) {
        //SecurityManager要完成认证和校验需要Realm
        DefaultWebSecurityManager securityManager = new DefaultWebSecurityManager();
        securityManager.setRealm(jdbcRealm);
        return securityManager;
    }
    //配置shiro的过滤器
    @Bean
    public ShiroFilterFactoryBean shiroFilter(DefaultSecurityManager securityManager) {
        //过滤器工厂
        ShiroFilterFactoryBean filter = new ShiroFilterFactoryBean();
        //过滤器是进行权限校验的核心,进行认证和授权需要SecurityManager
        filter.setSecurityManager(securityManager);
        //设置拦截规则
        //anon:匿名用户可以访问,authc:授权用户可以访问
        Map<String, String> filterMap = new HashMap<>();
        filterMap.put("/", "anon");              //项目个根路径不拦截
        filterMap.put("/login.html", "anon");    //登录页面不拦截
        filterMap.put("/register.html", "anon"); //注册页面不拦截
        filterMap.put("/user/login", "anon");    //登录不拦截
        filterMap.put("/user/regist", "anon");   //注册不拦截
        filterMap.put("/static/**", "anon");     //静态页面不拦截
        filterMap.put("/**", "authc");           //除了上面的请求路径,其他路径都要拦截
        filter.setFilterChainDefinitionMap(filterMap);
        //设置默认的登录页面
        filter.setLoginUrl("/login.html");
        //设置未授权访问的页面路径(一个页面如果未授权让其跳转到登录页面)
        filter.setUnauthorizedUrl("/login.html");
        return filter;
    }
}
4、进行认证测试:和上面测试方法相同
由于只要我们按照规定写了数据库表结构,那么既可以直接使用数据库中的信息
4、实现前端的权限菜单展示
1. 在Thymeleaf中使用标签
1、在pom.xml文件中导入thymeleaf模版对shiro标签支持的依赖
<dependency>
    <groupId>com.github.theborakompanioni</groupId>
    <artifactId>thymeleaf-extras-shiro</artifactId>
    <version>2.0.0</version>
</dependency>
2、在ShiroConfig中配置Shiro的方言:
@Bean
public ShiroDialect getShiroDialect(){
    return new ShiroDialect();
}
3、Thymeleaf模版中引入shiro的命名空间:
<html xmlns:th="http://www.thymeleaf.org"
xmlns:shiro="http://www.pollix.at/thymeleaf/shiro">
...
</html>
2. 常用标签
2.1 guest
判断用户是否是游客身份,如果是游客身份则显示此标签内容
<shiro:guest>
欢迎游客,<a href="login.html" rel="external nofollow"  rel="external nofollow" >请登录</a>
</shiro:guest>
2.2 user
判断用户是否是认证身份,如果是认证身份则显示此标签内容
<shiro:user>
已登录用户
</shiro:user>

2.3 principal
获取当前登录用户名
<shiro:user>
已登录用户<shiro:principal/>欢迎您!
</shiro:user>

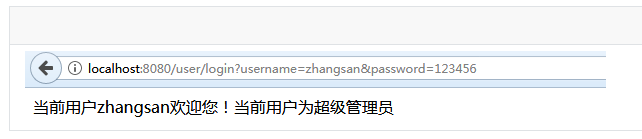
2.4 hasRole
当期那登录用户的角色
<shiro:user>
当前用户<shiro:principal/>欢迎您!
当前用户为<shiro:hasRole name="admin">超级管理员</shiro:hasRole>
<shiro:hasRole name="cmanager">仓管人员</shiro:hasRole>
<shiro:hasRole name="xmanager">销售人员</shiro:hasRole>
<shiro:hasRole name="kmanager">客服人员</shiro:hasRole>
<shiro:hasRole name="zmanager">行政人员</shiro:hasRole>
</shiro:user>
登录用户为zhangsan:
登录用户为lisi:

2.5 hasPermission
当前登录用户具有的权限
<!DOCTYPE html>
<html xmlns:th="http://www.thymeleaf.org"
xmlns:shiro="http://www.pollix.at/thymeleaf/shiro">
<head>
<meta charset="UTF-8">
<title>Title</title>
</head>
<body>
<shiro:guest>
欢迎游客,<a href="login.html" rel="external nofollow"  rel="external nofollow" >请登录</a>
</shiro:guest>
<shiro:user>
当前用户<shiro:principal/>欢迎您!
当前用户为<shiro:hasRole name="admin">超级管理员</shiro:hasRole>
<shiro:hasRole name="cmanager">仓管人员</shiro:hasRole>
<shiro:hasRole name="xmanager">销售人员</shiro:hasRole>
<shiro:hasRole name="kmanager">客服人员</shiro:hasRole>
<shiro:hasRole name="zmanager">行政人员</shiro:hasRole>
</shiro:user>
仓库管理:
<ul>
<shiro:hasPermission name="sys:c:save"><li><a href="#" rel="external nofollow"  rel="external nofollow"  rel="external nofollow"  rel="external nofollow"  rel="external nofollow"  rel="external nofollow"  rel="external nofollow"  rel="external nofollow"  rel="external nofollow"  rel="external nofollow"  rel="external nofollow"  rel="external nofollow" >入库</a> </li></shiro:hasPermission>
<shiro:hasPermission name="sys:c:delete"><li><a href="#" rel="external nofollow"  rel="external nofollow"  rel="external nofollow"  rel="external nofollow"  rel="external nofollow"  rel="external nofollow"  rel="external nofollow"  rel="external nofollow"  rel="external nofollow"  rel="external nofollow"  rel="external nofollow"  rel="external nofollow" >出库</a> </li></shiro:hasPermission>
<shiro:hasPermission name="sys:c:update"><li><a href="#" rel="external nofollow"  rel="external nofollow"  rel="external nofollow"  rel="external nofollow"  rel="external nofollow"  rel="external nofollow"  rel="external nofollow"  rel="external nofollow"  rel="external nofollow"  rel="external nofollow"  rel="external nofollow"  rel="external nofollow" >修改</a> </li></shiro:hasPermission>
<shiro:hasPermission name="sys:c:find"><li><a href="#" rel="external nofollow"  rel="external nofollow"  rel="external nofollow"  rel="external nofollow"  rel="external nofollow"  rel="external nofollow"  rel="external nofollow"  rel="external nofollow"  rel="external nofollow"  rel="external nofollow"  rel="external nofollow"  rel="external nofollow" >查询</a> </li></shiro:hasPermission>
</ul>
订单管理:
<ul>
<shiro:hasPermission name="sys:x:save"><li><a href="#" rel="external nofollow"  rel="external nofollow"  rel="external nofollow"  rel="external nofollow"  rel="external nofollow"  rel="external nofollow"  rel="external nofollow"  rel="external nofollow"  rel="external nofollow"  rel="external nofollow"  rel="external nofollow"  rel="external nofollow" >添加订单</a> </li></shiro:hasPermission>
<shiro:hasPermission name="sys:x:delete"><li><a href="#" rel="external nofollow"  rel="external nofollow"  rel="external nofollow"  rel="external nofollow"  rel="external nofollow"  rel="external nofollow"  rel="external nofollow"  rel="external nofollow"  rel="external nofollow"  rel="external nofollow"  rel="external nofollow"  rel="external nofollow" >删除订单</a> </li></shiro:hasPermission>
<shiro:hasPermission name="sys:x:update"><li><a href="#" rel="external nofollow"  rel="external nofollow"  rel="external nofollow"  rel="external nofollow"  rel="external nofollow"  rel="external nofollow"  rel="external nofollow"  rel="external nofollow"  rel="external nofollow"  rel="external nofollow"  rel="external nofollow"  rel="external nofollow" >修改订单</a> </li></shiro:hasPermission>
<shiro:hasPermission name="sys:x:find"><li><a href="#" rel="external nofollow"  rel="external nofollow"  rel="external nofollow"  rel="external nofollow"  rel="external nofollow"  rel="external nofollow"  rel="external nofollow"  rel="external nofollow"  rel="external nofollow"  rel="external nofollow"  rel="external nofollow"  rel="external nofollow" >查询订单</a> </li></shiro:hasPermission>
</ul>
客户管理:
<ul>
<shiro:hasPermission name="sys:k:save"><li><a href="#" rel="external nofollow"  rel="external nofollow"  rel="external nofollow"  rel="external nofollow"  rel="external nofollow"  rel="external nofollow"  rel="external nofollow"  rel="external nofollow"  rel="external nofollow"  rel="external nofollow"  rel="external nofollow"  rel="external nofollow" >添加客户</a></li></shiro:hasPermission>
<shiro:hasPermission name="sys:k:delete"><li><a href="#" rel="external nofollow"  rel="external nofollow"  rel="external nofollow"  rel="external nofollow"  rel="external nofollow"  rel="external nofollow"  rel="external nofollow"  rel="external nofollow"  rel="external nofollow"  rel="external nofollow"  rel="external nofollow"  rel="external nofollow" >删除客户</a></li></shiro:hasPermission>
<shiro:hasPermission name="sys:k:update"><li><a href="#" rel="external nofollow"  rel="external nofollow"  rel="external nofollow"  rel="external nofollow"  rel="external nofollow"  rel="external nofollow"  rel="external nofollow"  rel="external nofollow"  rel="external nofollow"  rel="external nofollow"  rel="external nofollow"  rel="external nofollow" >修改客户</a></li></shiro:hasPermission>
<shiro:hasPermission name="sys:k:find"><li><a href="#" rel="external nofollow"  rel="external nofollow"  rel="external nofollow"  rel="external nofollow"  rel="external nofollow"  rel="external nofollow"  rel="external nofollow"  rel="external nofollow"  rel="external nofollow"  rel="external nofollow"  rel="external nofollow"  rel="external nofollow" >查询客户</a></li></shiro:hasPermission>
</ul>
</body>
</html>
登录用户为:lisi

登录用户为zhangsan:

3. 认证流程回顾

5、自定义Realm实现权限管理
1. 表结构的设计
1.1 用户表:tb_users
create table tb_users(
    user_id int primary key auto_increment,
    username varchar(60) not null unique,
    password varchar(20) not null,
    password_salt varchar(60)
);
insert into tb_users(username,password) values("zhangsan","123456");
insert into tb_users(username,password) values("lisi","123456");
insert into tb_users(username,password) values("wangwu","123456");
insert into tb_users(username,password) values("zhaoliu","123456");
insert into tb_users(username,password) values("chenqi","123456");
1.2 角色表:tb_roles
create table tb_roles(
    role_id int primary key auto_increment,
    role_name varchar(100) not null
);
insert into tb_roles(role_name) values("admin");
insert into tb_roles(role_name) values("cmanager");
insert into tb_roles(role_name) values("xmanager");
insert into tb_roles(role_name) values("kmanager");
insert into tb_roles(role_name) values("zmanager");
1.3 权限表:tb_permissions
create table tb_permissions(
    permission_id int primary key auto_increment,
    permission_code varchar(20) not null,
    permission_name varchar(60)
);
insert into tb_permissions(permission_code,permission_name) values("sys:c:save","入库");
insert into tb_permissions(permission_code,permission_name) values("sys:c:delete","出库");
insert into tb_permissions(permission_code,permission_name) values("sys:c:update","修改");
insert into tb_permissions(permission_code,permission_name) values("sys:c:find","查询");
insert into tb_permissions(permission_code,permission_name) values("sys:x:save","新增订单");
insert into tb_permissions(permission_code,permission_name) values("sys:x:delete","删除订单");
insert into tb_permissions(permission_code,permission_name) values("sys:x:update","修改订单");
insert into tb_permissions(permission_code,permission_name) values("sys:x:find","查询订单");
insert into tb_permissions(permission_code,permission_name) values("sys:k:save","新增客户");
insert into tb_permissions(permission_code,permission_name) values("sys:k:delete","删除客户");
insert into tb_permissions(permission_code,permission_name) values("sys:k:update","修改客户");
insert into tb_permissions(permission_code,permission_name) values("sys:k:find","查询客户");
1.4 用户角色表:tb_urs
create table tb_urs(
    uid int not null,
    rid int not null
    -- primary key(uid,rid),
    -- constraint FK_user foreign key(uid) references tb_users(user_id),
    -- constraint FK_role foreign key(rid) references tb_rolls(roll_id)
);
-- zhangsan具有所有角色,代表具有所有权限,不用给他分配权限
insert into tb_urs(uid,rid) values(1,1);-- zhangsan用户具有admin角色
insert into tb_urs(uid,rid) values(1,2);-- zhangsan用户具有cmanager角色
insert into tb_urs(uid,rid) values(1,3);-- zhangsan用户具有xmanager角色
insert into tb_urs(uid,rid) values(1,4);-- zhangsan用户具有kmanagerr角色
insert into tb_urs(uid,rid) values(1,5);-- zhangsan用户具有zmanager角色
insert into tb_urs(uid,rid) values(2,2);-- lisi用户具有cmanager角色
insert into tb_urs(uid,rid) values(3,3);-- wangwu用户具有xmanager角色
insert into tb_urs(uid,rid) values(4,4);-- zhaoliu用户具有kmanager角色
insert into tb_urs(uid,rid) values(5,5);-- chenqi用户具有zmanager角色
1.5 角色权限表:tb_rps
create table tb_rps(
	rid int not null,
    pid int not null
);
-- 给角色2(仓管)分配权限
insert into tb_rps(rid,pid) values(2,1);
insert into tb_rps(rid,pid) values(2,2);
insert into tb_rps(rid,pid) values(2,3);
insert into tb_rps(rid,pid) values(2,4);
-- 给角色3(销售)分配权限
insert into tb_rps(rid,pid) values(3,3);
insert into tb_rps(rid,pid) values(3,5);
insert into tb_rps(rid,pid) values(3,6);
insert into tb_rps(rid,pid) values(3,7);
insert into tb_rps(rid,pid) values(3,8);
insert into tb_rps(rid,pid) values(3,9);
insert into tb_rps(rid,pid) values(3,10);
insert into tb_rps(rid,pid) values(3,11);
insert into tb_rps(rid,pid) values(3,12);
-- 给角色4(客服)分配权限
insert into tb_rps(rid,pid) values(4,11);
insert into tb_rps(rid,pid) values(4,12);
-- 给角色5(行政)分配权限
insert into tb_rps(rid,pid) values(5,4);
insert into tb_rps(rid,pid) values(5,8);
insert into tb_rps(rid,pid) values(5,12);
2. Dao层实现

shiro 进行认证需要用户信息:
- 根据用户名查询用户信息
shiro进行权限管理需要当前用户的角色和权限:
- 根据用户名查询当前用户的角色列表
- 根据用户名查询当前用户的权限列表
2.1 根据用户名查询用户信息
实体类User
@Data
public class User {
    private String userId;
    private String userName;
    private String userPwd;
    private String pwdSalt;
}
dao接口
@Mapper
public interface UserDao {
    //根据用户名查询用户信息
    public User queryUserByUsername(String username) throws Exception;
}
映射配置
<?xml version="1.0" encoding="UTF-8" ?>
<!DOCTYPE mapper
        PUBLIC "-//mybatis.org//DTD Mapper 3.0//EN"
        "http://mybatis.org/dtd/mybatis-3-mapper.dtd">
<mapper namespace="com.hh.dao.UserDao">
    <resultMap id="userMap" type="User">
        <id column="user_id" property="userId"></id>
        <result column="username" property="userName"/>
        <result column="password" property="userPwd"/>
        <result column="password_salt" property="pwdSalt"/>
    </resultMap>
    <select id="queryUserByUsername" resultMap="userMap">
        select * from tb_users
        where username=#{username}
    </select>
</mapper>
2.2 根据用户名查询角色信息
dao接口
@Mapper
public interface RoleDao {
    public Set<String> queryRoleNamesByUsername(String username) throws Exception;
}
映射配置
<?xml version="1.0" encoding="UTF-8" ?>
<!DOCTYPE mapper
        PUBLIC "-//mybatis.org//DTD Mapper 3.0//EN"
        "http://mybatis.org/dtd/mybatis-3-mapper.dtd">
<mapper namespace="com.hh.dao.RoleDao">
    <select id="queryRoleNamesByUsername" resultSets="java.util.Set" resultType="string">
        select
            role_name
        from
            tb_users
        join
            tb_urs
        on
            tb_users.user_id = tb_urs.uid
        join
            tb_roles
        on
            tb_urs.rid = tb_roles.role_id
        where
            tb_users.username=#{username}
    </select>
</mapper>
2.3 根据用户名查询权限列表
dao接口
public interface PermissionDAO {
    public Set<String> queryPermissionsByUsername(String  username) throws Exception;
}
映射配置
<?xml version="1.0" encoding="UTF-8" ?>
<!DOCTYPE mapper
        PUBLIC "-//mybatis.org//DTD Mapper 3.0//EN"
        "http://mybatis.org/dtd/mybatis-3-mapper.dtd">
<mapper namespace="com.hh.dao.PermissionDao">
    <select id="queryPermissionsByUsername" resultSets="java.util.Set" resultType="string">
        select
            tb_permissions.permission_code
        from
            tb_users
        join
            tb_urs
        on
            tb_users.user_id=tb_urs.uid
        join
            tb_roles
        on
            tb_urs.rid=tb_roles.role_id
        join
            tb_rps
        on
            tb_roles.role_id=tb_rps.rid
        join
            tb_permissions
        on
            tb_rps.pid=tb_permissions.permission_id
        where
            tb_users.username=#{username}
    </select>
</mapper>
3. 整合Shiro
3.1 导入依赖
<dependency>
    <groupId>org.apache.shiro</groupId>
    <artifactId>shiro-spring</artifactId>
    <version>1.4.1</version>
</dependency>
<dependency>
    <groupId>com.github.theborakompanioni</groupId>
    <artifactId>thymeleaf-extras-shiro</artifactId>
    <version>2.0.0</version>
</dependency>
3.2 配置Shiro过滤器
@Configuration
public class ShiroConfig {
    //1、配置Shiro的方言支持
    //2、配置Realm
    //3、配置SecurityManager
    //4、配置过滤器
    @Bean
    public ShiroDialect getShiroDialect(){
        return new ShiroDialect();
    }
    //自定义Realm,Realm相当于数据源,从数据库中查询出认证信息和授权信息
    @Bean
    public MyRealm getRealm(){
        MyRealm myRealm = new MyRealm();
        return myRealm;
    }
    @Bean
    public DefaultWebSecurityManager getDefaultWebSecurityManager(MyRealm myRealm){
        DefaultWebSecurityManager securityManager = new DefaultWebSecurityManager();
        securityManager.setRealm(myRealm);
        return securityManager;
    }
    @Bean
    public ShiroFilterFactoryBean shiroFilter(DefaultWebSecurityManager securityManager){
        ShiroFilterFactoryBean filter = new ShiroFilterFactoryBean();
        //过滤器就是shiro就行权限校验的核心,进行认证和授权是需要SecurityManager的
        filter.setSecurityManager(securityManager);
        Map<String,String> filterMap = new HashMap<>();
        filterMap.put("/","anon");
        filterMap.put("/index.html","anon");
        filterMap.put("/login.html","anon");
        filterMap.put("/regist.html","anon");
        filterMap.put("/user/login","anon");
        filterMap.put("/user/regist","anon");
        filterMap.put("/layui/**","anon");
        filterMap.put("/**","authc");
        filter.setFilterChainDefinitionMap(filterMap);
        filter.setLoginUrl("/login.html");
        //设置未授权访问的页面路径()
        filter.setUnauthorizedUrl("/login.html");
        return filter;
    }
}
3.3 自定义Realm
/**
 * 自定义Realm的规范:
 * 1、创建一个类实现AuthorizingRealm,重写里面的两个方法
 * 2、重写getName()方法,返回当前Realm的自定义名称
 */
public class MyRealm extends AuthorizingRealm {
    @Autowired
    private UserDao userDao;
    @Autowired
    private RoleDao roleDao;
    @Autowired
    private PermissionDao permissionDao;
    public String getName(){
        return "myRealm";
    }
    /**
     * 获取认证信息:将用户密码查询出来交给shiro
     * @param authenticationToken token就是传递的 subject.login(token)
     */
    @SneakyThrows
    @Override
    protected AuthenticationInfo doGetAuthenticationInfo(AuthenticationToken authenticationToken) throws AuthenticationException {
        UsernamePasswordToken token = (UsernamePasswordToken) authenticationToken;
        //从token中获取用户名
        String username = token.getUsername();
        //根据用户名到数据库中查询用户信息
        User user = userDao.queryUserByUsername(username);
        if(user==null){
            return null;
        }
        //将查询出来的密码封装成安全信息给shiro
        AuthenticationInfo info = new SimpleAuthenticationInfo(
                username,//当前用户的用户名
                user.getUserPwd(),//从数据库中查询出来的安全数据
                getName()
                );
        return info;
    }
    /**
     * 获取授权信息:将当前用户的角色和权限查询出交给shiro
     * @param principalCollection
     */
    @SneakyThrows
    @Override
    protected AuthorizationInfo doGetAuthorizationInfo(PrincipalCollection principalCollection) {
        //获取用户的用户名
        String username = (String)principalCollection.iterator().next();
        //根据用户名查询用户的角色列表
        Set<String> roleNames = roleDao.queryRoleNamesByUsername(username);
        //根据用户名查询用户的权限列表
        Set<String> ps = permissionDao.queryPermissionsByUsername(username);
        SimpleAuthorizationInfo info = new SimpleAuthorizationInfo();
        info.setRoles(roleNames);
        info.setStringPermissions(ps);
        return info;
    }
}
测试结果:


以上为个人经验,希望能给大家一个参考,也希望大家多多支持我们。
相关推荐
-

SpringBoot整合Shiro实现权限控制的代码实现
1.SpringBoot整合Shiro Apache Shiro是一个强大且易用的Java安全框架,执行身份验证.授权.密码和会话管理. 1.1.shiro简介 shiro有个核心组件,分别为Subject.SecurityManager和Realms Subject:相当于当前操作的"用户",这个用户不一定是一个具体的人,是一个抽象的概念,表明的是和当前程序进行交互的任何东西,例如爬虫.脚本.等等.所有的Subject都绑定到SecurityManager上,与 Subject 的所
-
Spring Boot 集成Shiro的多realm实现以及shiro基本入门教程
情景 我的项目中有六个用户角色(学校管理员,学生等),需要进行分别登陆.如果在一个realm中,对controller封装好的Token进行Service验证,需要在此realm中注入六个数据库操作对象,然后写一堆if语句来判断应该使用那个Service服务,然后再在验证方法(doGetAuthorizationInfo)中写一堆if来进行分别授权,这样写不仅会让代码可读性会非常低而且很难后期维护修改(刚写完的时候只有上帝和你能看懂你写的是什么,一个月之后你写的是什么就只有上帝能看懂了). 所以
-
SpringBoot中整合Shiro实现权限管理的示例代码
之前在 SSM 项目中使用过 shiro,发现 shiro 的权限管理做的真不错,但是在 SSM 项目中的配置太繁杂了,于是这次在 SpringBoot 中使用了 shiro,下面一起看看吧 一.简介 Apache Shiro是一个强大且易用的Java安全框架,执行身份验证.授权.密码和会话管理.使用Shiro的易于理解的API,您可以快速.轻松地获得任何应用程序,从最小的移动应用程序到最大的网络和企业应用程序. 三个核心组件: 1.Subject 即"当前操作用户".但是,在 Shi
-
Shiro:自定义Realm实现权限管理方式
目录 Shiro权限管理 1.基于JavaSe的Shiro的基本使用 1.导入shiro依赖 2.创建shiro配置文件:shiro.ini 3.shiro的基本使用 4.shiro认证授权流程 2.SpringBoot整合shiro 1. 导入依赖 2. 配置shiro过滤器 3. 进行认证测试 3.JdbcRealm实现权限管理 1. JdbcRealm表结构 2. 整合JdbcRealm 4.实现前端的权限菜单展示 1. 在Thymeleaf中使用标签 2. 常用标签 3. 认证流程回顾
-
SpringBoot整合Shiro框架,实现用户权限管理
一.Shiro简介 核心角色 1)Subject:认证主体 代表当前系统的使用者,就是用户,在Shiro的认证中,认证主体通常就是userName和passWord,或者其他用户相关的唯一标识. 2)SecurityManager:安全管理器 Shiro架构中最核心的组件,通过它可以协调其他组件完成用户认证和授权.实际上,SecurityManager就是Shiro框架的控制器. 3)Realm:域对象 定义了访问数据的方式,用来连接不同的数据源,如:关系数据库,配置文件等等. 核心理念 Shi
-
SpringBoot2.0整合Shiro框架实现用户权限管理的示例
GitHub源码地址:知了一笑 https://github.com/cicadasmile/middle-ware-parent 一.Shiro简介 1.基础概念 Apache Shiro是一个强大且易用的Java安全框架,执行身份验证.授权.密码和会话管理.作为一款安全框架Shiro的设计相当巧妙.Shiro的应用不依赖任何容器,它不仅可以在JavaEE下使用,还可以应用在JavaSE环境中. 2.核心角色 1)Subject:认证主体 代表当前系统的使用者,就是用户,在Shiro的认证中,
-
详解spring整合shiro权限管理与数据库设计
之前的文章中我们完成了基础框架的搭建,现在基本上所有的后台系统都逃不过权限管理这一块,这算是一个刚需了.现在我们来集成shiro来达到颗粒化权限管理,也就是从连接菜单到页面功能按钮,都进行权限都验证,从前端按钮的显示隐藏,到后台具体功能方法的权限验证. 首先要先设计好我们的数据库,先来看一张比较粗糙的数据库设计图: 具体的数据库设计代码 /* Navicat MySQL Data Transfer Source Server : 本机 Source Server Version : 50537
-
spring boot 集成 shiro 自定义密码验证 自定义freemarker标签根据权限渲染不同页面(推荐
项目里一直用的是 spring-security ,不得不说,spring-security 真是东西太多了,学习难度太大(可能我比较菜),这篇博客来总结一下折腾shiro的成果,分享给大家,强烈推荐shiro,真心简单 : ) 引入依赖 <dependency> <groupId>org.apache.shiro</groupId> <artifactId>shiro-spring</artifactId> <version>1.4
-
详解springboot shiro jwt实现权限管理
springboot + shiro + jwt (详情解析+代码实现)加密接口 设置权限 首先需要把shiro的几个配置类给下载好(我已经把需要的配置类给放到了github和网盘之中) 先讲完各个配置类的作用,后面讲具体流程 ShiroConfig.java 类主要是设置了过滤器 和shiro自己的session,假如这个类没有放行就只有token才能访问后端接口 UserRealm.java 类主要是检测用户权限和授予权限,对用户名的验证 JWTFilter.java 类主要是防止别人访问你
-
springboot集成shiro权限管理简单实现
目录 前言 依赖 配置 Filter过滤器配置 securityManager配置 Realm配置 密码加密 测试 前言 为了解决项目当中的权限管理问题,我们一般会选择引入spring security或者shiro框架来帮助我们更好地更快地构建权限管理体系. 依赖 首先第一步,我们需要给当前项目引入对应的依赖包.与spring boot集成一般首选starter包. <!-- shiro权限管理框架 --> <dependency> <groupId>org.a
-
Android 采用AOP方式封装6.0权限管理的方法
[一]背景 6.0运行时申请权限已经是一个老生常谈的内容了,最近项目TargetSDKVersion升到23以上,所以我们也需要做权限管理,我想到的需求是这样的: 1.支持单个权限.多个权限申请 2.运行时申请 3.无侵入式申请,无需关注权限申请的逻辑 4.除了Activity.Fragment之外,还需要支持Service中申请 5.对国产手机做兼容处理 第一.二点,Google都有对应的API: 第三点可以通过自定义注解+AOP切面方式来解决.为什么采用AOP方式呢?首先看AOP定义: 面向
-
django认证系统实现自定义权限管理的方法
本文记录使用django自带的认证系统实现自定义的权限管理系统,包含组权限.用户权限等实现. 0x01. django认证系统 django自带的认证系统能够很好的实现如登录.登出.创建用户.创建超级用户.修改密码等复杂操作,并且实现了用户组.组权限.用户权限等复杂结构,使用自带的认证系统就能帮助我们实现自定义的权限系统达到权限控制的目的. 0x02. 认证系统User对象 User对象顾名思义即为表示用户的对象,里面的属性包括: username password email first_na