springboot连接Redis的教程详解
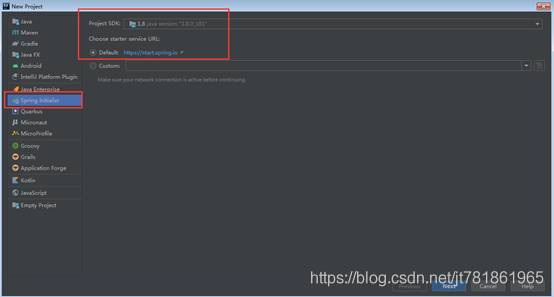
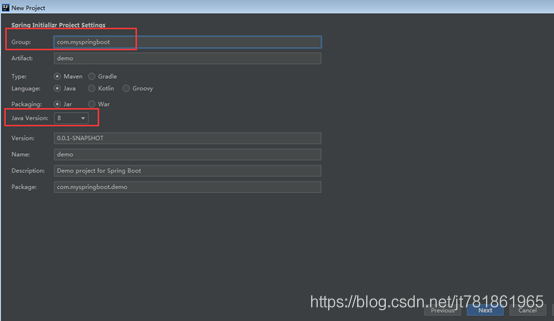
创建springboot项目


在NoSQL中选择Redis


项目目录

pom.xml中还需要加入下面的jar包
org.springframework.boot spring-boot-starter-json
在application.properties文件中添加Redis服务器信息
spring.redis.host=192.168.5.132
spring.redis.port=6379
剩下4个test类,我直接以源码的方式粘出来,里面有些代码是非必须的,我保留了测试的验证过程,所以里面会有冗余代码。(这些代码在我GitHub上的练习项目中也有)
package com.myspringboot.redis;

import org.springframework.boot.SpringApplication;
import org.springframework.boot.autoconfigure.SpringBootApplication;
import org.springframework.context.ConfigurableApplicationContext;

@SpringBootApplication
public class DemoApplication {

  public static void main(String[] args) {
    ConfigurableApplicationContext configurableApplicationContext = SpringApplication.run(DemoApplication.class, args);
    RedisTest redisTest = configurableApplicationContext.getBean(RedisTest.class);
    redisTest.testRedis();
  }

}
package com.myspringboot.redis;

import org.springframework.context.annotation.Bean;
import org.springframework.context.annotation.Configuration;
import org.springframework.data.redis.connection.RedisConnectionFactory;
import org.springframework.data.redis.core.StringRedisTemplate;
import org.springframework.data.redis.serializer.Jackson2JsonRedisSerializer;

@Configuration
public class MyTemplate {

  @Bean
  public StringRedisTemplate getMyTemplate(RedisConnectionFactory redisConnectionFactory){
    StringRedisTemplate stringRedisTemplate = new StringRedisTemplate(redisConnectionFactory);
    stringRedisTemplate.setHashValueSerializer(new Jackson2JsonRedisSerializer<Object>(Object.class));
    return stringRedisTemplate;
  }
}
package com.myspringboot.redis;

import com.fasterxml.jackson.databind.ObjectMapper;
import org.springframework.beans.factory.annotation.Autowired;
import org.springframework.beans.factory.annotation.Qualifier;
import org.springframework.data.redis.connection.Message;
import org.springframework.data.redis.connection.MessageListener;
import org.springframework.data.redis.connection.RedisConnection;
import org.springframework.data.redis.core.HashOperations;
import org.springframework.data.redis.core.RedisTemplate;
import org.springframework.data.redis.core.StringRedisTemplate;
import org.springframework.data.redis.hash.Jackson2HashMapper;
import org.springframework.data.redis.serializer.Jackson2JsonRedisSerializer;
import org.springframework.stereotype.Component;

import java.util.Map;

@Component
public class RedisTest {

  @Autowired
  RedisTemplate redisTemplate;

  @Autowired
  StringRedisTemplate stringRedisTemplate;

  @Autowired
  ObjectMapper objectMapper;

  // 自定义模板
  @Autowired
  @Qualifier("getMyTemplate")
  StringRedisTemplate myStringRedisTemplate;

  public void testRedis()  {
    //redis中直接查看时,乱码
    redisTemplate.opsForValue().set("key1", "hello1");
    System.out.println(redisTemplate.opsForValue().get("key1"));

    //redis中直接查看时,正常
    stringRedisTemplate.opsForValue().set("key2", "hello2");
    System.out.println(stringRedisTemplate.opsForValue().get("key2"));

    RedisConnection connection = redisTemplate.getConnectionFactory().getConnection();
    connection.set("key3".getBytes(), "hello3".getBytes());
    System.out.println(new String(connection.get("key3".getBytes())));

    HashOperations<String, Object, Object> hash = stringRedisTemplate.opsForHash();
    hash.put("key4", "name", "张三");
    hash.put("key4", "age", "18");
    System.out.println(hash.get("key4", "name"));
    System.out.println(hash.entries("key4"));

    stringRedisTemplate.setHashValueSerializer(new Jackson2JsonRedisSerializer<Object>(Object.class));
    Jackson2HashMapper jackson2HashMapper = new Jackson2HashMapper(objectMapper, false);// true 扁平化(将对象中的参数展开)
    User user = new User();
    user.setId(123);
    user.setName("zhangsan");
    stringRedisTemplate.opsForHash().putAll("key5", jackson2HashMapper.toHash(user));
    Map map = stringRedisTemplate.opsForHash().entries("key5");
    User user1 = objectMapper.convertValue(map, User.class);
    System.out.println(user1.getId());
    System.out.println(user1.getName());

    myStringRedisTemplate.opsForHash().putAll("key6", jackson2HashMapper.toHash(user));
    Map map1 = myStringRedisTemplate.opsForHash().entries("key6");
    User user2 = objectMapper.convertValue(map, User.class);
    System.out.println(user2.getId());
    System.out.println(user2.getName());

    //发布订阅
    myStringRedisTemplate.convertAndSend("qunliao", "hello");

    RedisConnection connection1 = myStringRedisTemplate.getConnectionFactory().getConnection();
    connection1.subscribe(new MessageListener() {
      @Override
      public void onMessage(Message message, byte[] bytes) {
        byte[] body = message.getBody();
        System.out.println(new String(body));
      }
    }, "qunliao".getBytes());

    while (true){
      myStringRedisTemplate.convertAndSend("qunliao", "hello");
      try {
        Thread.sleep(3000);
      } catch (InterruptedException e) {
        e.printStackTrace();
      }
    }
  }
}
package com.myspringboot.redis;

public class User {
  private int id;
  private String name;

  public int getId() {
    return id;
  }

  public void setId(int id) {
    this.id = id;
  }

  public String getName() {
    return name;
  }

  public void setName(String name) {
    this.name = name;
  }
}
到此这篇关于springboot连接Redis的教程详解的文章就介绍到这了,更多相关springboot连接Redis内容请搜索我们以前的文章或继续浏览下面的相关文章希望大家以后多多支持我们!
赞 (0)

