Python实现随机生成迷宫并自动寻路
Python深搜版:
核心在于带随机的深搜(见代码第23到27行,其实也可以用22行代替这几行代码,你可以试着把第24行的数字4改大或者改小,即调整随机程度)
import os
import random
from queue import Queue
import numpy
import colorama
from colorama import Fore, Back, Style
import sys

from bmpEditor import bmp

colorama.init()

# numpy.random.seed(1)
_xy = [0,2,0,-2,0]
size = 31
sys.setrecursionlimit(100000000)

road = set()
def dfs(curr_pos):
	road.add(curr_pos)
	# for i in numpy.random.permutation(4):
	p = [0,1,2,3]
	for i in range(4):
		l = random.randint(0,3)
		r = random.randint(0,3)
		p[l], p[r] = p[r], p[l]
	for i in p:
		next_pos = (curr_pos[0] + _xy[i], curr_pos[1] + _xy[i+1])
		if (0<=next_pos[0]<size and
			0<=next_pos[1]<size and
			next_pos not in road ):

			road.add(((curr_pos[0] + next_pos[0])/2, (curr_pos[1] + next_pos[1])/2))
			dfs(next_pos)

dfs((0,0))

q = Queue()
q.put((0,0))
ans_road = set()
def dfs_getans(curr_pos):
	# print(curr_pos)
	ans_road.add(curr_pos)
	if (size-1, size-1) in ans_road:
		return
	for i in range(4):
		next_pos = (curr_pos[0] + _xy[i]//2, curr_pos[1] + _xy[i+1]//2)
		if (0<=next_pos[0]<size and
			0<=next_pos[1]<size and
			next_pos in road and
			next_pos not in ans_road and
			(size-1, size-1) not in ans_road):

			dfs_getans(next_pos)
	if (size-1, size-1) not in ans_road:
		ans_road.remove(curr_pos)

dfs_getans((0,0))

for i in range(size):
	for j in range(size):
		print((Back.WHITE + ' ') if (i,j) in road else (Back.BLACK + ' '), end=' ')
	print()

wall_width = 2
cell_size = 6
image = bmp((size+3)*cell_size-wall_width, (size+3)*cell_size-wall_width, 0x000000)
for i in range(size+3):
	for j in range(size+3):
		if (i-1, j-1) in road:
			image.paint_rect(i*cell_size, j*cell_size, cell_size*2-wall_width, cell_size*2-wall_width, 0xffffff)

file_name = "%dmaze.bmp"%size
image.save_image(file_name)
os.system(file_name)

for p in ans_road:
	# image.paint_rect(p[0]+1, p[1]+1)
	image.paint_rect((
		p[0]+1)*cell_size + (cell_size - wall_width)//2,
		(p[1]+1)*cell_size + (cell_size - wall_width)//2,
		cell_size, cell_size,
		0xff0000
	)

file_name = "%dans.bmp"%size
image.save_image(file_name)
os.system(file_name)
效果
3131:


8181:

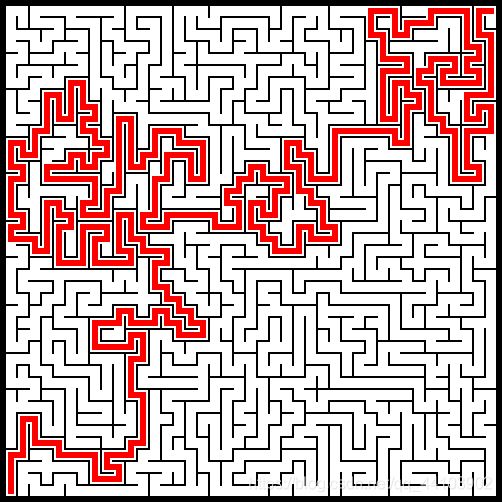
坐标系有翻转,控制台中的左上角对应图片中的左下角
其中bmpEditor不是官方库,代码地址(文件名为bmpEditor.py,和这以上代码放同一个路径下即可)
Python 广搜版
在队列的基础上把队列中的元素顺序打乱(第24行)
import os
import random
from queue import Queue
import numpy
import colorama
from colorama import Fore, Back, Style
import sys
import random

from bmpEditor import bmp
colorama.init()

numpy.random.seed(1)
_xy = [0,2,0,-2,0]
size = 59
sys.setrecursionlimit(size*size//4+size)

q = []
q.append((0,0))
road = set()
road.add((0,0))
while len(q) != 0:
	random.shuffle(q)
	curr_pos = q.pop()
	# print(curr_pos)
	for i in range(4):
		next_pos = (curr_pos[0] + _xy[i], curr_pos[1] + _xy[i+1])
		if (	0<=next_pos[0]<size and
				0<=next_pos[1]<size and
				next_pos not in road ):
			road.add( ((curr_pos[0] + next_pos[0])//2, (curr_pos[1] + next_pos[1])//2) )
			q.append(next_pos)
			road.add(next_pos)

ans_road = set()
def dfs_getans(curr_pos):
	ans_road.add(curr_pos)
	if (size-1, size-1) in ans_road:
		return
	for i in range(4):
		next_pos = (curr_pos[0] + _xy[i]//2, curr_pos[1] + _xy[i+1]//2)
		if (	0<=next_pos[0]<size and
				0<=next_pos[1]<size and
				next_pos in road and
				next_pos not in ans_road and
				(size-1, size-1) not in ans_road):
			dfs_getans(next_pos)
	if (size-1, size-1) not in ans_road:
		ans_road.remove(curr_pos)

dfs_getans((0,0))
print(len(ans_road))

for i in range(0, size):
	for j in range(0, size):
		print((Back.WHITE + ' ') if (i,j) in road else (Back.BLACK + ' '), end=' ')
	print()
wall_width = 1
cell_size = 5
image = bmp((size+3)*cell_size-wall_width, (size+3)*cell_size-wall_width, 0x000000)
for i in range(size+3):
	for j in range(size+3):
		if (i-1, j-1) in road:
			image.paint_rect(i*cell_size, j*cell_size, cell_size*2-wall_width, cell_size*2-wall_width, 0xffffff)

file_name = "%dmaze.bmp"%size
image.save_image(file_name)
os.system(file_name)

for p in ans_road:
	# image.paint_rect(p[0]+1, p[1]+1)
	image.paint_rect((
		p[0]+1)*cell_size + (cell_size - wall_width)//2,
		(p[1]+1)*cell_size + (cell_size - wall_width)//2,
		cell_size, cell_size,
		0xff0000
	)

file_name = "%dans.bmp"%size
image.save_image(file_name)
os.system(file_name)
效果:
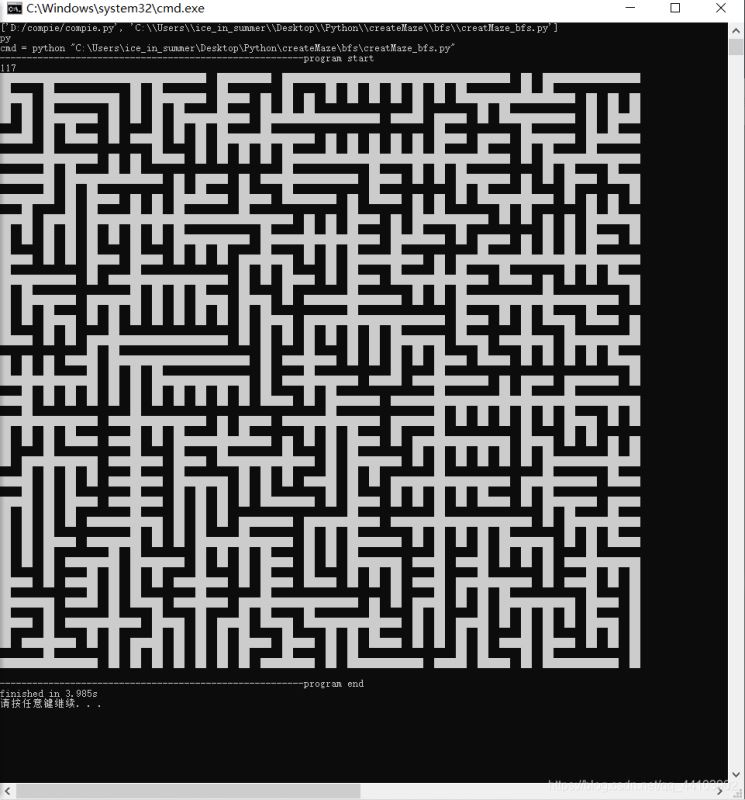

相比深度优先的,这种迷宫会更加“直”一些
lua版:
大体上是深搜,加了一定的随机性使得搜索过程中有一定概率暂时放弃当前路径。见表stop_points,(第7行、第74行及其后面的repeat循环)
local _xy = {0,2,0,-2,0}
local size = 41
local base = size+1
local road = {}

stop_points = {}
function dfs(curr_x, curr_y)
	road[curr_x*base+curr_y] = true
	if math.random(1,10) <= 3 then
		stop_points[curr_x*base+curr_y] = true
		return
	end
	-- os.execute("cls")
	-- print_map()
	local permutation = {1,2,3,4}
	for i=1, 4 do
		local l = math.random(1,4)
		local r = math.random(1,4)
		permutation[l], permutation[r] = permutation[r], permutation[l]
	end

	for i=1, 4 do
		local next_x = curr_x+_xy[permutation[i]]
		local next_y = curr_y+_xy[permutation[i]+1]
		if  next_x>=1 and next_x<=size and
			next_y>=1 and next_y<=size and
			road[next_x*base+next_y] == nil then

			local mid_x = math.floor((curr_x+next_x)/2)
			local mid_y = math.floor((curr_y+next_y)/2)
			road[mid_x*base+mid_y] = true
			dfs(next_x, next_y)
		end
	end
end

local ans_geted = false
local parent = {}
function get_ans(curr_x, curr_y)
	-- print(curr_x, curr_y)
	for i=1, 4 do
		next_x =  (curr_x + math.floor(_xy[i])/2 )
		next_y =  (curr_y + math.floor(_xy[i+1])/2 )
		-- print(next_x, next_y)
		if  next_x >= 1 and next_x <= size and
			next_y >= 1 and next_y <= size and
			road[next_x*base+next_y] and
			parent[next_x*base+next_y]==nil
		then
			parent[next_x*base+next_y] = curr_x*base+curr_y
			get_ans(next_x, next_y)
		end
	end

end

local ans_road = {}
function print_map()
	for i=0, size+1 do
		local line = ""
		for j=0, size+1 do
			if ans_road [i*base+j] then
				line = line..".."
			elseif road[i*base+j]==true then
				line = line.."  "
			else
				line = line.."HH"
			end
		end
		print(line)
	end
end

stop_points[1*base+1] = true

-- create maze
repeat
	local has_point = false
	for v,_ in pairs(stop_points) do
		has_point = true
		stop_points[v] = nil
		dfs(math.floor(v/base), v%base)
		break
	end
	-- print(has_point)
until not has_point

get_ans(1,1)
parent[1*base+1] = nil
print("")
-- for k,v in pairs(parent) do
-- 	print(string.format("[%d,%d]->[%d,%d]", math.floor(k/base), k%base, math.floor(v/base), v%base))
-- end
print("")
local x = size
local y = size
repeat
	-- print(x,y)
	ans_road[x*base+y] = true
	local v = parent[x*base+y]
	x = math.floor(v/base)
	y = v%base
until --[[(x==1 and y== 1)]] not parent[x*base+y]
ans_road[1*base+1] = true

print_map()
效果:
4141:

8989

到此这篇关于Python实现随机生成迷宫并自动寻路的文章就介绍到这了,更多相关Python生成迷宫并自动寻路内容请搜索我们以前的文章或继续浏览下面的相关文章希望大家以后多多支持我们!
相关推荐
-
PHP树的深度编历生成迷宫及A*自动寻路算法实例分析
本文实例讲述了PHP树的深度编历生成迷宫及A*自动寻路算法.分享给大家供大家参考.具体分析如下: 有一同事推荐了三思的迷宫算法,看了感觉还不错,就转成php 三思的迷宫算法是采用树的深度遍历原理,这样生成的迷宫相当的细,而且死胡同数量相对较少! 任意两点之间都存在唯一的一条通路. 至于A*寻路算法是最大众化的一全自动寻路算法 废话不多说,贴上带代码 迷宫生成类: 复制代码 代码如下: class Maze{ // Maze Create private $_w; priv
-

Javascript结合Vue实现对任意迷宫图片的自动寻路
前言 可以直接体验最终效果:https://maze-vite.vercel.app/ 寻路前: 寻路后,自动在图片上生成红色路径,蓝色是探索过的区域: 这里我故意用手机斜着角度拍,就是为了展示程序完全可以处理手机从现实拍摄的迷宫图片. 整个程序我准备用 Vue 3 + Vite 来写,但其实用不用 Vue 都一样,不会涉及复杂的界面,用别的框架甚至不用框架其实也完全可以. 二维数组,一本道 说了要从零开始,所以先尝试从非常简单的迷宫入手吧 对于我们人类来说,这个迷宫十分简单,显而易见的只有一条
-
C++ DFS算法实现走迷宫自动寻路
C++ DFS算法实现走迷宫自动寻路,供大家参考,具体内容如下 深度优先搜索百度百科解释: 事实上,深度优先搜索属于图算法的一种,英文缩写为DFS即Depth First Search.其过程简要来说是对每一个可能的分支路径深入到不能再深入为止,而且每个节点只能访问一次. 运行效果: 说明: 深度优先搜索算法是在我在图的部分接触到的,后来才发现它也可以不用在图的遍历上,它是一个独立的算法,它也可以直接用在一个二维数组上. 其算法原理和实现步骤在代码中已经有了很好的体现了,这里就不再赘述. 在程序
-
Python实现随机生成迷宫并自动寻路
Python深搜版: 核心在于带随机的深搜(见代码第23到27行,其实也可以用22行代替这几行代码,你可以试着把第24行的数字4改大或者改小,即调整随机程度) import os import random from queue import Queue import numpy import colorama from colorama import Fore, Back, Style import sys from bmpEditor import bmp colorama.init() #
-
Python深度优先算法生成迷宫
本文实例为大家分享了Python深度优先算法生成迷宫,供大家参考,具体内容如下 import random #warning: x and y confusing sx = 10 sy = 10 dfs = [[0 for col in range(sx)] for row in range(sy)] maze = [[' ' for col in range(2*sx+1)] for row in range(2*sy+1)] #1:up 2:down 3:left 4:right opera
-
Python实现随机生成有效手机号码及身份证功能示例
本文实例讲述了Python实现随机生成有效手机号码及身份证功能.分享给大家供大家参考,具体如下: 中国那么大,人那么多,几乎人手一部手机.手机号码已经作为各大互联网站的注册账户.同样,身份证更是如此.以下是生成有效手机号码和身份证号. 身份证需要下载districtcode.txt文件. 完整代码如下: import os import random import datetime BASE_DIR = os.path.dirname(os.path.dirname(__file__)) DC_
-
java图的深度优先遍历实现随机生成迷宫
最近经常在机房看同学在玩一个走迷宫的游戏,比较有趣,自己也用java写一个实现随机生成迷宫的算法,其实就是一个图的深度优先遍历算法.基本思想就是,迷宫中的每个点都有四面墙,然后呢. 1.从任意一点开始访问(我的算法中固定是从(0,0)点开始),往四个方向中的随机一个访问(每访问到一个可访问的点,就去掉该点的那个方向的墙),被访问点继续以这种方识向下进行访问. 2.对每个被访问的点都被标识为已访问,当一个点对某个方向进行访问时我们首先会判断被访问点是否已被访问,或者触到边界.如果该点四个方向皆已访
-
Python实现随机生成手机号及正则验证手机号的方法
本文实例讲述了Python实现随机生成手机号及正则验证手机号的方法.分享给大家供大家参考,具体如下: 依据 根据2017年10月份最新的手机号正则进行编码, 正则如下: (13\d|14[579]|15[^4\D]|17[^49\D]|18\d)\d{8} 代码 # -*- coding: utf-8 -*- import random def create_phone(): # 第二位数字 second = [3, 4, 5, 7, 8][random.randint(0, 4)] # 第三位
-
Python实现随机生成任意数量车牌号
之前做课设的时候舍友遇到了需要生成500w量级车牌号的问题,于是我便写了一个随机生成车牌号的程序,希望各位采纳. 注:Python实现 import random def chepaihao(len=6): char0='京津沪渝冀豫云辽黑湘皖鲁新苏浙赣鄂桂甘晋蒙陕吉闽赣粤青藏川宁琼' char1='ABCDEFGHJKLMNPQRSTUVWXYZ'#车牌号中没有I和O,可自行百度 char2='1234567890' len0=len(char0)-1 len1 = len(char1) -
-
Python+Selenium随机生成手机验证码并检查页面上是否弹出重复手机号码提示框
1.随机生成格式正确手机号码 # 随机产生格式正确的手机号码 def create_phone(self): num_start = ['134', '135', '136', '137', '138', '139', '150', '151', '152', '158', '159', '157', '182', '187', '188', '147', '130', '131', '132', '155', '156', '185', '186', '133', '153', '180',
-
Python实现随机生成算术题的示例代码
目录 前言 1.环境准备 2.主程序 3.效果展示 前言 前几天去我姐家里蹭饭吃,发现我姐家里的小外甥女儿已经上小学了,正在疯狂赶作业,加减乘除还有很多题目都经常出错. 我姐说老师每天给他们布置了作业:每天坚持做乘法和加减法混合运算.平常不仅费纸张还老是需要出题目,脑瓜子都想懵了 这我必须帮帮忙,用Python写了一段自动生成小学生计算题的代码,这下子外甥女儿应该会更喜欢我这个姨姨吧~ 1.环境准备 随机生成生成计算题,那我们便需要导入random模块. 环境安装:python 3.8: 解释器
-
C++实现随机生成迷宫地牢
可以用这个地图核心做成一个无限迷宫类的游戏 main.cpp // Author: FreeKnight 2014-09-02 #include "stdafx.h" #include <iostream> #include <string> #include <random> #include <cassert> /* 简单逻辑流程描述: 将整个地图填满土 在地图中间挖一个房间出来 选中某一房间(如果有多个的话)的墙壁 确定要修建某种新
-
python如何随机生成高强度密码
本文实例为大家分享了python随机生成高强度密码的具体代码,供大家参考,具体内容如下 import random import re # 字母类型 englishChar = ['q', 'w', 'e', 'r', 't', 'y', 'u', 'i', 'o', 'p', 'l', 'k', 'j', 'h', 'g', 'f', 'd', 's', 'a', 'z', 'x', 'c', 'v', 'b', 'n', 'm'] # 数字类型 numberChar = ['1', '2',