SpringCloud Alibaba Seata (收藏版)
一、简介
官网地址: http://seata.io/zh-cn/
1,概念
Seata是一款开源的分布式事务解决方案,致力于在微服务架构在提供高性能和简单一样的分布式事务服务。
2,处理过程
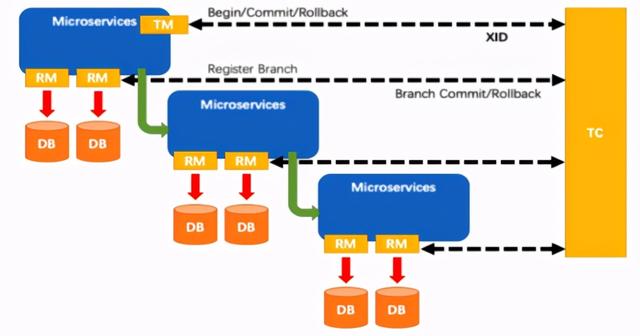
Transaction ID XID:全局唯一的事务ID
Transaction Coordinator(TC) :维护全局和分支事务的状态,驱动全局事务提交或回滚。
Transaction Manager™ :定义全局事务的范围:开始全局事务、提交或回滚全局事务。
Resource Manager(RM) :管理分支事务处理的资源,与TC交谈以注册分支事务和报告分支事务的状态,并驱动分支事务提交或回滚。

- TM向TC申请开启一个全局事务,全局事务创建成功并生成一个全局唯一的XID
- XID在微服务调用链路的上下文中传播
- RM向TC注册分支事务,将其纳入XID对应全局事务的管辖
- TM向TC发起针对XID的全局提交或回滚决议
- TC调度XID下管辖的全部分支事务完成提交或回滚请求
二、Seata-Server的安装
1,下载
http://seata.io/zh-cn/blog/download.html 选择指定版本下载(我这里用的是0.9.0)
2,修改配置文件
修改seata/conf/file.conf
#将service中修改group
vgroup_mapping.my_test_tx_group = "my_group"
#将store模块修改为db并修改数据连接,将conf目录下的db_store.sql文件导入到数据库中
mode = "db"
db {
  datasource = "dbcp"
  db-type = "mysql"
  driver-class-name = "com.mysql.jdbc.Driver"
  url = "jdbc:mysql://127.0.0.1:3306/seata"
  user = "root"
  password = "123456"
}
修改seata/conf/registry.conf
registry {
 type = "nacos"
 nacos {
  serverAddr = "localhost:8848"
  namespace = ""
  cluster = "default"
 }
三、Seata的应用
1,订单服务
源码: seata-order-service2001
a,配置pom
<!--nacos-->
<dependency>
  <groupId>com.alibaba.cloud</groupId>
  <artifactId>spring-cloud-starter-alibaba-nacos-discovery</artifactId>
</dependency>
<!--seata-->
<dependency>
  <groupId>com.alibaba.cloud</groupId>
  <artifactId>spring-cloud-starter-alibaba-seata</artifactId>
  <exclusions>
    <exclusion>
      <artifactId>seata-all</artifactId>
      <groupId>io.seata</groupId>
    </exclusion>
  </exclusions>
</dependency>
<dependency>
  <groupId>io.seata</groupId>
  <artifactId>seata-all</artifactId>
  <version>0.9.0</version>
</dependency>
<!--feign-->
<dependency>
  <groupId>org.springframework.cloud</groupId>
  <artifactId>spring-cloud-starter-openfeign</artifactId>
</dependency>
<!--web-actuator-->
<dependency>
  <groupId>org.springframework.boot</groupId>
  <artifactId>spring-boot-starter-web</artifactId>
</dependency>
<dependency>
  <groupId>org.springframework.boot</groupId>
  <artifactId>spring-boot-starter-actuator</artifactId>
</dependency>
<!--mysql-druid-->
<dependency>
  <groupId>mysql</groupId>
  <artifactId>mysql-connector-java</artifactId>
  <version>5.1.37</version>
</dependency>
<dependency>
  <groupId>com.alibaba</groupId>
  <artifactId>druid-spring-boot-starter</artifactId>
  <version>1.1.10</version>
</dependency>
<dependency>
  <groupId>org.mybatis.spring.boot</groupId>
  <artifactId>mybatis-spring-boot-starter</artifactId>
  <version>2.0.0</version>
</dependency>
b,配置yaml
server:
 port: 2001

spring:
 application:
  name: seata-order-service
 cloud:
  alibaba:
   seata:
    #自定义事务组名称需要与seata-server中的对应
    tx-service-group: my_group
  nacos:
   discovery:
    server-addr: localhost:8848
 datasource:
  driver-class-name: com.mysql.jdbc.Driver
  url: jdbc:mysql://localhost:3306/seata_order
  username: root
  password: 123456

feign:
 hystrix:
  enabled: false

logging:
 level:
  io:
   seata: info

mybatis:
 mapperLocations: classpath:mapper/*.xml
c,添加file.conf(与seata-server配置相同)
transport {
 # tcp udt unix-domain-socket
 type = "TCP"
 #NIO NATIVE
 server = "NIO"
 #enable heartbeat
 heartbeat = true
 #thread factory for netty
 thread-factory {
  boss-thread-prefix = "NettyBoss"
  worker-thread-prefix = "NettyServerNIOWorker"
  server-executor-thread-prefix = "NettyServerBizHandler"
  share-boss-worker = false
  client-selector-thread-prefix = "NettyClientSelector"
  client-selector-thread-size = 1
  client-worker-thread-prefix = "NettyClientWorkerThread"
  # netty boss thread size,will not be used for UDT
  boss-thread-size = 1
  #auto default pin or 8
  worker-thread-size = 8
 }
 shutdown {
  # when destroy server, wait seconds
  wait = 3
 }
 serialization = "seata"
 compressor = "none"
}

service {

 vgroup_mapping.my_group = "default"

 default.grouplist = "127.0.0.1:8091"
 enableDegrade = false
 disable = false
 max.commit.retry.timeout = "-1"
 max.rollback.retry.timeout = "-1"
 disableGlobalTransaction = false
}

client {
 async.commit.buffer.limit = 10000
 lock {
  retry.internal = 10
  retry.times = 30
 }
 report.retry.count = 5
 tm.commit.retry.count = 1
 tm.rollback.retry.count = 1
}

## transaction log store
store {
 ## store mode: file、db
 mode = "db"

 ## file store
 file {
  dir = "sessionStore"

  # branch session size , if exceeded first try compress lockkey, still exceeded throws exceptions
  max-branch-session-size = 16384
  # globe session size , if exceeded throws exceptions
  max-global-session-size = 512
  # file buffer size , if exceeded allocate new buffer
  file-write-buffer-cache-size = 16384
  # when recover batch read size
  session.reload.read_size = 100
  # async, sync
  flush-disk-mode = async
 }

 ## database store
 db {
  ## the implement of javax.sql.DataSource, such as DruidDataSource(druid)/BasicDataSource(dbcp) etc.
  datasource = "dbcp"
  ## mysql/oracle/h2/oceanbase etc.
  db-type = "mysql"
  driver-class-name = "com.mysql.jdbc.Driver"
  url = "jdbc:mysql://127.0.0.1:3306/seata"
  user = "root"
  password = "123456"
  min-conn = 1
  max-conn = 3
  global.table = "global_table"
  branch.table = "branch_table"
  lock-table = "lock_table"
  query-limit = 100
 }
}
lock {
 ## the lock store mode: local、remote
 mode = "remote"

 local {
  ## store locks in user's database
 }

 remote {
  ## store locks in the seata's server
 }
}
recovery {
 #schedule committing retry period in milliseconds
 committing-retry-period = 1000
 #schedule asyn committing retry period in milliseconds
 asyn-committing-retry-period = 1000
 #schedule rollbacking retry period in milliseconds
 rollbacking-retry-period = 1000
 #schedule timeout retry period in milliseconds
 timeout-retry-period = 1000
}

transaction {
 undo.data.validation = true
 undo.log.serialization = "jackson"
 undo.log.save.days = 7
 #schedule delete expired undo_log in milliseconds
 undo.log.delete.period = 86400000
 undo.log.table = "undo_log"
}

## metrics settings
metrics {
 enabled = false
 registry-type = "compact"
 # multi exporters use comma divided
 exporter-list = "prometheus"
 exporter-prometheus-port = 9898
}

support {
 ## spring
 spring {
  # auto proxy the DataSource bean
  datasource.autoproxy = false
 }
}
d,添加registry.conf(与seata-server的配置相同)
registry {
 # file 、nacos 、eureka、redis、zk、consul、etcd3、sofa
 type = "nacos"

 nacos {
  serverAddr = "localhost:8848"
  namespace = ""
  cluster = "default"
 }
 eureka {
  serviceUrl = "http://localhost:8761/eureka"
  application = "default"
  weight = "1"
 }
 redis {
  serverAddr = "localhost:6379"
  db = "0"
 }
 zk {
  cluster = "default"
  serverAddr = "127.0.0.1:2181"
  session.timeout = 6000
  connect.timeout = 2000
 }
 consul {
  cluster = "default"
  serverAddr = "127.0.0.1:8500"
 }
 etcd3 {
  cluster = "default"
  serverAddr = "http://localhost:2379"
 }
 sofa {
  serverAddr = "127.0.0.1:9603"
  application = "default"
  region = "DEFAULT_ZONE"
  datacenter = "DefaultDataCenter"
  cluster = "default"
  group = "SEATA_GROUP"
  addressWaitTime = "3000"
 }
 file {
  name = "file.conf"
 }
}

config {
 # file、nacos 、apollo、zk、consul、etcd3
 type = "file"

 nacos {
  serverAddr = "localhost"
  namespace = ""
 }
 consul {
  serverAddr = "127.0.0.1:8500"
 }
 apollo {
  app.id = "seata-server"
  apollo.meta = "http://192.168.1.204:8801"
 }
 zk {
  serverAddr = "127.0.0.1:2181"
  session.timeout = 6000
  connect.timeout = 2000
 }
 etcd3 {
  serverAddr = "http://localhost:2379"
 }
 file {
  name = "file.conf"
 }
}
e,fegin调用(这里以其中一个account为例)
@FeignClient(value = "seata-account-service")
public interface AccountService {

  @RequestMapping("/account/decrease")
  public CommonResult decrease(@RequestParam("userId") Long userId, @RequestParam("money") BigDecimal money);

}
f,事务service
@Slf4j
@Service
public class OrderServiceImpl implements OrderService {

  @Autowired
  OrderDao orderDao;
  @Autowired
  AccountService accountService;
  @Autowired
  StorageService storageService;

  @Override
  @GlobalTransactional(name = "my-order-test",rollbackFor = Exception.class) //加注解使用全局的事务,name 为事务名称不重复就行
  public Long create(Order order) {
    log.info("=========================下订单,开始");
    orderDao.create(order);
    log.info("=========================下订单,完成");

    log.info("=========================减库存,开始");
    storageService.decrease(order.getProductId(), order.getCount());
    log.info("=========================减库存,完成");

    log.info("=========================减积分,开始");
    accountService.decrease(order.getUserId(), order.getMoney());
    log.info("=========================减积分,完成");

    log.info("=========================订单状态修改,开始");
    orderDao.update(order.getId(),1);
    log.info("=========================订单状态修改,完成");

    return order.getId();
  }
}
g,启动类
2,库存服务
源码: seata-storage-service2002
与订单服务中的a,b,c,d,g配置步骤相同
3,账户服务
源码: seata-account-service2003
与库存服务的配置步骤相同
四、Seata的原理解析
参考文档: http://seata.io/zh-cn/docs/overview/what-is-seata.html
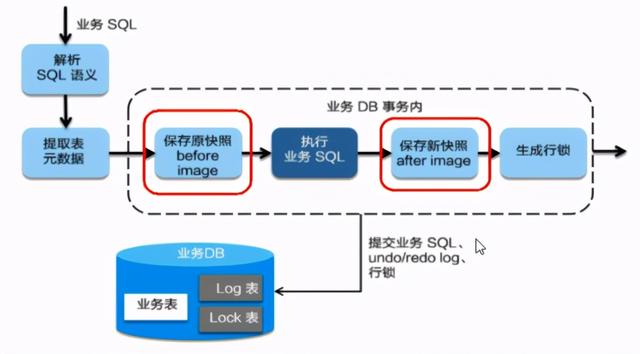
1,AT模式 一阶段
1,解析SQL语义,找到"业务SQL"要更新的业务数据,在业务数据被更新前,将其保存成"before image"
2,执行"业务SQL"更新业务数据,在业务数更新之后
3,将其保存成"after image",最后生成行锁。
以上操作全部在一个数据库事务内完成,这样保证了一阶段操作的原子性。

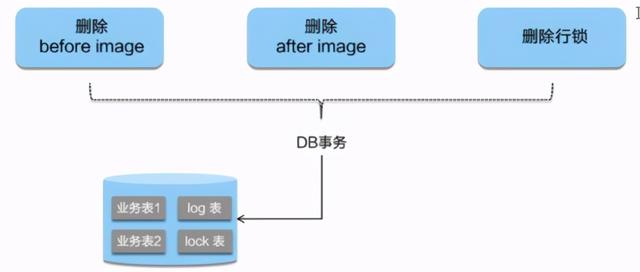
二阶段提交
因为"业务SQL"在一阶段已经提交至数据库,所以seata框架只需 将一阶段保存的快照数据和行锁删掉 ,完成数据清理即可。

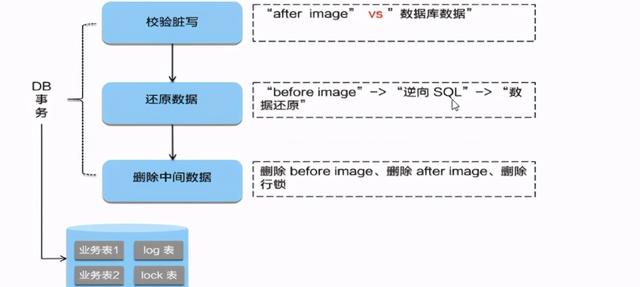
二阶段回滚
二阶段如果是回滚的话,seata就需要回滚一阶段已经执行的"业务SQL",还原业务数据。
回滚的方式便是用"before image"还原业务数据;但在还原前要首先校验脏写,对比"数据库当前业务数据"和"after image"
如果两份数据完全一致就说明没有脏写,可以还原业务数据,如果不一致就说明有脏写,出现脏写就需要转人工处理。

到此这篇关于SpringCloud Alibaba Seata 收藏来了的文章就介绍到这了,更多相关SpringCloud Alibaba Seata 内容请搜索我们以前的文章或继续浏览下面的相关文章希望大家以后多多支持我们!

