ASP.Net 之Datalist删除功能详解附代码

.aspx界面

代码如下:

<html xmlns="http://www.w3.org/1999/xhtml">
 <head runat="server">
     <title>DataList控件删除操作(支持批量删除)</title>
     <script type="text/javascript">
         function CheckAll(Obj) {
             var AllObj = document.all;
             if (Obj.checked)//全选
             {
                 for (var i = 0; i < AllObj.length; i++) {
                     if (AllObj[i].type == "checkbox") {
                         AllObj[i].checked = true;
                     }
                 }
             }
             else//反选
             {
                 for (var i = 0; i < AllObj.length; i++) {
                     if (AllObj[i].type == "checkbox") {
                         AllObj[i].checked = false;
                     }
                 }
             }
         }

</script>
 </head>
 <body>
     <form id="form1" runat="server">
     <div>
     <fieldset style="text-align: center; width: 540px;">
     <legend style=" text-align:center; ">使用Datalist删除数据(支持批量删除)</legend>

<asp:DataList ID="DataList1" runat="server"
             onitemcommand="DataList1_ItemCommand" DataKeyField="id">
        <HeaderTemplate>
        <div style="text-align:center">
        <table border = "1" cellpadding="0" cellspacing="0"  style=" font-size:12; width:500px"  >
         <tr>
             <td style="width:100px">全选/反选<input id="Checkbox1" type="checkbox" name="全选" value="全选" onclick="return CheckAll(this)" title="全选" /></td>
             <td style="width:100px">用户编号</td>
             <td style="width:100px">用户昵称</td>
             <td style="width:100px">个性签名</td>
             <td style="width:100px">删除</td>
         </tr>
        </table>
        </div>
        </HeaderTemplate>

<ItemTemplate>
            <div style="text-align:center">
            <table border = "1" cellpadding="0" cellspacing="0"  style=" font-size:12; width:500px"  >
                 <tr>
                 <td style="width:100px"> <asp:CheckBox ID="CheckBox2" runat="server" /></td>
                 <td style="width:100px"><asp:Label ID="Label1" runat="server" Text='<%# Eval("id") %>'></asp:Label></td>
                 <td style="width:100px"><asp:Label ID="Label2" runat="server" Text='<%# Eval("bg_name") %>'></asp:Label></td>
                 <td style="width:100px"><asp:Label ID="Label3" runat="server" Text='<%# Eval("bg_p_autograph") %>'></asp:Label></td>
                 <td style="width:100px"><asp:Button ID="btnDelete" runat="server" Text="删除"  CommandName="delete"
                        BorderStyle="None" onclientclick="return confirm("确认删除?");" /></td><%--请注意此处的CommandName命令--%>
                </tr>
             </table>
             </div>
            </ItemTemplate>
            <FooterTemplate>
                 <div style="text-align:center">
                     <table border="1" cellpadding="0" cellspacing="0" style="font-size:12px; width:100%">
                         <tr>
                         <td style="width:100%; text-align:center">
                             <asp:Button ID="btnPLDelete" runat="server" Text="批量删除"  CommandName="pldelete"
                                  BorderStyle="None" onclientclick="return confirm("确认删除?");"  /></td>
                         </tr>
                     </table>
                 </div>
            </FooterTemplate>
        </asp:DataList>
        </fieldset>
     </div>
     </form>
 </body>
 </html>

.cs界面

代码如下:

using System;
using System.Collections.Generic;
using System.Linq;
using System.Web;
using System.Web.UI;
using System.Web.UI.WebControls;
using System.Data;
using System.Data.SqlClient;
using System.Configuration;

public partial class _Default : System.Web.UI.Page
{

////得到Web.config 中的连接放在变量中
    SqlConnection con = new SqlConnection(ConfigurationManager.ConnectionStrings["connStr"].ConnectionString);
    protected void Page_Load(object sender, EventArgs e)
    {
        if (!IsPostBack)
        {
           //调用自定义方法绑定数据到控件(为以后做MVC打下基础)
            BindDataList();
        }
    }
    //对datelist进行数据绑定
    private void BindDataList()
    {

//定义查询语句,这里最好将SQL语句在SQL中写好并验证正确确在复制粘贴过来(在对数据查询时最好只查所需的一些不需要的数据就不要取出,这样可以提高运行的效率)
        string strSql = "SELECT * FROM bg_spatial";//定义一条SQL语句
        SqlDataAdapter sda = new SqlDataAdapter(strSql, con);
        DataSet ds = new DataSet();
        sda.Fill(ds);//把执行得到的数据放在数据集中
        DataList1.DataSource = ds;
        DataList1.DataBind();

}

protected void DataList1_ItemCommand(object source, DataListCommandEventArgs e)
    {
        switch (e.CommandName)
        {
            //单条数据删除操作
            case "delete":
                //取得当前Datalist控件列
                int id = int.Parse(DataList1.DataKeys[e.Item.ItemIndex].ToString());
                string strSQL = "delete from bg_spatial where id='" + id + "'";
                if (con.State.Equals(ConnectionState.Closed))
                {
                    con.Open();//打开数据库
                }
                SqlCommand cmd = new SqlCommand(strSQL, con);
                if (Convert.ToInt32(cmd.ExecuteNonQuery())>0)
                {
                    Response.Write("<script>alert('删除成功!')</script>");
                    BindDataList();
                }
                else
                {
                    Response.Write("<script>alert('删除失败!请查找原因')</script>");
                }
                con.Close();//关闭连接
                break;
            //批量数据删除操作
            case "pldelete":
                if (con.State.Equals(ConnectionState.Closed))
                {
                    con.Open();//打开数据库
                }
                DataListItemCollection dlic = DataList1.Items;//创建一个DataList列表项集合对象
                //执行一个循环删除所选中的信息
                for (int i = 0; i < dlic.Count; i++)
                {
                    if (dlic[i].ItemType == ListItemType.AlternatingItem||dlic[i].ItemType == ListItemType.Item)
                    {
                         CheckBox cbox = (CheckBox)dlic[i].FindControl("CheckBox2");
                         if (cbox.Checked)
                        {
                            int p_id = int.Parse(DataList1.DataKeys[dlic[i].ItemIndex].ToString());
                            SqlCommand p_cmd = new SqlCommand("delete from bg_spatial where id=" + p_id , con);
                            p_cmd.ExecuteNonQuery();
                        }
                    }

}
                con.Close();
                BindDataList();
                break;
        }
    }
}

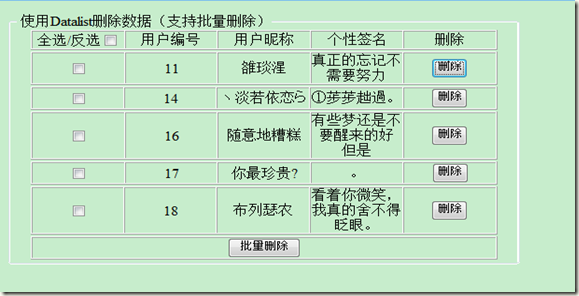
运行效果图:
(0)

相关推荐

  • asp.net datalist绑定数据后可以上移下移实现示例

    复制代码 代码如下: if (e.CommandName == "Up") { int index = e.Item.ItemIndex; string TitleID = rgZdgz.MasterTableView.DataKeyValues[index]["TitleID"].ToString().Trim(); if (e.Item.ItemIndex > 0) { ZdgzTitles.ZdgzTitlesDisPlayNum(rgZdgz.Mast

  • asp.net控件DataList分页用法

    本文实例讲述了asp.net控件DataList分页用法.分享给大家供大家参考,具体如下: protected void Page_Load(object sender, EventArgs e) { if (!IsPostBack) { ViewState["Page"] = 0; Bangding(); } } //绑定数据 public void Bangding() { PagedDataSource pds = new PagedDataSource(); pds.DataS

  • 在ASP.NET 2.0中操作数据之四十:自定义DataList编辑界面

    导言 DataList的编辑界面由EditItemTemplate里的标记语言和web控件定义.在目前为止所做的DataList编辑功能的例子里,编辑界面都只包含TextBox.在前面一章里,我们通过添加验证控件来增加了用户体验,提高了可用性. EditItemTemplate可以包含除了TextBox以外的很多控件,比如DropDownList, RadioButtonList, Calendar等.和使用TextBox一样,使用这些控件自定义编辑界面时,步骤如下: 为EditItemTemp

  • 在ASP.NET 2.0中操作数据之三十六:在DataList里编辑和删除数据概述

    导言 概述插入.更新和删除数据 里我们已经学习了如何使用GridView等控件来插入,更新删除数据.通过ObjectDataSource和其它数据控件仅仅只需要在智能标签里勾一下checkbox就完成了,不需要写任何代码.而DataList没有这些内置的功能.我们可以使用1.x 里的方法来实现这些功能.在本章我们将看到,DataList提供了一些事件和属性来完成我们的目的,为此我们需要写一些代码. 本章我们首先学习如何创建一个支持编辑和删除数据的DataList.后面的教程里我们将学习一些高级的

  • ASP.NET中利用DataList实现图片无缝滚动 实例分享

    [html] 复制代码 代码如下: <div id="demo" style="overflow: hidden; width: 441px; border: 0px">         <table width="441" height="130" border="0" cellpadding="0" cellspacing="0" backgro

  • asp.net中将数据库绑定到DataList控件的实现方法与实例代码

    解决方法1: datalist databind() 解决方法2: 查看MSDN上的详细说明资料 解决方法3: 在DataList的模板中用table表格,如: 复制代码 代码如下: <asp:DataList ID="dlDetailedInfo" runat="server" OnItemDataBound="dlDetailedInfo_ItemDataBound" Width="100%"> <Ite

  • 在ASP.NET 2.0中操作数据之三十九:在DataList的编辑界面里添加验证控件

    导言 到目前为止的讨论编辑DataList的教程里,没有包含任何验证用户的输入,即使是用户非法输入- 遗漏了product的name或者负的price- 会导致异常.在前面一章里我们学习了如何在DataList的UpdateCommand事件处理中添加异常处理代码,以便在出现异常时捕捉它并显示友好的错误信息.然而理想的编辑界面应该包含验证控件,用来在第一时间里阻止用户输入一些非法数据. 本章我们将学习在DataList的EditItemTemplate里添加验证控件从而提供一个更安全的编辑界面,

  • asp.net中Datalist使用数字分页的实现方法

    复制代码 代码如下: <%@ Page Language="C#" AutoEventWireup="true" CodeFile="Test(Datalist数字分页).aspx.cs" Inherits="Test_Datalist数字分页_" %> <!DOCTYPE html PUBLIC "-//W3C//DTD XHTML 1.0 Transitional//EN" "

  • 在ASP.NET 2.0中操作数据之三十七:DataList批量更新

    导言 在前面我们学习了如何创建item级的DataList.和可编辑的GridView一样,每个DataList里的item都包含一个Edit button,当点击时,item会变的可编辑.item级的编辑在偶尔需要更新时没什么问题,但是在有些情况下用户需要编辑大量的记录.如果一个用户需要编辑许多记录,他会被迫去不停的去点击Edit,作出修改,然后点击Update,这些大量的点击会妨碍他的工作效率.在这样的情况下,一个好的选择是提供一个完全可编辑的DataList,它的所有的item都处于编辑模

  • 在ASP.NET 2.0中操作数据之三十五:使用Repeater和DataList单页面实现主/从报表

    导言 在前面一章里我们学习了如何用两个页分别显示主/从信息.在"主"页里我们用Repeater来显示category.每个category的name都是一个链到"从"页的hyperlink.在从页里用一个两列的DataList显示选中的category下的product.本章我们将还是使用单页,在左边显示category列表,category的名字用LinkButton显示.点击其中一个时页面postback,在右边以两列的DataList显示出相关的product

随机推荐