SpringBoot Security使用MySQL实现验证与权限管理
目录
- 1. 创建用户表和虚拟凭据
- 2. 配置数据源属性
- 3. 声明弹簧安全性和MySQL JDBC驱动程序的依赖关系
- 4. 配置 JDBC 身份验证详细信息
- 5. 自定义登录验证过程
- 6. 登录页面
- 7. 测试登录和注销
- 结论
在本教程中,我将指导您如何编写代码,以使用具有基于表单的身份验证的Spring安全API来保护Spring Boot应用程序中的网页。用户详细信息存储在MySQL数据库中,并使用春季JDBC连接到数据库。我们将从本教程中的 ProductManager 项目开始,向现有的弹簧启动项目添加登录和注销功能。
1. 创建用户表和虚拟凭据
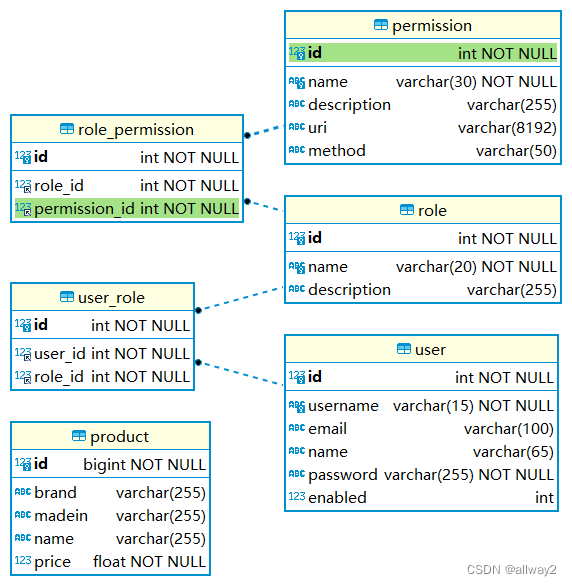
凭据应存储在数据库中,因此让我们创建新表,表间关系ER图如下:

-- --------------------------------------------------------
-- 主机:                           127.0.0.1
-- 服务器版本:                        8.0.22 - MySQL Community Server - GPL
-- 服务器操作系统:                      Win64
-- HeidiSQL 版本:                  12.1.0.6537
-- --------------------------------------------------------
/*!40101 SET @OLD_CHARACTER_SET_CLIENT=@@CHARACTER_SET_CLIENT */;
/*!40101 SET NAMES utf8 */;
/*!50503 SET NAMES utf8mb4 */;
/*!40103 SET @OLD_TIME_ZONE=@@TIME_ZONE */;
/*!40103 SET TIME_ZONE='+00:00' */;
/*!40014 SET @OLD_FOREIGN_KEY_CHECKS=@@FOREIGN_KEY_CHECKS, FOREIGN_KEY_CHECKS=0 */;
/*!40101 SET @OLD_SQL_MODE=@@SQL_MODE, SQL_MODE='NO_AUTO_VALUE_ON_ZERO' */;
/*!40111 SET @OLD_SQL_NOTES=@@SQL_NOTES, SQL_NOTES=0 */;
-- 导出 product3 的数据库结构
CREATE DATABASE IF NOT EXISTS `product3` /*!40100 DEFAULT CHARACTER SET utf8mb4 COLLATE utf8mb4_unicode_ci */ /*!80016 DEFAULT ENCRYPTION='N' */;
USE `product3`;
-- 导出  表 product3.permission 结构
CREATE TABLE IF NOT EXISTS `permission` (
  `id` int NOT NULL AUTO_INCREMENT,
  `name` varchar(30) CHARACTER SET utf8mb4 COLLATE utf8mb4_unicode_ci NOT NULL,
  `description` varchar(255) CHARACTER SET utf8mb4 COLLATE utf8mb4_unicode_ci DEFAULT NULL,
  `uri` varchar(8192) CHARACTER SET utf8mb4 COLLATE utf8mb4_unicode_ci DEFAULT NULL,
  `method` varchar(50) COLLATE utf8mb4_unicode_ci DEFAULT NULL,
  PRIMARY KEY (`id`),
  UNIQUE KEY `name` (`name`)
) ENGINE=InnoDB AUTO_INCREMENT=11 DEFAULT CHARSET=utf8mb4 COLLATE=utf8mb4_unicode_ci;
-- 正在导出表  product3.permission 的数据:~5 rows (大约)
INSERT INTO `permission` (`id`, `name`, `description`, `uri`, `method`) VALUES
	(3, 'product_create', '增加产品', '/new', 'GET'),
	(4, 'product_delete', '删除产品', '/delete/*', 'GET'),
	(5, 'product_save', '保存产品', '/save', 'POST'),
	(9, 'product_read', '读取产品', '/', 'GET'),
	(10, 'product_edit', '编辑产品', '/edit/*', 'GET');
-- 导出  表 product3.product 结构
CREATE TABLE IF NOT EXISTS `product` (
  `id` bigint NOT NULL AUTO_INCREMENT,
  `brand` varchar(255) COLLATE utf8mb4_unicode_ci DEFAULT NULL,
  `madein` varchar(255) COLLATE utf8mb4_unicode_ci DEFAULT NULL,
  `name` varchar(255) COLLATE utf8mb4_unicode_ci DEFAULT NULL,
  `price` float NOT NULL,
  PRIMARY KEY (`id`)
) ENGINE=InnoDB AUTO_INCREMENT=8 DEFAULT CHARSET=utf8mb4 COLLATE=utf8mb4_unicode_ci;
-- 正在导出表  product3.product 的数据:~2 rows (大约)
INSERT INTO `product` (`id`, `brand`, `madein`, `name`, `price`) VALUES
	(6, '6', '6', '6', 6),
	(7, '7', '7', '7', 7);
-- 导出  表 product3.role 结构
CREATE TABLE IF NOT EXISTS `role` (
  `id` int NOT NULL AUTO_INCREMENT,
  `name` varchar(20) CHARACTER SET utf8mb4 COLLATE utf8mb4_unicode_ci NOT NULL,
  `description` varchar(255) CHARACTER SET utf8mb4 COLLATE utf8mb4_unicode_ci DEFAULT NULL,
  PRIMARY KEY (`id`),
  UNIQUE KEY `name` (`name`)
) ENGINE=InnoDB AUTO_INCREMENT=4 DEFAULT CHARSET=utf8mb4 COLLATE=utf8mb4_unicode_ci;
-- 正在导出表  product3.role 的数据:~3 rows (大约)
INSERT INTO `role` (`id`, `name`, `description`) VALUES
	(1, 'ADMIN', 'Administrator role'),
	(2, 'USER_P1', 'Perfil 1'),
	(3, 'USER_P2', 'Perfil 2');
-- 导出  表 product3.role_permission 结构
CREATE TABLE IF NOT EXISTS `role_permission` (
  `id` int NOT NULL AUTO_INCREMENT,
  `role_id` int NOT NULL DEFAULT '0',
  `permission_id` int NOT NULL DEFAULT '0',
  PRIMARY KEY (`id`),
  UNIQUE KEY `role_id_permission_id` (`role_id`,`permission_id`),
  KEY `FK_role_permission_permission` (`permission_id`),
  CONSTRAINT `FK_role_permission_permission` FOREIGN KEY (`permission_id`) REFERENCES `permission` (`id`),
  CONSTRAINT `FK_role_permission_role` FOREIGN KEY (`role_id`) REFERENCES `role` (`id`)
) ENGINE=InnoDB AUTO_INCREMENT=11 DEFAULT CHARSET=utf8mb4 COLLATE=utf8mb4_unicode_ci;
-- 正在导出表  product3.role_permission 的数据:~10 rows (大约)
INSERT INTO `role_permission` (`id`, `role_id`, `permission_id`) VALUES
	(1, 1, 3),
	(2, 1, 4),
	(3, 1, 5),
	(4, 1, 9),
	(5, 1, 10),
	(8, 2, 5),
	(6, 2, 9),
	(7, 2, 10),
	(10, 3, 4),
	(9, 3, 9);
-- 导出  表 product3.urls 结构
CREATE TABLE IF NOT EXISTS `urls` (
  `name` varchar(500) COLLATE utf8mb4_unicode_ci NOT NULL,
  `description` varchar(500) COLLATE utf8mb4_unicode_ci DEFAULT NULL,
  PRIMARY KEY (`name`)
) ENGINE=InnoDB DEFAULT CHARSET=utf8mb4 COLLATE=utf8mb4_unicode_ci;
-- 正在导出表  product3.urls 的数据:~0 rows (大约)
-- 导出  表 product3.user 结构
CREATE TABLE IF NOT EXISTS `user` (
  `id` int NOT NULL AUTO_INCREMENT,
  `username` varchar(15) CHARACTER SET utf8mb4 COLLATE utf8mb4_unicode_ci NOT NULL,
  `email` varchar(100) CHARACTER SET utf8mb4 COLLATE utf8mb4_unicode_ci DEFAULT NULL,
  `name` varchar(65) CHARACTER SET utf8mb4 COLLATE utf8mb4_unicode_ci DEFAULT NULL,
  `password` varchar(255) CHARACTER SET utf8mb4 COLLATE utf8mb4_unicode_ci NOT NULL,
  `enabled` int DEFAULT NULL,
  PRIMARY KEY (`id`),
  UNIQUE KEY `username` (`username`)
) ENGINE=InnoDB AUTO_INCREMENT=4 DEFAULT CHARSET=utf8mb4 COLLATE=utf8mb4_unicode_ci;
-- 正在导出表  product3.user 的数据:~3 rows (大约)
INSERT INTO `user` (`id`, `username`, `email`, `name`, `password`, `enabled`) VALUES
	(1, 'admin', 'admin@example.com', 'Administrator', '$2a$10$2/LSmp3YoEOT97KzgrYODen7I88ErBovM2Qehw9DL1dW9DZ7DZSAm', 1),
	(2, 'u1', 'u1@example.com', 'User P1', '$2a$10$2/LSmp3YoEOT97KzgrYODen7I88ErBovM2Qehw9DL1dW9DZ7DZSAm', 1),
	(3, 'u2', 'u2@example.com', 'User P2', '$2a$10$2/LSmp3YoEOT97KzgrYODen7I88ErBovM2Qehw9DL1dW9DZ7DZSAm', 1);
-- 导出  表 product3.user_role 结构
CREATE TABLE IF NOT EXISTS `user_role` (
  `id` int NOT NULL AUTO_INCREMENT,
  `user_id` int NOT NULL DEFAULT '0',
  `role_id` int NOT NULL DEFAULT '0',
  PRIMARY KEY (`id`),
  UNIQUE KEY `user_id_role_id` (`user_id`,`role_id`),
  KEY `FK_user_role_role` (`role_id`),
  CONSTRAINT `FK_user_role_role` FOREIGN KEY (`role_id`) REFERENCES `role` (`id`),
  CONSTRAINT `FK_user_role_user` FOREIGN KEY (`user_id`) REFERENCES `user` (`id`)
) ENGINE=InnoDB AUTO_INCREMENT=4 DEFAULT CHARSET=utf8mb4 COLLATE=utf8mb4_unicode_ci;
-- 正在导出表  product3.user_role 的数据:~3 rows (大约)
INSERT INTO `user_role` (`id`, `user_id`, `role_id`) VALUES
	(1, 1, 1),
	(2, 2, 2),
	(3, 3, 3);
/*!40103 SET TIME_ZONE=IFNULL(@OLD_TIME_ZONE, 'system') */;
/*!40101 SET SQL_MODE=IFNULL(@OLD_SQL_MODE, '') */;
/*!40014 SET FOREIGN_KEY_CHECKS=IFNULL(@OLD_FOREIGN_KEY_CHECKS, 1) */;
/*!40101 SET CHARACTER_SET_CLIENT=@OLD_CHARACTER_SET_CLIENT */;
/*!40111 SET SQL_NOTES=IFNULL(@OLD_SQL_NOTES, 1) */;
2. 配置数据源属性
接下来,在应用程序属性文件中指定数据库连接信息,如下所示:根据您的MySQL数据库更新URL,用户名和密码。
spring.jpa.hibernate.ddl-auto=update
spring.datasource.url=jdbc:mysql://localhost:3306/product3?autoReconnect=true&useSSL=false&useUnicode=true&characterEncoding=UTF-8&serverTimezone=Asia/Shanghai
spring.datasource.username=root
spring.datasource.password=root
#logging.level.root=WARN
3. 声明弹簧安全性和MySQL JDBC驱动程序的依赖关系
要将Spring安全API用于项目,请在pom.xml文件中声明以下依赖项:并且要将JDBC与弹簧启动和MySQL一起使用:请注意,依赖项版本已由弹簧启动初学者父项目定义。
<?xml version="1.0" encoding="UTF-8"?>
<project xmlns="http://maven.apache.org/POM/4.0.0"
         xmlns:xsi="http://www.w3.org/2001/XMLSchema-instance"
         xsi:schemaLocation="http://maven.apache.org/POM/4.0.0 http://maven.apache.org/xsd/maven-4.0.0.xsd">
    <modelVersion>4.0.0</modelVersion>
    <parent>
        <groupId>org.springframework.boot</groupId>
        <artifactId>spring-boot-starter-parent</artifactId>
        <version>2.7.4</version>
        <relativePath /> <!-- lookup parent from repository -->
    </parent>
    <groupId>net.codejava</groupId>
    <artifactId>ProductManagerJDBCAuthenticationManuallyAuthenticateCaptchaAccess</artifactId>
    <version>2.0</version>
    <name>ProductManagerJDBCAuthenticationManuallyAuthenticateCaptchaAccess</name>
    <description>ProductManagerJDBCAuthentication</description>
    <packaging>jar</packaging>
    <properties>
        <java.version>1.8</java.version>
    </properties>
    <dependencies>
        <dependency>
            <groupId>org.springframework.boot</groupId>
            <artifactId>spring-boot-starter-data-jpa</artifactId>
        </dependency>
        <dependency>
            <groupId>org.springframework.boot</groupId>
            <artifactId>spring-boot-starter-thymeleaf</artifactId>
        </dependency>
        <dependency>
            <groupId>org.springframework.boot</groupId>
            <artifactId>spring-boot-starter-web</artifactId>
        </dependency>
        <dependency>
            <groupId>org.springframework.boot</groupId>
            <artifactId>spring-boot-devtools</artifactId>
        </dependency>
        <dependency>
            <groupId>mysql</groupId>
            <artifactId>mysql-connector-java</artifactId>
            <scope>runtime</scope>
        </dependency>
        <dependency>
            <groupId>org.springframework.boot</groupId>
            <artifactId>spring-boot-starter-security</artifactId>
        </dependency>
        <dependency>
            <groupId>org.thymeleaf.extras</groupId>
            <artifactId>thymeleaf-extras-springsecurity5</artifactId>
        </dependency>
        <dependency>
            <groupId>com.github.penggle</groupId>
            <artifactId>kaptcha</artifactId>
            <version>2.3.2</version>
        </dependency>
        <dependency>
            <groupId>org.projectlombok</groupId>
            <artifactId>lombok</artifactId>
            <version>1.18.24</version>
            <scope>provided</scope>
        </dependency>
    </dependencies>
    <build>
        <plugins>
            <plugin>
                <groupId>org.springframework.boot</groupId>
                <artifactId>spring-boot-maven-plugin</artifactId>
            </plugin>
        </plugins>
    </build>
</project>
4. 配置 JDBC 身份验证详细信息
要将 Spring 安全性与基于表单的身份验证和 JDBC 结合使用,请按如下方式创建WebSecurityConfig类:
package com.example;
import javax.sql.DataSource;
import org.springframework.beans.factory.annotation.Autowired;
import org.springframework.context.annotation.Bean;
import org.springframework.context.annotation.Configuration;
import org.springframework.http.HttpMethod;
import org.springframework.security.authentication.AuthenticationManager;
import org.springframework.security.config.annotation.authentication.builders.AuthenticationManagerBuilder;
import org.springframework.security.config.annotation.web.builders.HttpSecurity;
import org.springframework.security.config.annotation.web.configuration.EnableWebSecurity;
import org.springframework.security.config.annotation.web.configuration.WebSecurityConfigurerAdapter;
import org.springframework.security.crypto.bcrypt.BCryptPasswordEncoder;
@Configuration
@EnableWebSecurity
public class WebSecurityConfig extends WebSecurityConfigurerAdapter {
    @Autowired
    private DataSource dataSource;
    @Bean
    @Override
    public AuthenticationManager authenticationManagerBean() throws Exception {
        return super.authenticationManagerBean();
    }
    @Autowired
    public void configAuthentication(AuthenticationManagerBuilder authBuilder) throws Exception {
        authBuilder.jdbcAuthentication()
                .dataSource(dataSource)
                .passwordEncoder(new BCryptPasswordEncoder())
                .usersByUsernameQuery("select username, password, enabled from user where username=?")
                .authoritiesByUsernameQuery("SELECT user.username,permission.name FROM user,role,user_role,permission,role_permission WHERE user.id=user_role.user_id AND role.id=user_role.role_id AND role.id=role_permission.role_id AND permission.id=role_permission.permission_id  AND user.username=?");
    }
    @Override
    protected void configure(HttpSecurity http) throws Exception {
        http.authorizeRequests()
                .antMatchers("/common/**").permitAll()
                .antMatchers("/login").permitAll()
                .antMatchers("/logout").permitAll()
                .antMatchers("/verify").permitAll()
                .anyRequest()
                .access("@rbacService.hasPermission(request , authentication)")
                .and()
                .formLogin().loginPage("/login")
                .permitAll()
                .and()
                .logout().permitAll()
                .and()
                .exceptionHandling().accessDeniedPage("/403");
    }
}
此安全配置类必须使用@EnableWebSecurity注释进行批注,并且是Web 安全配置器适配器的子类。数据源对象的实例将由Spring框架创建并注入:
    @Autowired
    private DataSource dataSource;
它将从应用程序属性文件中读取数据库连接信息。要使用JDBC配置身份验证,请编写以下方法:
    @Autowired
    public void configAuthentication(AuthenticationManagerBuilder authBuilder) throws Exception {
        authBuilder.jdbcAuthentication()
                .dataSource(dataSource)
                .passwordEncoder(new BCryptPasswordEncoder())
                .usersByUsernameQuery("select username, password, enabled from users where username=?")
                .authoritiesByUsernameQuery("SELECT users.username,permissions.name FROM users,roles,users_roles,permissions,roles_permissions WHERE users.username=users_roles.username AND roles.name=users_roles.role_name AND roles.name=roles_permissions.role_name AND permissions.name=roles_permissions.permission AND users.username=?");
    }
如您所见,我们需要指定密码编码器(建议使用BCrypt),数据源和两个SQL语句:第一个根据用户名选择用户,第二个选择用户的角色。请注意,Spring安全性要求列名必须是用户名,密码,启用和角色。为了配置基于表单的身份验证,我们重写了 configure(HttpSecurity)方法,如下所示:
    @Override
    protected void configure(HttpSecurity http) throws Exception {
        http.authorizeRequests()
                .antMatchers("/edit/*", "/delete/*").hasAnyAuthority("ADMIN")
                .anyRequest().authenticated()
                .and()
                .formLogin().permitAll()
                .and()
                .logout().permitAll()
                .and()
                .exceptionHandling().accessDeniedPage("/403");
    }
在这里,我们指定所有请求都必须进行身份验证,这意味着用户必须登录才能使用该应用程序。使用Spring安全性提供的默认登录表单。要显示已登录用户的用户名,请在Thymeleaf模板文件中编写以下代码:
<div sec:authorize="isAuthenticated()">
Welcome <b><span sec:authentication="name">Username</span></b>
<i><span sec:authentication="principal.authorities">Roles</span></i>
</div>
并添加注销按钮:
            <form th:action="@{/logout}" method="post">
                <input type="submit" value="Logout" />
            </form>
如您所见,Spring Security将处理应用程序的登录和注销。我们不必编写重复的代码,只需指定一些配置即可。
5. 自定义登录验证过程
package com.example;
import org.springframework.beans.factory.annotation.Autowired;
import org.springframework.stereotype.Controller;
import org.springframework.util.StringUtils;
import org.springframework.web.bind.annotation.*;
import javax.servlet.http.HttpSession;
import org.springframework.security.authentication.AuthenticationManager;
import org.springframework.security.authentication.UsernamePasswordAuthenticationToken;
import org.springframework.security.core.Authentication;
import org.springframework.security.core.context.SecurityContext;
import org.springframework.security.core.context.SecurityContextHolder;
import static org.springframework.security.web.context.HttpSessionSecurityContextRepository.SPRING_SECURITY_CONTEXT_KEY;
@Controller
public class LoginController {
    /**
     * 注入身份认证管理器
     */
    @Autowired
    private AuthenticationManager authenticationManager;
    @GetMapping("/login")
    public String login() {
        return "login";
    }
    @PostMapping(value = "/verify")
    public String login(@RequestParam("username") String username,
            @RequestParam("password") String password,
            @RequestParam("verifyCode") String verifyCode,
            HttpSession session) {
        System.out.println("username is:" + username);
        System.out.println("password is:" + password);
        System.out.println("verifyCode is:" + verifyCode);
        if (StringUtils.isEmpty(verifyCode)) {
            session.setAttribute("errorMsg", "The verification code cannot be empty");
            return "login";
        }
        if (StringUtils.isEmpty(username) || StringUtils.isEmpty(password)) {
            session.setAttribute("errorMsg", "User name or password cannot be empty");
            return "login";
        }
        String kaptchaCode = session.getAttribute("verifyCode") + "";
        System.out.println("kaptchaCode is:" + kaptchaCode);
        if (StringUtils.isEmpty(kaptchaCode) || !verifyCode.equals(kaptchaCode)) {
            session.setAttribute("errorMsg", "Verification code error");
            return "login";
        }
//        User user = userService.login(userName, password);
        System.out.println(username + "==" + password + "==" + verifyCode);
        // 创建用户名与密码认证对象
        UsernamePasswordAuthenticationToken token = new UsernamePasswordAuthenticationToken(username, password);
        try {
            // 调用认证方法,返回认证对象
            Authentication authenticate = authenticationManager.authenticate(token);
            // 判断是否认证成功
            if (authenticate.isAuthenticated()) {
                // 设置用户认证成功,往Session中添加认证通过信息
                SecurityContextHolder.getContext().setAuthentication(authenticate);
                SecurityContext sc = SecurityContextHolder.getContext();
                sc.setAuthentication(authenticate);
                session.setAttribute(SPRING_SECURITY_CONTEXT_KEY, sc);
                // 重定向到登录成功页面
                return "redirect:/";
            } else {
                session.setAttribute("errorMsg", "Login failed");
                return "login";
            }
        } catch (Exception ex) {
            ex.printStackTrace();
        }
        return "login";
    }
}
kaptcha验证码
package net.codejava;
import com.google.code.kaptcha.impl.DefaultKaptcha;
import org.springframework.beans.factory.annotation.Autowired;
import org.springframework.stereotype.Controller;
import org.springframework.web.bind.annotation.GetMapping;
import javax.imageio.ImageIO;
import javax.servlet.ServletOutputStream;
import javax.servlet.http.HttpServletRequest;
import javax.servlet.http.HttpServletResponse;
import java.awt.image.BufferedImage;
import java.io.ByteArrayOutputStream;
@Controller
public class KaptchaController {
    @Autowired
    private DefaultKaptcha captchaProducer;
    @GetMapping("/common/kaptcha")
    public void defaultKaptcha(HttpServletRequest httpServletRequest, HttpServletResponse httpServletResponse) throws Exception {
        byte[] captchaOutputStream = null;
        ByteArrayOutputStream imgOutputStream = new ByteArrayOutputStream();
        try {
            //Produce the verification code string and save it in the session
            String verifyCode = captchaProducer.createText();
            httpServletRequest.getSession().setAttribute("verifyCode", verifyCode);
            BufferedImage challenge = captchaProducer.createImage(verifyCode);
            ImageIO.write(challenge, "jpg", imgOutputStream);
        } catch (IllegalArgumentException e) {
            httpServletResponse.sendError(HttpServletResponse.SC_NOT_FOUND);
            return;
        }
        captchaOutputStream = imgOutputStream.toByteArray();
        httpServletResponse.setHeader("Cache-Control", "no-store");
        httpServletResponse.setHeader("Pragma", "no-cache");
        httpServletResponse.setDateHeader("Expires", 0);
        httpServletResponse.setContentType("image/jpeg");
        ServletOutputStream responseOutputStream = httpServletResponse.getOutputStream();
        responseOutputStream.write(captchaOutputStream);
        responseOutputStream.flush();
        responseOutputStream.close();
    }
}
package net.codejava;
import com.google.code.kaptcha.impl.DefaultKaptcha;
import com.google.code.kaptcha.util.Config;
import org.springframework.context.annotation.Bean;
import org.springframework.stereotype.Component;
import java.util.Properties;
@Component
public class KaptchaConfig {
    @Bean
    public DefaultKaptcha getDefaultKaptcha() {
        DefaultKaptcha defaultKaptcha = new DefaultKaptcha();
        Properties properties = new Properties();
        properties.put("kaptcha.border", "no");
        properties.put("kaptcha.textproducer.font.color", "black");
        properties.put("kaptcha.image.width", "150");
        properties.put("kaptcha.image.height", "40");
        properties.put("kaptcha.textproducer.font.size", "30");
        properties.put("kaptcha.session.key", "verifyCode");
        properties.put("kaptcha.textproducer.char.space", "5");
        Config config = new Config(properties);
        defaultKaptcha.setConfig(config);
        return defaultKaptcha;
    }
}
6. 登录页面
<!DOCTYPE html>
<html xmlns:th="http://www.thymeleaf.org">
    <head>
        <meta charset="UTF-8">
        <meta http-equiv="X-UA-Compatible" content="IE=edge">
        <meta name="viewport" content="width=device-width, initial-scale=1.0">
        <title>Bootstrap 5 Sign In Form with Image Example</title>
        <link href="https://cdn.jsdelivr.net/npm/bootstrap@5.0.2/dist/css/bootstrap.min.css" rel="external nofollow"  rel="stylesheet"
              integrity="sha384-EVSTQN3/azprG1Anm3QDgpJLIm9Nao0Yz1ztcQTwFspd3yD65VohhpuuCOmLASjC" crossorigin="anonymous">
        <script src="https://cdn.jsdelivr.net/npm/bootstrap@5.0.2/dist/js/bootstrap.bundle.min.js"
                integrity="sha384-MrcW6ZMFYlzcLA8Nl+NtUVF0sA7MsXsP1UyJoMp4YLEuNSfAP+JcXn/tWtIaxVXM"
        crossorigin="anonymous"></script>
        <link rel="stylesheet" href="https://cdn.jsdelivr.net/npm/bootstrap-icons@1.5.0/font/bootstrap-icons.css" rel="external nofollow" >
    </head>
    <body>
        <form th:action="@{/verify}" method="post">
            <div class="container-fluid vh-100" style="margin-top:50px">
                <div class="" style="margin-top:50px">
                    <div class="rounded d-flex justify-content-center">
                        <div class=" col-md-4 col-sm-12 shadow-lg p-5 bg-light">
                            <div class="text-center">
                                <h3 class="text-primary">请登录</h3>
                            </div>
                            <div class="p-4">
                                <div class="input-group mb-3">
                                    <span class="input-group-text bg-secondary"><i
                                            class="bi bi-person-fill text-white"></i></span>
                                    <input id="username" type="text" name="username" required class="form-control" placeholder="用户名">
                                </div>
                                <div class="input-group mb-3">
                                    <span class="input-group-text bg-secondary"><i
                                            class="bi bi-key-fill text-white"></i></span>
                                    <input  id="password" type="password" name="password" required class="form-control" placeholder="密码">
                                </div>
                                <div class="input-group mb-3">
                                    <span class="input-group-text bg-secondary"><i
                                            class="bi bi-lock-fill text-white"></i></span>
                                    <input type="text" name="verifyCode"  class="form-control" placeholder="输入下图中的校验码">
                                </div>
                                <div class="input-group mb-3">
                                    <span class="input-group-text bg-secondary"><i
                                            class="bi bi-image-fill text-white"></i></span>
                                    <img alt="Click the picture to refresh!" class="pointer" th:src="@{/common/kaptcha}"
                                         onclick="this.src = '/common/kaptcha?d=' + new Date() * 1">
                                </div>
                                <div class="col-12">
                                    <button type="submit" class="btn btn-primary px-4 float-end mt-4">登录</button>
                                </div>
                            </div>
                        </div>
                    </div>
                </div>
            </div>
    </body>
</html>
7. 测试登录和注销
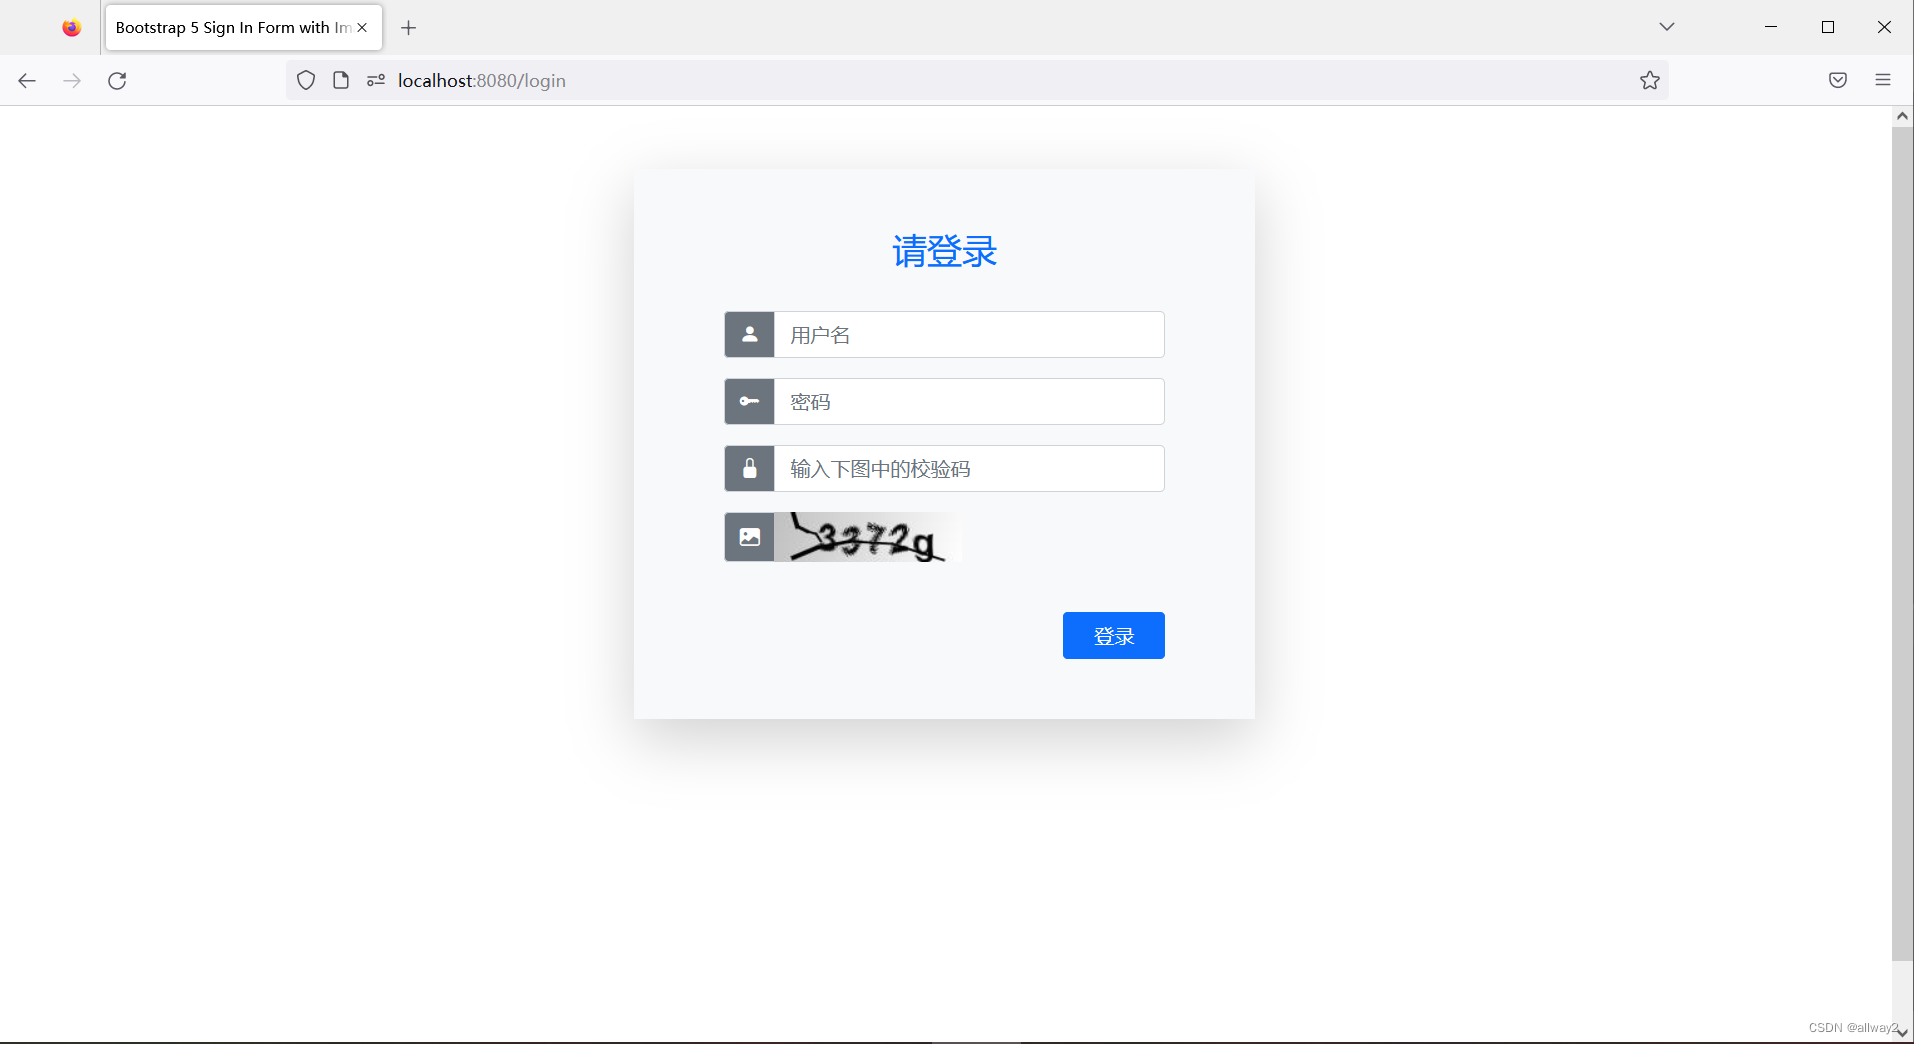
启动Spring Boot应用程序并访问 http://localhost:8080 在Web浏览器中,您将看到自定义的登录页面出现:

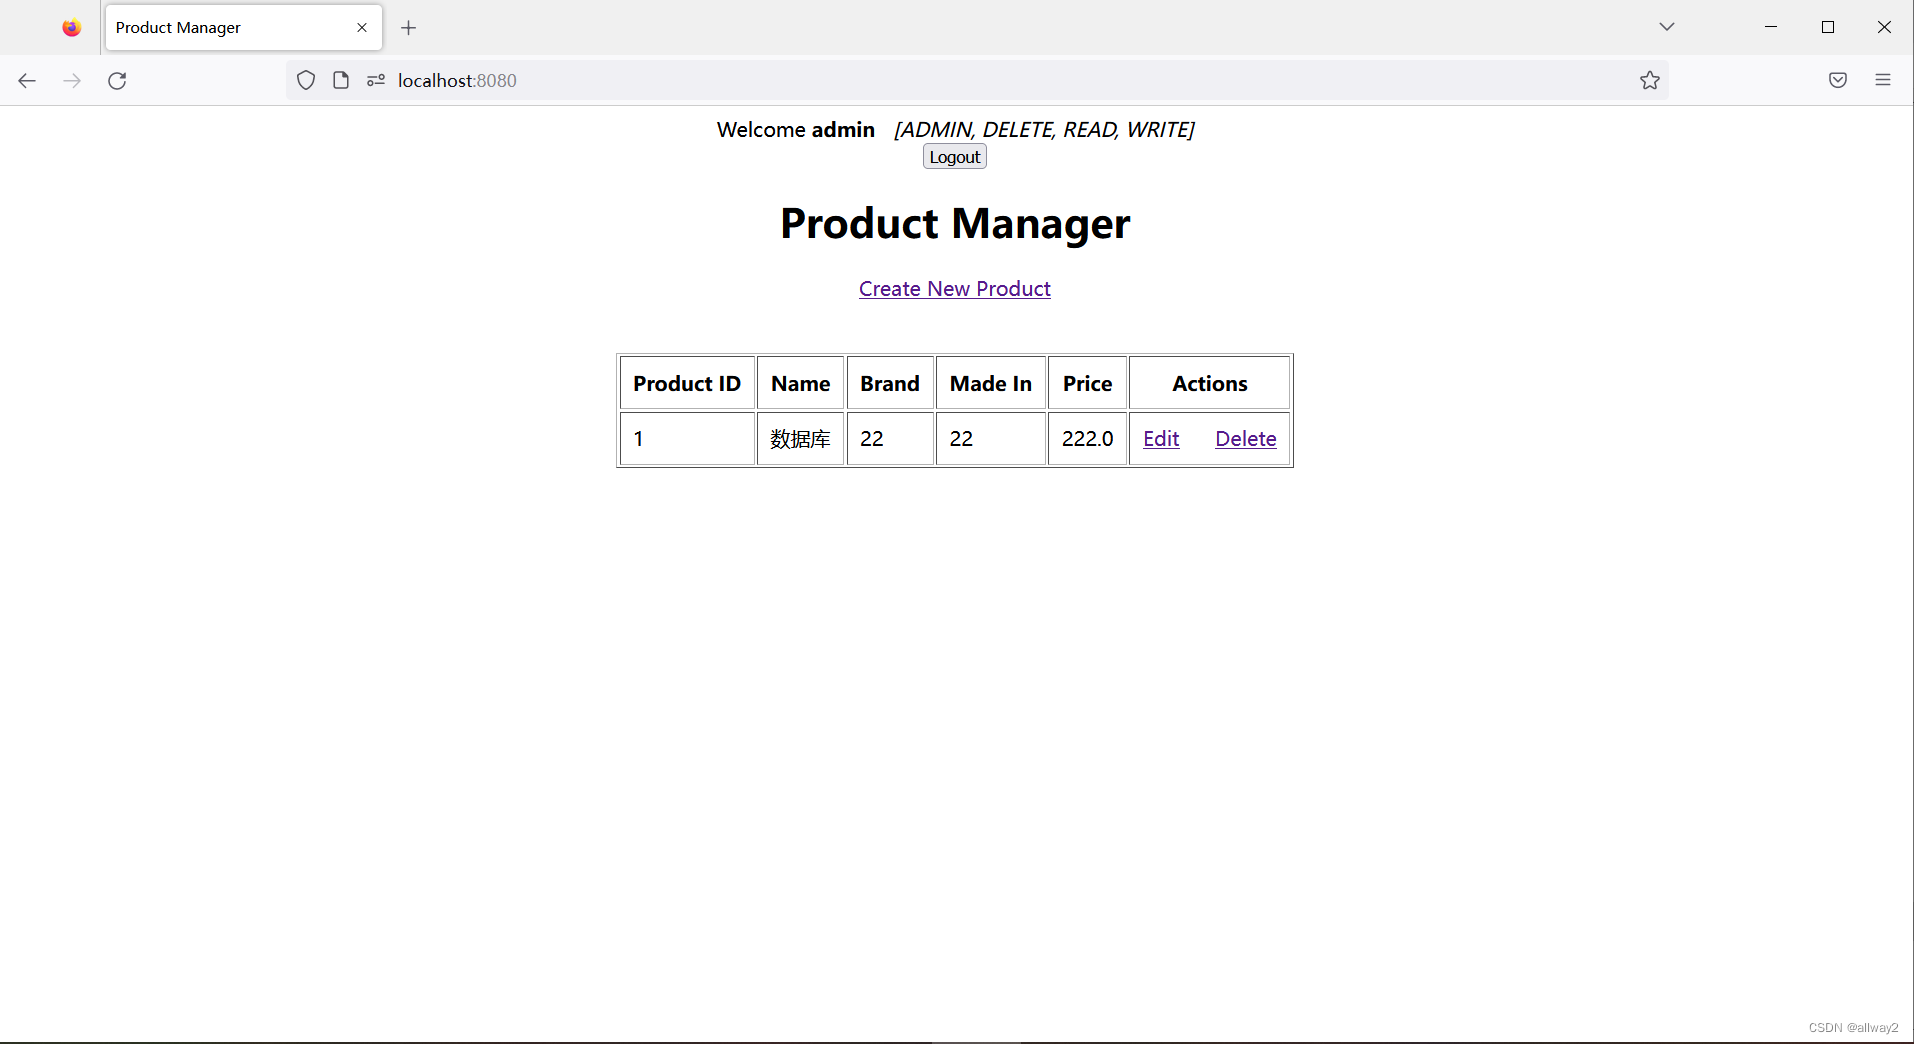
现在输入正确的用户名admin和密码admin,您将看到主页如下:

并注意欢迎消息后跟用户名。用户现在已通过身份验证以使用该应用程序。单击“注销”按钮,您将看到自定义的登录页面出现,这意味着我们已成功实现登录并注销到我们的Spring Boot应用程序。
自定义从数据库中获取动态权限验证
package com.example;
import javax.persistence.Entity;
import javax.persistence.GeneratedValue;
import javax.persistence.GenerationType;
import javax.persistence.Id;
import javax.persistence.Table;
import lombok.Data;
@Data
@Entity
public class Permission {
    @Id
    private Long id;
    private String name;
    private String description;
    private String uri;
    private String method;
}
package com.example;
import org.springframework.data.jpa.repository.JpaRepository;
public interface PermissionRepository extends JpaRepository<Permission, Long> {
    public Permission findByName(String name);
}
package com.example;
import javax.servlet.http.HttpServletRequest;
import org.springframework.security.core.Authentication;
/**
 * RBAC模型实现Security,即通过角色对用户进行分组,在对每个角色进行权限授权就, 进而简化用户权限分配以及管理。 需要的表: user:
 * 用户信息表 保存有的用户id,用户名、密码、账号、状态、salt加盐 role:角色表 user_role:用户角色关联表 permission: 权限表
 * 保存的有权限相关信息 role_permission: 角色与权限管理表
 */
public interface RbacService {
    //用户判断当前请求是否有操作权限
    boolean hasPermission(HttpServletRequest request, Authentication authentication);
}
package com.example;
import java.util.ArrayList;
import java.util.Collection;
import java.util.List;
import javax.servlet.http.HttpServletRequest;
import org.springframework.beans.factory.annotation.Autowired;
import org.springframework.security.core.Authentication;
import org.springframework.security.core.GrantedAuthority;
import org.springframework.security.core.userdetails.User;
import org.springframework.security.core.userdetails.UserDetails;
import org.springframework.stereotype.Component;
import org.springframework.util.AntPathMatcher;
@Component("rbacService")
public class RbacServiceImpl implements RbacService {
    @Autowired
    private PermissionRepository permissionRepository;
    private AntPathMatcher antPathMatcher = new AntPathMatcher();
    @Override
    public boolean hasPermission(HttpServletRequest request, Authentication authentication) {
        //获取用户认证信息
        System.out.println(authentication.getAuthorities());
        Object principal = authentication.getPrincipal();
        System.out.println(principal.getClass());
        //判断数据是否为空 以及类型是否正确
        if (null != principal && principal instanceof User) {
            String username = ((User) principal).getUsername();
            System.out.println(username);
        }
        String requestURI = request.getRequestURI();
        System.out.println(requestURI);
        String method = request.getMethod();
        System.out.println(method);
        Collection<? extends GrantedAuthority> authorities = authentication.getAuthorities();
        boolean hasPermission = false;
        for (GrantedAuthority authority : authorities) {
            String authorityname = authority.getAuthority();
            System.out.println(authority.getAuthority());
            Permission permission = permissionRepository.findByName(authorityname);
            System.out.println(permissionRepository.findByName(authorityname));
            if (null != permission && permission.getMethod().equals(request.getMethod()) && antPathMatcher.match(permission.getUri(), request.getRequestURI())) {
                hasPermission = true;
                break;
            }
        }
        System.out.println(hasPermission);
        return hasPermission;
    }
}
thymeleaf视图文件中,根据权限显示连接菜单
<!DOCTYPE html>
<html xmlns:th="http://www.thymeleaf.org"
xmlns:sec="https://www.thymeleaf.org/thymeleaf-extras-springsecurity5">
<head>
<meta charset="ISO-8859-1">
<title>Product Manager</title>
</head>
<body>
<div align="center">
<div sec:authorize="isAuthenticated()">
Welcome <b><span sec:authentication="name">Username</span></b>
<i><span sec:authentication="principal.authorities">Roles</span></i>
</div>
<form th:action="@{/logout}" method="post">
<input type="submit" value="Logout" />
</form>
<h1>Product Manager</h1>
<div sec:authorize="hasAnyAuthority('product_create')">
<a href="/new" rel="external nofollow" >Create New Product</a>
</div>
<br/><br/>
<table border="1" cellpadding="10">
<thead>
<tr>
<th>Product ID</th>
<th>Name</th>
<th>Brand</th>
<th>Made In</th>
<th>Price</th>
<th sec:authorize="hasAnyAuthority('product_edit', 'product_delete')">Actions</th>
</tr>
</thead>
<tbody>
<tr th:each="product : ${listProducts}">
<td th:text="${product.id}">Product ID</td>
<td th:text="${product.name}">Name</td>
<td th:text="${product.brand}">Brand</td>
<td th:text="${product.madein}">Made in</td>
<td th:text="${product.price}">Price</td>
<td>
<a sec:authorize="hasAuthority('product_edit')" th:href="@{'/edit/' + ${product.id}}" rel="external nofollow" >Edit</a>
<a sec:authorize="hasAuthority('product_delete')" th:href="@{'/delete/' + ${product.id}}" rel="external nofollow" >Delete</a>
</td>
</tr>
</tbody>
</table>
</div>
</body>
</html>
结论
到目前为止,您已经学会了使用基于表单的身份验证和数据库内凭据来保护Spring Boot应用程序。您会看到 Spring 安全性使实现登录和注销功能变得非常容易,并且非常方便。为方便起见,您可以下载下面的示例项目。
下载源码:传送门
到此这篇关于SpringBoot Security使用MySQL实现验证与权限管理的文章就介绍到这了,更多相关SpringBoot Security内容请搜索我们以前的文章或继续浏览下面的相关文章希望大家以后多多支持我们!

