.Net6集成IdentityServer4 +AspNetCore Identity读取数据表用户且鉴权授权管理API
目录
- 前言
- 1.创建.Net6 API程序
- 2.建立数据库连接类
- 3.Program里开始加东西(如果是历史的Net版本,是在StartUp里)
前言
IdentityServer4 实现鉴权、授权,AspNetCore Identity实现数据库用户管理表直接生成。
ps:IdentityServer4文档上最后给的例子是 // 配置使用内存存储用户信息,但使用 EF 存储客户端和资源信息,
我初步要实现的是 //数据库存储用户信息 内存存储资源 (下一步资源也放数据库 以后弄好了有机会更)
1.创建.Net6 API程序
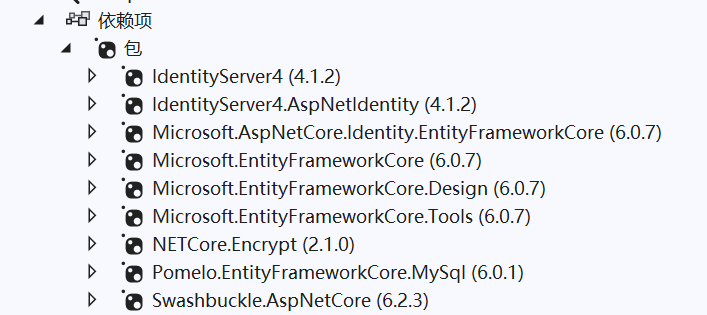
一顿引用,包括

防止图片挂掉打一遍文字:
- IdentityServer4、
- IdengtityServer4.AspNetIdentity、
- AspNetCore.Identity.EntityFrameWorkCore(生成数据库表用的)、
- EntityFrameWork+Disign+Tool三件套 (缺了不能自动迁移)、
- Pomelo.EntityFrameWorkCore.MySql(我是用的MySql,如果是SqlServer 不用这个用一个大概叫EF.Sqlserver的)、
- Encrypt (加密MD5用的 不必须)、
下面那个是自带的。
2.建立数据库连接类
using Microsoft.AspNetCore.Identity;
using Microsoft.EntityFrameworkCore;
using MyIDP;
using MyIDP.Models;
using MyIDP.Permission;

var builder = WebApplication.CreateBuilder(args);

// Add services to the container.
builder.Services.AddControllers();
// Learn more about configuring Swagger/OpenAPI at https://aka.ms/aspnetcore/swashbuckle
builder.Services.AddEndpointsApiExplorer();
builder.Services.AddSwaggerGen();

//由此重要
builder.Services.AddDbContext<IdpDbContext>(opt =>
{
    opt.UseMySql("server=127.0.0.1;Port=3306;database=AccountDb;uid=root;pwd=123456;", new MySqlServerVersion(new Version(8,0,29)));
});

builder.Services.AddIdentity<ApplicationUser, IdentityRole>()
                .AddUserManager<MyUserManager>()
                .AddEntityFrameworkStores<IdpDbContext>()
                .AddDefaultTokenProviders();

builder.Services.AddIdentityServer()
    .AddDeveloperSigningCredential()

    .AddInMemoryIdentityResources(MyIDP.IdpConfig.GetIdentityResources())
    .AddInMemoryClients(MyIDP.IdpConfig.GetClients())
    .AddInMemoryApiScopes( MyIDP.IdpConfig.GetScope())
    .AddInMemoryApiResources( MyIDP.IdpConfig.GetApiResources())    //.AddResourceOwnerValidator<MyResourceOwnerPasswordValidator>() //这句可以打开自主验证登录用户
    //.AddProfileService<MyProfileService>()
    .AddAspNetIdentity<ApplicationUser>()
    //.AddTestUsers(new List<IdentityServer4.Test.TestUser>
    //{
    //    new IdentityServer4.Test.TestUser
    //    {
    //        SubjectId="123",
    //        Username = "alice",
    //        Password = "alice",
    //        Claims = new List<Claim>() {
    //            new Claim(JwtClaimTypes.Role, "superadmin"),
    //            new Claim(JwtClaimTypes.Role, "admin")
    //        }
    //    }
    //})
    ;

var app = builder.Build();

// Configure the HTTP request pipeline.
if (app.Environment.IsDevelopment())
{
    app.UseSwagger();
    app.UseSwaggerUI();
}

app.UseIdentityServer();
app.UseAuthorization();
app.MapControllers();
app.Run();
3.Program里开始加东西(如果是历史的Net版本,是在StartUp里)
using Microsoft.AspNetCore.Identity;
using Microsoft.EntityFrameworkCore;
using MyIDP;
using MyIDP.Models;
using MyIDP.Permission;

var builder = WebApplication.CreateBuilder(args);
// Add services to the container.
builder.Services.AddControllers();
// Learn more about configuring Swagger/OpenAPI at https://aka.ms/aspnetcore/swashbuckle
builder.Services.AddEndpointsApiExplorer();
builder.Services.AddSwaggerGen();
//由此重要
builder.Services.AddDbContext<IdpDbContext>(opt =>
{
    opt.UseMySql("server=127.0.0.1;Port=3306;database=AccountDb;uid=root;pwd=123456;", new MySqlServerVersion(new Version(8,0,29)));
});
builder.Services.AddIdentity<ApplicationUser, IdentityRole>()
                .AddUserManager<MyUserManager>()
                .AddEntityFrameworkStores<IdpDbContext>()
                .AddDefaultTokenProviders();
builder.Services.AddIdentityServer()
    .AddDeveloperSigningCredential()
    .AddInMemoryIdentityResources(MyIDP.IdpConfig.GetIdentityResources())
    .AddInMemoryClients(MyIDP.IdpConfig.GetClients())
    .AddInMemoryApiScopes( MyIDP.IdpConfig.GetScope())
    .AddInMemoryApiResources( MyIDP.IdpConfig.GetApiResources())    //.AddResourceOwnerValidator<MyResourceOwnerPasswordValidator>() //这句可以打开自主验证登录用户
    //.AddProfileService<MyProfileService>()
    .AddAspNetIdentity<ApplicationUser>()
    //.AddTestUsers(new List<IdentityServer4.Test.TestUser>
    //{
    //    new IdentityServer4.Test.TestUser
    //    {
    //        SubjectId="123",
    //        Username = "alice",
    //        Password = "alice",
    //        Claims = new List<Claim>() {
    //            new Claim(JwtClaimTypes.Role, "superadmin"),
    //            new Claim(JwtClaimTypes.Role, "admin")
    //        }
    //    }
    //})
    ;
var app = builder.Build();
// Configure the HTTP request pipeline.
if (app.Environment.IsDevelopment())
{
    app.UseSwagger();
    app.UseSwaggerUI();
}
app.UseIdentityServer();
app.UseAuthorization();
app.MapControllers();
app.Run();
因为使用的是内存储存t鉴权信息的方式,所以建立IdentityServer4的配置类IdpConfig
public static class IdpConfig
    {
        public static IEnumerable<IdentityResource> GetIdentityResources()
        {
            return new IdentityResource[]
            {
                new IdentityResources.OpenId(),
                new IdentityResources.Profile(),
                new IdentityResources.Address(),
                new IdentityResources.Phone(),
                new IdentityResources.Email()
            };
        }
        public static IEnumerable<ApiResource> GetApiResources()
        {
            //return new ApiResource[]
            //{
            //    new ApiResource("api1", "My API #1",new List<string>(){JwtClaimTypes.Role})
            //};
            //新写法
            return new[]
            {
                new ApiResource("api1", "My API #1")
                {
                    Scopes = { "scope1"}
                }
            };
        }
        public static IEnumerable<Client> GetClients()
        {
            return new[]
            {
                #region MyRegion
                 //// client credentials flow client
                //new Client
                //{
                //    ClientId = "console client",
                //    ClientName = "Client Credentials Client",

                //    AllowedGrantTypes = GrantTypes.ClientCredentials,

                //    ClientSecrets = { new Secret("511536EF-F270-4058-80CA-1C89C192F69A".Sha256()) },

                //    AllowedScopes = { "api1" }
                //},

    #endregion
                // wpf client, password grant
                new Client
                {
                    ClientId = "client",
                    AllowedGrantTypes = GrantTypes.ResourceOwnerPassword,
                    ClientSecrets =
                    {
                        new Secret("secret".Sha256())
                    },
                    AllowedScopes = //允许当访问的资源
                    {
                        "scope1",
                        //"api1",
                        IdentityServerConstants.StandardScopes.OpenId,
                        IdentityServerConstants.StandardScopes.Email,
                        IdentityServerConstants.StandardScopes.Address,
                        IdentityServerConstants.StandardScopes.Phone,
                        IdentityServerConstants.StandardScopes.Profile }
                }
            };
        }
        public static IEnumerable<ApiScope> GetScope()
        {
            return new ApiScope[] {
                new ApiScope("scope1"),
                new ApiScope("scope2"),
            };
        }
    }
数据库的usernamager
public class MyUserManager : UserManager<ApplicationUser>
    {
        public MyUserManager(IUserStore<ApplicationUser> store, IOptions<IdentityOptions> optionsAccessor, IPasswordHasher<ApplicationUser> passwordHasher,
          IEnumerable<IUserValidator<ApplicationUser>> userValidators, IEnumerable<IPasswordValidator<ApplicationUser>> passwordValidators, ILookupNormalizer keyNormalizer, IdentityErrorDescriber errors, IServiceProvider services, ILogger<UserManager<ApplicationUser>> logger)
           : base(store, optionsAccessor, new MyPasswordHasher(), userValidators, passwordValidators, keyNormalizer, errors, services, logger)
        {
            optionsAccessor.Value.Password.RequireDigit = false;
            optionsAccessor.Value.Password.RequiredLength = 4;
            optionsAccessor.Value.Password.RequireLowercase = false;
            optionsAccessor.Value.Password.RequireUppercase = false;
            optionsAccessor.Value.Password.RequireNonAlphanumeric = false;
        }

    }
重写验证密码的方法类MyResourceOwnerPasswordValidator,(如果没有打开Program中的AddResourceOwnerValidator<MyResourceOwnerPasswordValidator>() 则不需要)
public class MyResourceOwnerPasswordValidator : IResourceOwnerPasswordValidator
    {
        public readonly SignInManager<ApplicationUser> signInManager;
        private readonly MyUserManager userManager;
        //public readonly IEventService service;
        public MyResourceOwnerPasswordValidator(MyUserManager userService, SignInManager<ApplicationUser> signInManager)//, IEventService service)
        {
            userManager = userService;
            this.signInManager = signInManager;
            //this.service = service;
        }
        public async Task ValidateAsync(ResourceOwnerPasswordValidationContext context)
        {
            if (string.IsNullOrEmpty(context.UserName) || string.IsNullOrEmpty(context.Password))
            {
                context.Result = new GrantValidationResult(TokenRequestErrors.InvalidGrant, "验证被拒绝,用户名或者密码为空。");
                return;
            }
            var user = await userManager.FindByNameAsync(context.UserName);
            if (user == null)
            {
                context.Result = new GrantValidationResult(TokenRequestErrors.InvalidGrant, "验证失败,不存在当前用户。");
                return;
            }
            //检验用户密码(虽然我也不知道他的密码是采用什么加密方式得到的,但是我也不需要知道)
            var passwordPass = await userManager.CheckPasswordAsync(user, context.Password);
            if (!passwordPass)
            {
                context.Result = new GrantValidationResult(TokenRequestErrors.InvalidGrant, "验证失败,用户凭证错误");
                return;
            }
            else
            {
                try
                {
                    await userManager.AddLoginAsync(user, new UserLoginInfo(user.Id, "", user.UserName));
                }
                catch (Exception ex)
                {
                    ;
                }
                finally
                {
                    context.Result = new GrantValidationResult(user.Id, GrantType.ResourceOwnerPassword, new List<Claim>() { new Claim("account", user.UserName) });
                }
            }
            return;
        }
    }
MyPasswordHasher
public class MyPasswordHasher : PasswordHasher<ApplicationUser>
    {
        public override string HashPassword(ApplicationUser user, string password)
        {
            //PasswordHasher<ApplicationUser> ph = new PasswordHasher<ApplicationUser>();
            //var pstr = ph.HashPassword(new ApplicationUser(), password);
            //return pstr;
            return password.MD5();
        }

        public override PasswordVerificationResult VerifyHashedPassword(ApplicationUser user, string hashedPassword, string providedPassword)
        {
            if (providedPassword.MD5().Equals(hashedPassword))
            {
                return PasswordVerificationResult.Success;
            }
            else
            {
                return PasswordVerificationResult.Failed;
            }
        }
    }
创建自己的User类 ApplicationUser继承 IdentityUser 复写自带的AspNetUser表
public class ApplicationUser : IdentityUser
    {
        public string MySomething { get; set; } = "";
        /// <summary>
        /// 创建时间
        /// </summary>
        public DateTime CreateTime { get; set; }
        /// <summary>
        /// 创建人Id
        /// </summary>
        public string CreatorId { get; set; } = "";
        /// <summary>
        /// 否已删除
        /// </summary>
        public bool Deleted { get; set; }
        /// <summary>
        /// 姓名
        /// </summary>
        public string RealName { get; set; }
        /// <summary>
        /// 性别
        /// </summary>
        public Sex Sex { get; set; }
        /// <summary>
        /// 出生日期
        /// </summary>
        public DateTime? Birthday { get; set; }
        /// <summary>
        /// 所属部门Id
        /// </summary>
        public string DepartmentId { get; set; } = "";
        public string OtherData { get; set; } = "";
        // 用户角色 用户权限 用户信息 用户登录tokens  重新绑定与父类的关系 命名必须和父类一致
        public virtual ICollection<IdentityUserRole<string>> UserRoles { get; set; }
        public virtual ICollection<IdentityUserClaim<string>> Claims { get; set; }
        public virtual ICollection<IdentityUserLogin<string>> Logins { get; set; }
        public virtual ICollection<IdentityUserToken<string>> Tokens { get; set; }
    }
    public enum Sex
    {
        [Description("男")]
        Man = 1,
        [Description("女")]
        Woman = 0
    }
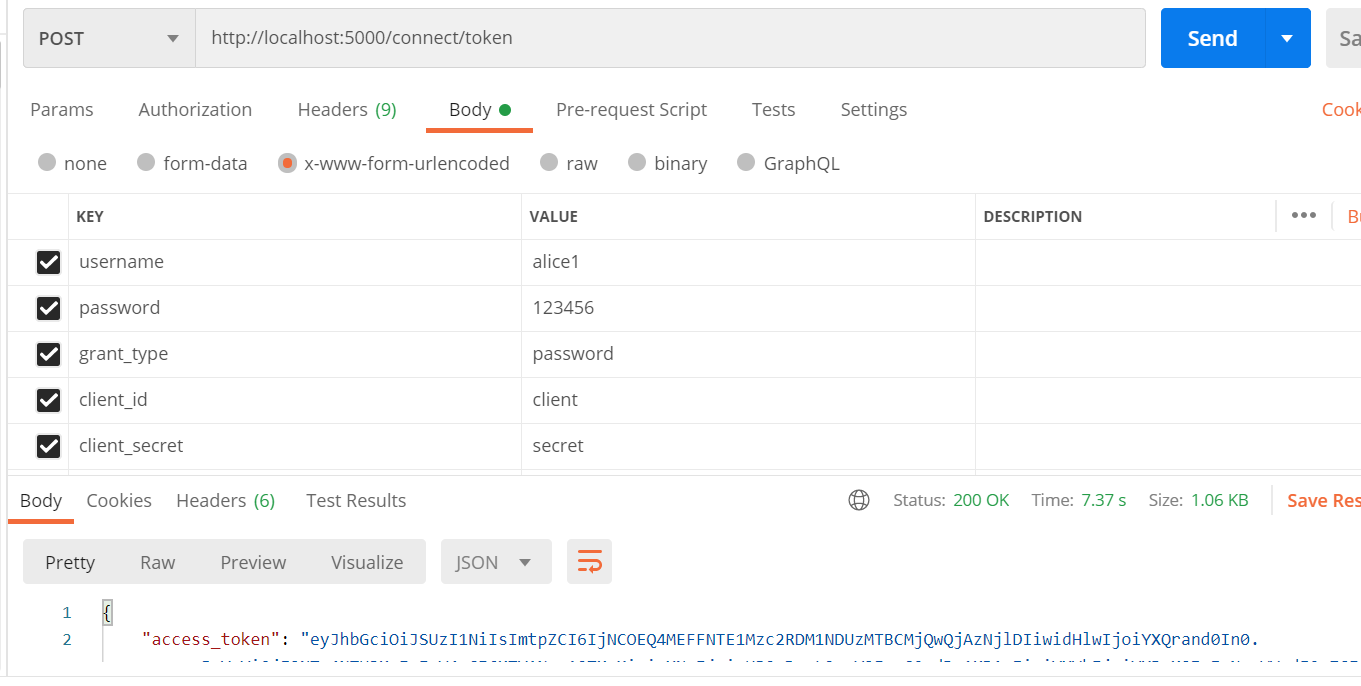
至此可以生成数据库迁移后 Postman测试一下:

到此这篇关于.Net6集成IdentityServer4 +AspNetCore Identity读取数据表用户且鉴权授权管理API的文章就介绍到这了,更多相关.Net6 读取数据表用户内容请搜索我们以前的文章或继续浏览下面的相关文章希望大家以后多多支持我们!
赞 (0)

