Android常用布局使用技巧示例讲解
目录
- 一、FrameLayout 帧布局
- 二、ConstraintLayout 约束布局
- 1、相对定位
- 2、角度定位
- 3、权重和0dp
- 4、控件排成一排平均分布(默认)
- 5、Group分组
- 6、Barrier屏障
一、FrameLayout 帧布局
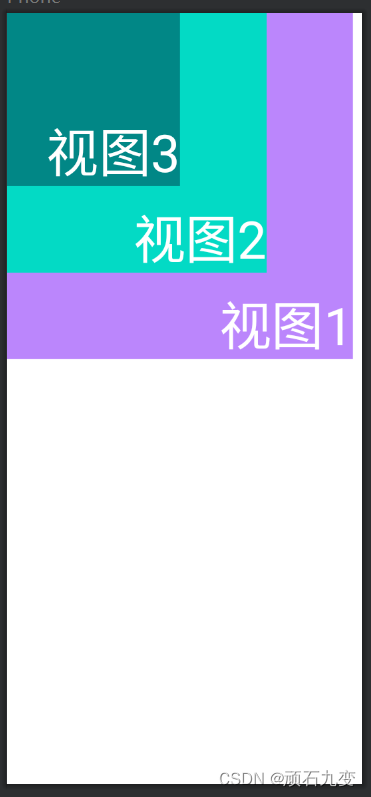
这种布局类似叠加的图片,没有任何的定位方式,当我们往里面添加组件的时候,会默认把他们放到容器的左上角。
上面的组件显示在底层,下面的组件显示在上层。
如下代码,视图1显示在最底层,视图3显示在最上层
<?xml version="1.0" encoding="utf-8"?>
<FrameLayout xmlns:android="http://schemas.android.com/apk/res/android"
    android:layout_width="match_parent"
    android:layout_height="match_parent">
    <TextView
        android:layout_width="400dp"
        android:layout_height="400dp"
        android:gravity="bottom|end"
        android:text="视图1"
        android:background="@color/purple_200"
        android:textColor="@color/white"
        android:textSize="60sp"
        />
    <TextView
        android:layout_width="300dp"
        android:layout_height="300dp"
        android:gravity="bottom|end"
        android:text="视图2"
        android:background="@color/teal_200"
        android:textColor="@color/white"
        android:textSize="60sp"
        />
    <TextView
        android:layout_width="200dp"
        android:layout_height="200dp"
        android:gravity="bottom|end"
        android:text="视图3"
        android:background="@color/teal_700"
        android:textColor="@color/white"
        android:textSize="60sp"
        />
</FrameLayout>
二、ConstraintLayout 约束布局
从 Android Studio 2.3 起,官方的模板默认使用 ConstraintLayout,它的出现主要是为了解决布局嵌套过多的问题,以灵活的方式定位和调整小部件。
ConstraintLayout和RelativeLayout有点像,比RelativeLayout更灵活,性能更出色。可以按照比例约束控件位置和尺寸,能够更好地适配屏幕大小不同的机型。
1、相对定位
常用属性:
- layout_constraintLeft_toLeftOf:左边和目标组件的左边对齐
- layout_constraintLeft_toRightOf:左边和目标组件的右边对齐
- layout_constraintRight_toLeftOf:右边和目标组件的左边对齐
- layout_constraintRight_toRightOf:右边和目标组件的右边对齐
- layout_constraintTop_toTopOf:上边和目标组件的上边对齐
- layout_constraintTop_toBottomOf:上边和目标组件的下边对齐
- layout_constraintBottom_toTopOf:下边和目标组件的上边对齐
- layout_constraintBottom_toBottomOf:下边和目标组件的下边对齐
- layout_constraintBaseline_toBaselineOf:文本基线对齐,如两个TextView的高度不一致,但是又希望他们文本对齐
- layout_constraintStart_toStartOf:同layout_constraintLeft_toLeftOf
- layout_constraintStart_toEndOf:同layout_constraintLeft_toRightOf
- layout_constraintEnd_toStartOf:同layout_constraintRight_toLeftOf
- layout_constraintEnd_toEndOf:同layout_constraintRight_toRightOf
- layout_constraintHorizontal_bias:左右约束时的水平偏移量,可设置0-1的数值,默认0.5居中
- layout_constraintVertical_bias:上下约束时的垂直偏移量,可设置0-1的数值,默认0.5居中
- layout_constraintHorizontal_weight:水平权重值,可以是任意数值,在0dp时生效
- layout_constraintVertical_weight:垂直权重,可以是任意数值,在0dp时生效
- layout_constraintDimensionRatio:宽高比,当宽或高至少有一个尺寸被设置为0dp时可设置比例,如(1:2)

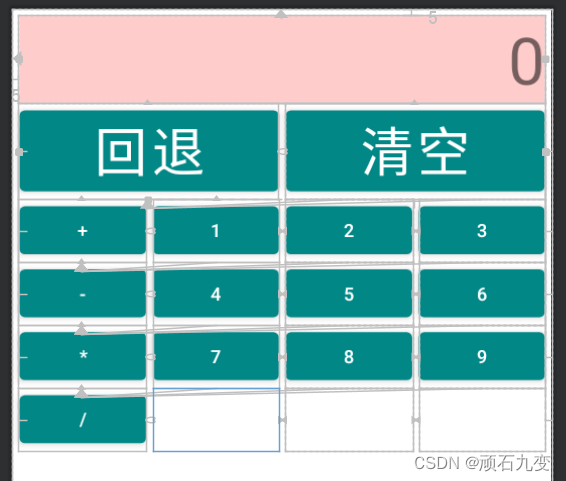
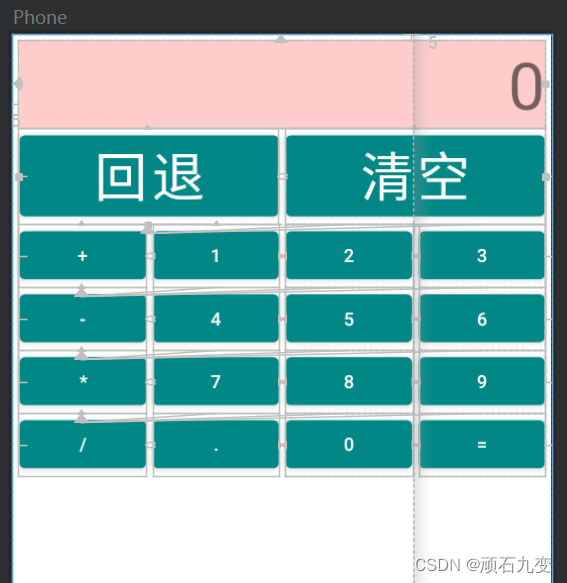
示例代码,计算器布局:
<?xml version="1.0" encoding="utf-8"?>
<androidx.constraintlayout.widget.ConstraintLayout xmlns:android="http://schemas.android.com/apk/res/android"
    xmlns:app="http://schemas.android.com/apk/res-auto"
    xmlns:tools="http://schemas.android.com/tools"
    android:layout_width="match_parent"
    android:layout_height="match_parent"
    tools:context=".MainActivity">
    <TextView
        android:id="@+id/c_view1"
        android:layout_height="wrap_content"
        android:layout_width="match_parent"
        app:layout_constraintStart_toStartOf="parent"
        app:layout_constraintTop_toTopOf="parent"
        android:layout_gravity="fill"
        android:gravity="end"
        android:layout_marginStart="5dp"
        android:layout_marginEnd="5dp"
        android:layout_marginTop="5dp"
        android:background="#FFCCCC"
        android:text="0"
        android:textSize="50sp" />
    <Button
        android:layout_height="wrap_content"
        android:layout_width="0dp"
        app:layout_constraintTop_toBottomOf="@id/c_view1"
        app:layout_constraintStart_toStartOf="@id/c_view1"
        app:layout_constraintEnd_toStartOf="@id/btn_qk"
        android:layout_marginEnd="5dp"
        android:textSize="40sp"
        android:id="@+id/btn_ht"
        android:text="回退" />
    <Button
        android:id="@+id/btn_qk"
        android:layout_height="0dp"
        android:layout_width="0dp"
        app:layout_constraintEnd_toEndOf="@id/c_view1"
        app:layout_constraintStart_toEndOf="@id/btn_ht"
        app:layout_constraintTop_toBottomOf="@id/c_view1"
        app:layout_constraintBottom_toBottomOf="@id/btn_ht"
        android:textSize="40sp"
        android:text="清空" />
    <Button android:text="+"
        android:id="@+id/btn_jia"
        android:layout_height="wrap_content"
        android:layout_width="0dp"
        android:layout_marginEnd="5dp"
        app:layout_constraintHorizontal_weight="1"
        app:layout_constraintTop_toBottomOf="@id/btn_ht"
        app:layout_constraintStart_toStartOf="@id/btn_ht"
        app:layout_constraintEnd_toStartOf="@id/btn_01"
        />
    <Button android:text="1"
        android:id="@+id/btn_01"
        android:layout_height="wrap_content"
        android:layout_width="0dp"
        android:layout_marginEnd="5dp"
        app:layout_constraintHorizontal_weight="1"
        app:layout_constraintTop_toBottomOf="@id/btn_ht"
        app:layout_constraintStart_toEndOf="@id/btn_jia"
        app:layout_constraintEnd_toStartOf="@id/btn_02"
        />
    <Button android:text="2"
        android:id="@+id/btn_02"
        android:layout_height="wrap_content"
        android:layout_width="0dp"
        android:layout_marginEnd="5dp"
        app:layout_constraintHorizontal_weight="1"
        app:layout_constraintTop_toBottomOf="@id/btn_ht"
        app:layout_constraintStart_toEndOf="@id/btn_01"
        app:layout_constraintEnd_toStartOf="@id/btn_03"
        />
    <Button android:text="3"
        android:id="@+id/btn_03"
        android:layout_height="wrap_content"
        android:layout_width="0dp"
        app:layout_constraintHorizontal_weight="1"
        app:layout_constraintTop_toBottomOf="@id/btn_ht"
        app:layout_constraintStart_toEndOf="@id/btn_02"
        app:layout_constraintEnd_toEndOf="@id/btn_qk"
        />
    <Button android:text="-"
        android:id="@+id/btn_jian"
        android:layout_height="wrap_content"
        android:layout_width="0dp"
        android:layout_marginEnd="5dp"
        app:layout_constraintHorizontal_weight="1"
        app:layout_constraintTop_toBottomOf="@id/btn_jia"
        app:layout_constraintStart_toStartOf="@id/btn_ht"
        app:layout_constraintEnd_toStartOf="@id/btn_04"
        />
    <Button android:text="4"
        android:id="@+id/btn_04"
        android:layout_height="wrap_content"
        android:layout_width="0dp"
        android:layout_marginEnd="5dp"
        app:layout_constraintHorizontal_weight="1"
        app:layout_constraintTop_toBottomOf="@id/btn_jia"
        app:layout_constraintEnd_toStartOf="@id/btn_05"
        app:layout_constraintStart_toEndOf="@id/btn_jian"
        />
    <Button android:text="5"
        android:id="@+id/btn_05"
        android:layout_height="wrap_content"
        android:layout_width="0dp"
        android:layout_marginEnd="5dp"
        app:layout_constraintHorizontal_weight="1"
        app:layout_constraintTop_toBottomOf="@id/btn_jia"
        app:layout_constraintEnd_toStartOf="@id/btn_06"
        app:layout_constraintStart_toEndOf="@id/btn_04"
        />
    <Button android:text="6"
        android:id="@+id/btn_06"
        android:layout_height="wrap_content"
        android:layout_width="0dp"
        app:layout_constraintHorizontal_weight="1"
        app:layout_constraintTop_toBottomOf="@id/btn_jia"
        app:layout_constraintStart_toEndOf="@id/btn_05"
        app:layout_constraintEnd_toEndOf="@id/btn_qk"
        />
    <Button android:text="*"
        android:id="@+id/btn_xin"
        android:layout_height="wrap_content"
        android:layout_width="0dp"
        android:layout_marginEnd="5dp"
        app:layout_constraintHorizontal_weight="1"
        app:layout_constraintTop_toBottomOf="@id/btn_jian"
        app:layout_constraintStart_toStartOf="@id/btn_ht"
        app:layout_constraintEnd_toStartOf="@id/btn_07"
        />
    <Button android:text="7"
        android:id="@+id/btn_07"
        android:layout_height="wrap_content"
        android:layout_width="0dp"
        android:layout_marginEnd="5dp"
        app:layout_constraintHorizontal_weight="1"
        app:layout_constraintTop_toBottomOf="@id/btn_jian"
        app:layout_constraintEnd_toStartOf="@id/btn_08"
        app:layout_constraintStart_toEndOf="@id/btn_xin"
        />
    <Button android:text="8"
        android:id="@+id/btn_08"
        android:layout_height="wrap_content"
        android:layout_width="0dp"
        android:layout_marginEnd="5dp"
        app:layout_constraintHorizontal_weight="1"
        app:layout_constraintTop_toBottomOf="@id/btn_jian"
        app:layout_constraintEnd_toStartOf="@id/btn_09"
        app:layout_constraintStart_toEndOf="@id/btn_07"
        />
    <Button android:text="9"
        android:id="@+id/btn_09"
        android:layout_height="wrap_content"
        android:layout_width="0dp"
        app:layout_constraintHorizontal_weight="1"
        app:layout_constraintTop_toBottomOf="@id/btn_jian"
        app:layout_constraintStart_toEndOf="@id/btn_08"
        app:layout_constraintEnd_toEndOf="@id/btn_qk"
        />
    <Button android:text="/"
        android:id="@+id/btn_chu"
        android:layout_height="wrap_content"
        android:layout_width="0dp"
        android:layout_marginEnd="5dp"
        app:layout_constraintHorizontal_weight="1"
        app:layout_constraintTop_toBottomOf="@id/btn_xin"
        app:layout_constraintStart_toStartOf="@id/btn_ht"
        app:layout_constraintEnd_toStartOf="@id/btn_dian"
        />
    <Button android:text="."
        android:id="@+id/btn_dian"
        android:layout_height="wrap_content"
        android:layout_width="0dp"
        android:layout_marginEnd="5dp"
        app:layout_constraintHorizontal_weight="1"
        app:layout_constraintTop_toBottomOf="@id/btn_xin"
        app:layout_constraintEnd_toStartOf="@id/btn_00"
        app:layout_constraintStart_toEndOf="@id/btn_chu"
        />
    <Button android:text="0"
        android:id="@+id/btn_00"
        android:layout_height="wrap_content"
        android:layout_width="0dp"
        android:layout_marginEnd="5dp"
        app:layout_constraintHorizontal_weight="1"
        app:layout_constraintTop_toBottomOf="@id/btn_xin"
        app:layout_constraintEnd_toStartOf="@id/btn_deng"
        app:layout_constraintStart_toEndOf="@id/btn_dian"
        />
    <Button android:text="="
        android:id="@+id/btn_deng"
        android:layout_height="wrap_content"
        android:layout_width="0dp"
        app:layout_constraintHorizontal_weight="1"
        app:layout_constraintTop_toBottomOf="@id/btn_xin"
        app:layout_constraintStart_toEndOf="@id/btn_00"
        app:layout_constraintEnd_toEndOf="@id/btn_qk"
        />
</androidx.constraintlayout.widget.ConstraintLayout>
2、角度定位
常用属性:
- layout_constraintCircle:角度定位参照目标组件
- layout_constraintCircleAngle:偏移角度,参照组件垂直方向往右边转动角度
- layout_constraintCircleRadius:距离

<?xml version="1.0" encoding="utf-8"?>
<androidx.constraintlayout.widget.ConstraintLayout xmlns:android="http://schemas.android.com/apk/res/android"
    xmlns:app="http://schemas.android.com/apk/res-auto"
    xmlns:tools="http://schemas.android.com/tools"
    android:layout_width="match_parent"
    android:layout_height="match_parent"
    tools:context=".MainActivity">
    <!-- 按钮1 屏幕居中 -->
    <Button
        android:id="@+id/button"
        android:layout_width="wrap_content"
        android:layout_height="wrap_content"
        android:layout_marginTop="94dp"
        android:text="按钮1"
        app:layout_constraintStart_toStartOf="parent"
        app:layout_constraintEnd_toEndOf="parent"
        app:layout_constraintTop_toTopOf="parent"
        app:layout_constraintBottom_toBottomOf="parent"
        />
    <!-- 按钮2 相对按钮1旋转120度,且距离按钮1中心点120dp -->
    <Button
        android:id="@+id/button2"
        android:layout_width="wrap_content"
        android:layout_height="wrap_content"
        android:layout_marginBottom="10dp"
        android:text="按钮2"
        app:layout_constraintCircle="@id/button"
        app:layout_constraintCircleAngle="120"
        app:layout_constraintCircleRadius="120dp" />
</androidx.constraintlayout.widget.ConstraintLayout>
3、权重和0dp
- 如果layout_width设置为0dp,那么控件就会水平铺开撑满所有空间
- 如果layout_height设置为0dp,那么控件就会垂直铺开撑满所有空间
- layout_constraintHorizontal_weight:设置权重值,可以是任意数值
4、控件排成一排平均分布(默认)
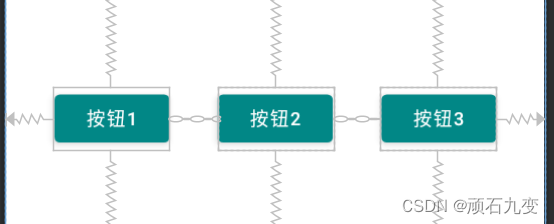
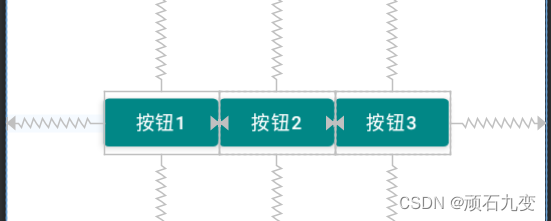
一条链的第一个控件是这条链的链头,我们可以在链头中设置layout_constraintHorizontal_chainStyle来改变整条链的样式。chains提供了3种样式,分别是:
- CHAIN_SPREAD:展开元素平均分布 (默认)
- CHAIN_SPREAD_INSIDE:展开元素,但链的两端贴近parent
- CHAIN_PACKED:链的元素将被打包在一起

<?xml version="1.0" encoding="utf-8"?>
<androidx.constraintlayout.widget.ConstraintLayout xmlns:android="http://schemas.android.com/apk/res/android"
    xmlns:app="http://schemas.android.com/apk/res-auto"
    xmlns:tools="http://schemas.android.com/tools"
    android:layout_width="match_parent"
    android:layout_height="match_parent"
    tools:context=".MainActivity">
    <Button
        android:id="@+id/button"
        android:layout_width="wrap_content"
        android:layout_height="wrap_content"
        android:text="按钮1"
        app:layout_constraintTop_toTopOf="parent"
        app:layout_constraintBottom_toBottomOf="parent"
        app:layout_constraintLeft_toLeftOf="parent"
        app:layout_constraintRight_toLeftOf="@id/button2" />
    <Button
        android:id="@+id/button2"
        android:layout_width="wrap_content"
        android:layout_height="wrap_content"
        android:text="按钮2"
        app:layout_constraintTop_toTopOf="parent"
        app:layout_constraintBottom_toBottomOf="parent"
        app:layout_constraintLeft_toRightOf="@+id/button"
        app:layout_constraintRight_toLeftOf="@id/button3"  />
    <Button
        android:id="@+id/button3"
        android:layout_width="wrap_content"
        android:layout_height="wrap_content"
        android:text="按钮3"
        app:layout_constraintTop_toTopOf="parent"
        app:layout_constraintBottom_toBottomOf="parent"
        app:layout_constraintLeft_toRightOf="@id/button2"
        app:layout_constraintRight_toRightOf="parent" />
</androidx.constraintlayout.widget.ConstraintLayout>
5、Group分组
Group可以把多个控件归为一组,方便隐藏或显示一组控件
    <androidx.constraintlayout.widget.Group
        android:id="@+id/group"
        android:layout_width="wrap_content"
        android:layout_height="wrap_content"
        android:visibility="invisible"
        app:constraint_referenced_ids="btn_deng,btn_00,btn_dian"/>
6、Barrier屏障
Barrier只是用来辅助布局,不会显示在页面上,其他组件可以和Barrier做约束。
- constraint_referenced_ids:参考的组件id列表,多个用逗号(,)隔开
- barrierDirection:屏障位于参考组件的位置,可选值(left、right、top、bottom、start、end)
    <androidx.constraintlayout.widget.Barrier
        android:id="@+id/barrier"
        android:layout_width="wrap_content"
        android:layout_height="wrap_content"
        app:barrierDirection="right"
        app:constraint_referenced_ids="btn_01,btn_02"
        />
到此这篇关于Android常用布局使用技巧示例讲解的文章就介绍到这了,更多相关Android常用布局内容请搜索我们以前的文章或继续浏览下面的相关文章希望大家以后多多支持我们!
赞 (0)

