C#实现手机拍照并且保存水印照片
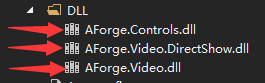
图像采集需要调用摄像头就行拍照操作,网上查了一下资料,需要引用以下3个dll。
看一下运行界面

界面都比较low,主要是功能实现。
private void Camera_Load(object sender, EventArgs e)
{
this.btnSave.Enabled = false;
try
{
borderSize = GetBorderSize(this);
captionHeight = GetCaptionHeight(this);
//InitStudent("", "", "");
this.comboBox_SizeMode.Text = "填充(保持比例)";
FilterInfoCollection infos = new FilterInfoCollection(FilterCategory.VideoInputDevice);
if ((infos != null) && (infos.Count > 0))
{
}
else
{
MessageBox.Show("没有视频设备");
}
this.LoadVedio();
this.splitContainer1.Panel2MinSize = 280;
this.splitContainer1.SplitterDistance = this.splitContainer1.Width - this.splitContainer1.Panel2MinSize + 1;
mf = new BorderForm();
mf.Show(this);
//mf.Left = (this.Left + this.splitContainer1.Panel1.Width - mf.Width) / 2;
//mf.Top = (this.Top + this.splitContainer1.Panel1.Height - mf.Height) / 2;
//marLeft = mf.Left - this.Left;
//marTop = mf.Top - this.Top;
Rectangle rtPic = this.pictureBox_Camera.RectangleToScreen(this.pictureBox_Camera.ClientRectangle);
Rectangle rtMF = this.mf.RectangleToScreen(this.mf.ClientRectangle);
if (rtPic == null || rtMF == null || rtPic.Width == 0 || rtMF.Width == 0)
{
return;
}
mf.Left = ((rtMF.Width + rtMF.Left) + (rtPic.Width + rtPic.Left)) / 2;
mf.Top = ((rtMF.Height + rtMF.Top) + (rtPic.Height + rtPic.Top)) / 2;
mf.SizeChanged += new EventHandler(mf_SizeChanged);
mf.LocationChanged += new EventHandler(mf_LocationChanged);
pictureBox_Camera_SizeChanged(sender, e);
//启动连拍
//this.ShootOneTime = 0;
this.timer1.Start();
}
catch (Exception ex)
{
MessageBox.Show(ex.Message, "错误", MessageBoxButtons.OK, MessageBoxIcon.Error);
}
}
//加载摄像头设备
private void LoadVedio()
{
FilterInfoCollection infos = new FilterInfoCollection(FilterCategory.VideoInputDevice);
if ((infos != null) && (infos.Count > 0))
{
int index = 0;
foreach (FilterInfo info in infos)
{
this.cmbCaptureDevice.Items.Add(new DeviceInfo(info.Name, info.MonikerString, index, FilterCategory.VideoInputDevice));
index++;
}
this.cmbCaptureDevice.SelectedIndex = 0;
}
}
/// <summary>
/// 拍照
/// </summary>
private void Shoot()
{
try
{
if (this.pictureBox_Camera.Image != null && (int)this.numericUpDown1.Value > 0 && (int)this.numericUpDown2.Value > 0)
{
Bitmap resultImage = new Bitmap((int)this.numericUpDown1.Value, (int)this.numericUpDown2.Value);
Graphics g = Graphics.FromImage(resultImage);
g.CopyFromScreen(new Point(this.mf.Location.X + 1, this.mf.Location.Y + 1), new Point(6, 6 + (isWin7 ? 2 : 0)), new Size(resultImage.Size.Width, resultImage.Size.Height - (6 + (isWin7 ? 2 : 0))));
if (!string.IsNullOrEmpty(XH))
{
string str = "";
if (this.XH != "")
{
str = this.XH;
}
else if (this.SFZH != "")
{
str = this.SFZH;
}
else if (this.KSH != "")
{
str = this.KSH;
}
if (this.checkBox2.Checked)
{
str = XM + " " + str;
}
int txtWidth = (int)(g.MeasureString(str, new Font("宋体", 9)).Width * 1.1);
Rectangle rec = new Rectangle((resultImage.Width - txtWidth) / 2, resultImage.Height - 16, txtWidth, 15);
g.FillRectangle(Brushes.White, rec);
StringFormat sf = new StringFormat();
sf.LineAlignment = StringAlignment.Center;
sf.Alignment = StringAlignment.Center;
rec.Height++;
g.DrawString(str, new Font("宋体", 9), Brushes.Black, rec, sf);
}
this.pictureBox_tx.Image = resultImage;
}
else
{
this.pictureBox_tx.Image = null;
}
}
catch (Exception ex)
{
MessageBox.Show(ex.Message, "", MessageBoxButtons.OK, MessageBoxIcon.Error);
}
}
//选择摄像装置
private void cmbCaptureDevice_SelectedIndexChanged(object sender, EventArgs e)
{
if (this.cmbCaptureDevice.SelectedItem != null)
{
this.cmbDeviceCapability.Items.Clear();
VideoCaptureDevice device = new VideoCaptureDevice(((DeviceInfo)this.cmbCaptureDevice.SelectedItem).MonikerString);
for (int i = 0; i < device.VideoCapabilities.Length; i++)
{
VideoCapabilities capabilities = device.VideoCapabilities[i];
DeviceCapabilityInfo item = new DeviceCapabilityInfo(capabilities.FrameSize);
this.cmbDeviceCapability.Items.Add(item);
}
DeviceInfo selectedItem = (DeviceInfo)this.cmbCaptureDevice.SelectedItem;
if (this.captureAForge != null)
{
this.captureAForge.NewFrame -= new NewFrameEventHandler(this.captureAForge_NewFrame);
//this.captureAForge.SnapshotFrame -= new NewFrameEventHandler(this.captureAForge_SnapshotFrame);
if (this.captureAForge.IsRunning)
{
this.captureAForge.SignalToStop();
}
this.captureAForge.WaitForStop();
this.captureAForge = null;
}
this.captureAForge = new VideoCaptureDevice(selectedItem.MonikerString);
this.captureAForge.ProvideSnapshots = true;
this.captureAForge.NewFrame += new NewFrameEventHandler(this.captureAForge_NewFrame);
//this.captureAForge.SnapshotFrame += new NewFrameEventHandler(this.captureAForge_SnapshotFrame);
if (this.cmbDeviceCapability.Items.Count > 0)
{
this.cmbDeviceCapability.SelectedIndex = 0;
}
}
}
//选择分辨率
private void cmbDeviceCapability_SelectedIndexChanged(object sender, EventArgs e)
{
string[] strArray = this.cmbDeviceCapability.Text.Trim().Split(new char[] { 'x' });
int width = int.Parse(strArray[0]);
int height = int.Parse(strArray[1]);
if (this.captureAForge != null)
{
if (this.captureAForge.IsRunning)
{
this.captureAForge.SignalToStop();
}
this.captureAForge.WaitForStop();
this.captureAForge.DesiredFrameSize = new Size(width, height);
this.captureAForge.DesiredSnapshotSize = new Size(width, height);
//this.captureAForge.DesiredFrameRate = 1000;
this.captureAForge.Start();
}
}
//设置数据源大小
private void comboBox_SizeMode_SelectedIndexChanged(object sender, EventArgs e)
{
switch (this.comboBox_SizeMode.Text)
{
case "默认(原始大小)":
this.pictureBox_Camera.SizeMode = PictureBoxSizeMode.Normal;
break;
case "居中(原始大小)":
this.pictureBox_Camera.SizeMode = PictureBoxSizeMode.CenterImage;
break;
case "填充(拉伸图像)":
this.pictureBox_Camera.SizeMode = PictureBoxSizeMode.StretchImage;
break;
case "填充(保持比例)":
this.pictureBox_Camera.SizeMode = PictureBoxSizeMode.Zoom;
break;
}
}
//保存照片
private void buttonSave_Click(object sender, EventArgs e)
{
try
{
string filename = Path.Combine(Application.StartupPath, "StuImages", "Newstuimages", this.XH + ".JPG");
if (!this.checkBox1.Checked && File.Exists(filename))
{
if (MessageBox.Show("该生已经有照片文件,是否覆盖? ", "", MessageBoxButtons.OKCancel, MessageBoxIcon.Warning) == DialogResult.OK)
{
//存储到本地
this.pictureBox_tx.Image.Save(filename);
//OnDataChanged(this, new DataEventArgs(string.Format("头像采集(覆盖),学号:{0},姓名:{1},考生号:{2},身份证号:{3}", this.XH, this.XM, this.KSH, this.SFZH)));
this.txtKSH.Focus();
this.txtKSH.SelectAll();
}
else
{
return;
}
}
else
{
this.pictureBox_tx.Image.Save(filename);
//OnDataChanged(this, new DataEventArgs(string.Format("头像采集,学号:{0},姓名:{1},考生号:{2},身份证号:{3}", this.XH, this.XM, this.KSH, this.SFZH)));
this.txtKSH.Focus();
this.txtKSH.SelectAll();
}
this.timer1.Start();
}
catch
{
}
finally
{
//启用下面一行,点击保存后头像会立即启动刷新
//this.timer1.Start();
this.btnSave.Enabled = false;
}
}
保存照片可以选择自动覆盖同名照片或者在照片中加入水印效果。
操作时候可以自行拖动长方形的框进行选择拍照
以上所述是小编给大家介绍的C#实现手机拍照并且保存水印照片,希望对大家有所帮助,如果大家有任何疑问请给我留言,小编会及时回复大家的。在此也非常感谢大家对我们网站的支持!
相关推荐
-
C# 添加图片水印类实现代码
复制代码 代码如下: using System; using System.Collections.Generic; using System.Text; using System.Drawing; using System.IO; using System.Drawing.Imaging; using System.Web; using System.Drawing.Drawing2D; using System.Reflection; namespace Chen { public clas
-
C#(.net)水印图片的生成完整实例
本文以一个完整实例讲述了C#水印图片的生成方法.是非常实用的技巧.分享给大家供大家参考. 具体实例代码如下: /* * * 使用说明: * 建议先定义一个WaterImage实例 * 然后利用实例的属性,去匹配需要进行操作的参数 * 然后定义一个WaterImageManage实例 * 利用WaterImageManage实例进行DrawImage(),印图片水印 * DrawWords()印文字水印 * */ using System; using System.Drawing; using
-
c#实现摄像头拍照功能示例
复制代码 代码如下: using System.Drawing;using System.Drawing.Imaging;using System;using System.Runtime.InteropServices; 复制代码 代码如下: private const int WM_USER = 0x400;private const int WS_CHILD = 0x40000000;private const int WS_VISIBLE = 0x10000000;private con
-
C#实现将网页保存成图片的网页拍照功能
本文实例主要实现了网页照相机程序的功能.C#实现将网页保存成图片格式,简单实现网页拍照,主要是基于ActiveX 组件的网页快照类,AcitveX 必须实现 IViewObject 接口.因此读者完全可扩展此类将其用于你的C#软件项目中.在此特别感谢作者:随飞提供的代码. 主要功能代码如下: using System; using System.Collections.Generic; using System.Text; using System.Runtime.InteropServices
-
.net c# gif动画如何添加图片水印实现思路及代码
复制代码 代码如下: public static Bitmap WaterMarkWithText(System.Drawing.Bitmap origialGif, string text,string filePath) { //用于存放桢 List<Frame> frames = new List<Frame>(); //如果不是gif文件,直接返回原图像 if (origialGif.RawFormat.Guid != System.Drawing.Imaging.Imag
-
C# 添加文字水印类代码
复制代码 代码如下: using System; using System.Collections.Generic; using System.Text; using System.Drawing; using System.IO; using System.Drawing.Imaging; namespace Chen { public class warterfont { public void addtexttoimg(string filename, string text) { if
-

C#实现手机拍照并且保存水印照片
图像采集需要调用摄像头就行拍照操作,网上查了一下资料,需要引用以下3个dll. 看一下运行界面 界面都比较low,主要是功能实现. private void Camera_Load(object sender, EventArgs e) { this.btnSave.Enabled = false; try { borderSize = GetBorderSize(this); captionHeight = GetCaptionHeight(this); //InitStudent("&quo
-
Androidstudio调用摄像头拍照并保存照片
本文实例为大家分享了Androidstudio调用摄像头拍照并保存照片的具体代码,供大家参考,具体内容如下 首先在manifest.xmlns文件中声明权限 <?xml version="1.0" encoding="utf-8"?> <manifest xmlns:android="http://schemas.android.com/apk/res/android" package="com.example
-
HTML5+Canvas调用手机拍照功能实现图片上传(下)
上一篇只讲到前台操作,这篇专门涉及到Java后台处理,前台通过Ajax提交将Base64编码过的图片数据信息传到Java后台,然后Java这边进行接收处理,通过对图片数据信息进行Base64解码,之后使用流将图片数据信息上传至服务器进行保存,并且将图片的路径地址存进数据库. 大家可以点此链接查看前台本地压缩上传的处理: HTML5+Canvas+jQuery调用手机拍照功能实现图片上传(上) ok,废话不多说了,直接贴代码吧. 1.前台js代码: $.ajax({ async:false,//是
-
Android手机拍照或选取图库图片作为头像
package zhangpgil.photo; import java.io.File; import android.support.v7.app.ActionBarActivity; import android.view.View; import android.widget.Button; import android.widget.ImageView; import android.widget.Toast; import android.content.Intent; import
-
Android编程实现手机拍照的方法详解
本文实例讲述了Android编程实现手机拍照的方法.分享给大家供大家参考,具体如下: 今天弄了差不多一天手机拍照,后来,边弄边想,而且现在也不知道自己知道的这些对不对,首先,如果使用此种方式拍照的话,程序在模拟器中,刚启动就会出问题,不知道什么原因,猜可能是因为是模拟器的原因,目前没有手机进行测试,这一些无法解释,代码如下: Intent intent = new Intent(MediaStore.ACTION_IMAGE_CAPTURE); startActivityForResult(in
-
Android通过手机拍照或从本地相册选取图片设置头像
像微信.QQ.微博等社交类的APP,通常都有设置头像的功能,设置头像通常有两种方式: 1.让用户通过选择本地相册之类的图片库中已有的图像,裁剪后作为头像. 2.让用户启动手机的相机拍照,拍完照片后裁剪,然后作为头像. 我现在写一个简单的完整代码例子,说明如何在android中实现上述两个头像设置功能. MainActivity.Java文件: package zhangpgil.photo; import java.io.File; import android.support.v7.app.A
-
解决android有的手机拍照后上传图片被旋转的问题
需求:做仿新浪发微博的项目,能够上传图片还有两外一个项目用到手机拍摄图片,这两个都需要把图片上传到服务器 遇到问题:有的手机拍摄的图片旋转90度,有的图片旋转了180度,有的手机是正常的,服务器要求的是正的,这样问题就来了,不能用户发个照片在微博上看到的是被旋转了的啊,另外一个项目里旋转了的图片直接匹配出现问题,这个更严重. 解决:开始的时候在网上没有找到很好的解决办法,谷歌百度的搜了一通,想到第一种解决方式,当手机拍照结束,在返回结果处理里面立即跳转到一个新的页面,在新的页面里让用户自己手动去
-
Android实现拍照添加时间水印
本文实例为大家分享了Android实现拍照添加时间水印的具体代码,供大家参考,具体内容如下 效果如下图 : 1.拍照 // 非空判断 拍照 if (mCamera0 != null){ mCamera0.takePicture(null, null, jpeg0); // 1 front } 2.创建JPEG数据回调 // 创建JPEG图片回调数据对象 public static PictureCallback jpeg0 = new P
-
HTML5+Canvas调用手机拍照功能实现图片上传(上)
因为最近一段时间,一直在弄微信项目,其中涉及到了证件上传的功能,刚开始的时候一点头绪都没有,上网查了很多资料,QQ群里面也问了不少人,很多人说如果是app程序,可以申请系统权限,然后再去调用系统底层的东西,但是微信是在浏览器里面操作的,我们自定义的页面也是通过微信内置浏览器打开的,而且微信浏览器在内部进行了很多特殊处理,屏蔽了很多东西,所以要在页面调用拍照功能或者是打开手机系统的图库目录是不可能的,当然,这些都只是大伙儿理论上的猜测而已,而在我查了两天的资料之后,发现这个问题原来是可以解决的,而
-
Android实现手机拍照功能
本文实例为大家讲解如何轻松实现Android手机拍照功能,分享给大家供大家参考.具体如下: 一.布局文件main.xml <?xml version="1.0" encoding="utf-8"?> <FrameLayout xmlns:android="http://schemas.android.com/apk/res/android" android:layout_width="fill_parent"