Android使用RecyclerView实现投票系统
本文实例为大家分享了Android投票系统的具体代码,供大家参考,具体内容如下
一、创建一个fragment_vote_list.xml用来显示投票的主页面
(1)标题栏使用Toolbar
(2)投票区域可以滑动,使用RecyclerView实现
<?xml version="1.0" encoding="utf-8"?>
<RelativeLayout xmlns:android="http://schemas.android.com/apk/res/android"
 android:layout_width="match_parent"
 android:layout_height="match_parent"
 xmlns:app="http://schemas.android.com/apk/res-auto"
 android:clickable="true"
 android:background="@color/backgroundColorWhite">
 <LinearLayout
  android:layout_width="match_parent"
  android:layout_height="match_parent"
  android:background="@color/backgroundColorWhite"
  android:orientation="vertical">
  <android.support.v7.widget.Toolbar
   android:id="@+id/vote_list_toolbar"
   android:layout_width="match_parent"
   android:layout_height="@dimen/toolbarHeight"
   android:background="@color/backgroundColorWhite"
   app:contentInsetStart="0dp">
   <RelativeLayout
    android:layout_width="match_parent"
    android:layout_height="match_parent">
    <Button
     android:id="@+id/vote_list_back_btn"
     android:layout_width="@dimen/titleBarBackWidth"
     android:layout_height="@dimen/titleBarBackHeight"
     android:layout_margin="@dimen/margin_min"
     android:layout_centerVertical="true"
     android:background="@drawable/titlebar_back"
     android:layout_marginLeft="@dimen/padding_20"
     />
    <TextView
     android:id="@+id/vote_list_title_tv"
     android:layout_width="wrap_content"
     android:layout_height="wrap_content"
     android:layout_centerInParent="true"
     android:layout_gravity="center_vertical"
     android:text="投票"
     android:textColor="@color/textcolor_28282d"
     android:textSize="@dimen/textSizeMax"
     android:textStyle="bold"/>
   </RelativeLayout>
  </android.support.v7.widget.Toolbar>

  <android.support.v7.widget.RecyclerView
   android:id="@+id/vote_list_recycleview"
   android:layout_width="match_parent"
   android:layout_height="match_parent">
  </android.support.v7.widget.RecyclerView>
 </LinearLayout>
</RelativeLayout>
注:界面字体大小以及控件宽度自行调整即可,使用RecyclerView首先需要在项目的build.gradle中添加相应的依赖库才行。添加:implementation ‘com.android.support:recyclerview-v7:24.2.1'
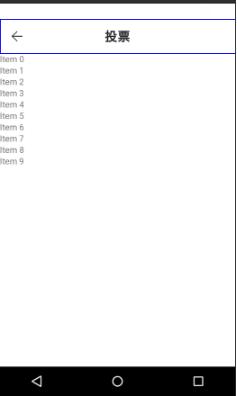
界面效果:
二、创建一个item_vote.xml用来显示投票的具体内容
(1)主布局使用LinearLayout实现,里面添加一个TextView用来显示投票的问题,使用CheckBox作为投票的多选框。
(2)将当前的Item加载到投票的主页面中
<?xml version="1.0" encoding="utf-8"?>
<LinearLayout xmlns:android="http://schemas.android.com/apk/res/android"
 android:orientation="vertical"
 android:layout_width="match_parent"
 android:layout_height="wrap_content"
 android:background="@color/backgroundColorWhite"
 >
 <TextView
  android:id="@+id/item_vote_question_tv"
  android:layout_width="wrap_content"
  android:layout_height="wrap_content"
  android:text="1.请问你支持哪一个决议?"
  android:textColor="@color/black"
  android:textSize="@dimen/item_vote_question"
  android:layout_marginLeft="@dimen/padding_20" />
 <LinearLayout
  android:layout_width="wrap_content"
  android:layout_height="wrap_content"
  android:background="@color/backgroundColorWhite"
  android:orientation="vertical"
  android:layout_margin="@dimen/padding_20">
  <CheckBox
   android:id="@+id/item_vote_answer1_cb"
   android:layout_width="wrap_content"
   android:layout_height="wrap_content"
   android:text="AAAAAA"
   android:textColor="@color/black"
   android:textSize="@dimen/item_vote_answer" />
  <CheckBox
   android:id="@+id/item_vote_answer2_cb"
   android:layout_width="wrap_content"
   android:layout_height="wrap_content"
   android:text="BBBBBBB"
   android:textColor="@color/black"
   android:textSize="@dimen/item_vote_answer" />
  <CheckBox
   android:id="@+id/item_vote_answer3_cb"
   android:layout_width="wrap_content"
   android:layout_height="wrap_content"
   android:text="BCCCCC"
   android:textColor="@color/black"
   android:textSize="@dimen/item_vote_answer" />

 </LinearLayout>

</LinearLayout>
界面效果:

三、创建一个投票信息实体类作为适配器的适配类型,新建VoteInfo.java类。
public class VoteInfo {
 private String questionItem;
 private String[] answerItems;
 public VoteInfo(String questionItem,String[] answerItems){
  this.questionItem=questionItem;
  this.answerItems=answerItems;

 }
 public String getQuestionItem(){
  return questionItem;
 }
 public String[] getAnswerItems(){
  return answerItems;
 }
}
四、接下来需要为RecyclerView准备一个适配器,新建VoteInfoAdapter.java,让这个适配器继承自RecyclerView.Adapter,并将泛型指定为VoteInfoAdapter.ViewHolder。其中,ViewHolder是我们在VoteInfoAdapter中定义的一个内部类。
public class VoteInfoAdapter extends RecyclerView.Adapter<VoteInfoAdapter.ViewHolder> {

 private List<VoteInfo> mVoteInfoList;
 @Override
 public ViewHolder onCreateViewHolder(@NonNull ViewGroup parent, int viewType) {
  View view= LayoutInflater.from(parent.getContext()).inflate(R.layout.item_vote,parent,false);
  ViewHolder holder=new ViewHolder(view);
  return holder;
 }

 @Override
 public void onBindViewHolder(@NonNull ViewHolder holder, int position) {
  VoteInfo voteInfo=mVoteInfoList.get(position);
  holder.questionItem.setText(voteInfo.getQuestionItem());
  holder.answerItem_1.setText(voteInfo.getAnswerItems()[0]);
  holder.answerItem_2.setText(voteInfo.getAnswerItems()[1]);
  holder.answerItem_3.setText(voteInfo.getAnswerItems()[2]);

 }

 @Override
 public int getItemCount() {
  return mVoteInfoList.size();
 }

 static class ViewHolder extends RecyclerView.ViewHolder{
  TextView questionItem;
  CheckBox answerItem_1;
  CheckBox answerItem_2;
  CheckBox answerItem_3;
  public ViewHolder(View itemView) {
   super(itemView);
   questionItem=(TextView)itemView.findViewById(R.id.item_vote_question_tv);
   answerItem_1=(CheckBox)itemView.findViewById(R.id.item_vote_answer1_cb);
   answerItem_2=(CheckBox)itemView.findViewById(R.id.item_vote_answer2_cb);
   answerItem_3=(CheckBox)itemView.findViewById(R.id.item_vote_answer3_cb);

  }
 }
 public VoteInfoAdapter(List<VoteInfo> voteInfoList){
  mVoteInfoList=voteInfoList;

 }
}
五、适配器已经准备完毕,开始使用RecyclerView,新建一个ShowVoteAdapter.java类。
public class ShowVoteActivity extends BaseActivity{
 @BindView(R.id.vote_list_recycleview)
 RecyclerView recyclerView;
 private List<VoteInfo> voteInfoList=new ArrayList<VoteInfo>();

 @Override
 protected void onCreate(Bundle saveInstanceState) {
  super.onCreate(saveInstanceState);
  ScreenUtils.setContentViewWithOrientation(this,
    ScreenUtils.isPhone() ? R.layout.fragment_vote_list : R.layout.fragment_vote_list);
  initVoteInfo();
  LinearLayoutManager linearLayoutManager=new LinearLayoutManager(this);
  recyclerView.setLayoutManager(linearLayoutManager);
  VoteInfoAdapter voteInfoAdapter=new VoteInfoAdapter(voteInfoList);
  recyclerView.setAdapter(voteInfoAdapter);
 }
 private void initVoteInfo(){
  VoteInfo vote1=new VoteInfo("1.请问以下哪个答案最佳?",new String[]{"AAAAAA","BBBBBB","CCCCCC"});
  voteInfoList.add(vote1);
  VoteInfo vote2=new VoteInfo("2.请问以下哪个答案最佳?",new String[]{"AAAAAA","BBBBBB","CCCCCC"});
  voteInfoList.add(vote2);
  VoteInfo vote3=new VoteInfo("3.请问以下哪个答案最佳?",new String[]{"AAAAAA","BBBBBB","CCCCCC"});
  voteInfoList.add(vote3);
  VoteInfo vote4=new VoteInfo("4.请问以下哪个答案最佳?",new String[]{"AAAAAA","BBBBBB","CCCCCC"});
  voteInfoList.add(vote4);
  VoteInfo vote5=new VoteInfo("5.请问以下哪个答案最佳?",new String[]{"AAAAAA","BBBBBB","CCCCCC"});
  voteInfoList.add(vote5);
  VoteInfo vote6=new VoteInfo("6.请问以下哪个答案最佳?",new String[]{"AAAAAA","BBBBBB","CCCCCC"});
  voteInfoList.add(vote6);
  VoteInfo vote7=new VoteInfo("7.请问以下哪个答案最佳?",new String[]{"AAAAAA","BBBBBB","CCCCCC"});
  voteInfoList.add(vote7);
  VoteInfo vote8=new VoteInfo("8.请问以下哪个答案最佳?",new String[]{"AAAAAA","BBBBBB","CCCCCC"});
  voteInfoList.add(vote8);
  VoteInfo vote9=new VoteInfo("9.请问以下哪个答案最佳?",new String[]{"AAAAAA","BBBBBB","CCCCCC"});
  voteInfoList.add(vote9);
  VoteInfo vote10=new VoteInfo("10.请问以下哪个答案最佳?",new String[]{"AAAAAA","BBBBBB","CCCCCC"});
  voteInfoList.add(vote10);
  VoteInfo vote11=new VoteInfo("11.请问以下哪个答案最佳?",new String[]{"AAAAAA","BBBBBB","CCCCCC"});
  voteInfoList.add(vote11);

 }
}
六、需要AndroidManifest.xml中注册ShowVoteActivity,才能够正常启动。
<activity
 android:name="com.inpor.fastmeetingcloud.activity.ShowVoteActivity"
 android:configChanges="keyboardHidden|orientation|screenSize"
 android:screenOrientation="portrait"
 android:windowSoftInputMode="stateAlwaysHidden|adjustPan" />
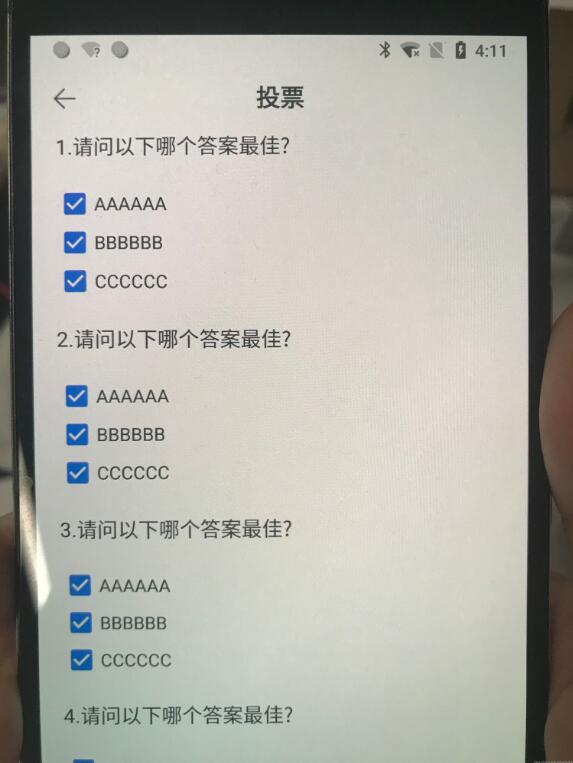
七、最终界面效果图
以上就是本文的全部内容,希望对大家的学习有所帮助,也希望大家多多支持我们。
相关推荐
-

Android ListView构建支持单选和多选的投票项目
引言 我们在android的APP开发中有时候会碰到提供一个选项列表供用户选择的需求,如在投票类型的项目中,我们提供一些主题给用户选择,每个主题有若干选项,用户对这些主题的选项进行选择,然后提交. 本文以一个支持单选和多选投票项目为例,演示了在一个ListView中如何构建CheckBox列表和RadioButton列表,并分析了实现的原理和思路,提供有需要的朋友参考. 项目的演示效果如下. 数据源 通常我们的数据源来自于数据库.首先,我们构建投票项目类SubjectItem. /** * 主题
-
Android自定义View实现投票进度条
本文实例为大家分享了Android投票进度条的具体代码,供大家参考,具体内容如下 效果展示 功能属性介绍 <!-- MatchSupportProgressBar --> <declare-styleable name="MatchSupportProgressBar"> <!-- 进度条圆角角度 --> <attr name="progress_radio" format="string"><
-
Android使用RecyclerView实现投票系统
本文实例为大家分享了Android投票系统的具体代码,供大家参考,具体内容如下 一.创建一个fragment_vote_list.xml用来显示投票的主页面 (1)标题栏使用Toolbar (2)投票区域可以滑动,使用RecyclerView实现 <?xml version="1.0" encoding="utf-8"?> <RelativeLayout xmlns:android="http://schemas.android.com/
-
Android中RecyclerView上拉下拉,分割线,多条目的实例代码
//activity的xml <?xml version="1.0" encoding="utf-8"?> <RelativeLayout xmlns:android="http://schemas.android.com/apk/res/android" xmlns:tools="http://schemas.android.com/tools" android:id="@+id/activity
-
Android 中RecyclerView通用适配器的实现
Android 中RecyclerView通用适配器的实现 前言: SDK的5.0版本出来已经N久了,可以说是已经经过许多人的检验了,里面的新控件不能说是非常完美,但也是非常好用了,其中最让我喜爱的就是RecyclerView了,可以完美替代ListView和GridView(除了添加headerview和footview了,网上有许多解决方式.这个下面会以一种简单的方式顺带解决,肯定为大家省心),而且可以代码动态切换这两种布局方式以及瀑布流布局.相关切换方式网上有很多,大家自行搜索,我就不贴连
-
PHP+MySQL实现的简单投票系统实例
本文实例讲述了PHP+MySQL实现的简单投票系统.分享给大家供大家参考,具体如下: <html> <head><title>手机系统调查问卷</title> <style type="text/css"> <!-- span{ width:600px; height:100px; background-color:write; postion:relative; border:1px #cccccc solid; }
-
Android 给RecyclerView添加分割线的具体步骤(分享)
[吐槽]RecyclerView没有提供分割线的方法,想要加个线还要自己画,点击事件的监听都要自己实现,不过真的好用. 给RecyclerView添加分割线的步骤 1.新建类继承于RecyclerView.ItemDecoration,此为是抽象类: public static abstract class ItemDecoration { public void onDraw(Canvas c, RecyclerView parent, State state) { onDraw(c, par
-
Android中recyclerView底部添加透明渐变效果
前言 最近实现一个recyclerView透明渐变的效果,遇到了一些坑,尝试了一些方法,这里记录一下. 效果图 图片在上面显示2列,文字在下面显示1列:底部要有个透明渐变的效果,直到完全看不到. gridLayoutManager动态设置列数 大概是分两类,一类以图片为item 一行2个,一类以文字为item 一行一个. 这个第一反应是用viewType去区分图片类型,但是由于起初不知道gridLayout可以动态列数.就在上面两列,下面一列上为难起来了. 如果统一用一列吧,那就把两个image
-
php投票系统之增加与删除投票(管理员篇)
关于投票系统怎么样怎么样的引言就不多说,这不是毕业设计,主要说一下使用php实现投票系统,与其他普通系统一样,分为两部分,一个是管理员部分,一个是普通用户部分. 关于投票系统的管理部分,非常之简单,提供两部分的功能,增加投票与删除投票 关键在于设计好数据库的表,拟定于这样存一个投票,voteparent表存这个投票的标题.描述是否被删除,votechildren表存这个投票的子选项与投票数 一.基本目标 首先投票系统是这样的: 三个链接,点进去能够直接进行相关功能的操作,本文主写管理员部分,普通
-
Android中RecyclerView拖拽、侧删功能的实现代码
废话不多说,下面展示一下效果. 这是GridView主文件实现. public class GridViewActivity extends AppCompatActivity { RecyclerView mRecyclerView; List<String> mStringList; RecyclerAdapter mRecyAdapter; @Override protected void onCreate(@Nullable Bundle savedInstanceState) { s
-
简易的投票系统以及js刷票思路和方法
早就听说有什么刷票脚本,微博投票等等相关的投票都有某些人去刷票. 试一下吧,兴许自己也会刷票呢?捣鼓了几个小时,终于有所眉目. (1)投票系统 要刷票,就得先有个投票界面. 当然,可以直接去各个投票网站就行,不过这里还是自己弄个投票页面,方便自己. 页面大致如下 或者 查看演示 照理,界面很简洁,但也基本有了投票的基本功能. 原始规则是:只能投一次票,然后提示成功,然后按钮不可用. 都是原生JS,DOM操作不灵活的可以借此练练手.当然,用jq将会很便捷. html/css部分 <!DOCTYPE
-
js脚本编写简单刷票投票系统
本文实例为大家分享了js刷票投票系统的具体代码,供大家参考,具体内容如下 <!DOCTYPE html PUBLIC "-//W3C//DTD XHTML 1.0 Transitional//EN" "http://www.w3.org/TR/xhtml1/DTD/xhtml1-transitional.dtd"> <html xmlns="http://www.w3.org/1999/xhtml"> <meta h