Android Studio Intent隐式启动,发短信,拨号,打电话,访问网页等实例代码
Android Studio Intent隐式启动,发短信,拨号,打电话,访问网页等实例代码
功能
创建5个按钮,隐式启动、发短信、拨号按钮、电话按钮、打开网页按钮。通过使用Intent来完成各自按钮下的功能
代码目录如下
详细代码如下:
activity_main.xml代码如下
<LinearLayout xmlns:android="http://schemas.android.com/apk/res/android"
  xmlns:tools="http://schemas.android.com/tools"
  android:layout_width="match_parent"
  android:layout_height="match_parent"
  android:orientation="horizontal"
  android:paddingBottom="@dimen/activity_vertical_margin"
  android:paddingLeft="@dimen/activity_horizontal_margin"
  android:paddingRight="@dimen/activity_horizontal_margin"
  android:paddingTop="@dimen/activity_vertical_margin"
  tools:context=".MainActivity">

  <LinearLayout
    android:layout_width="0dp"
    android:layout_height="wrap_content"
    android:layout_weight="1"
    android:orientation="vertical">

    <Button
      android:id="@+id/button1"
      android:layout_width="wrap_content"
      android:layout_height="wrap_content"
      android:text="隐式启动" />

    <Button
      android:id="@+id/button2"
      android:layout_width="wrap_content"
      android:layout_height="wrap_content"
      android:text="发短信" />

    <Button
      android:id="@+id/button3"
      android:layout_width="wrap_content"
      android:layout_height="wrap_content"
      android:text="拨号按钮" />

    <Button
      android:id="@+id/button4"
      android:layout_width="wrap_content"
      android:layout_height="wrap_content"
      android:text="电话按钮" />
  </LinearLayout>

  <LinearLayout
    android:layout_width="0dp"
    android:layout_height="wrap_content"
    android:layout_weight="2">

    <Button
      android:id="@+id/button5"
      android:layout_width="match_parent"
      android:layout_height="192dp"
      android:text="打开百度网页"
      />

  </LinearLayout>

</LinearLayout>
firstlayout.xml代码如下:
<?xml version="1.0" encoding="utf-8"?>
<LinearLayout xmlns:android="http://schemas.android.com/apk/res/android"
android:layout_width="match_parent"
android:layout_height="match_parent"
android:orientation="vertical">
<EditText
android:id="@+id/editText1"
android:layout_width="match_parent"
android:layout_height="match_parent"
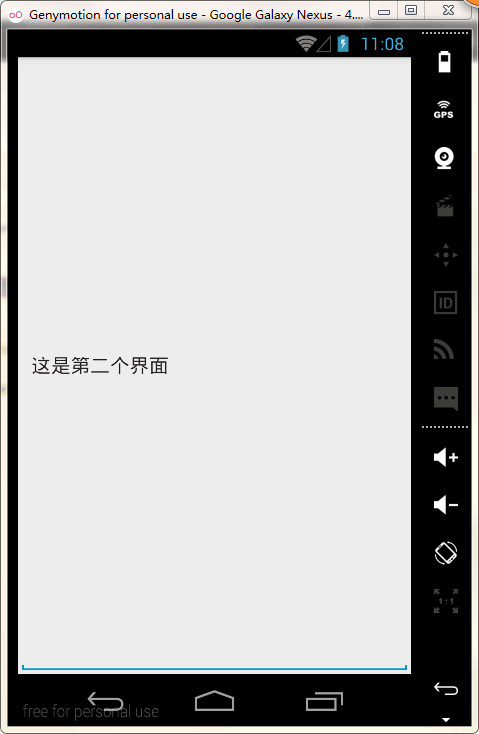
android:text="这是第二个界面"/>
</LinearLayout>
MainActivity.java代码如下:
package com.example.administrator.chang;

import android.app.Activity;
import android.content.Intent;
import android.net.Uri;
import android.os.Bundle;
import android.view.View;
import android.widget.Button;

public class MainActivity extends Activity {

  @Override
  protected void onCreate(Bundle savedInstanceState) {
    super.onCreate(savedInstanceState);
    setContentView(R.layout.activity_main);

    Button button1= (Button) findViewById(R.id.button1);
    button1.setOnClickListener(new View.OnClickListener() {
      @Override
      public void onClick(View v) {
        Intent intent =new Intent("com.example.administrator.chang.ACTION_START");
        startActivity(intent);
      }
    });
    //发短信
    Button button2= (Button) findViewById(R.id.button2);
    button2.setOnClickListener(new View.OnClickListener() {
      @Override
      public void onClick(View v) {
        Intent intent = new Intent();
        intent.setAction(Intent.ACTION_SENDTO);
        intent.setData(Uri.parse("smsto:10086"));
        intent.putExtra("sms_body","The SMS text");
        startActivity(intent);
      }
    });
    // 拨号
    Button button3= (Button) findViewById(R.id.button3);
    button3.setOnClickListener(new View.OnClickListener() {
      @Override
      public void onClick(View v) {
        Intent intent =new Intent();
        intent.setAction(Intent.ACTION_DIAL);
        intent.setData(Uri.parse("tel:10086"));
        startActivity(intent);
      }
    });
    //打电话
    Button button4= (Button) findViewById(R.id.button4);
    button4.setOnClickListener(new View.OnClickListener() {
      @Override
      public void onClick(View v) {
        Intent intent=new Intent();
        intent.setAction(Intent.ACTION_CALL);
        intent.setData(Uri.parse("tel:10086"));
        startActivity(intent);
      }
    });

    Button button5= (Button) findViewById(R.id.button5);
    button5.setOnClickListener(new View.OnClickListener() {
      @Override
      public void onClick(View v) {
        Intent intent=new Intent();
        intent.setAction(Intent.ACTION_VIEW);
        intent.setData(Uri.parse("http://www.baidu.com"));
        startActivity(intent);
      }
    });

  }

}
SecondActivity.java代码如下:
package com.example.administrator.chang;

import android.app.Activity;
import android.os.Bundle;

/**
 * Created by Administrator on 2015/8/19.
 */
public class SecondActivity extends Activity {
  @Override
  protected void onCreate(Bundle savedInstanceState) {
    super.onCreate(savedInstanceState);
    setContentView(R.layout.firstlayout);
  }
}
AndroidManifest.xml代码如下:
<?xml version="1.0" encoding="utf-8"?>
<manifest xmlns:android="http://schemas.android.com/apk/res/android"
  package="com.example.administrator.chang">

  <uses-permission android:name="android.permission.CALL_PHONE" />
  <application
    android:allowBackup="true"
    android:icon="@mipmap/ic_launcher"
    android:label="@string/app_name"
    android:theme="@style/AppTheme">

    <activity
      android:name=".MainActivity"
      android:label="@string/app_name">
      <intent-filter>
        <action android:name="android.intent.action.MAIN" />

        <category android:name="android.intent.category.LAUNCHER" />
      </intent-filter>
    </activity>
    <activity android:name=".SecondActivity">
      <intent-filter>
        <action android:name="com.example.administrator.chang.ACTION_START" />
        <category android:name="android.intent.category.DEFAULT" />
      </intent-filter>
    </activity>
  </application>

</manifest>
说明 :打电话按钮中需要添加用户权限,具体代码部分是
<uses-permission android:name="android.permission.CALL_PHONE" />
发短信按钮我用的是intent.setAction(Intent.ACTION_SENDTO);如过短信直接能发送出去需要添加用户权限
android.permission.SEND_SMS
在安卓中严格区分大小写。例如下面两段代码代表不同的意思:
<categoryandroid:name="android.intent.category.LAUNCHER" />

 <category android:name="ANDROID.INTENT.CATEGORY.LAUNCHER" />
结果如下:
主页面:

点击隐式启动后跳转到第二个页面
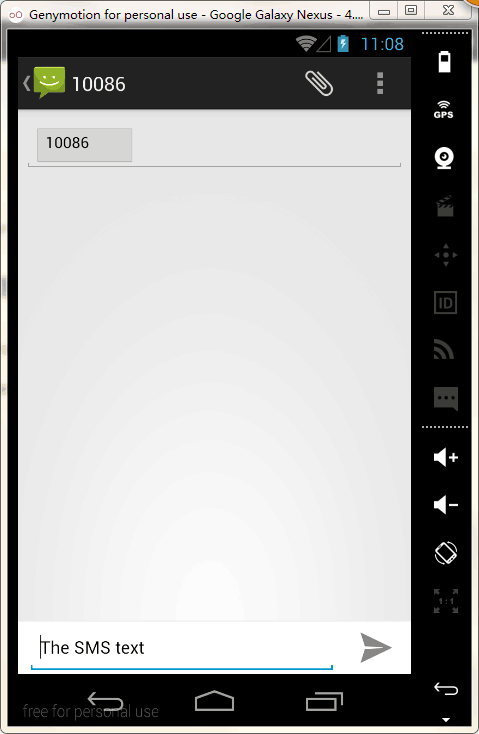
点击发送短信跳转到发送短信页面
点击拨号按钮跳转到系统拨号界面

点击电话按钮跳转到通话界面

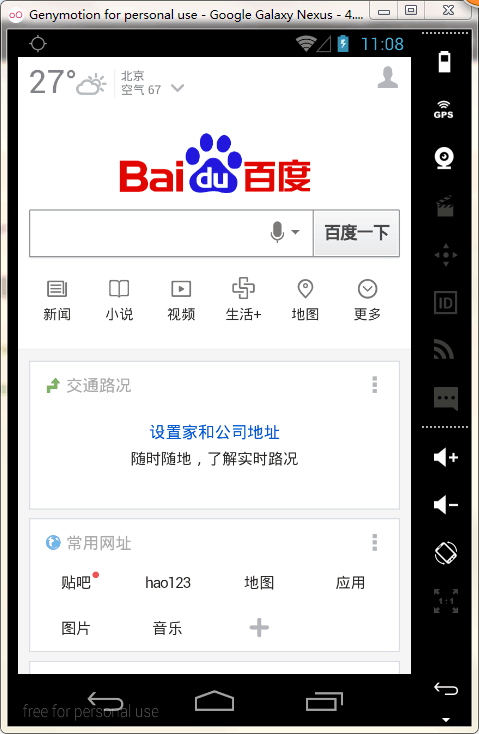
点击打开百度网页按钮跳转到百度网站
感谢阅读,希望能帮助到大家,谢谢大家对本站的支持!
相关推荐
-

Android Intent封装的实例详解
Android Intent封装的实例详解 什么是Intent: Intent是协调应用间.组件之间的通讯和交互.通过Intent你可以启动Activity.Service.Broadcasts.更可以跨程序调用第三方组件.例如:启动拨打电话界面.音乐播放等. 组件 启动 Activity startActicity() Service startService(),bindService( ) Broadcasts sendBroadcast() 使用Intent: 栗子:在一个Act
-
Android编程实现全局获取Context及使用Intent传递对象的方法详解
本文实例讲述了Android编程实现全局获取Context及使用Intent传递对象的方法.分享给大家供大家参考,具体如下: 一.全局获取 Context Android 开发中很多地方需要用到 Context,比如弹出 Toast.启动活动.发送广播.操作数据库-- 由于很多操作都是在活动中进行的,而活动本身就是一个 Context 对象,所以获取 Context 并不是那么困难. 但是,当应用程序的架构逐渐开始复杂起来的时候,很多的逻辑代码都将脱离 Activity 类,由此在某些情况下,获
-
Android编程使用Intent传递图片的方法详解
本文实例讲述了Android编程使用Intent传递图片的方法.分享给大家供大家参考,具体如下: 基本思路是先把bitmap转化为byte数组,用Intent传递数组,在将数组转化为bitmap bitmap转化为byte数组的方法: private byte[] Bitmap2Bytes(Bitmap bm){ ByteArrayOutputStream baos = new ByteArrayOutputStream(); bm.compress(Bitmap.CompressFormat.
-
Android编程中Intent实现页面跳转功能详解
本文实例讲述了Android编程中Intent实现页面跳转功能.分享给大家供大家参考,具体如下: 安卓四大组件:Activity.Service.Broadcast Receiver.Content Provider Intent实现页面之间跳转 1.无返回值 startActivity(intent) 2.有返回值 startActivityForResult(intent,requestCode); onActivityResult(int requestCode,int resultCod
-
Android使用Intent获取联系人信息
Intent的使用 趁着工作之余,看了一下intent,发现好多知识都已经忘记了,然后自己有重新复习了一遍,在这里做一下笔记,以下为自己总结的几点: intent是一个好东西 他可以启动Activity还可以回调数据 调用各种数据,联系人等等 进程之间可以接收同一个intent 三大组件的桥梁 解释一下为什么是三大组件吧,都知道四大组件分别是Activity,Service,BroadCastReceiver,ContentProvider.Intent是Activity,Service,Bro
-
Android 通过Intent调用系统拍照程序出现图片太小的问题解决办法
Android 通过Intent调用系统拍照程序出现图片太小的问题解决办法 Intent it = newIntent("android.media.action.IMAGE_CAPTURE"); startActivityForResult(it, Activity.DEFAULT_KEYS_DIALER); 按下拍照键后,会返回到你的activity,所以你的activity要在onActivityResult方法里加一个处理, protectedvoidonActivityRes
-
Android Intent调用 Uri的方法总结
Android Intent调用 Uri的方法总结 //调用浏览器 Uri uri = Uri.parse(""); Intent it = new Intent(Intent.ACTION_VIEW,uri); startActivity(it); //显示某个坐标在地图上 Uri uri = Uri.parse("geo:38.899533,-77.036476"); Intent it = new Intent(Intent.Action_VIEW,uri);
-
Android Studio Intent隐式启动,发短信,拨号,打电话,访问网页等实例代码
Android Studio Intent隐式启动,发短信,拨号,打电话,访问网页等实例代码 功能 创建5个按钮,隐式启动.发短信.拨号按钮.电话按钮.打开网页按钮.通过使用Intent来完成各自按钮下的功能 代码目录如下 详细代码如下: activity_main.xml代码如下 <LinearLayout xmlns:android="http://schemas.android.com/apk/res/android" xmlns:tools="http://sc
-
Android使用Intent隐式实现页面跳转
在上一篇文章中我介绍了使用Intent显式来实现页面向下跳转,接下来这篇文章主要介绍的是使用Intent隐式来实现向上跳转,什么意思呢,就是当我们从第一个页面跳转到第二个页面的时候我们可以从第二个页面跳转回去. 通过查阅文档你会发现Activity中还有一个startActivityForResult()方法也是用于启动活动的,但是这个方法期望在活动销毁的时候能返回一个结果给上一个活动,毫无疑问这就是我们所要达到的效果. startActivityForResult()方法接收2个参数,第一个参
-
Android显式启动与隐式启动Activity的区别介绍
前段时间立志坚持写博客,但是发现自己的积累的确不多,于是假期泡了泡图书馆,读了一些很有价值的文章.收获颇多,今天的文章分享为主,共同学习. 为什么要写显式启动与隐式启动Activity.这源于自己的一次面试,被Baidu工程师问道,但是后来觉得自己回答的不好,废话少说,进入正题. 如题,Android的Acitivity启动大致有两种方式:显式启动与隐式启动.下面分别介绍: A:显式启动 对于初学者来说,这个最常见,下面用代码来解释什么是显式启动. 复制代码 代码如下: Intent inten
-
Android Studio实现发短信功能
首先需要在AndroidManifest注册权限 <uses-permission android:name="android.permission.SEND_SMS"></uses-permission> 实现发短信的代码如下 String content ="";//短信内容 String phone = "";//电话号码 SmsManager sm = SmsManager.getDefault(); List&l
-
二个android模拟器互发短信程序演示
一.创建 Android工程 Project name:SendMessage BuildTarget:Android2.2 Application name:发送短信 Package name:com.sms.Activity Create Activity:SendMessage Min SDK Version:8 二.编辑工程 1.编辑字符串strings.xml文件内容为: 复制代码 代码如下: <?xml version="1.0" encoding="utf
-
Android 实现自动打电话与发短信的实例
Android 实现自动打电话与发短信的实例 一.自动可以拨打电话 bt.setOnClickListener(new View.OnClickListener() { @Override public void onClick(View view) { EditText et = (EditText)findViewById(R.id.et); String number = et.getText().toString(); //激活可以打电话的组件 Intent intent = new
-
Android编程实现定时发短信功能示例
本文实例讲述了Android编程实现定时发短信功能.分享给大家供大家参考,具体如下: 第一,要实现发短信的功能,必须要用到android系统中发短信的权限,即在AndoridManifest.xml中添加如下内容 <uses-permissionandroid:name="android.permission.SEND_SMS"/> 第二,使用AlarmManager来实现一个倒计时的功能,当时间到时发送短 信.AlarmManager有两个相似的用法: 1.在指定时常
-
android开发基础教程—打电话发短信
打电话发短信demo 复制代码 代码如下: public class MainActivity extends Activity { EditText mPhoneNum,mMessage; @Override protected void onCreate(Bundle savedInstanceState) { super.onCreate(savedInstanceState); setContentView(R.layout.activity_main); mPhoneNum=(Edit
-
Andriod Studio实现拨打电话和发送短信的示例代码
在 Android Studio中创建项目,然后在该项目中创建一个Module名称为“IntentDial”.在该 Module中实现本实例,具体步骤如下:(1)在新建 Module的res\layout目录下添加布局文件shouji.xml,将添加的布局管理器设置为相对布局管理器,然后在布局管理器中添加4个用于显示公司信息的文本框,再添加两个 ImageButton 组件,分别为拨打电话按钮和发送短信按钮.代码如下: <?xml version="1.0" encoding=&
-
Android编程实现读取手机联系人、拨号、发送短信及长按菜单操作方法实例小结
本文实例讲述了Android编程实现读取手机联系人.拨号.发送短信及长按菜单操作方法.分享给大家供大家参考,具体如下: 1.Andrid项目结构图↓主要操作图中红色方框内的文件. 2.首先布局代码如下 a, main.xml 程序运行的主界面,主要用ListView列表控件展示手机联系人 <?xml version="1.0" encoding="utf-8"?> <LinearLayout xmlns:android="http://s