vue.js移动端tab组件的封装实践实例
这是vue.js系列文章第二遍,第一篇讲述的是如何搭建vue.js的开发环境,计划按进度做成一款完整的app,当然前提是时间允许的话。本文用到了stylus语法,至于为什么使用stylus而不去用sass,主要是因为stylus来自于Node.js社区。总之stylus是一款高效的CSS预处理器,具体使用不在本文讨论范围。好了,废话不说了,下面讲述怎么封装tababr的切换。
底部tab进行页面切换,会用到vue里面的路由,也就是vue-router
我们在安装vue-cli时选中默认安装vue-router即可。
安装完毕后,打开我的项目,我们需要在router目录的index.vue中配置路由信息,具体配置信息如下
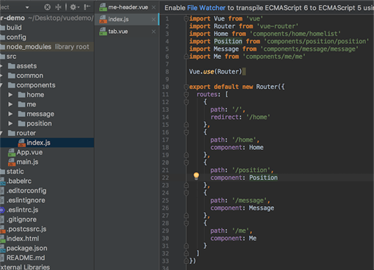
从上面图片,我们可以看到,我们一共配置了4子页面,其中redirect为配置默认组件的路由。
路由配置完成后,我们需要封装tab组件了
因为tab组件属于基础组件,所以我们新建了文件夹tab,然后在tab文件夹下面新建了tabbar组件和tababritem组件。我们先说tababritem组件的封装
tabbaritem封装
我们知道tababritem有一张正常显示图片,选中后的图片,和图片下的文字,其中属性id用来记录当前tabbaritem的组件名,属性isRouter用来记录当前选中是否是这个tababritem。
<template>
 <a class="m-tabbar-item" :class="{'is-active':isActive}" @click="goToRouter">
  <div class="m-tabbar-item-icon" v-show="!isActive"><slot name="icon-normal"></slot></div>
  <div class="m-tabbar-item-icon" v-show="isActive"><slot name="icon-active"></slot></div>
  <div class="m-tabbar-item-text"><slot></slot></div>
 </a>
</template>

<script type="text/ecmascript-6">

 export default{
  props: {
   id: {
    type: String
   },
   isRouter: {
    type: Boolean,
    default: false
   }
  },
  computed: {
   isActive () {
    return this.isRouter
   }
  },
  methods: {
   goToRouter () {
    this.$parent.$emit('tabbarActionEvent', this.id)
    // 判断是否为路由跳转
    this.$router.push(this.id)
   }
  }
 }
</script>

<style scoped lang="stylus" rel="stylesheet/stylus">

 .m-tabbar-item
  flex: 1
  text-align: center
  .m-tabbar-item-icon
   padding-top: 5px
   padding-bottom 1px
   img
    width: 24px
    height: 24px
  .m-tabbar-item-text
   font-size: 8px
   color:#949494
  &.is-active
   .m-tabbar-item-text
    color: #fa3e25

</style>
接下来,我们要封装tababr,tabbar里面需要包含tabbaritem,主要设置了下tabbar的样式,具体代码如下
tabbar的封装
<template>
 <div class="m-tabbar">
  <slot></slot>
 </div>
</template>

<script type="text/ecmascript-6">
 export default {}
</script>

<style scoped lang="stylus" rel="stylesheet/stylus">

 .m-tabbar
  display: flex
  flex-direction: row
  position: fixed
  bottom: 0
  left: 0
  right: 0
  width: 100%
  overflow: hidden
  height: 50px
  background: #fff
  border-top: 1px solid #e4e4e4

</style>
最后在我们的app.vue里面引用tabbar组件,监听子类tabbaritem的点击方法,来控制当前哪个item的选中颜色文字的改变
app.vue代码
<template>
<div id="app">
<router-view></router-view>
<m-tabbar @tabbarActionEvent='changeSelectedValue'>
<m-tabbar-item id='Home' :isRouter="isHome">


首页
</m-tabbar-item>
<m-tabbar-item id='Position' :isRouter="isPosition">


职位
</m-tabbar-item>
<m-tabbar-item id='Message' :isRouter="isMessage">


消息
</m-tabbar-item>
<m-tabbar-item id='Me' :isRouter="isMe">


我
</m-tabbar-item>
</m-tabbar>
</div>
</template>
<script>
import mTabbar from 'common/tab/tab.vue'
import mTabbarItem from 'common/tab/tabbar-item'
export default {
name: 'app',
components: {
mTabbar,
mTabbarItem
},
data () {
return {
isHome: true,
isPosition: false,
isMessage: false,
isMe: false
}
},
methods: {
changeSelectedValue: function (elValue) {
if (elValue === 'Home') {
this.isHome = true
} else {
this.isHome = false
}
if (elValue === 'Position') {
this.isPosition = true
} else {
this.isPosition = false
}
if (elValue === 'Message') {
this.isMessage = true
} else {
this.isMessage = false
}
if (elValue === 'Me') {
this.isMe = true
} else {
this.isMe = false
}
}
}
}
</script>
自此tababr已经封装完毕了,其中用到的tabbaritem图片,大家可以自己替换掉,下一篇,会提到导航部分的封装
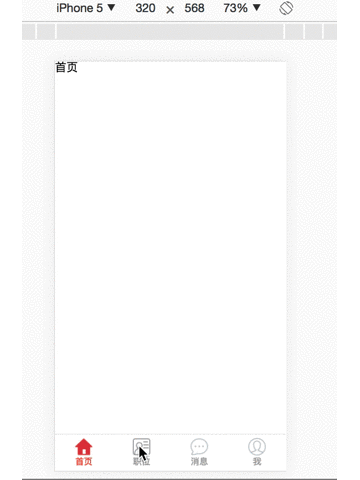
最终运行效果如下
以上就是本文的全部内容,希望对大家的学习有所帮助,也希望大家多多支持我们。
相关推荐
-

Vue.js上下滚动加载组件的实例代码
由于工作的需要并鉴于网上的vue.js滚动加载方案不合适,自己写了一个简单实用的.就短短的150行代码. 组件代码 // scrollLoader.vue // 滚动加载组件 <style scoped> .container-main {margin: 0 auto; overflow: auto; overflow-x: hidden; padding: 0;} .loading{ width: 100%; height: 40px; position: relative; overflo
-
Vue.js划分组件的方法
常见的一些页面,大家坐在一起敲代码就可以了,做完这个页面再做别的页面,但是作为一个功能复杂的系统,尤其是使用一些适合模块化开发的框架,这样会显得效率很低,那么我们就单纯的看在Vue里面如何划分组件的. 总结下来有两种可以划分,两种划分的方法一种是页面上的功能块,select,pagenation,和一些需要大量代码去实现的一些部分,我们可以把它提取出来放到一起或者分类.还有一种根据页面区域来划分,header,footer,sidebar,有了组件之后Vue的组件是怎么实现的? Vue的组件是怎
-
vue.js组件之间传递数据的方法
前言 组件是 vue.js 最强大的功能之一,而组件实例的作用域是相互独立的,这就意味着不同组件之间的数据无法相互引用.如何传递数据也成了组件的重要知识点之一. 组件 组件与组件之间,还存在着不同的关系.父子关系与兄弟关系(不是父子的都暂称为兄弟吧). 父子组件 父子关系即是组件 A 在它的模板中使用了组件 B,那么组件 A 就是父组件,组件 B 就是子组件. // 注册一个子组件 Vue.component('child', { data: function(){ text: '我是fathe
-
vue.js学习之UI组件开发教程
本文主要给大家介绍了关于vue.js之UI组件开发的相关内容,分享出来供大家参考学习,下面来一起看看详细的介绍: 1. 新建组件: <script src="/public/javascripts/vue.js"></script> <style> #app1{background-color: red} #app2{background-color: blue} </style> <body> <div id=&quo
-
Vue.js中组件中的slot实例详解
Vue组件中的slot slot 可以实现在已经定义的组件中添加内容,组件会接收内容并输出,假如有一个组件person,它的里面包含的是个人信息,如下面这样 <template id="per"> <div> <p>姓名:...</p> <p>年龄:...</p> <p>职业:...</p> </div> </template> 在应用的时候,当然希望这里面可以是灵活
-
vue.js移动端tab组件的封装实践实例
这是vue.js系列文章第二遍,第一篇讲述的是如何搭建vue.js的开发环境,计划按进度做成一款完整的app,当然前提是时间允许的话.本文用到了stylus语法,至于为什么使用stylus而不去用sass,主要是因为stylus来自于Node.js社区.总之stylus是一款高效的CSS预处理器,具体使用不在本文讨论范围.好了,废话不说了,下面讲述怎么封装tababr的切换. 底部tab进行页面切换,会用到vue里面的路由,也就是vue-router 我们在安装vue-cli时选中默认安装vu
-
vue.js 父向子组件传参的实例代码
1.新建componentA.vue组件,代码如下: store.js代码如下: const STORAGE_KEY = 'todos-vue.js' export default{ fetch(){ return JSON.parse(window.localStorage.getItem(STORAGE_KEY) || '[]') }, save(items){ window.localStorage.setItem(STORAGE_KEY,JSON.stringify(items)); }
-
vue.js 父向子组件传参的实例代码
1.新建componentA.vue组件,代码如下: store.js代码如下: const STORAGE_KEY = 'todos-vue.js' export default{ fetch(){ return JSON.parse(window.localStorage.getItem(STORAGE_KEY) || '[]') }, save(items){ window.localStorage.setItem(STORAGE_KEY,JSON.stringify(items)); }
-
详解vue.js移动端导航navigationbar的封装
有几天没更新了,这几天上海天气比较热,天气一热就懒得写了.今天感觉还好,就写下导航部分的封装吧. 关于环境搭建和底部tabbar的封装请参考前面的两篇文章 web app和移动端原生app的构架方式不一样的,页面的切换是对整个页面的重新渲染.所以我们每个页面都有自己的导航条. 下面简单封装下导航条 html部分 此处写的导航的三个部分,分别是左边div.中间的title部分div.右边div.代码如下 <template> <header class="m-header&quo
-
Mint UI 基于 Vue.js 移动端组件库
官网地址 http://mint-ui.github.io/ Mint UI 包含丰富的 CSS 和 JS 组件,能够满足日常的移动端开发需要.通过它,可以快速构建出风格统一的页面,提升开发效率. 真正意义上的按需加载组件.可以只加载声明过的组件及其样式文件,无需再纠结文件体积过大. 考虑到移动端的性能门槛,Mint UI 采用 CSS3 处理各种动效,避免浏览器进行不必要的重绘和重排,从而使用户获得流畅顺滑的体验. 依托 Vue.js 高效的组件化方案,Mint UI 做到了轻量化.即使全部引
-
atom-design(Vue.js移动端组件库)手势组件使用教程
介绍 atom-design经过几个月的开发,以及这段时间的修复bug,对js,css压缩,按需引入处理等等的性能优化,现在已经逐渐完善.做这套UI考虑到很多性能的问题,以及如何让开发者更自由.更简单的去使用.这篇文章主要讲使用Gesture(手势)相关组件的感受. Gesture(手势)相关组件 •Carousel(传送带) •SlideItem (滑动条) •Range (区域选择) •Pull Gesture (上下拉动手势) Carousel(传送带) import {Carousel}
-
Vue.js桌面端自定义滚动条组件之美化滚动条VScroll
前言 前段时间有给大家分享一个vue桌面端弹框组件,今天再分享最近开发的一个vue pc端自定义滚动条组件. vscroll 一款基于vue2.x开发的网页端轻量级超小巧自定义美化滚动条组件.支持是否原生滚动条.鼠标移出是否自动隐藏.自定义滚动条尺寸及颜色等功能. 组件在设计开发之初借鉴了 el-scrollbar 及 vuebar 等组件设计思想. 通过简单的标签写法<v-scroll>...</v-scroll> 即可快速生成一个漂亮的替换原生滚动条. 参数配置 props:
-
vue.js管理后台table组件封装的方法
目录 问题分析 为什么封装 封装的内容都有哪些 封装table组件 确认数据格式 封装组件 封装全局组件 table组件封装 分页组件封装 数据定义 封装 总结 最近开了新的项目,简单说了自己的table封装. 问题分析 为什么封装 首先为什么封装,是因为追求技术吗,不,是因为懒,不想一直的去粘贴复制代码,所以就想把table封装下,可以在创建新的table的时候,只需要填充数据就行了. 封装的内容都有哪些 主要有两个,一个是table组件,一个是分页组件 搞清楚这个些,就可以开始封装组件了.
-
Vue.js+cube-ui(Scroll组件)实现类似头条效果的横向滚动导航条
本博主在一次个人移动端项目中,遇到这么一个需求:希望自己的项目中,头部导航条的效果可以像今日头条那样,横向滚动! 对于这样的效果,在各大移动端项目中几乎是随处可见,为什么呢? 我们都知道,对于移动端也就是手机上,我们页面的宽度并不像PC端那样大,可以显示很长的导航项,但对于我们移动端来说,由于功能的拓展,或者业务的细分,往往导航项也会随之增多,一旦超过移动端在一行的页面显示宽度,那便会出现导航项换行的现象,虽说也有这样布局,但一旦导航项增多到一定程度的时候,我们的页面(首页)将均被导航项霸占,这
-
vue.js购物车添加商品组件的方法
现实向购物车添加商品组件 代码 <template> <div class="cartcontrol"> <!--商品减一区域--> <div class="reduce" v-show="food.count>0"> <i class="icon-remove_circle_outline"></i> </div> <!--商品数