Pytorch实现基于CharRNN的文本分类与生成示例
1 简介
本篇主要介绍使用pytorch实现基于CharRNN来进行文本分类与内容生成所需要的相关知识,并最终给出完整的实现代码。
2 相关API的说明
pytorch框架中每种网络模型都有构造函数,在构造函数中定义模型的静态参数,这些参数将对模型所包含weights参数的维度进行设置。在运行时,模型的实例将接收动态的tensor数据并调用forword,在得到模型输出之后便可以和真实的标签数据进行误差计算,并通过优化器进行反向传播以调整模型的参数。下面重点介绍NLP常用到的模型和相关方法。
2.1 nn.Embedding
词嵌入层是NLP应用中常见的模块。在word2vec出现之前,一种方法是使用每个token的one-hot向量进行运算。one-hot是一种稀疏编码,运算效果较差。word2vec用于生成每个token的Dense向量表示。目前的研究结果证明,word2vec可以有效提升模型的训练效果。
pytorch的模型提供了Embedding模型用于实现词嵌入过程Embedding层中的权重用于随机初始化词的向量,权重参数在后续的训练中会被不断调整,并被优化。
模型的创建方法为:embeding = nn.Embedding(vocab_size, embedding_dim)
vocab_size 表示字典的大小
embedding_dim 词嵌入的维度数量,通常设置远小于字典大小,60-300之间通常可满足需要
使用:embeded = embeding(input)
input 需要嵌入的句子,可为任意维度。单个句子表示为token的索引列表,如[283, 4092, 1, ]
output 数据的嵌入表示,shape=[*, embedding_dim],*为input的维度
示例代码:
import torch
from torch import nn

embedding = nn.Embedding(5, 4) # 假定语料只有5个词,词向量维度为3
sents = [[1, 2, 3],
   [2, 3, 4]] # 两个句子,how:1 are:2 you:3, are:2 you:3 ok:4
embed = embedding(torch.LongTensor(sents))
print(embed) # shape=(2
'''
tensor([[[-0.6991, -0.3340, -0.7701, -0.6255],
   [ 0.2969, 0.4720, -0.9403, 0.2982],
   [ 0.8902, -1.0681, 0.4035, 0.1645]],
  [[ 0.2969, 0.4720, -0.9403, 0.2982],
   [ 0.8902, -1.0681, 0.4035, 0.1645],
   [-0.7944, -0.1766, -1.5941, 0.4544]]], grad_fn=<EmbeddingBackward>)
'''
2.2 nn.RNN
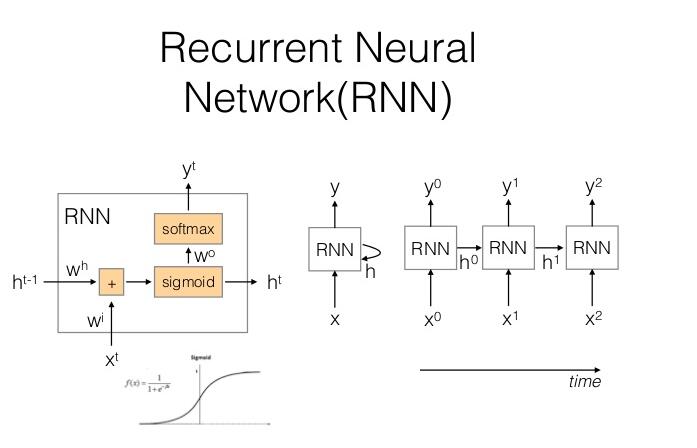
RNN是NLP的常用模型,普通的RNN单元结构如下图所示:

RNN单元还有一些变体,主要是单元内部的激活函数不同或数据使用了不同计算。RNN每个单元存在输入x与上一时刻的隐层状态h,输出有y与当前时刻的隐层状态。
对RNN单元的改进有LSTM和GRU,这三种类型的模型的输入数据都需要3D的tensor,,,使用时设置b atch_first为true时,输入数据的shape为[batch,seq_length, input_dim],第一维为batch的数量不使用时设置为1,第二维序列的长度,第三维为输入的维度,通常为词嵌入的维度。
rnn = RNN(input_dim, hidden_dim, num_layers=1, batch_first, bidirectional)
input_dim 输入token的特征数量,使用embeding时为嵌入的维度
hidden_dim 隐层的单元数,决定RNN的输出长度
num_layers 层数
batch_frist 第一维为batch,反之第一堆为seq_len,默认为False
bidirectional 是否为双向RNN,默认为False
output, hidden = rnn(input, hidden)
input 一批输入数据,shape为[batch, seq_len, input_dim]
hidden 上一时刻的隐层状态,shape为[num_layers * num_directions, batch, hidden_dim]
output 当前时刻的输出,shape为[batch, seq_len, num_directions*hidden_dim]
import torch
from torch import nn

vocab_size = 5
embed_dim = 3
hidden_dim = 8

embedding = nn.Embedding(vocab_size, embed_dim)
rnn = nn.RNN(embed_dim, hidden_dim, batch_first=True)

sents = [[1, 2, 4],
   [2, 3, 4]]
h0 = torch.zeros(1, embeded.size(0), 8) # shape=(num_layers*num_directions, batch, hidden_dim)

embeded = embedding(torch.LongTensor(sents))
out, hidden = rnn(embeded, h0) # out.shape=(2,3,8), hidden.shape=(1,2,8)

print(out, hidden)

'''
tensor([[[-0.1556, -0.2721, 0.1485, -0.2081, -0.2231, -0.1459, -0.0319, 0.2617],
   [-0.0274, 0.1561, -0.0509, -0.1723, -0.2678, -0.2616, 0.0786, 0.4124],
   [ 0.2346, 0.4487, -0.1409, -0.0807, -0.0232, -0.4975, 0.4244, 0.8337]],
  [[ 0.0879, 0.1122, 0.1502, -0.3033, -0.2715, -0.1191, 0.1367, 0.5275],
   [ 0.2258, 0.4395, -0.1365, 0.0135, -0.0777, -0.5221, 0.4683, 0.8115],
   [ 0.0158, 0.3471, 0.0742, -0.0550, -0.0098, -0.5521, 0.5923,0.8782]]],    grad_fn=<TransposeBackward0>)
tensor([[[ 0.2346, 0.4487, -0.1409, -0.0807, -0.0232, -0.4975, 0.4244, 0.8337],
   [ 0.0158, 0.3471, 0.0742, -0.0550, -0.0098, -0.5521, 0.5923, 0.8782]]],    grad_fn=<ViewBackward>)
'''
2.3 nn.LSTM
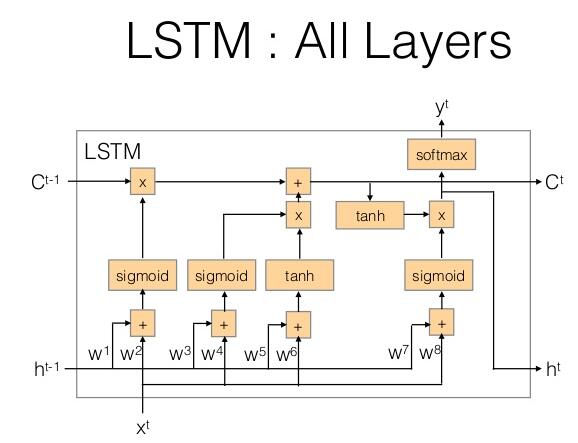
LSTM是RNN的一种模型,结构中增加了记忆单元,LSTM单元结构如下图所示:

每个单元存在输入x与上一时刻的隐层状态h和上一次记忆c,输出有y与当前时刻的隐层状态及当前时刻的记忆c。其使用上和RNN类似。
lstm = LSTM(input_dim, hidden_dim, num_layers=1, batch_first=True, bidirectional)
input_dim 输入word的特征数量,使用embeding时为嵌入的维度
hidden_dim 隐层的单元数
output, (hidden, cell) = lstm(input, (hidden, cell))
input 一批输入数据,shape为[batch, seq_len, input_dim]
hidden 当前时刻的隐层状态,shape为[num_layers * num_directions, batch, hidden_dim]
cell 当前时刻的记忆状态,shape为[num_layers * num_directions, batch, hidden_dim]
output 当前时刻的输出,shape为[batch, seq_len, num_directions*hidden_dim]
2.4 nn.GRU
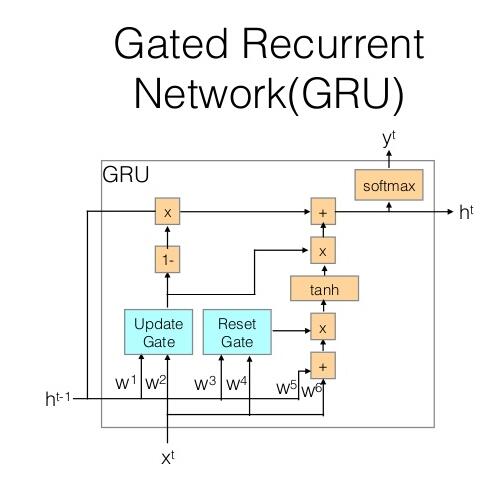
GRU也是一种RNN单元,但它比LSTM简化许多,普通的GRU单元结构如下图所示:

每个单元存在输入x与上一时刻的隐层状态h,输出有y与当前时刻的隐层状态。
rnn = GRU(input_dim, hidden_dim, num_layers=1, batch_first=True, bidirectional)
input_dim 输入word的特征数量,使用embeding时为嵌入的维度
hidden_dim 隐层的单元数
output, hidden = rnn(input, hidden)
input 一批输入数据,shape为[batch, seq_len, input_dim]
hidden 上一时刻的隐层状态,shape为[num_layers*num_directions, batch, hidden_dim]
output 当前时刻的输出,shape为[batch, seq_len, num_directions*hidden_size]
2.5 损失函数
MSELoss均方误差

输入x,y可以是任意的shape,但要保持相同的shape
CrossEntropyLoss 交叉熵误差

x : 包含每个类的得分,2-D tensor, shape=(batch, n)
class: 长度为batch 的 1D tensor,每个数值为类别的索引(0到 n-1)
3 字符级RNN的分类应用
这里先介绍字符极词向量的训练与使用。语料库使用nltk的names语料库,训练根据人名预测对应的性别,names语料库有两个分类,female与male,每个分类下对应约4000个人名。这个语料库是比较适合字符级RNN的分类应用,因为人名比较短,不能再做分词以使用词向量。
首次使用nltk的names语料库要先下载下来,运行代码nltk.download('names')即可。
字符级RNN模型的词汇表很简单,就是单个字符的集合,对于英文来说,只有26个字母,外加空格等会出现在名字中间的字符,见第14行代码。出于简化的目的,所有名字统一转换为小写。
神经网络很简单,一层RNN网络,用于学习名字序列的特征。一层全连接网络,用于从将高维特征映射到性别的二分类上。这部分代码由CharRNN类实现。这里没有使用embeding层,而是使用字符的one-hot编码,当然使用Embeding也是可以的。
网络的训练和使用封装为Model类,提供三个方法。train(), evaluate(),predict()分别用于训练,评估和预测使用。具体见下面的代码及注释。
import torch
from torch import nn
import torch.nn.functional as F
import numpy as np
import sklearn
import string
import random
nltk.download('names')
from nltk.corpus import names

USE_CUDA = torch.cuda.is_available()
device = torch.device("cuda" if USE_CUDA else "cpu")

chars = string.ascii_lowercase + '-' + ' ' + "'"

'''
将名字编码为向量:每个字符为one-hot编码,将多个字符的向量进行堆叠
abc = [ [1, 0, ...,0]
  [0, 1, 0, ..]
  [0, 0, 1, ..] ]
abc.shape = (len("abc"), len(chars))
'''
def name2vec(name):
 ids = [chars.index(c) for c in name if c not in ["\\"]]

 a = np.zeros(shape=(len(ids), len(chars)))
 for i, idx in enumerate(ids):
  a[i][idx] = 1
 return a

def load_data():
 female_file, male_file = names.fileids()

 f1_names = names.words(female_file)
 f2_names = names.words(male_file)

 data_set = [(name.lower(), 0) for name in f1_names] + [(name.lower(), 1) for name in f2_names]
 data_set = [(name2vec(name), sexy) for name, sexy in data_set]
 random.shuffle(data_set)
 return data_set

class CharRNN(nn.Module):
 def __init__(self, vocab_size, hidden_size, output_size):
  super(CharRNN, self).__init__()
  self.vocab_size = vocab_size
  self.hidden_size = hidden_size
  self.output_size = output_size

  self.rnn = nn.RNN(vocab_size, hidden_size, batch_first=True)
  self.liner = nn.Linear(hidden_size, output_size)

 def forward(self, input):
  h0 = torch.zeros(1, 1, self.hidden_size, device=device) # 初始hidden state
  output, hidden = self.rnn(input, h0)
  output = output[:, -1, :] # 只使用最终时刻的输出作为特征
  output = self.liner(output)
  output = F.softmax(output, dim=1)
  return output

hidden_dim = 128
output_dim = 2

class Model:
 def __init__(self, epoches=100):
  self.model = CharRNN(len(chars), hidden_dim , output_dim)
  self.model.to(device)
  self.epoches = epoches

 def train(self, train_set):
  loss_func = nn.CrossEntropyLoss()
  optimizer = torch.optim.RMSprop(self.model.parameters(), lr=0.0003)

  for epoch in range(self.epoches):
   total_loss = 0
   for x in range(1000):# 每轮随机样本训练1000次
    name, sexy = random.choice(train_set)
    # RNN的input要求shape为[batch, seq_len, embed_dim],由于名字为变长,也不准备好将其填充为定长,因此batch_size取1,将取的名字放入单个元素的list中。
    name_tensor = torch.tensor([name], dtype=torch.float, device=device)
    # torch要求计算损失时,只提供类别的索引值,不需要one-hot表示
    sexy_tensor = torch.tensor([sexy], dtype=torch.long, device=device)

    optimizer.zero_grad()

    pred = self.model(name_tensor) # [batch, out_dim]
    loss = loss_func(pred, sexy_tensor)
    loss.backward()
    total_loss += loss
    optimizer.step()
   print("Training: in epoch {} loss {}".format(epoch, total_loss/1000))

 def evaluate(self, test_set):
  with torch.no_grad(): # 评估时不进行梯度计算
   correct = 0
   for x in range(1000): # 从测试集中随机采样测试1000次
    name, sexy = random.choice(test_set)
    name_tensor = torch.tensor([name], dtype=torch.float, device=device)

    pred = self.model(name_tensor)
    if torch.argmax(pred).item() == sexy:
     correct += 1

   print('Evaluating: test accuracy is {}%'.format(correct/10.0))

 def predict(self, name):
  p = name2vec(name.lower())
  name_tensor = torch.tensor([p], dtype=torch.float, device=device)
  with torch.no_grad():
   out = self.model(name_tensor)
   out = torch.argmax(out).item()
   sexy = 'female' if out == 0 else 'male'
   print('{} is {}'.format(name, sexy))

if __name__ == "__main__":
 model = Model(10)
 data_set = load_data()
 train, test = sklearn.model_selection.train_test_split(data_set)
 model.train(train)
 model.evaluate(test)
 model.predict("Jim")
 model.predict('Kate')
'''
Evaluating: test accuracy is 82.6%
Jim is male
Kate is female
'''
4 基于字符级RNN的文本生成
文本生成的思想是,通过让神经网络学习下一个输出是哪个字符来训练权重参数。这里我们仍使用names语料库,尝试训练一个生成指定性别人名的神经网络化。与分类不同的是分类只计算最终状态输出的误差而生成要计算序列每一步计算上的误差,因此训练时要逐个字符的输入到网络。由于是根据性别来生成人名,因此把性别的one-hot向量concat到输入数据里,作为训练数据的一部分。
模型由类CharRNN实现,模型的训练和使用由Model类实现,提供了train(), sample()方法,前者用于训练模型,后者用于从训练中进行采样生成。
# coding=utf-8
import torch
from torch import nn
import torch.nn.functional as F
import numpy as np
import string
import random
import nltk
nltk.download('names')
from nltk.corpus import names

USE_CUDA = torch.cuda.is_available()
device = torch.device("cuda" if USE_CUDA else "cpu")

# 使用符号!作为名字的结束标识
chars = string.ascii_lowercase + '-' + ' ' + "'" + '!'

hidden_dim = 128
output_dim = len(chars)

# name abc encode as [[1, ...], [0,1,...], [0,0,1...]]
def name2input(name):
 ids = [chars.index(c) for c in name if c not in ["\\"]]
 a = np.zeros(shape=(len(ids), len(chars)), dtype=np.long)
 for i, idx in enumerate(ids):
  a[i][idx] = 1
 return a

# name abc encode as [0 1 2]
def name2target(name):
 ids = [chars.index(c) for c in name if c not in ["\\"]]
 return ids

# female=[[1, 0]] male=[[0,1]]
def sexy2input(sexy):
 a = np.zeros(shape=(1, 2), dtype=np.long)
 a[0][sexy] = 1
 return a

def load_data():
 female_file, male_file = names.fileids()

 f1_names = names.words(female_file)
 f2_names = names.words(male_file)

 data_set = [(name.lower(), 0) for name in f1_names] + [(name.lower(), 1) for name in f2_names]
 random.shuffle(data_set)
 print(data_set[:10])
 return data_set

'''
[('yoshiko', 0), ('timothea', 0), ('giorgi', 1), ('thedrick', 1), ('tessie', 0), ('keith', 1), ('carena', 0), ('anthea', 0), ('cathyleen', 0), ('almeta', 0)]
'''
class CharRNN(nn.Module):
 def __init__(self, vocab_size, hidden_size, output_size):
  super(CharRNN, self).__init__()
  self.vocab_size = vocab_size
  self.hidden_size = hidden_size
  self.output_size = output_size
  # 输入维度增加了性别的one-hot嵌入,dim+=2
  self.rnn = nn.GRU(vocab_size+2, hidden_size, batch_first=True)
  self.liner = nn.Linear(hidden_size, output_size)

 def forward(self, sexy, name, hidden=None):
  if hidden is None:
   hidden = torch.zeros(1, 1, self.hidden_size, device=device) # 初始hidden state
  # 对每个输入字符,将性别向量嵌入到头部
  input = torch.cat([sexy, name], dim=2)
  output, hidden = self.rnn(input, hidden)
  output = self.liner(output)
  output = F.dropout(output, 0.3)
  output = F.softmax(output, dim=2)
  return output.view(1, -1), hidden

class Model:
 def __init__(self, epoches):
  self.model = CharRNN(len(chars), hidden_dim , output_dim)
  self.model.to(device)
  self.epoches = epoches

 def train(self, train_set):
  loss_func = nn.CrossEntropyLoss()
  optimizer = torch.optim.RMSprop(self.model.parameters(), lr=0.001)

  for epoch in range(self.epoches):
   total_loss = 0
   for x in range(1000): # 每轮随机样本训练1000次
    loss = 0
    name, sexy = random.choice(train_set)
    optimizer.zero_grad()
    hidden = torch.zeros(1, 1, hidden_dim, device=device)
    # 对于姓名kate,将kate作为输入,ate!作为训输出,依次将每个字符输入网络,以计算误差
    for x, y in zip(list(name), list(name[1:]+'!')):
     name_tensor = torch.tensor([name2input(x)], dtype=torch.float, device=device)
     sexy_tensor = torch.tensor([sexy2input(sexy)], dtype=torch.float, device=device)
     target_tensor = torch.tensor(name2target(y), dtype=torch.long, device=device)

     pred, hidden = self.model(sexy_tensor, name_tensor, hidden)
     loss += loss_func(pred, target_tensor)

    loss.backward()
    optimizer.step()

    total_loss += loss/(len(name) - 1)

   print("Training: in epoch {} loss {}".format(epoch, total_loss/1000))

 def sample(self, sexy, start):
  max_len = 8
  result = []
  with torch.no_grad():
   hidden = None
   for c in start:
    sexy_tensor = torch.tensor([sexy2input(sexy)], dtype=torch.float, device=device)
    name_tensor = torch.tensor([name2input(c)], dtype=torch.float, device=device)
    pred, hidden = self.model(sexy_tensor, name_tensor, hidden)

   c = start[-1]
   while c != '!':
    sexy_tensor = torch.tensor([sexy2input(sexy)], dtype=torch.float, device=device)
    name_tensor = torch.tensor([name2input(c)], dtype=torch.float, device=device)
    pred, hidden = self.model(sexy_tensor, name_tensor, hidden)
    topv, topi = pred.topk(1)
    c = chars[topi]

    # c = chars[torch.argmax(pred)]
    result.append(c)

    if len(result) > max_len:
     break

  return start + "".join(result[:-1])

if __name__ == "__main__":
 model = Model(10)
 data_set = load_data()

 model.train(data_set)
 print(model.sample(0, "ka"))
 c = input('please input name prefix: ')
 while c != 'q':
  print(model.sample(1, c))
  print(model.sample(0, c))
  c = input('please input name prefix: ')
4 总结
通过这两个实验,可以发现深度学习可以以强有力的数据拟合能力来实现较好的数据分类及生成,但也要看到,深度学习并不理解人类的文本,还无任何创作能力。所谓的诗歌生成,绘画等神经网络无非是尽量使生成内容的概率分布与样本类似而已,理解和推断仍是机器所不具备的。
以上这篇Pytorch实现基于CharRNN的文本分类与生成示例就是小编分享给大家的全部内容了,希望能给大家一个参考,也希望大家多多支持我们。

