@ComponentScan注解用法之包路径占位符解析
目录
- 代码测试
- 底层行为分析
- 总结
@ComponentScan注解的basePackages属性支持占位符吗?
答案是肯定的。
代码测试
首先编写一个属性配置文件(Properties),名字随意,放在resources目录下。
在该文件中只需要定义一个属性就可以,属性名随意,值必须是要扫描的包路径。
basepackages=com.xxx.fame.placeholder
编写一个Bean,空类即可。
package com.xxx.fame.placeholder;
import org.springframework.stereotype.Component;
@Component
public class ComponentBean {
}
编写启动类,在启动类中通过@PropertySource注解来将外部配置文件加载到Spring应用上下文中,其次在@ComponentScan注解的value属性值中使用占位符来指定要扫描的包路径(占位符中指定的属性名必须和前面在属性文件中定义的属性名一致)。
使用Spring 应用上下文来获取前面编写的Bean,执行main方法,那么是会报错呢?还是正常返回实例呢?
package com.xxx.fame.placeholder;
import org.springframework.context.annotation.AnnotationConfigApplicationContext;
import org.springframework.context.annotation.ComponentScan;
import org.springframework.context.annotation.PropertySource;
@PropertySource("classpath:componentscan.properties")
@ComponentScan("${basepackages}")
public class ComponentScanPlaceholderDemo {
    public static void main(String[] args) {
        AnnotationConfigApplicationContext context = new AnnotationConfigApplicationContext();
        context.register(ComponentScanPlaceholderDemo.class);
        context.refresh();
        ComponentBean componentBean = context.getBean(ComponentBean.class);
        System.out.println(componentBean);
    }
}
运行结果如下,可以看到正常返回ComponentBean在IoC容器中的实例了。

这里我们是将@PropertySource注解添加到启动类上,那如果将@ProperSource注解添加到ComponentBean类上,程序还可以正常运行吗(将启动类上的@PropertySource注解移除掉)?
@Component
@PropertySource("classpath:componentscan.properties")
public class ComponentBean {}
启动应用程序。可以发现程序无法启动,抛出以下异常。在这个错误里有一个关键信息:“Could not resolve placeholder ‘basepackages' in value " b a s e p a c k a g e s " ” , 即 无 法 解 析 @ C o m p o n e n t S c a n 注 解 中 指 定 的 “ {basepackages}"”,即无法解析@ComponentScan注解中指定的“ basepackages"”,即无法解析@ComponentScan注解中指定的“{basepackages}”。

接下来我们就分析下,为什么在启动类中添加@PropertySource注解,导入属性资源,然后在@ComponentScan注解中使用占位符就没有问题,而在非启动类中添加@PropertySource导入外部配置资源,在@ComponentScan注解中使用占位符就会抛出异常。
上面说的启动类其实也存在问题,更精准的描述应该是在调用Spring 应用上下文的refresh方法之前调用register方法时传入的Class。
// ConfigurationClassParser#doProcessConfigurationClass
protected final SourceClass doProcessConfigurationClass(
			ConfigurationClass configClass, SourceClass sourceClass, Predicate<String> filter)
			throws IOException {
		// 扫描到的 配置类是否添加了@Component注解,如果外部类添加了@Component注解,再处理内部类
		if (configClass.getMetadata().isAnnotated(Component.class.getName())) {
			// Recursively process any member (nested) classes first
			processMemberClasses(configClass, sourceClass, filter);
		}
		// 处理所有的@PropertySource注解,由于@PropertySource被JDK1.8中的元注解@Repeatable所标注
		// 因此可以在一个类中添加多个
		for (AnnotationAttributes propertySource : AnnotationConfigUtils.attributesForRepeatable(
				sourceClass.getMetadata(), PropertySources.class,
				org.springframework.context.annotation.PropertySource.class)) {
			if (this.environment instanceof ConfigurableEnvironment) {
				processPropertySource(propertySource);
			} else {
				logger.info("Ignoring @PropertySource annotation on [" + sourceClass.getMetadata().getClassName() +
						"]. Reason: Environment must implement ConfigurableEnvironment");
			}
		}
		// 处理所有的@ComponentScan注解,@ComponentScan注解也被@Repeatable注解所标注
		Set<AnnotationAttributes> componentScans = AnnotationConfigUtils.attributesForRepeatable(
				sourceClass.getMetadata(), ComponentScans.class, ComponentScan.class);
		if (!componentScans.isEmpty() &&
				!this.conditionEvaluator.shouldSkip(sourceClass.getMetadata(), ConfigurationPhase.REGISTER_BEAN)) {
			for (AnnotationAttributes componentScan : componentScans) {
				// The config class is annotated with @ComponentScan -> perform the scan immediately
				Set<BeanDefinitionHolder> scannedBeanDefinitions =
						this.componentScanParser.parse(componentScan, sourceClass.getMetadata().getClassName());
				// Check the set of scanned definitions for any further config classes and parse recursively if needed
				for (BeanDefinitionHolder holder : scannedBeanDefinitions) {
					BeanDefinition bdCand = holder.getBeanDefinition().getOriginatingBeanDefinition();
					if (bdCand == null) {
						bdCand = holder.getBeanDefinition();
					}
					if (ConfigurationClassUtils.checkConfigurationClassCandidate(bdCand, this.metadataReaderFactory)) {
						parse(bdCand.getBeanClassName(), holder.getBeanName());
					}
				}
			}
		}
		// 删除其它与本次分析无关的代码....
		// No superclass -> processing is complete
		return null;
	}
底层行为分析
要想完全搞明白这个问题,就必须清楚Spring 应用上下文关于Bean资源加载这一块以及外部资源配置方面的逻辑,由于这一块逻辑比较庞大,单篇文章很难说明白,这里就只分析产生以上错误的原因。
问题的根源就出在ConfigurationClassParser的doProcessConfigurationClass方法中,在该方法中,Spring是先处理@PropertySource注解,再处理@ComponentScan或者@ComponentScans注解,而Spring应用上下文最先处理的类是谁呢?
答案就是我们通过应用上下文的register方法注册的类。当我们在register方法注册的类上添加@PropertySource注解,那么没问题,先解析@PropertySource注解导入的外部资源,接下来再解析@ComponentScan注解中的占位符,可以获取到值。
当我们将@PropertySource注解添加到非register方法注册的类时,由于是优先解析通过register方法注册的类,再去解析@ComponentScan注解,发现需要处理占位符才能进行类路径下的资源扫描,这时候就会使用Environment对象实例去解析。结果发现没有Spring应用上下文中并没有一个名为"basepackages"属性,所以抛出异常。
// ConfigurationClassParser#doProcessConfigurationClass
protected final SourceClass doProcessConfigurationClass(
			ConfigurationClass configClass, SourceClass sourceClass, Predicate<String> filter)
			throws IOException {
		// 扫描到的 配置类是否添加了@Component注解,如果外部类添加了@Component注解,再处理内部类
		if (configClass.getMetadata().isAnnotated(Component.class.getName())) {
			// Recursively process any member (nested) classes first
			processMemberClasses(configClass, sourceClass, filter);
		}
		// 处理所有的@PropertySource注解,由于@PropertySource被JDK1.8中的元注解@Repeatable所标注
		// 因此可以在一个类中添加多个
		for (AnnotationAttributes propertySource : AnnotationConfigUtils.attributesForRepeatable(
				sourceClass.getMetadata(), PropertySources.class,
				org.springframework.context.annotation.PropertySource.class)) {
			if (this.environment instanceof ConfigurableEnvironment) {
				processPropertySource(propertySource);
			} else {
				logger.info("Ignoring @PropertySource annotation on [" + sourceClass.getMetadata().getClassName() +
						"]. Reason: Environment must implement ConfigurableEnvironment");
			}
		}
		// 处理所有的@ComponentScan注解,@ComponentScan注解也被@Repeatable注解所标注
		Set<AnnotationAttributes> componentScans = AnnotationConfigUtils.attributesForRepeatable(
				sourceClass.getMetadata(), ComponentScans.class, ComponentScan.class);
		if (!componentScans.isEmpty() &&
				!this.conditionEvaluator.shouldSkip(sourceClass.getMetadata(), ConfigurationPhase.REGISTER_BEAN)) {
			for (AnnotationAttributes componentScan : componentScans) {
				// The config class is annotated with @ComponentScan -> perform the scan immediately
				Set<BeanDefinitionHolder> scannedBeanDefinitions =
						this.componentScanParser.parse(componentScan, sourceClass.getMetadata().getClassName());
				// Check the set of scanned definitions for any further config classes and parse recursively if needed
				for (BeanDefinitionHolder holder : scannedBeanDefinitions) {
					BeanDefinition bdCand = holder.getBeanDefinition().getOriginatingBeanDefinition();
					if (bdCand == null) {
						bdCand = holder.getBeanDefinition();
					}
					if (ConfigurationClassUtils.checkConfigurationClassCandidate(bdCand, this.metadataReaderFactory)) {
						parse(bdCand.getBeanClassName(), holder.getBeanName());
					}
				}
			}
		}
		// 删除其它与本次分析无关的代码....
		// No superclass -> processing is complete
		return null;
	}
那么除了将@PropertySource注解添加到通过register方法注册类中(注意该方法的参数是可变参类型,即可以传递多个。如果传递多个,需要注意Spring 应用上下文解析它们的顺序,如果顺序不当也可能抛出异常),还有其它的办法吗?
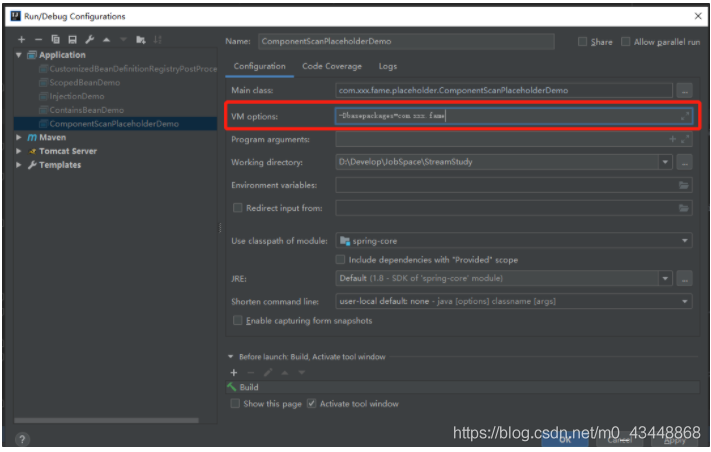
答案是有的,这里先给出答案,通过-D参数来完成,或者编码(设置到系统属性中),以Idea为例,只需在VM options中添加-Dbasepackages=com.xxx.fame即可。
或者在Spring应用上下文启动之前(refresh方法执行之前),调用System.setProperty(String,String)方法手动将属性以及属性值设置进去。
package com.xxx.fame.placeholder;
import org.springframework.context.annotation.AnnotationConfigApplicationContext;
import org.springframework.context.annotation.ComponentScan;
@ComponentScan("${basepackages}")
public class ComponentScanPlaceholderDemo {
    public static void main(String[] args) {
    // 手动调用System#setProperty方法,设置 “basepackages”及其属性值。
        System.setProperty("basepackages","com.xxx.fame");
        AnnotationConfigApplicationContext context = new AnnotationConfigApplicationContext();
        context.register(ComponentScanPlaceholderDemo.class);
        context.refresh();
        ComponentBean componentBean = context.getBean(ComponentBean.class);
        System.out.println(componentBean);
    }
}
而这由延伸出来一个很有意思的问题,手动调用System的setProperty方法来设置“basepackages” 属性,但同时也通过@PropertySource注解导入的外部资源中也指定相同的属性名但不同值,接下来通过Environment对象实例来解析占位符“${basepackages}”,那么究竟是哪个配置生效呢?
@ComponentScan("${basepackages}")
@PropertySource("classpath:componentscan.properties")
public class ComponentScanPlaceholderDemo {
    public static void main(String[] args) {
        System.setProperty("basepackages","com.xxx.fame");
        AnnotationConfigApplicationContext context = new AnnotationConfigApplicationContext();
        context.register(ComponentScanPlaceholderDemo.class);
        context.refresh();
        String value = context.getEnvironment().resolvePlaceholders("${basepackages}");
        System.out.println("${basepackages}占位符的值究竟是 com.xxx.fame 还是 com.unknow 呢? " + value);
    }
}
#在componentscan.properties指定相同的属性名,但值不同
basepackages=com.unknow
接下来启动应用上下文,执行结果如下:

可以看到是通过System的setProperty方法设置的属性值生效,具体原因这里就不再展开分析了,以后会详细分析Spring中外部配置优先级问题,很有意思。
书归正传,Spring 应用上下文是如何解析占位符的呢?想要知道答案,只需要跟着ComponentScanParser的parse方法走即可,因为在Spring应用上下中是由该类来解析@ComponentScan注解并完成指定类路径下的资源扫描和加载。
其实前面已经给出了答案,就是通过Environment实例的resolvePlaceHolders方法,但这里稍有不同的是resolvePlaceholders方法对于不能解析的占位符不会抛出异常,只会原样返回,那么为什么前面抛出异常呢?答案是使用了另一个方法-resolveRequiredPalceholders方法。
在ComponentScanAnnotationParser方法中,首先创建了ClassPathBeanDefinitionScanner对象,顾名思义该类就是用来处理类路径下的BeanDefinition资源扫描的(在MyBatis和Spring整合中,MyBatis就通过继承该类来完成@MapperScan注解中指定包路径下的资源扫描)。
由于@ComponentScan注解中的basepackages方法的返回值是一个数组,因此这里使用String类型的数组来接受,遍历该数组,没有每一个获取到每一个包路径,调用Environment对象的resolvePlaceholder方法来解析可能存在的占位符。由于resolvePlaceholders方法对于不能解析的占位符不会抛出异常,因此显然问题不是出自这里(之所以要提出这一部分代码,是想告诉大家,在@ComponentScan注解中可以使用占位符的,Spring是有处理的)。
在该方法的最后调用了ClassPathBeanDefinitionScanner的doScan方法,那么我们继续往下追查,看哪里调用了Environment对象的resolveRequiredPlaceholders方法。
// ComponentScanAnnotationParser#parse
public Set<BeanDefinitionHolder> parse(AnnotationAttributes componentScan, final String declaringClass) {
   ClassPathBeanDefinitionScanner scanner = new ClassPathBeanDefinitionScanner(this.registry,
         componentScan.getBoolean("useDefaultFilters"), this.environment, this.resourceLoader);
   // 删除与本次分析无关的代码.....
   Set<String> basePackages = new LinkedHashSet<>();
   String[] basePackagesArray = componentScan.getStringArray("basePackages");
   for (String pkg : basePackagesArray) {
      String[] tokenized = StringUtils.tokenizeToStringArray(this.environment.resolvePlaceholders(pkg),
            ConfigurableApplicationContext.CONFIG_LOCATION_DELIMITERS);
      Collections.addAll(basePackages, tokenized);
   }
  // 删除与本次分析无关的代码.....
   return scanner.doScan(StringUtils.toStringArray(basePackages));
}
在ClassPathBeanDefinitionScanner的doScan方法中,遍历传入的basePackages(即用户在@ComponentScan注解的basepackes方法中指定的资源路径,也许有小伙伴疑惑为什么我明明没有指定,只指定了其value方法,这涉及到Spring注解中的显式引用,有兴趣的小伙伴可以查看Spring 在Github项目上的Wiki),对于遍历到的每一个basepackge,都调用findCandidateComponents方法来处理,由于该方法的返回值是集合,泛型是BeanDefinitionHolder,这意味着已经根据资源路径完成了资源的扫描和加载,所以需要继续往下追查。
// ClassPathBeanDefinitionScanner#doScan
protected Set<BeanDefinitionHolder> doScan(String... basePackages) {
   Assert.notEmpty(basePackages, "At least one base package must be specified");
   Set<BeanDefinitionHolder> beanDefinitions = new LinkedHashSet<>();
   for (String basePackage : basePackages) {
      Set<BeanDefinition> candidates = findCandidateComponents(basePackage);
      // ...省略其它代码
   }
   return beanDefinitions;
}
ClassPathBeanDefinitionScanner并没有该方法,而是由其父类ClassPathScanningCandidateComponentProvider定义并实现。在findCandidateComponents方法中,首先判断是否使用了索引,如果使用了索引则调用addCandidateComponentsFromIndex方法,否则调用scanCandidateComponents方法(索引是Spring为了减少应用程序的启动时间,通过编译器来在编译期就确定那些类是需要IoC容器来进行管理的)。
// ClassPathScanningCandidateComponentProvider#findCandidateComponents
public Set<BeanDefinition> findCandidateComponents(String basePackage) {
   if (this.componentsIndex != null && indexSupportsIncludeFilters()) {
      return addCandidateComponentsFromIndex(this.componentsIndex, basePackage);
   } else {
      return scanCandidateComponents(basePackage);
   }
}
由于并未使用索引,所以执行scanCandidateComponents方法。在该方法中,首先创建了一个Set集合用来存放BeanDefinition,重点接下来的资源路径拼接,首先在资源路径前面拼接上“classpath*:”,然后调用resolveBasePackage方法,传入basePackage,最后拼接上“**/*.class”,看起来值的怀疑的地方只有这个resolveBasePackage方法了。
// ClassPathScanningCandidateComponentProvider#DEFAULT_RESOURCE_PATTERN
static final String DEFAULT_RESOURCE_PATTERN = "**/*.class";
//ResourcePatternResolver#CLASSPATH_ALL_URL_PREFIX
String CLASSPATH_ALL_URL_PREFIX = "classpath*:";
// ClassPathScanningCandidateComponentProvider#scanCandidateComponents
private Set<BeanDefinition> scanCandidateComponents(String basePackage) {
   Set<BeanDefinition> candidates = new LinkedHashSet<>();
   try {
      String packageSearchPath = ResourcePatternResolver.CLASSPATH_ALL_URL_PREFIX +
            resolveBasePackage(basePackage) + '/' + this.resourcePattern;
      // 删除与本次分析无关的代码......
   } catch (IOException ex) {
      throw new BeanDefinitionStoreException("I/O failure during classpath scanning", ex);
   }
   return candidates;
}
果不其然,在resolveBasePackage方法中,调用Environment实现类对象的resolveRequiredPlacehol-ders方法。
// ClassPathScanningCandidateComponentProvider#resolveBasePackage
protected String resolveBasePackage(String basePackage) {
   return ClassUtils.convertClassNameToResourcePath(getEnvironment().resolveRequiredPlaceholders(basePackage));
}
最后我们分析下为什么resolvePlaceholders方法对于不能处理的占位符只会原样返回,而resolveReq-uiredPlaceholders方法对于不能处理的占位符却会抛出异常呢?
Environment实现类并不具备占位符解析能力,其只具有存储外部配置以及查询外部配置的能力,虽然也实现了PropertyResolver接口,这也是典型的装饰者模式实现。
// AbstractEnvironment#resolvePlaceholders
public String resolvePlaceholders(String text) {
	return this.propertyResolver.resolvePlaceholders(text);
}
// AbstractEnvironment#resolveRequiredPlaceholders
public String resolveRequiredPlaceholders(String text) throws IllegalArgumentException {
	return this.propertyResolver.resolveRequiredPlaceholders(text);
}

AbstractProperyResolver实现了resolvePlaceholders方法以及resolveRequiredPlaceholders方法,不过能明显看到都是委派给PropertyPlaceholderHelper类来完成占位符的解析。不过重点是在通过cr-eatePlaceholders方法创建PropertyPlaceholderHelper实例传入的布尔值。
在resolvePlaceholders方法中调用createPlaceholderHelper方法时,传入的布尔值为true,而在resolveRequiredPlaceholders方法中调用createPlaceholders方式时传入的布尔值为false。
该值决定了PropertyPlaceholderHelper在面对无法解析的占位符时的行为。
@Nullable
private PropertyPlaceholderHelper nonStrictHelper;
	@Nullable
private PropertyPlaceholderHelper strictHelper;
// AbstractPropertyResolver#resolvePlaceholders
public String resolvePlaceholders(String text) {
   if (this.nonStrictHelper == null) {
      this.nonStrictHelper = createPlaceholderHelper(true);
   }
   return doResolvePlaceholders(text, this.nonStrictHelper);
}
// AbstractPropertyResolver#resolveRequiredPlaceholders
public String resolveRequiredPlaceholders(String text) throws IllegalArgumentException {
   if (this.strictHelper == null) {
      this.strictHelper = createPlaceholderHelper(false);
   }
   return doResolvePlaceholders(text, this.strictHelper);
}
在PropertyPlaceholderHelper的parseStringValue方法中(该方法就是Spring 应用上下文中解析占位符的地方(例如@Value注解中配置的占位符))。
在该方法中,对于无法解析的占位符,首先会判断ignoreUnresolvablePlaceholders属性是否为true,如果为true,则继续尝试解析,否则(else分支)就是抛出我们前面的看到的异常。
ingnoreUresolvablePlaceholder属性的含义是代表是否需要忽略不能解析的占位符。
// PropertyPlaceholderHelper#parseStringValue
protected String parseStringValue(
      String value, PlaceholderResolver placeholderResolver, @Nullable Set<String> visitedPlaceholders) {
   // 省略与本次分析无关代码......
   StringBuilder result = new StringBuilder(value);
   while (startIndex != -1) {
      int endIndex = findPlaceholderEndIndex(result, startIndex);
      if (endIndex != -1) {
          // 省略与本次分析无关代码......
         } else if (this.ignoreUnresolvablePlaceholders) {
            // Proceed with unprocessed value.
            startIndex = result.indexOf(this.placeholderPrefix, endIndex + this.placeholderSuffix.length());
         } else {
            throw new IllegalArgumentException("Could not resolve placeholder '" +
                  placeholder + "'" + " in value \"" + value + "\"");
         }
         visitedPlaceholders.remove(originalPlaceholder);
      } else {
         startIndex = -1;
      }
   }
   return result.toString();
}
总结
我们可以在@ComponentScan注解中通过使用占位符来外部化指定Spring 应用上下文要加载的资源路径,但需要注意的是要配合@PropertySource注解使用或者通过-D参数来指定。
在使用@PropertySource注解来导入外部配置资源的时候,需要注意的是该注解必须添加到通过调用register方法注册的配置类中,并且如果传入的是多个配置类,那么需要注意它们之间的顺序,以防因为顺序问题而导致解析占位符失败。
以上为个人经验,希望能给大家一个参考,也希望大家多多支持我们。
相关推荐
-
spring @Component注解原理解析
这篇文章主要介绍了spring @Component注解原理解析,文中通过示例代码介绍的非常详细,对大家的学习或者工作具有一定的参考学习价值,需要的朋友可以参考下 1.@controller 控制器(注入服务) 2.@service 业务(注入dao) 3.@repository dao(实现dao访问) 4.@component (把普通pojo实例化到spring容器中,相当于配置文件中的<bean id="" class=""/>) 5.@Comp
-
Spring注解开发@Bean和@ComponentScan使用案例
组件注册 用@Bean来注册 搭建好maven web工程 pom加入spring-context,spring-core等核心依赖 创建实例类com.hjj.bean.Person, 生成getter,setter方法 public class Person { private String name; private int age; } 创建com.hjj.config.MainConfig @Configuration //告诉spring是一个配置类 public class Main
-

详解SpringBoot启动类的扫描注解的用法及冲突原则
背景 SpringBoot 启动类上,配置扫描包路径有三种方式,最近看到一个应用上三种注解都用上了,代码如下: @SpringBootApplication(scanBasePackages ={"a","b"}) @ComponentScan(basePackages = {"a","b","c"}) @MapperScan({"XXX"}) public class XXApplic
-
springboot @ComponentScan注解原理解析
这篇文章主要介绍了springboot @ComponentScan注解原理解析,文中通过示例代码介绍的非常详细,对大家的学习或者工作具有一定的参考学习价值,需要的朋友可以参考下 @ComponentScan 告诉Spring从哪里找到bean. 如果你的其他包都在@SpringBootApplication注解的启动类所在的包及其下级包,则你什么都不用做,SpringBoot会自动帮你把其他包都扫描了. 如果你有一些bean所在的包,不在启动类的包及其下级包,那么你需要手动加上@Compone
-
spring boot 的常用注解使用小结
@RestController和@RequestMapping注解 4.0重要的一个新的改进是@RestController注解,它继承自@Controller注解.4.0之前的版本,Spring MVC的组件都使用@Controller来标识当前类是一个控制器servlet.使用这个特性,我们可以开发REST服务的时候不需要使用@Controller而专门的@RestController. 当你实现一个RESTful web services的时候,response将一直通过response
-
@ComponentScan注解用法之包路径占位符解析
目录 代码测试 底层行为分析 总结 @ComponentScan注解的basePackages属性支持占位符吗? 答案是肯定的. 代码测试 首先编写一个属性配置文件(Properties),名字随意,放在resources目录下. 在该文件中只需要定义一个属性就可以,属性名随意,值必须是要扫描的包路径. basepackages=com.xxx.fame.placeholder 编写一个Bean,空类即可. package com.xxx.fame.placeholder; import org
-
Spring Boot环境属性占位符解析及类型转换详解
前提 前面写过一篇关于Environment属性加载的源码分析和扩展,里面提到属性的占位符解析和类型转换是相对复杂的,这篇文章就是要分析和解读这两个复杂的问题.关于这两个问题,选用一个比较复杂的参数处理方法PropertySourcesPropertyResolver#getProperty,解析占位符的时候依赖到 PropertySourcesPropertyResolver#getPropertyAsRawString: protected String getPropertyAsRawSt
-
Spring及Mybatis整合占位符解析失败问题解决
问题:写了一个新的dao接口,进行单元测试时提示: Initialization of bean failed; nested exception is org.springframework.beans.TypeMismatchException: Failed to convert property value of type 'java.lang.String' to required type 'int' for property 'maxActive'; nested exceptio
-
spring是如何解析xml配置文件中的占位符
前言 我们在配置Spring Xml配置文件的时候,可以在文件路径字符串中加入 ${} 占位符,Spring会自动帮我们解析占位符,这么神奇的操作Spring是怎么帮我们完成的呢?这篇文章我们就来一步步揭秘. 1.示例 ClassPathXmlApplicationContext applicationContext = new ClassPathXmlApplicationContext(); applicationContext.setConfigLocation("${java.versi
-
MyBatis中#{}占位符与${}拼接符的用法说明
1.关于#{}占位符 先来看以下的示例,该示例是MyBatis中的SQL映射配置文件(Mapper配置文件),在该配置中使用了#{}占位符. <?xml version="1.0" encoding="UTF-8" ?> <!DOCTYPE mapper PUBLIC "-//mybatis.org//DTD Mapper 3.0//EN" "http://mybatis.org/dtd/mybatis-3-mappe
-
golang fmt格式“占位符”的实例用法详解
golang 的fmt 包实现了格式化I/O函数,类似于C的 printf 和 scanf. # 定义示例类型和变量 type Human struct { Name string } var people = Human{Name:"zhangsan"} 普通占位符 占位符 说明 举例 输出 %v 相应值的默认格式. Printf("%v", people) {zhangsan}, %+v 打印结构体时,会添加字段名 Printf("%+v",
-
Spring实战之属性占位符配置器用法示例
本文实例讲述了Spring实战之属性占位符配置器用法.分享给大家供大家参考,具体如下: 一 配置文件 <?xml version="1.0" encoding="GBK"?> <beans xmlns:xsi="http://www.w3.org/2001/XMLSchema-instance" xmlns="http://www.springframework.org/schema/beans" xmlns
-
Spring实战之属性覆盖占位符配置器用法示例
本文实例讲述了Spring实战之属性覆盖占位符配置器用法.分享给大家供大家参考,具体如下: 一 配置文件 <?xml version="1.0" encoding="GBK"?> <beans xmlns:xsi="http://www.w3.org/2001/XMLSchema-instance" xmlns="http://www.springframework.org/schema/beans" xsi
-
python常见的占位符总结及用法
占位符说明 1.%c,格式化字符及其ASCII码 2.%s,格式化字符串 3.%d,格式化整数 4.%u,格式化无符号整数 5.%o,格式化无符号八进制数 实例 print('%2d-%02d' % (3, 1)) print('%.2f' % 3.1415926) 结果: 3-01 3.14 基础知识点扩展: 占位符,顾名思义就是插在输出里站位的符号.我们可以把它理解成我们预定饭店.当我们告诉饭店的时候,饭店的系统里会有我们的预定位置.虽然我们现在没有去但是后来的顾客就排在我们后面. 常见的占
-
深入理解结构体中占位符的用法
复制代码 代码如下: typedef union{ struct x{ char a1 : 2; char b1 : 3; char c1 : 3; }x1; char c;}my_un;int main(){ my_un a; a.c = 100; printf("%d/n",a.x1.c1); printf("%d/n",sizeof(my_un)); return 0;} 输出结果:31即第一个是3,