springBoot整合rabbitmq测试常用模型小结
目录
- 1.添加依赖
- 2.编写配置
- 3.编写并测试
之前我们记录了原生java代码使用rabbitmq的方法,很简单,类似于原生jdbc代码一样,将连接对象抽离出来作为工具类,生产者和消费者通过工具类获取连接对象,进而获取通道对象,再注册交换机或者是队列等,发送消息与接收消息。
在企业开发中,我们更多的是使用spring框架来整合其它技术,springboot更是方便的提供了各种starter来快速添加依赖,完成整合,开箱即用。
1.添加依赖
<dependency>
	  <groupId>org.springframework.boot</groupId>
	  <artifactId>spring-boot-starter-amqp</artifactId>
</dependency>
2.编写配置
配置信息包括ip,端口,虚拟主机,用户名和密码,和原生java代码所需的配置信息一致。
spring:
  application:
    name: spirngboot-rabbitmq
  rabbitmq:
    host: 192.168.20.128
    port: 5672
    virtual-host: /vh
    username: wuwl
    password: 123456
3.编写并测试
本文主要针对前五种常用模型,在spirngboot框架的基础上整合rabbitmq并进行测试使用。

(1) Hello World模型
这是一种简单的直连模型,生产者将消息直接发送至消息队列,消费者绑定消息队列后直接获取,一对一。spring-boot-starter-amqp为我们提供了一个org.springframework.amqp.rabbit.core.RabbitTemplate类来方便我们使用rabbitmq,自动注入即可。
生产者测试类:
@SpringBootTest(classes = RabbitmqDemoApplication.class)
@RunWith(SpringRunner.class)
public class RabbitmqDemoApplicationTests {
    @Autowired
    private RabbitTemplate rabbitTemplate;
    @Test
    public void testHelloQueues(){
            rabbitTemplate.convertAndSend("hello","hello world");
    }
}
生产者向名为hello的队列发送消息,但是,在没有消费者的情况下,生产者没有任何意义。另外,convertAndSend方法的第一个参数并不是消息队列的意思,而是routingKey,我们根据源码找到最初定义的接口可以看到以下内容:
/**
	 * Convert a Java object to an Amqp {@link Message} and send it to a default exchange
	 * with a specific routing key.
	 *
	 * @param routingKey the routing key
	 * @param message a message to send
	 * @throws AmqpException if there is a problem
	 */
	void convertAndSend(String routingKey, Object message) throws AmqpException;
第二个参数为Object类型,也就是说可以传递任意类型的对象,该方法将对象转换成一个Amqp消息并发送到一个默认的交换机,并且routingKey为第一个参数的内容,没有提到消息队列的信息,但我们可以分析到,这里的routingKey与queues应该是同名的。
消费者类:
@Component
@RabbitListener(queuesToDeclare = @Queue("hello"))
public class HelloQueuesConsumer {
    @RabbitHandler
    public void consume(String msg){
        System.out.println("消费消息:" + msg + " " + System.currentTimeMillis());
    }
}
上面的代码等同于:
@Component
public class HelloQueuesConsumer {
    @RabbitListener(queuesToDeclare = @Queue("hello"))
    public void consume(String msg){
        System.out.println("消费消息:" + msg + " " + System.currentTimeMillis());
    }
}
@RabbitListener 可以标注在类上面,需配合 @RabbitHandler 注解一起使用
@RabbitListener 标注在类上面表示当有收到消息的时候,就交给 @RabbitHandler 的方法处理,具体使用哪个方法处理,根据 MessageConverter 转换后的参数类型
直接启动测试方法,也就是生产者,可以看到:
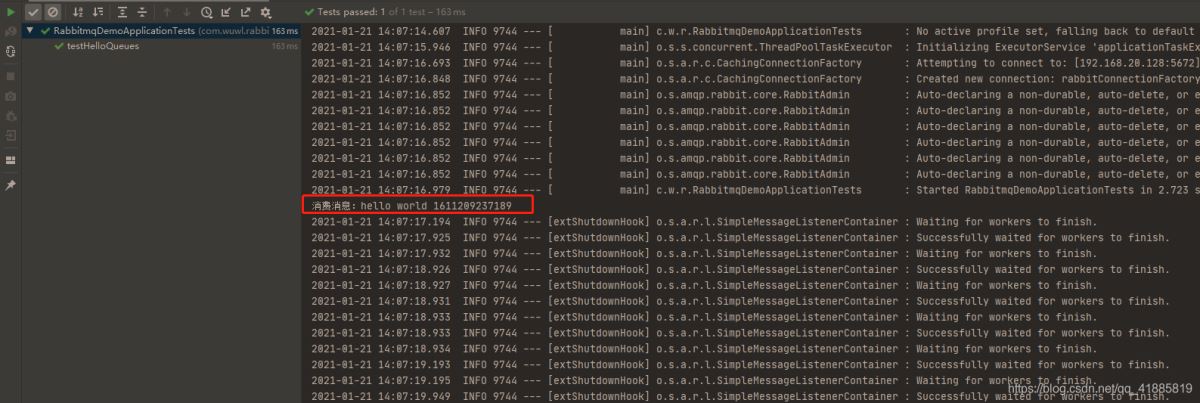
消费者有接收到消息队列中的信息并打印。
(2) work queues模型
生产者测试方法,类与第一个模型一致
@Test
public void testWorkQueues(){
    for (int i = 0; i < 20; i++) {
        rabbitTemplate.convertAndSend("work","work index " + i);
    }
}
消费者类:
@Component
public class WorkQueuesConsumer {
    @RabbitListener(queuesToDeclare = @Queue("work"))
    public void consume1(String msg){
        System.out.println("consumer1消费消息:" + msg);
    }
    @RabbitListener(queuesToDeclare = @Queue("work"))
    public void consume2(String msg){
        System.out.println("consumer2消费消息:" + msg);
    }
}
启动生产者测试方法:

消费者一与消费者二均匀分配了队列中的消息任务,即使两者执行效率不一致,也同样是均匀分配。
(3) Publish/Subscribe模型
生产者测试方法:
for (int i = 0; i < 20; i++) {
    rabbitTemplate.convertAndSend("amq.fanout","","fanout msg " + i);
}
消费者类:
@Component
public class FanoutQueuesConsumer {
    @RabbitListener(bindings = {
            @QueueBinding(value = @Queue,
                    exchange = @Exchange(
                            value = "amq.fanout",
                            type = "fanout"))})
    public void consume1(String msg) {
        System.out.println("consumer1消费消息:" + msg);
    }
    @RabbitListener(bindings = {
            @QueueBinding(value = @Queue,
                    exchange = @Exchange(
                            value = "amq.fanout",
                            type = "fanout"))})
    public void consume2(String msg) {
        System.out.println("consumer2消费消息:" + msg);
    }
}
注意此处的交换机信息
启动生产者测试方法:

此处只粘贴了部分打印信息,两个消费者获得了相同的消息,生产者将消息发送至交换机,由交换机发送至已注册到交换机的所有临时消息队列,进而消费者获取队列中的消息。
(4) Routing模型
生产者测试方法:
@Test
public void testDirectQueues(){
    rabbitTemplate.convertAndSend("amq.direct","info","routingKey is info");
    rabbitTemplate.convertAndSend("amq.direct","warn","routingKey is warn");
    rabbitTemplate.convertAndSend("amq.direct","error","routingKey is error");
}
routing也成为fanout模型,对应的交换机类型为direct
消费者类:
@Component
public class DirectQueuesConsumer {
    @RabbitListener(bindings = {
            @QueueBinding(value = @Queue,
                    exchange = @Exchange(
                            value = "amq.direct",
                            type = "direct"),
                    key = {"info", "warn", "error"})})
    public void consume1(String msg) {
        System.out.println("consumer1消费消息:" + msg);
    }

    @RabbitListener(bindings = {
            @QueueBinding(value = @Queue,
                    exchange = @Exchange(
                            value = "amq.direct",
                            type = "direct"),
                    key = "error")})
    public void consume2(String msg) {
        System.out.println("consumer2消费消息:" + msg);
    }
}
启动生产者测试类: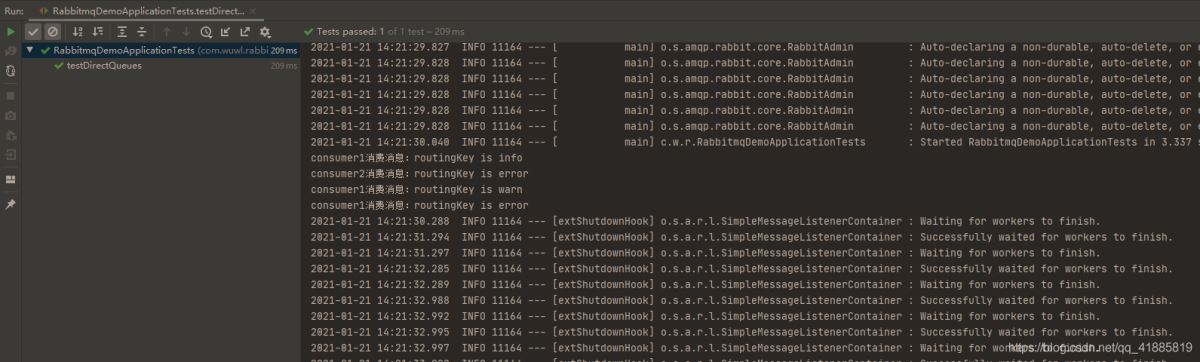
消费者一配置了三种类型的routingKey,所以三种类型的消息都能够接收到,消费者二只能接受到error类型的消息。
(5) Topic模型
生产者测试方法:
@Test
public void testTopicQueues(){
    rabbitTemplate.convertAndSend("amq.topic","file.info","routingKey is info");
    rabbitTemplate.convertAndSend("amq.topic","file.warn","routingKey is warn");
    rabbitTemplate.convertAndSend("amq.topic","file.error","routingKey is error");
}
消费者类:
@Component
public class TopicQueuesConsumer {
    @RabbitListener(bindings = {
            @QueueBinding(value = @Queue,
                    exchange = @Exchange(
                            value = "amq.topic",
                            type = "topic"),
                    key = {"#"})})
    public void consume1(String msg) {
        System.out.println("consumer1消费消息:" + msg);
    }

    @RabbitListener(bindings = {
            @QueueBinding(value = @Queue,
                    exchange = @Exchange(
                            value = "amq.topic",
                            type = "topic"),
                    key = "*.error")})
    public void consume2(String msg) {
        System.out.println("consumer2消费消息:" + msg);
    }
}
启动生产者测试方法:

消费者一配置的routingKey为#,可以接受任意类型的消息,*好代表一个单词,消费者二可以接受任意单词加上.error为routingKey的消息。
到此这篇关于springBoot整合rabbitmq并测试五种常用模型的文章就介绍到这了,更多相关springBoot整合rabbitmq内容请搜索我们以前的文章或继续浏览下面的相关文章希望大家以后多多支持我们!
相关推荐
-
RabbitMQ 3.9.7 镜像模式集群与Springboot 2.5.5 整合
目录 1. 概述 2. 场景说明 3. 与Springboot的整合 3.1 引入依赖 3.2 生产服务配置 3.3 生产服务代码 3.4 消费服务配置 3.5 消费服务代码 3.6 Rest 测试代码 4. 综述 1. 概述 老话说的好:做人要懂得变通,善于思考,有时稍微转个弯,也许问题就解决了. 言归正传,之前我们聊了 RabbitMQ 3.9.7 镜像模式集群的搭建,今天我们来聊聊 RabbitMQ 3.9.7 镜像模式集群与Springboot 2.5.5 整合. 2. 场景说明 服务器
-

RabbitMQ开启SSL与SpringBoot连接测试的配置方法
目录 楔子 配置 RabbitMQ 开启 SSL 使用 OpenSSL CLI 工具验证证书是否有效 编写 SpringBoot 代码连接测试 参考 楔子 近期公司程序被安全扫描出 远程主机允许明文身份验证 中风险漏洞,查了下修复方案,RabbitMQ官方提供了SSL连接方式,而且 SpringBoot AMQP 也支持 SSL 连接.以下将配置RabbitMQ开启SSL 并使用 SpringBoot Demo 测试连接. PS : 写文章时此配置还未安全扫描复测,如果测试通过,本人将更新此文章
-
一篇文章教你将JAVA的RabbitMQz与SpringBoot整合
目录 一.fanout:发布订阅型 二.direct:直连型 三.topic:通配符模式 四.消费者端接收消息 总结 本文主要聊SpringBoot整合RabbitMQ,主要分为生产者和消费者两个工程,目录结构如下: 先简单说一下RabbitMQ的一些核心概念: 1.虚拟主机vhost:vhost是物理隔离的,你可以将vhost看作是一个个小型的RabbitMQ 2.交换机exchange:生产者发送的消息不是直接到达队列的,而是交换机,然后交换机再根据路由key,路由到指定的队列,可以理解为一
-
SpringBoot停止启动时测试检查rabbitmq操作
目录 SpringBoot停止启动时测试检查rabbitmq 问题 解决 RabbitMQ的简单使用的Demo 1.声明 2.创建一个测试账户 3.pom依赖 5.创建入口类 6.测试 7.总结 SpringBoot停止启动时测试检查rabbitmq 问题 在Springboot项目中配置rabbitmq后,总是在每次启动时自动测试MQ的连接,如果测试不通过,就一直重连,导致项目无法正常启动.自己在开发与MQ无关的功能时,无法正常进行,十分耽误时间.如下所示: org.springframewo
-
SpringBoot整合RabbitMQ及生产全场景高级特性实战
目录 摘要 整合 依赖与配置 生产者配置消息队列规则 生产者发布消息 消费者监听消息 摘要 整合场景含 topic 工作模式(通过 routingKey 可满足简单/工作队列/发布订阅/路由等四种工作模式)和 confirm(消息确认).return(消息返回).basicAck(消息签收).basicNack(拒绝签收).DLX(Dead Letter Exchange死信队列)实现延时/定时任务等. 整合 依赖与配置 以下内容消费者同生产者 <parent> <groupId>
-
springBoot整合rabbitmq测试常用模型小结
目录 1.添加依赖 2.编写配置 3.编写并测试 之前我们记录了原生java代码使用rabbitmq的方法,很简单,类似于原生jdbc代码一样,将连接对象抽离出来作为工具类,生产者和消费者通过工具类获取连接对象,进而获取通道对象,再注册交换机或者是队列等,发送消息与接收消息.在企业开发中,我们更多的是使用spring框架来整合其它技术,springboot更是方便的提供了各种starter来快速添加依赖,完成整合,开箱即用. 1.添加依赖 <dependency> <groupId>
-
Springboot整合RabbitMq测试TTL的方法详解
目录 什么是TTL? 如何设置TTL? 设定整个队列的过期时间 配置类编写 测试 配置 测试 总结 代码下载 什么是TTL? 在RabbitMq中,存在一种高级特性 TTL. TTL即Time To Live的缩写,含义为存活时间或者过期时间.即: 设定消息在队列中存活的时间.当指定时间内,消息依旧未被消费,则由队列自动将其删除. 如何设置TTL? 既然涉及到设定消息的存活时间,在RabbitMq中,存在两种设置方式: 设置整个队列的过期时间. 设置单个消息的过期时间. 设定整个队列的过期时间
-
Springboot 整合RabbitMq(用心看完这一篇就够了)
该篇文章内容较多,包括有rabbitMq相关的一些简单理论介绍,provider消息推送实例,consumer消息消费实例,Direct.Topic.Fanout的使用,消息回调.手动确认等. (但是关于rabbitMq的安装,就不介绍了) 在安装完rabbitMq后,输入http://ip:15672/ ,是可以看到一个简单后台管理界面的. 在这个界面里面我们可以做些什么? 可以手动创建虚拟host,创建用户,分配权限,创建交换机,创建队列等等,还有查看队列消息,消费效率,推送效率等等. 以上
-
SpringBoot整合RabbitMQ实现消息确认机制
前面几篇案例已经将常用的交换器(DirectExchange.TopicExchange.FanoutExchange)的用法介绍完了,现在我们来看一下消息的回调,也就是消息确认. 在rabbitmq-provider项目的application.yml文件上加上一些配置 server: port: 8021 spring: #给项目来个名字 application: name: rabbitmq-provider #配置rabbitMq 服务器 rabbitmq: host: 127.0.0.
-
SpringBoot整合RabbitMQ 手动应答(简单demo)
版本说明 JDK 1.8 RabbitMQ 3.7.15 Erlang 22.0 SpringBoot 2.3.3.RELEASE // TODO 2021年1月8日 整理CentOS安装RabbitMQ流程 1. 在RabbitMQ的Web管理界面,创建test队列 参数的含义 durability:是否持久化(重启或宕机后消息依然保存) durable 持久 transient 暂时 新建maven项目. 2. pom.xml <?xml version="1.0" enco
-
SpringBoot整合RabbitMQ, 实现生产者与消费者的功能
自然,依赖是少不了的.除了spring-boot-starter-web依赖外. 就这个是最主要的依赖了,其他的看着办就是了.我用的是gradle,用maven的看着弄也一样的.无非就是包+包名+版本 //AMQP compile('org.springframework.boot:spring-boot-starter-amqp:2.0.4.RELEASE') 这里有一个坑.导致我后来发送消息时一直连不上去.报错: java.net.SocketException: socket closed
-
SpringBoot整合RabbitMQ消息队列的完整步骤
SpringBoot整合RabbitMQ 主要实现RabbitMQ以下三种消息队列: 简单消息队列(演示direct模式) 基于RabbitMQ特性的延时消息队列 基于RabbitMQ相关插件的延时消息队列 公共资源 1. 引入pom依赖 <dependency> <groupId>org.springframework.boot</groupId> <artifactId>spring-boot-starter-amqp</artifactId>
-
springBoot整合rabbitMQ的方法详解
引入pom <?xml version="1.0" encoding="UTF-8"?> <project xmlns="http://maven.apache.org/POM/4.0.0" xmlns:xsi="http://www.w3.org/2001/XMLSchema-instance" xsi:schemaLocation="http://maven.apache.org/POM/4.0
-
springboot整合RabbitMQ发送短信的实现
RabbitMQ安装和运行 # 安装 rpm -ivh erlang-21.3.8.9-1.el7.x86_64.rpm rpm -ivh socat-1.7.3.2-1.el6.lux.x86_64.rpm rpm -ivh rabbitmq-server-3.8.1-1.el7.noarch.rpm # 卸载 #rpm -qa | grep rabbitmq # 启用管理插件 rabbitmq-plugins enable rabbitmq_management # 启动RabbitMQ s
-
SpringBoot整合RabbitMQ的5种模式实战
目录 一.环境准备 二.简单模式 三.工作队列模式 四.广播模式(Fanout) 五.直连模式(Direct) 六.通配符模式(Topic) 一.环境准备 1.pom依赖 <!-- 父工程依赖 --> <parent> <groupId>org.springframework.boot</groupId> <artifactId>spring-boot-starter-parent</artifactId> <version&g