Android SharedPreferences实现记住密码和自动登录界面
SharedPreferences介绍:
SharedPreferences是Android平台上一个轻量级的存储类,主要是保存一些常用的配置参数,它是采用xml文件存放数据的,文件存放在"/data/data<package name>/shared_prefs"目录下。
SharedPreferences的用法:
由于SharedPreferences是一个接口,而且在这个接口里没有提供写入数据和读取数据的能力。但它是通过其Editor接口中的一些方法来操作SharedPreference的,用法见下面代码:
Context.getSharedPreferences(String name,int mode)来得到一个SharedPreferences实例
name:是指文件名称,不需要加后缀.xml,系统会自动为我们添加上。
mode:是指定读写方式,其值有三种,分别为:
Context.MODE_PRIVATE:指定该SharedPreferences数据只能被本应用程序读、写
Context.MODE_WORLD_READABLE:指定该SharedPreferences数据能被其他应用程序读,但不能写
Context.MODE_WORLD_WRITEABLE:指定该SharedPreferences数据能被其他应用程序读写。
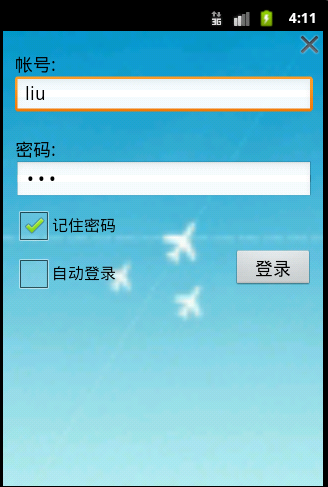
结果截图:


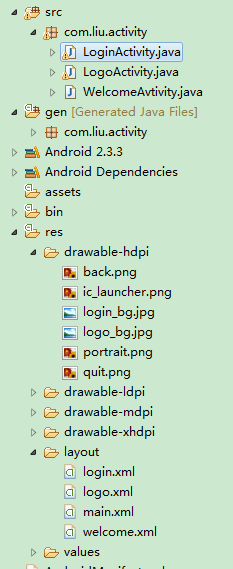
工程目录:

Java代码
LoginActivity.java
package com.liu.activity;

import android.app.Activity;
import android.app.backup.SharedPreferencesBackupHelper;
import android.content.Context;
import android.content.Intent;
import android.content.SharedPreferences;
import android.content.SharedPreferences.Editor;
import android.os.Bundle;
import android.text.Spannable;
import android.view.View;
import android.view.View.OnClickListener;
import android.view.Window;
import android.widget.Button;
import android.widget.CheckBox;
import android.widget.CompoundButton;
import android.widget.CompoundButton.OnCheckedChangeListener;
import android.widget.EditText;
import android.widget.ImageButton;
import android.widget.Toast;

public class LoginActivity extends Activity {

 private EditText userName, password;
 private CheckBox rem_pw, auto_login;
 private Button btn_login;
 private ImageButton btnQuit;
 private String userNameValue,passwordValue;
 private SharedPreferences sp;

 public void onCreate(Bundle savedInstanceState) {
 super.onCreate(savedInstanceState);

 //去除标题
 this.requestWindowFeature(Window.FEATURE_NO_TITLE);
 setContentView(R.layout.login);

 //获得实例对象
 sp = this.getSharedPreferences("userInfo", Context.MODE_WORLD_READABLE);
 userName = (EditText) findViewById(R.id.et_zh);
 password = (EditText) findViewById(R.id.et_mima);
 rem_pw = (CheckBox) findViewById(R.id.cb_mima);
 auto_login = (CheckBox) findViewById(R.id.cb_auto);
 btn_login = (Button) findViewById(R.id.btn_login);
 btnQuit = (ImageButton)findViewById(R.id.img_btn);

 //判断记住密码多选框的状态
 if(sp.getBoolean("ISCHECK", false))
 {
  //设置默认是记录密码状态
  rem_pw.setChecked(true);
  userName.setText(sp.getString("USER_NAME", ""));
  password.setText(sp.getString("PASSWORD", ""));
  //判断自动登陆多选框状态
  if(sp.getBoolean("AUTO_ISCHECK", false))
  {
   //设置默认是自动登录状态
   auto_login.setChecked(true);
  //跳转界面
  Intent intent = new Intent(LoginActivity.this,LogoActivity.class);
  LoginActivity.this.startActivity(intent);

  }
 }

 // 登录监听事件 现在默认为用户名为:liu 密码:123
 btn_login.setOnClickListener(new OnClickListener() {

  public void onClick(View v) {
  userNameValue = userName.getText().toString();
  passwordValue = password.getText().toString();

  if(userNameValue.equals("liu")&&passwordValue.equals("123"))
  {
   Toast.makeText(LoginActivity.this,"登录成功", Toast.LENGTH_SHORT).show();
   //登录成功和记住密码框为选中状态才保存用户信息
   if(rem_pw.isChecked())
   {
   //记住用户名、密码、
   Editor editor = sp.edit();
   editor.putString("USER_NAME", userNameValue);
   editor.putString("PASSWORD",passwordValue);
   editor.commit();
   }
   //跳转界面
   Intent intent = new Intent(LoginActivity.this,LogoActivity.class);
   LoginActivity.this.startActivity(intent);
   //finish();

  }else{

   Toast.makeText(LoginActivity.this,"用户名或密码错误,请重新登录", Toast.LENGTH_LONG).show();
  }

  }
 });

 //监听记住密码多选框按钮事件
 rem_pw.setOnCheckedChangeListener(new OnCheckedChangeListener() {
  public void onCheckedChanged(CompoundButton buttonView,boolean isChecked) {
  if (rem_pw.isChecked()) {

   System.out.println("记住密码已选中");
   sp.edit().putBoolean("ISCHECK", true).commit();

  }else {

   System.out.println("记住密码没有选中");
   sp.edit().putBoolean("ISCHECK", false).commit();

  }

  }
 });

 //监听自动登录多选框事件
 auto_login.setOnCheckedChangeListener(new OnCheckedChangeListener() {
  public void onCheckedChanged(CompoundButton buttonView,boolean isChecked) {
  if (auto_login.isChecked()) {
   System.out.println("自动登录已选中");
   sp.edit().putBoolean("AUTO_ISCHECK", true).commit();

  } else {
   System.out.println("自动登录没有选中");
   sp.edit().putBoolean("AUTO_ISCHECK", false).commit();
  }
  }
 });

 btnQuit.setOnClickListener(new OnClickListener() {

  @Override
  public void onClick(View v) {
  finish();
  }
 });

 }
}
LogoActivity.java
package com.liu.activity;
import android.app.Activity;
import android.content.Intent;
import android.content.SharedPreferences;
import android.content.SharedPreferences.Editor;
import android.opengl.ETC1;
import android.os.Bundle;
import android.view.View;
import android.view.View.OnClickListener;
import android.view.Window;
import android.view.animation.AlphaAnimation;
import android.view.animation.Animation;
import android.view.animation.Animation.AnimationListener;
import android.widget.Button;
import android.widget.ImageButton;
import android.widget.ImageView;
import android.widget.ProgressBar;

public class LogoActivity extends Activity {
 private ProgressBar progressBar;
 private Button backButton;

 protected void onCreate(Bundle savedInstanceState) {
 super.onCreate(savedInstanceState);
 // 去除标题
 this.requestWindowFeature(Window.FEATURE_NO_TITLE);
 setContentView(R.layout.logo);

 progressBar = (ProgressBar) findViewById(R.id.pgBar);
 backButton = (Button) findViewById(R.id.btn_back);

 Intent intent = new Intent(this, WelcomeAvtivity.class);
 LogoActivity.this.startActivity(intent);

 backButton.setOnClickListener(new OnClickListener() {

  @Override
  public void onClick(View v) {
  finish();

  }
 });

 }

}
WelcomeActivity.java
package com.liu.activity;
import android.app.Activity;
import android.os.Bundle;

public class WelcomeAvtivity extends Activity {

 @Override
 protected void onCreate(Bundle savedInstanceState) {
 // TODO Auto-generated method stub
 super.onCreate(savedInstanceState);
 setContentView(R.layout.welcome);
 }

}
布局文件:
login.xml文件
<?xml version="1.0" encoding="utf-8"?>
<LinearLayout xmlns:android="http://schemas.android.com/apk/res/android"
 android:layout_width="fill_parent"
 android:layout_height="fill_parent"
 android:background="@drawable/logo_bg"
 android:orientation="vertical" >

 <RelativeLayout
 android:layout_width="fill_parent"
 android:layout_height="wrap_content" >
 <ImageButton
  android:id="@+id/img_btn"
  android:layout_width="wrap_content"
  android:layout_height="wrap_content"
  android:layout_alignParentRight="true"
  android:background="@drawable/quit"/>

 <TextView
  android:id="@+id/tv_zh"
  android:layout_width="wrap_content"
  android:layout_height="35dip"
  android:layout_marginLeft="12dip"
  android:layout_marginTop="10dip"
  android:gravity="bottom"
  android:text="帐号:"
  android:textColor="#000000"
  android:textSize="18sp" />

 <EditText
  android:id="@+id/et_zh"
  android:layout_width="fill_parent"
  android:layout_height="40dip"
  android:layout_below="@id/tv_zh"
  android:layout_marginLeft="12dip"
  android:layout_marginRight="10dip" />

 <TextView
  android:id="@+id/tv_mima"
  android:layout_width="wrap_content"
  android:layout_height="35dip"
  android:layout_below="@id/et_zh"
  android:layout_marginLeft="12dip"
  android:layout_marginTop="10dip"
  android:gravity="bottom"
  android:text="密码:"
  android:textColor="#000000"
  android:textSize="18sp" />

 <EditText
  android:id="@+id/et_mima"
  android:layout_width="fill_parent"
  android:layout_height="40dip"
  android:layout_below="@id/tv_mima"
  android:layout_marginLeft="12dip"
  android:layout_marginRight="10dip"
  android:maxLines="200"
  android:password="true"
  android:scrollHorizontally="true" />

 <CheckBox
  android:id="@+id/cb_mima"
  android:layout_width="wrap_content"
  android:layout_height="wrap_content"
  android:layout_below="@id/et_mima"
  android:layout_marginLeft="12dip"
  android:text="记住密码"
  android:textColor="#000000" />

 <CheckBox
  android:id="@+id/cb_auto"
  android:layout_width="wrap_content"
  android:layout_height="wrap_content"
  android:layout_below="@id/cb_mima"
  android:layout_marginLeft="12dip"
  android:text="自动登录"
  android:textColor="#000000" />
 <Button
  android:id="@+id/btn_login"
  android:layout_width="80dip"
  android:layout_height="40dip"
  android:layout_below="@id/et_mima"
  android:layout_alignParentRight="true"
  android:layout_alignTop="@id/cb_auto"
  android:layout_marginRight="10dip"
  android:gravity="center"
  android:text="登录"
  android:textColor="#000000"
  android:textSize="18sp"/>

 </RelativeLayout>

</LinearLayout>
logo.xml文件
<?xml version="1.0" encoding="utf-8"?>
<LinearLayout xmlns:android="http://schemas.android.com/apk/res/android"
 android:layout_width="fill_parent"
 android:layout_height="fill_parent"
 android:background="@drawable/logo_bg"
 android:orientation="vertical" >

 <RelativeLayout
 android:layout_width="fill_parent"
 android:layout_height="wrap_content"
 android:layout_weight="3">

 <ProgressBar
  android:id="@+id/pgBar"
  android:layout_width="wrap_content"
  android:layout_height="wrap_content"
  android:layout_centerInParent="true" />

 <TextView
  android:id="@+id/tv1"
  android:layout_width="wrap_content"
  android:layout_height="wrap_content"
  android:layout_below="@id/pgBar"
  android:layout_centerHorizontal="true"
  android:text="正在登录..."
  android:textColor="#000000"
  android:textSize="18sp" />
 </RelativeLayout>

 <LinearLayout
 android:layout_width="fill_parent"
 android:layout_height="wrap_content"
 android:layout_weight="1"
 android:gravity="center"
 android:orientation="vertical" >

 <Button
  android:id="@+id/btn_back"
  android:layout_width="70dip"
  android:layout_height="35dip"
  android:text="取消"
  android:textColor="#000000"
  android:textSize="12sp" />
 </LinearLayout>

</LinearLayout>
welcome.xml
<?xml version="1.0" encoding="utf-8"?>
<LinearLayout xmlns:android="http://schemas.android.com/apk/res/android"
 android:layout_width="fill_parent"
 android:layout_height="fill_parent"
 android:layout_gravity="center"
 android:background="@drawable/login_bg"
 android:orientation="vertical" >

 <TextView
 android:layout_width="fill_parent"
 android:layout_height="wrap_content"
 android:gravity="center"
 android:text="登陆成功,进入用户界面"
 android:textColor="#000000"
 android:textSize="20sp" />

</LinearLayout>
工程下载连接:android-SharedPreferences_jb51.rar
以上就是本文的全部内容,希望对大家的学习有所帮助,也希望大家多多支持我们。

