TensorFlow2基本操作之 张量排序 填充与复制 查找与替换
目录
- 张量排序
- tf.sort
- tf.argsort
- tf.math.top_k
- 填充与复制
- tf.pad
- tf.tile
- 查找与替换
- tf.where (第一种)
- tf.where (第二种)
- tf.scatter_nd
张量排序

tf.sort
tf.sort函数可以帮我们对张量进行排序.
格式:
tf.sort(
    values, axis=-1, direction='ASCENDING', name=None
)
参数:
- values: 要进行排序的张量
- axis: 操作维度
- direction: 正序或者倒序
- name: 数据名称
例子:
# 创建张量0~9, 并打乱顺序
a = tf.random.shuffle(tf.range(10))
print(a)

# 从小到大
b = tf.sort(a)  # direction="ASCENDING"
print(b)

# 从大到小
c = tf.sort(a, direction="DESCENDING")
print(c)
输出结果:
tf.Tensor([6 3 7 5 4 0 2 9 8 1], shape=(10,), dtype=int32)
tf.Tensor([0 1 2 3 4 5 6 7 8 9], shape=(10,), dtype=int32)
tf.Tensor([9 8 7 6 5 4 3 2 1 0], shape=(10,), dtype=int32)
tf.argsort
tf.argsort返回张量的索引排序, 沿给的轴排序.
格式:
tf.argsort(
    values, axis=-1, direction='ASCENDING', stable=False, name=None
)
参数:
- 要进行排序的张量
- axis: 操作维度
- direction: 正序或者倒序
- stable: 如果为 True, 则原始张量中的相等元素将不会按返回的顺序重新排序
- name: 数据名称
例子:
# 创建张量0~9, 并打乱顺序
a = tf.random.shuffle(tf.range(10))
print(a)

# 从小到大
b = tf.argsort (a)
print(b)

# 从大到小
c = tf.argsort (a, direction="DESCENDING")
print(c)
输出结果:
tf.Tensor([9 4 3 1 2 6 0 5 7 8], shape=(10,), dtype=int32)
tf.Tensor([6 3 4 2 1 7 5 8 9 0], shape=(10,), dtype=int32)
tf.Tensor([0 9 8 5 7 1 2 4 3 6], shape=(10,), dtype=int32)
tf.math.top_k
tf.math.top_k可以帮助我们查找最后一个维度的 k 个最大条目的值和索引.
格式:
tf.math.top_k(
    input, k=1, sorted=True, name=None
)
参数:
- input: 传入张量
- k=1: 前 k 位
- sorted: 是否排序
- name: 数据名称
例子:
# 创建张量0~9, 并打乱顺序, 形状为 3*3
a = tf.reshape(tf.random.shuffle(tf.range(9)), [3, 3])
print(a)

# 取top2
b = tf.math.top_k(a, 2)
print(b)
输出结果:
tf.Tensor(
[[2 1 4]
[5 7 0]
[8 6 3]], shape=(3, 3), dtype=int32)
TopKV2(values=<tf.Tensor: shape=(3, 2), dtype=int32, numpy=
array([[4, 2],
[7, 5],
[8, 6]])>, indices=<tf.Tensor: shape=(3, 2), dtype=int32, numpy=
array([[2, 0],
[1, 0],
[0, 1]])>)
填充与复制
tf.pad
tf.pad可以帮我们对一个 tensor 四周进行填充.

格式:
tf.pad(
    tensor, paddings, mode='CONSTANT', constant_values=0, name=None
)
参数:
- tensor: 传入的张量
- paddings: 要扩展的维度
- mode: 模式, 默认为 “CONSTANT”
- constant_value: 在 “CONSTANT” 模式下, 要使用的标量填充值 (必须与张量类型相同)
- name: 数据名称
例子:
# pad
a = tf.reshape(tf.range(9), [3, 3])
print(a)

# 上下左右填充一圈0
b = tf.pad(a, [[1, 1], [1, 1]])
print(b)
输出结果:
tf.Tensor(
[[0 1 2]
[3 4 5]
[6 7 8]], shape=(3, 3), dtype=int32)
tf.Tensor(
[[0 0 0 0 0]
[0 0 1 2 0]
[0 3 4 5 0]
[0 6 7 8 0]
[0 0 0 0 0]], shape=(5, 5), dtype=int32)
tf.tile
tf.tile可以帮助我们实现 tensor 的复制.
格式:
tf.tile(
    input, multiples, name=None
)
参数:
- input: 传入的张量
- multiples: 复制的次数
- name: 数据名称
例子:
# tile
a = tf.reshape(tf.range(9), [3, 3])
print(a)

b = tf.tile(a, [2, 2])
print(b)
输出结果:
tf.Tensor(
[[0 1 2]
[3 4 5]
[6 7 8]], shape=(3, 3), dtype=int32)
tf.Tensor(
[[0 1 2 0 1 2]
[3 4 5 3 4 5]
[6 7 8 6 7 8]
[0 1 2 0 1 2]
[3 4 5 3 4 5]
[6 7 8 6 7 8]], shape=(6, 6), dtype=int32)
查找与替换

tf.where (第一种)
返回元素为 True 的位置.
格式:
tf.where(
    condition, name=None
)
参数:
- condition: 判断条件
- name: 数据名称
例子:
# 第一种用法(单参数)
mask = tf.constant([[True, True, True], [False, True, True], [True, False, False]])
print(mask)

indices = tf.where(mask)
print(indices)
输出结果:
tf.Tensor(
[[ True True True]
[False True True]
[ True False False]], shape=(3, 3), dtype=bool)
tf.Tensor(
[[0 0]
[0 1]
[0 2]
[1 1]
[1 2]
[2 0]], shape=(6, 2), dtype=int64)
tf.where (第二种)
类似三元运算符的用法.
格式:
tf.where(
    condition, x=None, y=None, name=None
)
参数:
- condition: 判断条件
- x: 如果条件为 True 赋值
- y: 如果条件为 False 赋值
- name: 数据名称
例子:
# 第二种用法(三个参数)
zeros = tf.zeros([3, 3])
print(zeros)

ones = tf.ones([3, 3])
print(ones)

mask = tf.constant([[True, True, True], [False, True, True], [True, False, False]])
print(mask)

result = tf.where(mask, zeros, ones)
print(result)
输出结果:
tf.Tensor(
[[0. 0. 0.]
[0. 0. 0.]
[0. 0. 0.]], shape=(3, 3), dtype=float32)
tf.Tensor(
[[1. 1. 1.]
[1. 1. 1.]
[1. 1. 1.]], shape=(3, 3), dtype=float32)
tf.Tensor(
[[ True True True]
[False True True]
[ True False False]], shape=(3, 3), dtype=bool)
tf.Tensor(
[[0. 0. 0.]
[1. 0. 0.]
[0. 1. 1.]], shape=(3, 3), dtype=float32)
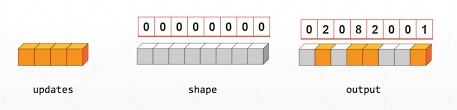
tf.scatter_nd
使用索引更新张量.
格式:
tf.scatter_nd(
    indices, updates, shape, name=None
)
参数:
- indices: 索引
- updates: 更新的值
- shape: 形状
- name: 数据名称
例子:
# scatter_nd
indices = tf.constant([[4], [3], [1], [7]])
print(indices)

updates = tf.constant([9, 10, 11, 12])
print(updates)

shape = tf.constant([8])
print(shape)

result = tf.scatter_nd(indices, updates, shape)
print(result)
输出结果:
tf.Tensor(
[[4]
[3]
[1]
[7]], shape=(4, 1), dtype=int32)
tf.Tensor([ 9 10 11 12], shape=(4,), dtype=int32)
tf.Tensor([8], shape=(1,), dtype=int32)
tf.Tensor([ 0 11 0 10 9 0 0 12], shape=(8,), dtype=int32)
到此这篇关于TensorFlow2基本操作之 张量排序 填充与复制 查找与替换的文章就介绍到这了,更多相关TensorFlow2基本操作内容请搜索我们以前的文章或继续浏览下面的相关文章希望大家以后多多支持我们!
相关推荐
-

一小时学会TensorFlow2之基本操作2实例代码
目录 索引操作 简单索引 Numpy 式索引 使用 : 进行索引 tf.gather tf.gather_nd tf.boolean_mask 切片操作 简单切片 step 切片 维度变换 tf.reshape tf.transpose tf.expand_dims tf.squeeze Boardcasting tf.boardcast_to tf.tile 数学运算 加减乘除 log & exp pow & sqrt 矩阵相乘 @ 索引操作 简单索引 索引 (index) 可以帮助我们
-
一小时学会TensorFlow2之基本操作1实例代码
目录 概述 创建数据 创建常量 创建数据序列 创建图变量 tf.zeros tf.ones tf.zeros_like tf.ones_like tf.fill tf.gather tf.random 正态分布 均匀分布 打乱顺序 获取数据信息 获取数据维度 数据是否为张量 数据转换 转换成张量 转换数据类型 转换成 numpy 概述 TensorFlow2 的基本操作和 Numpy 的操作很像. 今天带大家来看一看 TensorFlow 的基本数据操作. 创建数据 详细讲解一下 TensorF
-
TensorFlow2基本操作之合并分割与统计
目录 合并与分割 tf.concat tf.stack tf.unstack tf.split 数据统计 tf.norm reduce_min/max/mean argmax / argmin tf.equal tf.unique 合并与分割 tf.concat tf.concat可以帮助我们实现拼接操作. 格式: tf.concat( values, axis, name='concat' ) 参数: values: 一个 tensor 或 tensor list axis: 操作的维度 na
-
TensorFlow2基本操作之 张量排序 填充与复制 查找与替换
目录 张量排序 tf.sort tf.argsort tf.math.top_k 填充与复制 tf.pad tf.tile 查找与替换 tf.where (第一种) tf.where (第二种) tf.scatter_nd 张量排序 tf.sort tf.sort函数可以帮我们对张量进行排序. 格式: tf.sort( values, axis=-1, direction='ASCENDING', name=None ) 参数: values: 要进行排序的张量 axis: 操作维度 direc
-
java 线性表接口的实例详解
java 线性表接口的实例详解 前言: 线性表是其组成元素间具有线性关系的一种线性结构,对线性表的基本操作主要有插入.删除.查找.替换等,这些操作可以在线性表的任何位置进行.线性表可以采用顺序存储结构和链式存储结构表示. 本接口的类属于dataStructure包的linearList子包.线性表接口LList声明如下,描述线性表的取值.置值.插入.删除等基本操作. package dataStructure.linearList; public interface LList<E> { bo
-
Java实现几种常见排序算法代码
稳定度(稳定性)一个排序算法是稳定的,就是当有两个相等记录的关键字R和S,且在原本的列表中R出现在S之前,在排序过的列表中R也将会是在S之前. 排序算法分类 常见的有插入(插入排序/希尔排序).交换(冒泡排序/快速排序).选择(选择排序).合并(归并排序)等. 一.插入排序 插入排序(Insertion Sort),它的工作原理是通过构建有序序列,对于未排序数据,在已排序序列中从后向前扫描,找到相应位置并插入.插入排序在实现上,通常采用in-place排序(即只需用到O(1)的额外空间的排序),
-
python sort、sorted高级排序技巧
Python list内置sort()方法用来排序,也可以用python内置的全局sorted()方法来对可迭代的序列排序生成新的序列. 1)排序基础 简单的升序排序是非常容易的.只需要调用sorted()方法.它返回一个新的list,新的list的元素基于小于运算符(__lt__)来排序. 复制代码 代码如下: >>> sorted([5, 2, 3, 1, 4]) [1, 2, 3, 4, 5] 你也可以使用list.sort()方法来排序,此时list本身将被修改.通常此方法不如s
-
javascript对JSON数据排序的3个例子
一.适用于数字排序和字幕排序 json 的排序方法有很多种,这是其中最简单的一种方法. 复制代码 代码如下: var sortBy = function (filed, rev, primer) { rev = (rev) ? -1 : 1; return function (a, b) { a = a[filed]; b = b[filed]; if (typeof (primer) != 'undefined') {
-
关于.NET Framework中的设计模式--应用策略模式为List排序
简单类型排序 编程时遇到排序在平常不过,使用.Net最常见的就是对泛型List<T>进行排序,如果T是简单数据类型排序那么很简单 复制代码 代码如下: public List<int> SortSimpleList(List<int> list){list.Sort();return list;} 同样对string等简单类型List<T>排序均如此,如果我们要排的对象复杂了怎么办,我们知道List<T> sort()最后是用快速排序实现,快速排
-
php数组中包含中文的排序方法
php数组中文排序,文件格式一般用utf8,直接用asort排序不行.若是gbk和gb2312可以.这跟编码有关.gbk和gb2312本身的编码就是用拼音排序的. 复制代码 代码如下: function utf8_array_asort(&$array) {if(!isset($array) || !is_array($array)) { return false;}foreach($array as $k=>$v) { $array[$k] = iconv('UTF-8', 'GB23