Android入门教程之Fragment的具体使用详解
目录
- Fragment 的简单用法
- 动态加载 Fragment
- Fragment 实现返回栈
- Fragment 和 Activity 之间的交互
- Fragment 生命周期
Fragment 的简单用法
Fragment 是一种可以嵌入在 Activity 当中的 UI 片段,它能让程序更加合理和充分地利用大屏幕的空间,因此在平板上应用非常广泛
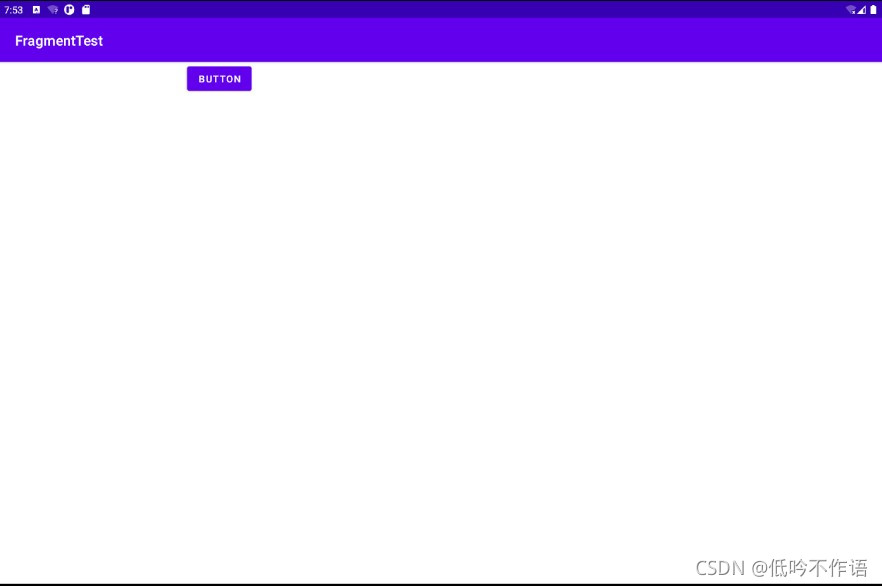
在一个 Activity 中添加两个 Fragment,并让两个 Fragment 平分 Activity 的空间,首先新建一个左侧 Fragment 的布局 left_fragment.xml,这个布局只放置了一个按钮
<LinearLayout xmlns:android="http://schemas.android.com/apk/res/android"
    android:orientation="vertical"
    android:layout_width="match_parent"
    android:layout_height="match_parent">

    <Button
        android:id="@+id/button"
        android:layout_width="wrap_content"
        android:layout_height="wrap_content"
        android:layout_gravity="center_horizontal"
        android:text="Button" />

</LinearLayout>
然后新建一个右侧 Fragment 的布局 right_fragment.xml,将背景色设置成绿色,并放置一个 TextView 用于显示一段文本
<LinearLayout xmlns:android="http://schemas.android.com/apk/res/android"
    android:orientation="vertical"
    android:background="#00ff00"
    android:layout_width="match_parent"
    android:layout_height="match_parent">

    <TextView
        android:layout_width="wrap_content"
        android:layout_height="wrap_content"
        android:layout_gravity="center_horizontal"
        android:textSize="24sp"
        android:text="This is right fragment" />

</LinearLayout>
接着新建一个 LeftFragment 类,并让它继承自 Fragment,注意这里要使用 AndroidX 库中的 Fragment,将刚刚定义的两个布局动态加载进来
class LeftFragment : Fragment() {

    override fun onCreateView(
        inflater: LayoutInflater,
        container: ViewGroup?,
        savedInstanceState: Bundle?
    ): View? {
        return inflater.inflate(R.layout.left_fragment, container, false)
    }
}
class RightFragment : Fragment() {

    override fun onCreateView(
        inflater: LayoutInflater,
        container: ViewGroup?,
        savedInstanceState: Bundle?
    ): View? {
        return inflater.inflate(R.layout.right_fragment, container, false)
    }
}
接下来修改 activity_main.xml 中的代码,使用 <fragment> 标签在布局中添加 Fragment
<LinearLayout xmlns:android="http://schemas.android.com/apk/res/android"
    android:orientation="horizontal"
    android:layout_width="match_parent"
    android:layout_height="match_parent">

    <fragment
        android:id="@+id/leftFrag"
        android:name="com.example.fragmenttest.LeftFragment"
        android:layout_width="0dp"
        android:layout_height="match_parent"
        android:layout_weight="1" />

    <fragment
        android:id="@+id/rightFrag"
        android:name="com.example.fragmenttest.RightFragment"
        android:layout_width="0dp"
        android:layout_height="match_parent"
        android:layout_weight="1" />

</LinearLayout>

动态加载 Fragment
Fragment 真正强大之处在于,它可以在程序运行时根据具体情况来动态添加 Fragment,使得程序界面更加多样化
修改 activity_main.xml 的代码,使用 FrameLayout 布局,所有的空间都会默认摆放在布局的左上角,由于这里仅需要在布局里放入一个 Fragment,不需要任何定位,因此适合使用 FragLayout
<LinearLayout xmlns:android="http://schemas.android.com/apk/res/android"
    android:orientation="horizontal"
    android:layout_width="match_parent"
    android:layout_height="match_parent">

    <fragment
        android:id="@+id/leftFrag"
        android:name="com.example.fragmenttest.LeftFragment"
        android:layout_width="0dp"
        android:layout_height="match_parent"
        android:layout_weight="1" />

    <FrameLayout
        android:id="@+id/rightLayout"
        android:layout_width="0dp"
        android:layout_height="match_parent"
        android:layout_weight="1" />

</LinearLayout>
修改 MainActivity 中的代码,实现动态添加 Fragment 的功能,给左侧 Fragment 的按钮注册一个点击事件,会动态加载右侧 Fragment
class MainActivity : AppCompatActivity() {

    override fun onCreate(savedInstanceState: Bundle?) {
        super.onCreate(savedInstanceState)
        setContentView(R.layout.activity_main)
        button.setOnClickListener {
            replaceFragment(RightFragment())
        }
    }

    private fun replaceFragment(fragment: Fragment) {
        val fragmentManager = supportFragmentManager
        val transaction = fragmentManager.beginTransaction()
        transaction.replace(R.id.rightLayout, fragment)
        transaction.commit()
    }
}

Fragment 实现返回栈
在上一节,通过点击按钮加载一个 Fragment 之后,按下 Back 键程序就会直接退出,如果我们希望实现类似返回栈的效果,按下 Back 键可以返回
FragmentTransaction 中提供了一个 addToBackStack() 方法,可以用于将一个事务添加到返回栈中,修改 MainActivity 中的代码
class MainActivity : AppCompatActivity() {

    override fun onCreate(savedInstanceState: Bundle?) {
        super.onCreate(savedInstanceState)
        setContentView(R.layout.activity_main)
        button.setOnClickListener {
            replaceFragment(RightFragment())
        }
    }

    private fun replaceFragment(fragment: Fragment) {
        val fragmentManager = supportFragmentManager
        val transaction = fragmentManager.beginTransaction()
        transaction.replace(R.id.rightLayout, fragment)
        transaction.addToBackStack(null)
        transaction.commit()
    }
}
我们在事务提交之前调用了 FragmentTransaction 的 addToBackStack() 方法,它可以接收一个名字用于描述返回栈的状态,一般传入 null 即可。现在重新运行程序,点击按钮加载右侧 Fragment,然后按下 Back 键,程序不会立刻退出,而是返回上一状态
Fragment 和 Activity 之间的交互
为了方便 Fragment 和 Activity 之间进行交互,FragmentManager 提供了一个类似于 findViewById() 的方法,专门用于从布局文件中获取 Fragment 的实例
supportFragmentManager.findFragmentById(R.id.leftFrag) as LeftFragment
那么在 Fragment 中又该怎么调用 Activity 里的方法呢?在每个 Fragment 中都可以通过调用 getActivity() 方法来得到和当前 Fragment 相关联的 Activity 实例
 if (activity != null) {
     val mainActivity = activity as MainActivity
 }
不同的 Fragment 之间也可以通信,基本思路是:首先在一个 Fragment 中得到与它相关联的 Activity,然后再通过这个 Activity 去获取另外一个 Fragment 实例,就实现了不同的 Fragment 之间的通信了
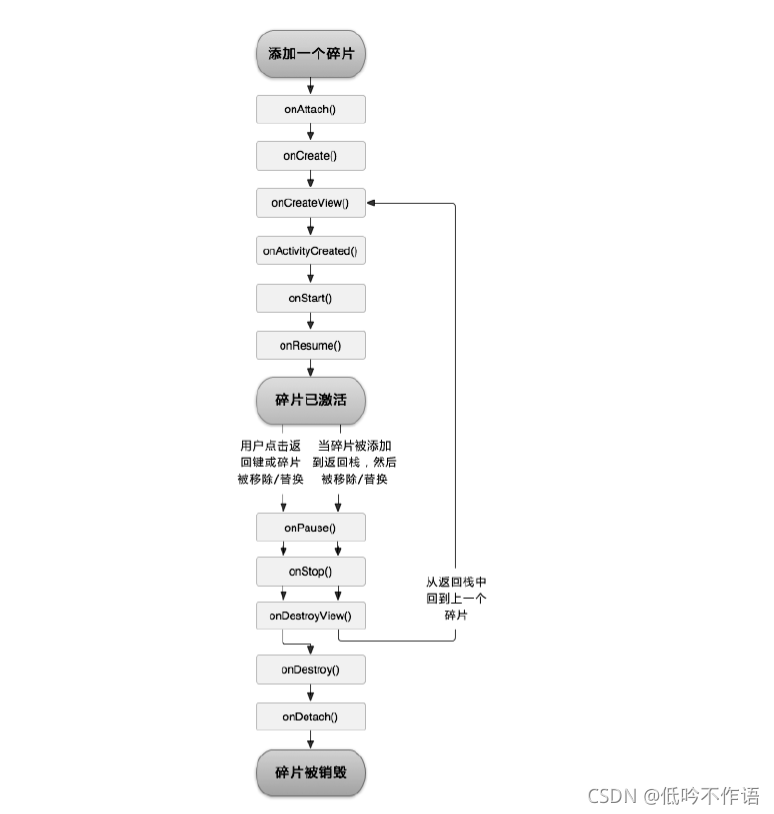
Fragment 生命周期
和 Activity 一样,Fragment 也有自己的生命周期,并且大体一致,只不过在一些细小的地方会有部分区别:
- 运行状态
当一个 Fragment 所关联的 Activity 正处于运行状态,该 Fragment 也处于运行状态
- 暂停状态
当一个 Activity 进入暂停状态(由于另一个未占满的 Activity 被添加到了栈顶),与它相关联的 Fragment 就会进入暂停状态
- 停止状态
当一个 Activity 进入停止状态,与它相关联的 Fragment 就会进入停止状态,或者通过调用 FragmentTransaction 的 remove()、replace() 方法将 Fragment 从 Activity 中移除,但在事务提交前调用了 addToBackStack() 方法,也会进入停止状态
- 销毁状态
当 Activity 被销毁时,与它相关联的 Fragment 就会进入销毁状态,或者通过调用 FragmentTransaction 的 remove()、replace() 方法将 Fragment 从 Activity 中移除,但在事务提交前没有调用了 addToBackStack() 方法,也会进入销毁状态
Fragment 完整的生命周期可参考下图
到此这篇关于Android入门教程之Fragment的具体使用详解的文章就介绍到这了,更多相关Android Fragment内容请搜索我们以前的文章或继续浏览下面的相关文章希望大家以后多多支持我们!
相关推荐
-

Android在fragment中编写toobar的步骤详解
第一步的话就是首先导入我们的依赖的包: compile 'com.android.support:appcompat-v7:23.3.0' 第二步的话就是准备我们的布局文件和我们的item 在这的话我是将我们的toobar单独的放在一个布局文件中的方便以后的调用以及将我们的主题改为 我们noactionbar,同时在我们的主文件中进行引用 修改为nopactionbar 引用 设置单独的xml文件 然后的话就是我们在我们的这个位置设置的是我们的啊就是toobar的单独的一个文件代码如下: <?x
-
Android Fragment使用全解
我们都知道,Android上的界面展示都是通过Activity实现的,Activity实在是太常用了,我相信大家都已经非常熟悉了,这里就不再赘述. 但是Activity也有它的局限性,同样的界面在手机上显示可能很好看,在平板上就未必了,因为平板的屏幕非常大,手机的界面放在平板上可能会有过分被拉长.控件间距过大等情况.这个时候更好的体验效果是在Activity中嵌入"小Activity",然后每个"小Activity"又可以拥有自己的布局.因此,我们今天的主角Frag
-
详解Android studio 动态fragment的用法
fragment的使用时Android的基础,它有两种用法,第一个就是静态的fragment.第二个则是动态的fragment. 静态fragment直接在layout创建你想要的fragment的XML的文件,然后在你的Java包里面创建对应fragment的class文件 布局代码如下所示 <?xml version="1.0" encoding="utf-8"?> <LinearLayout xmlns:android="http:
-
Android中PreferenceFragment的使用详解
目录 PreferenceFragment简介 PreferenceFragment使用 PreferenceFragment 扩展 PreferenceFragment简介 在我们写一个项目的时候,基本都有选项设置界面,这类设置界面的原理基本都是本地的一些个性化设置,通过读取本地设置来改变某些差异显示(例如字体大小,主题颜色,WIFI自动下载等).这些设置一般都会使用Preference来保存,Android专门为这种Activity提供了便捷的基类PreferenceActivity(如果是
-
Android Fragment监听返回键的一种合理方式
开场 以下场景为杜撰: 产品经理:"小罗,这个信息发送界面,如果用户输入了内容,点击返回键的时候,要先询问用户是否保存草稿箱哈". 小罗:"收到,这问题简单." 说完小罗就准备着手处理,然后却发现信息编辑界面是一个Fragment,然而Fragment并没有提供返回键点击的直接处理:小罗虽菜,但是摸鱼也摸了些年头了,这问题难不倒小罗. 小罗心想,反正Activity提供了onBackPressed方法,再不济的情况把这个操作分发到Fragment中去就好,可是对于处
-
Android入门教程之Fragment的具体使用详解
目录 Fragment 的简单用法 动态加载 Fragment Fragment 实现返回栈 Fragment 和 Activity 之间的交互 Fragment 生命周期 Fragment 的简单用法 Fragment 是一种可以嵌入在 Activity 当中的 UI 片段,它能让程序更加合理和充分地利用大屏幕的空间,因此在平板上应用非常广泛 在一个 Activity 中添加两个 Fragment,并让两个 Fragment 平分 Activity 的空间,首先新建一个左侧 Fragment
-
Android入门教程之ListView的具体使用详解
目录 ListView 的简单用法 定制 ListView 的界面 提升 ListView 的运行效率 ListView 的点击事件 ListView 的简单用法 在布局中加入 ListView 控件还算简单,先为 ListView 指定一个 id,然后将宽度和高度都设置为 match_parent,这样 ListView 就占满了整个布局的空间 <LinearLayout xmlns:android="http://schemas.android.com/apk/res/android&
-
Android入门教程之RecyclerView的具体使用详解
目录 RecyclerView 的基本用法 横向滚动 RecyclerView 点击事件 RecyclerView 的基本用法 和我们之前学习的控件不一样,RecyclerView 属于新增控件,所以我们需要在项目的 build.gradle 中添加 RecyclerView 库的依赖,才能使用该控件 dependencies { implementation "org.jetbrains.kotlin:kotlin-stdlib:$kotlin_version" implementa
-
AngularJS入门教程之REST和定制服务详解
在这一步中,我们会改进我们APP获取数据的方式. 请重置工作目录: git checkout -f step-11 对我们应用所做的最后一个改进就是定义一个代表RESTful客户端的定制服务.有了这个客户端我们可以用一种更简单的方式来发送XHR请求,而不用去关心更底层的$http服务(API.HTTP方法和URL). 步骤9和步骤10之间最重要的不同在下面列出.你可以在GitHub里看到完整的差别. 模板 定制的服务被定义在app/js/services,所以我们需要在布局模板中引入这个文件.另
-
AngularJS入门教程之XHR和依赖注入详解
到现在为止,我们使用是硬编码的三条手机记录数据集.现在我们使用AngularJS一个内置服务$http来获取一个更大的手机记录数据集.我们将使用AngularJS的依赖注入(dependency injection (DI))功能来为PhoneListCtrl控制器提供这个AngularJS服务. 请重置工作目录: git checkout -f step-5 刷新浏览器,你现在应该能看到一个20部手机的列表. 步骤4和步骤5之间最重要的不同在下面列出.你可以在GitHub里看到完整的差别. 数
-
ES6入门教程之let和const命令详解
前言 在javascript中,我们都知道使用var来声明变量.javascript是函数级作用域,函数内可以访问函数外的变量,函数外不能访问函数内的变量. 函数级作用域会导致一些问题就是某些代码块内的变量会在全局范围内有效,这我们是非常熟悉的: for (var i = 0; i < 10; i++) { console.log(i); // 0,1,2...,9 } console.log(i); //10 if(true){ var s = 20; } console.log(s); //
-
Android开发教程之Fragment定义、创建与使用方法详解【包含Activity通讯,事务执行等】
本文实例讲述了Android开发教程之Fragment定义.创建与使用方法.分享给大家供大家参考,具体如下: 概述 Fragment是activity的界面中的一部分或一种行为.你可以把多个Fragment们组合到一个activity中来创建一个多面界面并且你可以在多个activity中重用一个Fragment.你可以把Fragment认为模块化的一段activity,它具有自己的生命周期,接收它自己的事件,并可以在activity运行时被添加或删除. Fragment不能独立存在,它必须嵌入到
-
Zend Framework教程之Application和Bootstrap用法详解
本文实例讲述了Zend Framework教程之Application和Bootstrap用法.分享给大家供大家参考,具体如下: 在一个MVC应用程序中,我们需要初始化建立数据库链接,配置视图和视图助手,配置布局,注册相关插件,注册action 助手等等,这些配置和准备工作我们都需要一一完成.有时候可能有一些初始化操作需要,但是在有些情况下这些初始化可能不需要.通过Zend_Application不仅仅可以完成这些操作,而且可以让这些配置和初始化工作更统一有序,重用性更高. Zend_Appli
-
Java并发教程之Callable和Future接口详解
刚把Thread 的知识理了一遍. Runnable是一个接口,而Thread是Runnable的一个实现类. 所以也就有了之前创建线程的两种方法 继承Thread 实现Runnable 我们看一下新建线程的方法: 都是得传入一个Runnable对象(这句话很关键) 所以传入一个Runnble和Thread对象都行. 现在引入创建线程的第三种方法:Callable 为了实现 Runnable,需要实现不返回任何内容的 run()方法,而对于 Callable,需要实现在完成时返回结果的 call
-
Android入门教程之ListView的应用示例
本文实例讲述了Android ListView的简单应用.分享给大家供大家参考,具体如下: 我们今天要讲的内容是Android中ListView中的实现.一共分为四个步骤,我将一一讲解: Step one:创建一个新的Android工程,命名为ListViewDemo. Step two:找到ListViewDemo.Java,把我们习惯的继承Activity,改成ListActivity,如下: public class ListViewDemo extends ListActivity St