基于Tensorflow一维卷积用法详解
我就废话不多说了,大家还是直接看代码吧!
import tensorflow as tf
import numpy as np
input = tf.constant(1,shape=(64,10,1),dtype=tf.float32,name='input')#shape=(batch,in_width,in_channels)
w = tf.constant(3,shape=(3,1,32),dtype=tf.float32,name='w')#shape=(filter_width,in_channels,out_channels)
conv1 = tf.nn.conv1d(input,w,2,'VALID') #2为步长
print(conv1.shape)#宽度计算(width-kernel_size+1)/strides ,(10-3+1)/2=4 (64,4,32)
conv2 = tf.nn.conv1d(input,w,2,'SAME') #步长为2
print(conv2.shape)#宽度计算width/strides 10/2=5 (64,5,32)
conv3 = tf.nn.conv1d(input,w,1,'SAME') #步长为1
print(conv3.shape) # (64,10,32)
with tf.Session() as sess:
 print(sess.run(conv1))
 print(sess.run(conv2))
 print(sess.run(conv3))
以下是input_shape=(1,10,1), w = (3,1,1)时,conv1的shape

以下是input_shape=(1,10,1), w = (3,1,3)时,conv1的shape

补充知识:tensorflow中一维卷积conv1d处理语言序列举例
tf.nn.conv1d:
函数形式: tf.nn.conv1d(value, filters, stride, padding, use_cudnn_on_gpu=None, data_format=None, name=None):
程序举例:
import tensorflow as tf
import numpy as np
sess = tf.InteractiveSession()

# --------------- tf.nn.conv1d -------------------
inputs=tf.ones((64,10,3)) # [batch, n_sqs, embedsize]
w=tf.constant(1,tf.float32,(5,3,32)) # [w_high, embedsize, n_filers]
conv1 = tf.nn.conv1d(inputs,w,stride=2 ,padding='SAME') # conv1=[batch, round(n_sqs/stride), n_filers],stride是步长。

tf.global_variables_initializer().run()
out = sess.run(conv1)
print(out)
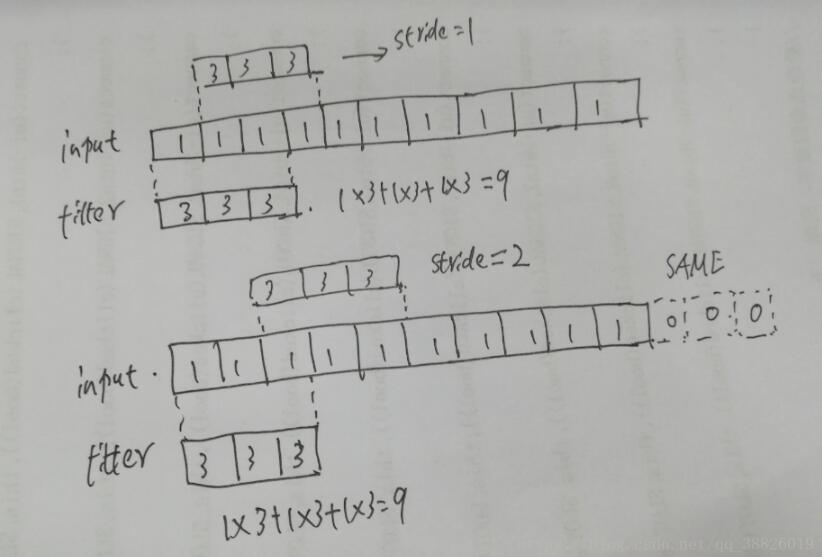
注:一维卷积中padding='SAME'只在输入的末尾填充0
tf.layters.conv1d:
函数形式:tf.layters.conv1d(inputs, filters, kernel_size, strides=1, padding='valid', data_format='channels_last', dilation_rate=1, activation=None, use_bias=True,...)
程序举例:
import tensorflow as tf
import numpy as np
sess = tf.InteractiveSession()

# --------------- tf.layters.conv1d -------------------
inputs=tf.ones((64,10,3)) # [batch, n_sqs, embedsize]
num_filters=32
kernel_size =5
conv2 = tf.layers.conv1d(inputs, num_filters, kernel_size,strides=2, padding='valid',name='conv2') # shape = (batchsize, round(n_sqs/strides),num_filters)
tf.global_variables_initializer().run()
out = sess.run(conv2)
print(out)
二维卷积实现一维卷积:
import tensorflow as tf
sess = tf.InteractiveSession()
def conv2d(x, W):
 return tf.nn.conv2d(x, W, strides=[1,1,1,1], padding='SAME')
def max_pool_1x2(x):
 return tf.nn.avg_pool(x, ksize=[1,1,2,1], strides=[1,1,2,1], padding='SAME')
'''
ksize = [x, pool_height, pool_width, x]
strides = [x, pool_height, pool_width, x]
'''

x = tf.Variable([[1,2,3,4]], dtype=tf.float32)
x = tf.reshape(x, [1,1,4,1]) #这一步必不可少,否则会报错说维度不一致;
'''
[batch, in_height, in_width, in_channels] = [1,1,4,1]
'''

W_conv1 = tf.Variable([1,1,1],dtype=tf.float32) # 权重值
W_conv1 = tf.reshape(W_conv1, [1,3,1,1]) # 这一步同样必不可少
'''
[filter_height, filter_width, in_channels, out_channels]
'''
h_conv1 = conv2d(x, W_conv1) # 结果:[4,8,12,11]
h_pool1 = max_pool_1x2(h_conv1)
tf.global_variables_initializer().run()
print(sess.run(h_conv1)) # 结果array([6,11.5])x
两种池化操作:
# 1:stride max pooling
convs = tf.expand_dims(conv, axis=-1) # shape=[?,596,256,1]
smp = tf.nn.max_pool(value=convs, ksize=[1, 3, self.config.num_filters, 1], strides=[1, 3, 1, 1],
     padding='SAME') # shape=[?,299,256,1]
smp = tf.squeeze(smp, -1) # shape=[?,299,256]
smp = tf.reshape(smp, shape=(-1, 199 * self.config.num_filters))

# 2: global max pooling layer
gmp = tf.reduce_max(conv, reduction_indices=[1], name='gmp')
不同核尺寸卷积操作:
kernel_sizes = [3,4,5] # 分别用窗口大小为3/4/5的卷积核
with tf.name_scope("mul_cnn"):
 pooled_outputs = []
 for kernel_size in kernel_sizes:
  # CNN layer
  conv = tf.layers.conv1d(embedding_inputs, self.config.num_filters, kernel_size, name='conv-%s' % kernel_size)
  # global max pooling layer
  gmp = tf.reduce_max(conv, reduction_indices=[1], name='gmp')
  pooled_outputs.append(gmp)
 self.h_pool = tf.concat(pooled_outputs, 1) #池化后进行拼接
以上这篇基于Tensorflow一维卷积用法详解就是小编分享给大家的全部内容了,希望能给大家一个参考,也希望大家多多支持我们。
相关推荐
-
TensorFlow keras卷积神经网络 添加L2正则化方式
我就废话不多说了,大家还是直接看代码吧! model = keras.models.Sequential([ #卷积层1 keras.layers.Conv2D(32,kernel_size=5,strides=1,padding="same",data_format="channels_last",activation=tf.nn.relu,kernel_regularizer=keras.regularizers.l2(0.01)), #池化层1 keras.l
-
Tensorflow实现将标签变为one-hot形式
将数据标签变为类似MNIST的one-hot编码形式 def one_hot(indices, depth, on_value=None, off_value=None, axis=None, dtype=None, name=None): """Returns a one-hot tensor. The locations represented by indices in `indices` take value `on_value`, while all other l
-
Tensorflow卷积实现原理+手写python代码实现卷积教程
从一个通道的图片进行卷积生成新的单通道图的过程很容易理解,对于多个通道卷积后生成多个通道的图理解起来有点抽象.本文以通俗易懂的方式讲述卷积,并辅以图片解释,能快速理解卷积的实现原理.最后手写python代码实现卷积过程,让Tensorflow卷积在我们面前不再是黑箱子! 注意: 本文只针对batch_size=1,padding='SAME',stride=[1,1,1,1]进行实验和解释,其他如果不是这个参数设置,原理也是一样. 1 Tensorflow卷积实现原理 先看一下卷积实现原理,对于
-
Tensorflow tf.tile()的用法实例分析
tf.tile()应用于需要张量扩展的场景,具体说来就是: 如果现有一个形状如[width, height]的张量,需要得到一个基于原张量的,形状如[batch_size,width,height]的张量,其中每一个batch的内容都和原张量一模一样.tf.tile使用方法如: tile( input, multiples, name=None ) import tensorflow as tf a = tf.constant([7,19]) a1 = tf.tile(a,multiples=[
-
tensorflow 用矩阵运算替换for循环 用tf.tile而不写for的方法
如下所示: # u [32,30,200] # u_logits [400,32,30] q_j_400 = [] for j in range(400): q_j_400.append(tf.squeeze(tf.matmul(tf.transpose(u,[0,2,1]),tf.expand_dims(tf.nn.softmax(u_logits[j]),-1)),[2])) # tf.matmul [32,200,30],[32,30,1] test_result = tf.stack(q
-
基于Tensorflow一维卷积用法详解
我就废话不多说了,大家还是直接看代码吧! import tensorflow as tf import numpy as np input = tf.constant(1,shape=(64,10,1),dtype=tf.float32,name='input')#shape=(batch,in_width,in_channels) w = tf.constant(3,shape=(3,1,32),dtype=tf.float32,name='w')#shape=(filter_width,in
-
易语言一维数组用法详解
在易语言中,一维数组的用法灵活性较强,所以实际应用起来也能够解决很多问题.我们本次来说明下易语言一维数组的成员操作方法及技巧. 1.首先,我们打开易语言编程工具,新建一个文件,如图所示 2.接着,我们选择要新建的类型,选择windows窗口程序,点击确认.如图所示 3.我们进入窗口界面中,从组件库中选择编辑框.按钮.树型框等放入窗口中,如图所示 4.我们选中树型框,在左侧属性事件中,选择列表项被选择事件,如图所示.在该事件中,我们只需要获取到被选中项的序号即可,如图所示 5.点击进入程序,我们在
-
Pytorch中膨胀卷积的用法详解
卷积和膨胀卷积 在深度学习中,我们会碰到卷积的概念,我们知道卷积简单来理解就是累乘和累加,普通的卷积我们在此不做赘述,大家可以翻看相关书籍很好的理解. 最近在做项目过程中,碰到Pytorch中使用膨胀卷积的情况,想要的输入输出是图像经过四层膨胀卷积后图像的宽高尺寸不发生变化. 开始我的思路是padding='SAME'结合strides=1来实现输入输出尺寸不变,试列好多次还是有问题,报了张量错误的提示,想了好久也没找到解决方法,上网搜了下,有些人的博客说经过膨胀卷积之后图像的尺寸不发生变化,有
-
基于C++中setiosflags()的用法详解
cout<<setiosflags(ios::fixed)<<setiosflags(ios::right)<<setprecision(2); setiosflags 是包含在命名空间iomanip 中的C++ 操作符,该操作符的作用是执行由有参数指定区域内的动作: iso::fixed 是操作符setiosflags 的参数之一,该参数指定的动作是以带小数点的形式表示浮点数,并且在允许的精度范围内尽可能的把数字移向小数点右侧: iso::right 也是se
-

基于BootStrap Metronic开发框架经验小结【五】Bootstrap File Input文件上传插件的用法详解
Bootstrap文件上传插件File Input是一个不错的文件上传控件,但是搜索使用到的案例不多,使用的时候,也是一步一个脚印一样摸着石头过河,这个控件在界面呈现上,叫我之前使用过的Uploadify 好看一些,功能也强大些,本文主要基于我自己的框架代码案例,介绍其中文件上传插件File Input的使用. 1.文件上传插件File Input介绍 这个插件主页地址是:http://plugins.krajee.com/file-input,可以从这里看到很多Demo的代码展示:http:/
-
基于IntBuffer类的基本用法(详解)
废话不多说,直接上代码 package com.ietree.basicskill.socket.basic.nio; import java.nio.IntBuffer; /** * Created by Administrator on 2017/5/25. */ public class BufferTest { public static void main(String[] args) { // 1 基本操作 /*//创建指定长度的缓冲区 IntBuffer buf = IntBuff
-
基于vue.js中事件修饰符.self的用法(详解)
.self可以理解为跳过冒泡事件和捕获事件,只有直接作用在该元素上的事件才可以执行. 代码如下: <!DOCTYPE html> <html lang="en"> <head> <meta charset="UTF-8"> <title>self</title> <script src="vue.js"></script> <!--'''''''
-
基于java Files类和Paths类的用法(详解)
Java7中文件IO发生了很大的变化,专门引入了很多新的类: import java.nio.file.DirectoryStream; import java.nio.file.FileSystem; import java.nio.file.FileSystems; import java.nio.file.Files; import java.nio.file.Path; import java.nio.file.Paths; import java.nio.file.attribute.
-
对TensorFlow的assign赋值用法详解
TensorFlow修改变量值后,需要重新赋值,assign用起来有点小技巧,就是需要需要弄个操作子,运行一下. 下面这么用是不行的 import tensorflow as tf import numpy as np x = tf.Variable(0) init = tf.initialize_all_variables() sess = tf.InteractiveSession() sess.run(init) print(x.eval()) x.assign(1) print(x.ev
-
基于Laravel-admin 后台的自定义页面用法详解
Laravel-admin 这个后台很好用,几乎省去了html和js的困扰,让后台CURD变得优雅简洁. 这是一个自定义面的Demo 路由定义: $router->get('mails/send', 'MailController@send'); $router->post('mails/send', 'MailController@send'); 控制中写法: public function send(Content $content) { //添加请求 if (request()->