Ext面向对象开发实践代码第1/2页
示例程序简述:
这个Demo为了演示如将使用GridPanel显示数据,并为GridPanel添加工具条按钮,提供弹出式窗体新增数据。
使用到的Ext组件
这个Demo涉及到Ext中的GridPanel,FormPanel和Window三个组件。
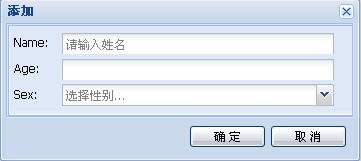
效果图

现在开始讲解代码,首先看一下创建GridPanel的代码片段
代码如下:
//定义数据列表面板类
PersonListGridPanel = Ext.extend(Ext.grid.GridPanel, {
insertWin: null,
updateWin: null,
constructor: function() {
//添加自定义事件
this.addEvents("rowSelect");
this.insertWin = new InsertPersonInfoWindow();
this.insertWin.on("submit", this.onInsertWinSubmit, this);
this.updateWin = new UpdatePersonInfoWindow();
this.updateWin.on("submit", this.onUpdateWinSubmit, this);
PersonListGridPanel.superclass.constructor.call(this, {
renderTo: Ext.getBody(),
width: 360,
height: 300,
frame:true,
sm: new Ext.grid.RowSelectionModel({
singleSelect:true,
listeners: {
"rowselect": {
fn: function(sm, rowIndex, r) {
this.fireEvent("rowSelect", r); //触发自定义事件
},
scope: this
}
}
}),
store: new Ext.data.JsonStore({
data: [{name: "李宗盛", age: 28, sex: "男"}, {name: "林忆莲", age: 26, sex: "女"}],
fields: ["name", "sex", "age"]
}),
draggable: false,
enableColumnMove: false,
title: "First Grid",
//iconCls:'icon-grid',
colModel: new Ext.grid.ColumnModel([
{header: "Staff Name", width: 100, menuDisabled: true},
{header: "Age", width: 100, sortable: true, dataIndex: "age", align: "right", tooltip: "这里是提示信息"},
{header: "Sex", width: 100, sortable: true, dataIndex: "sex", align: "center"}
]),
tbar: [{
text: "添加人员",
handler: function() {
//***************************************************
//如果没有重写InsertPersonInfoWindow的Close方法
//在调用之前需要检查其实例insertWin是否被释放
//使用示例:
//if (!this.insertWin) {
// this.insertWin = new InsertPersonInfoWindow();
//}
//this.insertWin.show();
//***************************************************
this.insertWin.show();
},
scope: this
}, "-", {
text: "修改人员",
handler: function() {
var r = this.getActiveRecord();
if (!r) return;
//一定要先调用Show方法,而后再调用Load方法,
//否则数据不会被呈现出来
this.updateWin.show();
this.updateWin.load(r);
},
scope: this
}, "-", {
text: "删除人员",
handler: function() {
var r = this.getActiveRecord();
if (!r) return;
Ext.MessageBox.confirm("删除", "删除当前人员信息?", function(btn) {
if(btn == "yes") {
this.delRecord(r);
}
}, this);
},
scope: this
}]
});
},
getActiveRecord: function() {
var sm = this.getSelectionModel();
//没有选中的记录时,是抛出异常还是返回null???????
return (sm.getCount() === 0) ? null : sm.getSelected();
},
insert: function(r) {
this.getStore().add(r);
},
delRecord: function(r) {
this.getStore().remove(r);
},
onInsertWinSubmit: function(win, r) {
this.insert(r);
},
onUpdateWinSubmit: function(win, r) {
alert('onUpdateWinSubmit');
}
});
//定义数据维护面板,在后面定义的新增和修改窗体中都会使用到该面板
PersonInfoFormPanel = Ext.extend(Ext.form.FormPanel, {
constructor: function() {
PersonInfoFormPanel.superclass.constructor.call(this, {
//title: "Person Info",
frame: true,
width: 360,
labelWidth: 40,
defaultType: "textfield",
defaults: { anchor: "92%" },
items: [{
name: "name", //注意,这里使用name属性而不是id,因为PersonInfoFormPanel会被添加和插入两个窗体使用,使用id会有冲突,导致组件不能被正确显示
fieldLabel: "Name",
allowBlank: false,
emptyText: "请输入姓名",
blankText: "姓名不能为空"
}, {
name: "age",
fieldLabel: "Age",
vtype: "age"
}, {
hiddenName: "sex",
xtype: "combo",
fieldLabel: "Sex",
store: new Ext.data.SimpleStore({
fields: [
{name: 'Sex'}
],
data:[["男"], ["女"]]
}),
mode: 'local',
displayField:'Sex',
triggerAction: 'all',
emptyText:'选择性别...'
}]
})
},
getValues: function() {
if (this.getForm().isValid()) {
return new Ext.data.Record(this.getForm().getValues());
}
else {
throw Error("Error Message");
}
},
setValues: function(r) {
this.getForm().loadRecord(r);
},
reset: function() {
this.getForm().reset();
}
});
对数据的维护有新增和更新两个动作,从设计的角度来讲就需要编写两个窗体对其进行操作。细心的朋友一定会想,新增和更新的动作都是针对相同的数据表,那么能不能只写一个窗体,然后复用呢?答案是肯定的。下面我们就先写一个窗体基类。
代码如下:
//新增,修改窗体基类
PersonInfoWindow = Ext.extend(Ext.Window, {
form: null,
constructor: function() {
this.addEvents("submit");
this.form = new PersonInfoFormPanel();
//Ext.apply(this.form, {baseCls: "x-plain"});
PersonInfoWindow.superclass.constructor.call(this, {
plain: true,
width: 360,
modal: true, //模式窗体
onEsc: Ext.emptyFn,
closeAction: "hide",
items: [this.form],
buttons: [{
text: "确 定",
handler: this.onSubmitClick,
scope: this
}, {
text: "取 消",
handler: this.onCancelClick,
scope: this
}]
});
//alert(this.onSubmitClick);
},
close: function() {
//需要重写CLose方法,
//否则在窗体被关闭其实体会被释放
this.hide();
this.form.reset();
},
onSubmitClick: function() {
//alert(Ext.util.JSON.encode(this.form.getValues().data));
try {
this.fireEvent("submit", this, this.form.getValues());
this.close();
}
catch(_err) {
return;
}
},
onCancelClick: function() {
this.close();
}
});
基类写了之后,我们就可以使用继承的方法来编写新进和更新窗体了。
代码如下:
//定义新增数据窗体
InsertPersonInfoWindow = Ext.extend(PersonInfoWindow, {
title: "添加"
});
//==============================================================================
//定义编辑数据窗体
UpdatePersonInfoWindow = Ext.extend(PersonInfoWindow, {
title: "修改",
load: function(r) {
this.form.setValues(r);
}
});
为了区分新增和更新窗体,我们在其各自的实现类中为其指定了Title属性,另外在更新窗体类中需要另外添加一个用于加载待编辑数据的方法Load。
脚本部分算是完成了,下面看看如何在HTML中使用。HTML中的引用代码
代码如下:
<script type="text/javascript">
Ext.QuickTips.init();
Ext.form.Field.prototype.msgTarget = "side";
Ext.BLANK_IMAGE_URL = "http://localhost:8080/ext-2.2/resources/images/default/s.gif";
Ext.apply(Ext.form.VTypes, {
"age": function(_v) {
if (/^\d+$/.test(_v)) {
var _age = parseInt(_v);
if ((_age > 0) && (_age < 200)) return true;
}
return false;
},
"ageText": "年龄必须在0到200之间",
"ageMask": /[0-9]/i
});
Ext.onReady(function() {
new PersonListGridPanel();
});
</script>
代码很简洁,也很清晰。只需要创建一个PersonListGridPanel即可,因为它自身包含了新增、修改的窗体对象,而新增和修改窗体中都使用到了负责数据编辑的PersonInfoFormPanel。
在PersonInfoFormPanel中使用了VTypes进行数据验证。
新增和修改窗体仅仅是界面,负责将用户在PersonInfoFormPanel中填写的数据传回到ListGrid中以便保存,或是将ListGrid中的数据传递到PersonInfoFormPanel中进行呈现,供用户编辑。
当前1/2页 12下一页阅读全文

