vue组件表单数据回显验证及提交的实例代码
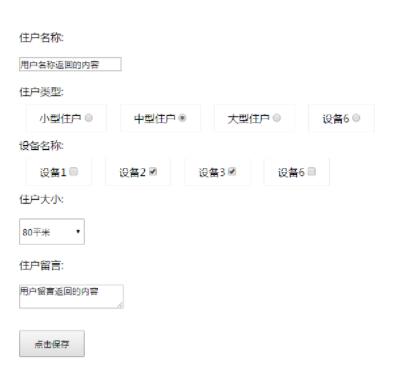
最近项目需要到vue开发单页面,所以就研究一下表单数据的回显,验证及提交如何用vue组件的方式实现。


代码如下:
<template>
 <div class="index">
 <!--header-bar></header-bar-->
 <div style="margin:20px;">
 <div class="item">
 <p>住户名称:</p>
 <p>
  <input type="text" value="username" v-model="formStatus.username" placeholder="输入名称">
 </p>
 </div>
 <div class="item">
 <p>住户类型:</p>
 <p>
  <label v-for="(item, index) in zhuhuType">
  <span>{{item.name}}</span>
  <input type="radio" name = "zhuhutype" :value="item.id" :checked="item.isChecked" @click="changeZh(index)" v-model="formStatus.zhuhuType">
  </label>
 </p>
 </div>
 <div class="item">
 <p>设备名称:</p>
 <p>
  <label v-for="(item, index) in shebeiType">
  <span>{{item.name}}</span>
  <input type="checkbox" :value="item.id" :checked="item.isChecked" @click="changeSb(index)" v-model="formStatus.shebeiType">
  </label>
 </p>
 </div>
 <div class="item">
 <p>住户大小:</p>
 <p>
  <select v-model="formStatus.zhuhudaxiao">
  <option value="0">请选择</option>
  <option v-for="option in zhuhudaxiao" v-model="zhuhudaxiao" :id = "option.id" :value="option.value" >{{option.name}}</option>
  </select>
 </p>
 </div>
 <div class="item">
 <p>住户留言:</p>
 <p>
  <textarea value="userword" v-model="formStatus.userword"></textarea>
 </p>
 </div>

 </div>
 <p style="margin:20px 0;"><button @click="save">点击保存</button></p>
 </div>
</template>
<script>
 import Vue from 'vue'
 import axios from 'axios';
 import ElementUI from 'element-ui'
 import URL from '../utils/Tools/URL.js'
 import 'element-ui/lib/theme-chalk/index.css'
 Vue.use(ElementUI)
 import headerBar from '../modules/headerBar.vue';
 export default {
 name: 'index',
 data (){
 return {
 zhuhuType: [],
 shebeiType: [],
 zhuhudaxiao: [],
 //绑定改变后的表单值用于提交
 formStatus: {
  username: "",
  zhuhuType: 43,
  shebeiType: [52, 23],
  zhuhudaxiao: "",
  userword: ""
 }
 }
 },
 components: { headerBar },
 methods: {
 getPage (currentPage){
 console.log(currentPage);
 // this.$http.get("http://192.168.1.200/test.php").then(res=>{
 // console.log(res.data);
 // });
 },
 handleEdit(index, row) {
 console.log(index, row);
 },
 handleDelete(index, row) {
 console.log(index, row);
 },
 save(){
 if(this.formStatus.username == ""){
  alert("输入名称");
  return false;
 }
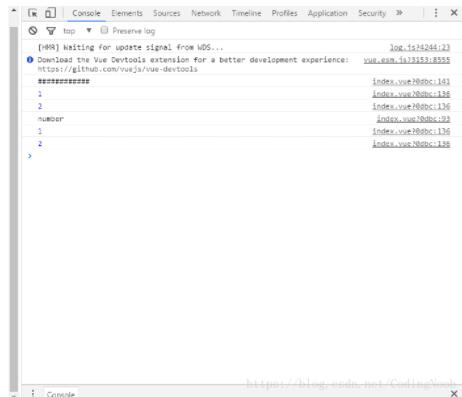
 console.log(typeof(this.formStatus.zhuhuType));
 if(typeof(parseInt(this.formStatus.zhuhuType)) != "number"){
  alert("输入住户类型");
  return false;
 }
 if(this.formStatus.shebeiType.length == 0 ){
  alert("输入设备名称");
  return false;
 }
 if(this.formStatus.zhuhudaxiao == 0){
  alert("选择住户大小");
  return false;
 }
 if(this.formStatus.userword == ""){
  alert("输入用户留言");
  return false;
 }

 console.log(this.formStatus);
 console.log("####用户名称####");
 console.log(this.formStatus.username);

 console.log("####住户类型####");
 console.log(this.zhuhuType);

 console.log("####设备名称####");
 console.log(this.shebeiType);

 console.log("####住户大小####");
 console.log(this.userDxselected);

 console.log("####用户留言####");
 console.log(this.userword);
 },
 //住户类型改变数据
 changeZh(index){
 this.zhuhuType.forEach(function(value, index){
  value.isChecked = false;
 });
 this.zhuhuType[index].isChecked = true;
 },
 //设备选择改变数据
 changeSb(index){
 console.log(index);
 this.shebeiType[index].isChecked = !this.shebeiType[index].isChecked;
 }
 },
 created () {
 console.log("############");
 //用户名称
 this.formStatus.username = "用户名称返回的内容";

 //循环住户类型
 this.zhuhuType = [{
 name: '小型住户',
 id: '12',
 isChecked: false
 },{
 name: '中型住户',
 id: '43',
 isChecked: false
 },{
 name: '大型住户',
 id: '72',
 isChecked: true
 },{
 name: '超大型住户',
 name: '设备6',
 id: '25',
 isChecked: false
 }];

 //循环设备名称
 this.shebeiType = [{
 name: '设备1',
 id: '22',
 isChecked: true
 },{
 name: '设备2',
 id: '23',
 isChecked: false
 },{
 name: '设备3',
 id: '52',
 isChecked: true
 },{
 name: '设备6',
 id: '65',
 isChecked: false
 }];

 //住户大小
 this.zhuhudaxiao = [{
 name: "100平米",
 id: 1,
 value: 1
 },{
 name: "80平米",
 id: 2,
 value: 2
 },{
 name: "70平米",
 id: 3,
 value: 3
 }];

 //住户大小
 this.formStatus.zhuhudaxiao = 2;
 //用户名称
 this.formStatus.userword = "用户留言返回的内容";
 // axios.get("/test.php").then(res=>{
 // this.table = this.table.concat(res.data.data);

 // console.log(res.data);
 // });
 }
 }
</script>
<style>
 select{height:40px;width:100px;}
 .el-button--mini, .el-button--mini.is-round{}
 *{margin:0;padding:0;font-family:"微软雅黑";}
 button{height:40px;width:100px;margin-left:20px;}
 .item p{padding:10px 0;}
 .table, .page{
 width:900px;
 height:auto;
 margin:20px auto;
 }
 label{
 padding:10px 20px;
 margin:10px;
 border:1px solid #eee;
 }
 body{padding-top:80px;}
 .header{
 position:fixed;
 top:0;
 width:100%;
 background:#eee;
 }
 .header ul{
 height:80px;
 width:1000px;
 }
 .header ul li{
 float:left;
 width:200px;
 font-size:14px;
 line-height:80px;
 text-align:Center;
 }
 .header ul li a{
 display:block;
 }

</style>
赞 (0)

