vue 自定义 select内置组件

1.整合了第三方 jQuery 插件 (select2)
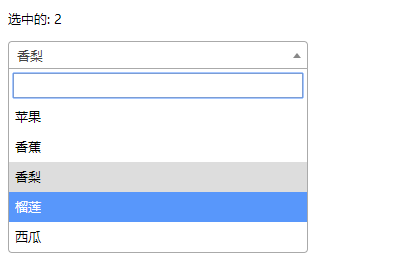
<!DOCTYPE html>
<html>
<head>
  <meta charset="UTF-8">
  <title></title>
  <link rel="stylesheet" href="js/select2/select2.min.css" />
  <style>
    html, body {
 font: 13px/18px sans-serif;
}
select {
 min-width: 300px;
}
  </style>
</head>
<body>
<div id="el">
  <p>选中的: {{ selected }}</p>
  <select2 :options="options" v-model="selected"></select2>
</div>
  <script src="js/jQuery-2.1.4.min.js"></script>
  <script src="js/select2/select2.min.js"></script>
  <script src="http://cdnjs.cloudflare.com/ajax/libs/vue/2.1.3/vue.js"></script>
<script>
  Vue.component('select2', {
    props: ['options', 'value'],
    template: '<select><slot></slot></select>',
    mounted: function () {
      var vm = this;// init select2
      $(this.$el).select2({ data: this.options }).val(this.value).trigger('change').on('change', function () {
        // emit event on change.
        vm.$emit('input', this.value)
      })
    },
    watch: {
      value: function (value) {
          // update value
        $(this.$el).val(value).trigger('change')
      },
      options: function (options) {
         // update options
        $(this.$el).empty().select2({ data: options })
      }
    },
    destroyed: function () {
      $(this.$el).off().select2('destroy')
    }
  })
var vm = new Vue({
  el: '#el',
  data: {
    selected: 2,
    options: [
      { id: 0, text: '苹果' },
      { id: 1, text: '香蕉' },
      { id: 2, text: '香梨' },
      { id: 3, text: '榴莲' },
      { id: 4, text: '西瓜' }
    ]
  }
})
</script>
</body>
</html> 

2.简单select

<!DOCTYPE html>
<html lang="en">
<head>
<meta charset="utf-8">
  <style>
  *{
    padding: 0;
    margin: 0;
  }
  ul,li {
    list-style: none;
  }
  li {
    line-height: 2em;
  }
  li:hover {
    background-color: #f9f9f9;
    border-radius:5px;
    cursor: pointer;
  }
  input{
    cursor:pointer;
    outline:none;
  }
  #app {
    margin-top: 20px;
  }
  #app h2 {
    text-align: center;
  }
  .wrap {
    background-color: rgba(56, 170, 214, 0.45);
    border-radius: 20px;
    width: 300px;
    margin: 40px;
    padding: 20px;
  }
  input[type="button"] {
    font-size:14px;
    margin-left:2px;
    padding:2px 5px;
    background-color:rgb(228, 33, 33);
    color:white;
    border:1px solid rgb(228, 33, 33);
    border-radius:5px;
  }
  .clearFix {
    padding-left:
  }
  input.keyWord {
    border: 1px solid #777777;
    border-radius: 10px;
    height: 30px;
    width: 80%;
    padding-left: 10px;
    font-size: 16px;
  }
  ul.list {
    margin: 20px 0;
  }
  ul.list li {
    padding: 10px 0 0 10px;
  }
</style>
</head>
 <body>
 <div id="app">
    <div style="float: left;">
      <h2>自定义下拉框</h2>
      <custom-select btn-value="查询" v-bind:list="list1"></custom-select>
    </div>
    <div style="float: left;">
      <h2>自定义下拉框2</h2>
      <custom-select btn-value="搜索" v-bind:list="list2"></custom-select>
    </div>
  </div>
  <div id="app1">
    <custom-select></custom-select>
  </div>
    <script src="http://cdnjs.cloudflare.com/ajax/libs/vue/2.1.3/vue.js"></script>
 <script>
    Vue.component("custom-select",{
      data(){
        return {
          selectShow:false,
          val:""
        }
      },
      props:["btnValue","list"],
      template:`<section class="wrap">
            <div class="searchIpt clearFix">
              <div class="clearFix">
                <input type="text" class="keyWord" :value="val" @click="selectShow = !selectShow" />
                <input type="button" :value="btnValue" />
                <span></span>
              </div>
              <custom-list
                v-show="selectShow"
                :list="list"
                v-on:receive="changeValueHandle"
              >
              </custom-list>
            </div>
           </section>`,
      methods:{
        changeValueHandle(value){
          this.val = value;
        }
      }
    });
    Vue.component("custom-list",{
      props:["list"],
      template:`<ul class="list">
              <li v-for="item in list" @click="selectValueHandle(item)">{{item}}
              </li>
           </ul>`,
      methods:{
        selectValueHandle:function(item){
          this.$emit("receive",item)
        }
      }
    })
    new Vue({
      el:"#app",
      data:{
        list1:['北京','上海','广州','杭州'],
        list2:['17-01-11','17-02-11','17-03-11','17-04-11'],
      }
    })
  </script>
  </body>
</html>  

参考:

1.内置组件

总结

以上所述是小编给大家介绍vue 自定义 select内置组件,希望对大家有所帮助,如果大家有任何疑问请给我留言,小编会及时回复大家的。在此也非常感谢大家对我们网站的支持!

您可能感兴趣的文章:

  • 详解Vue用自定义指令完成一个下拉菜单(select组件)
  • vue2组件之select2调用的示例代码
  • bootstrap select插件封装成Vue2.0组件
(0)

相关推荐

  • 详解Vue用自定义指令完成一个下拉菜单(select组件)

    这次分享的是关于Vue自定义指令的使用方法,学习完基础后我们再来实战完成一个下拉列表,废话不多说,直接上干货 基本用法 //全局注册 Vue.directive('my-directive', { // 指令选项 }) // 局部注册 var app = new Vue({ el: '#app' directives: { 'my-directive': { // 指令选项 } }) 相信对Vue比较熟悉的人看完都知道,directive的写法与组件 基本类似,只是方法名由component改为

  • vue2组件之select2调用的示例代码

    目前,项目中使用了纯前端的静态项目+RESTFul接口的模式.为了更好的对数据进行操作,前端使用了vue2的mvvm功能,但是由于不是单页面应用,所以,并没有涉及到其它的如vue-route等功能,也未使用webpack等编译功能,所以,也没有使用.vue文件功能.这时候,如果用到控件,则多数从原jquery的组件中选择. select下拉搜索选择 这次的需求调研与设计是原来做winform开发的同事,由于用惯了devexpress这个控件库,所以,对于searchlookupeditor这个控

  • bootstrap select插件封装成Vue2.0组件

    因为bootstrap-select功能比较强大,而且样式还不错,所以在项目使用了vue,所以,觉得对bootstrap-select进行封装. html 复制代码 代码如下: <my-select :options="input.options" v-model="input.value" ref="typeSelect" :index="index" :childidx="childIdx" :l

  • vue 自定义 select内置组件

    1.整合了第三方 jQuery 插件 (select2) <!DOCTYPE html> <html> <head> <meta charset="UTF-8"> <title></title> <link rel="stylesheet" href="js/select2/select2.min.css" /> <style> html, body

  • vue中keep-alive内置组件缓存的实例代码

    需求: home 组件中有一个 name 的 data 数据.这个数据修改之后,再切换到其他的组件.再切换到 home 组件,希望 home 中 name 这个值是之前修改过的值.希望组件有缓存. keep-alive 的使用方式: 将要缓存的组件使用 keep-alive 包裹住即可. keep-alive优点的介绍: 1. 切换组件时,当前组件不会触发销毁的生命周期钩子.也就是说不会销毁了. 2. 切换回来时,也不会重新创建.(既然都没有被销毁,哪里来的重新创建呢) 3. 会多出两个生命周期

  • LRU算法在Vue内置组件keep-alive中的使用

    vue的keep-alive内置组件的使用也是使用了改算法,源码如下: export default { name: "keep-alive", // 抽象组件属性 ,它在组件实例建立父子关系的时候会被忽略,发生在 initLifecycle 的过程中 abstract: true, props: { // 被缓存组件 include: patternTypes, // 不被缓存组件 exclude: patternTypes, // 指定缓存大小 max: [String, Numb

  • vue内置组件component--通过is属性动态渲染组件操作

    我就废话不多说了,大家看代码吧~ <!DOCTYPE html> <html> <head> <meta charset="utf-8"> <title></title> <script src="https://cdn.jsdelivr.net/npm/vue"></script> <script src="https://cdn.bootcss.com

  • vue.js内置组件之keep-alive组件使用

    keep-alive是Vue.js的一个内置组件.<keep-alive> 包裹动态组件时,会缓存不活动的组件实例,而不是销毁它们.它自身不会渲染一个 DOM 元素,也不会出现在父组件链中. 当组件在 <keep-alive> 内被切换,它的 activated 和 deactivated 这两个生命周期钩子函数将会被对应执行. 它提供了include与exclude两个属性,允许组件有条件地进行缓存. 举个栗子 <keep-alive> <router-view

  • vue内置组件keep-alive事件动态缓存实例

    在App.vue文件中配置 <keep-alive> <router-view v-if="$route.meta.keepAlive"></router-view> </keep-alive> <router-view v-if="!$route.meta.keepAlive"></router-view> 在路由中配置 { path: '/backstage', component: res

  • Vue 内置组件keep-alive的使用示例

    目录 一.keep-alive 用法 使用示例: 1.缓存所有页面: 2.根据条件缓存部分页面 3.结合vue-router,缓存部分页面 二.keep-alive 生命周期 1. activated 2. deactivated keep-alive 是Vue内置的组件之一, 主要用于保留组件状态或避免重新渲染. 作用    在组件切换过程中将状态保留在内存中,防止重复渲染DOM,减少加载时间及性能消耗,提高用户体验. 一.keep-alive 用法 < keep-alive> 包裹动态组件

  • 手写Vue内置组件component的实现示例

    目录 前言 内置组件component的使用 component组件的原理分析 虚拟DOM与原生DOM render函数的使用 尝试手写实现component 总结 最近在复习Vue的源码,今天带大家手写实现一下Vue内置组件component,比较简单,最近面试有被问到. 前言 Vue大家都很熟悉,除了原生的组件,其自己也封装了一下内置组件,比如component,transition,keep-alive等等. component算是用的比较多的了,当我们遇到需要根据不同条件显示不同组件的时

  • Vue动态组件与内置组件浅析讲解

    目录 一.动态组件 二.内置组件 一.动态组件 在vue中,有很多的组件可以挂载同一个挂载点上面,要在同一个挂载的点上的多个组件之间可以实现动态的切换渲染,我们可以通过内置组件component的is属性动态的绑定组件,然后我们就可以根据is的值来决定哪一个组件要被渲染,非常的方便. 我们通过一点简单的实例代码可以加深了解: 示例代码: <!DOCTYPE html> <html lang="en"> <head> <title>组件之间

  • vue 内置组件 component 的用法示例详解

    目录 component is 内置组件切换方法一: component is 内置组件切换方法二: component is 内置组件切换方法一: component组件(单独拿出一个组件来专门进行切换使用) 使用is来绑定你的组件:如下面的reviewedPlan planDetailsList attachmentList等引入的组件名 changeViewFun 是用来切换组件的方法 通过给is绑定的currentView来实现切换组件 pathUrl就是当前的路由 <template>

随机推荐