Android仿微信布局的实现示例
目前没有实现微信的功能,只是对微信的各个界面的调动以及对通讯录,发现和我中各个按钮的设置,同时如果你想尝试给微信中各个按钮背后添加功能时间可以用此作为模板哦,如拍照,朋友圈的添加都可以在此拓展哟,这个代码后期我会尽可能的添加对应的按钮的功能,希望对你们有所帮助,另外,这个代码的部分调用没有完成,不过我给部分的界面跳转做过例子了,照此方法即可完成,很容易的!另外我用的方法比较笨重,但是很容易理解,也算对我们初学者做个简单参考吧!
下面是代码部分:
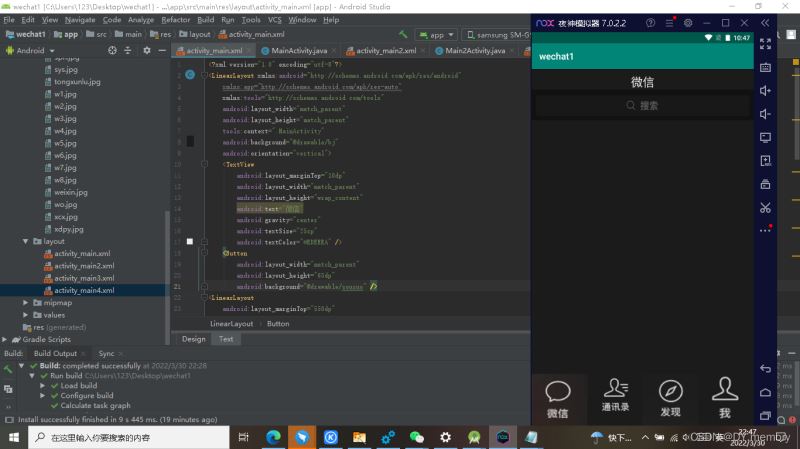
<?xml version="1.0" encoding="utf-8"?>
<LinearLayout xmlns:android="http://schemas.android.com/apk/res/android"
    xmlns:app="http://schemas.android.com/apk/res-auto"
    xmlns:tools="http://schemas.android.com/tools"
    android:layout_width="match_parent"
    android:layout_height="match_parent"
    tools:context=".MainActivity"
    android:background="@drawable/bj"
    android:orientation="vertical"
    >

    <TextView
        android:layout_marginTop="10dp"
        android:layout_width="match_parent"
        android:layout_height="wrap_content"
        android:text="微信"
        android:gravity="center"
        android:textSize="25sp"
        android:textColor="#EDEEEA"
        />
    <Button
        android:layout_width="match_parent"
        android:layout_height="65dp"
        android:background="@drawable/sousuo"

        />
<LinearLayout
    android:layout_marginTop="550dp"
    android:layout_width="wrap_content"
    android:layout_height="wrap_content"
    android:orientation="horizontal">
    <Button
        android:id="@+id/wx"
        android:layout_width="wrap_content"
        android:layout_height="wrap_content"
    android:background="@drawable/weixin"
        android:layout_weight="1"
    />
    <Button
        android:id="@+id/btn1"
        android:layout_width="wrap_content"
        android:layout_height="wrap_content"
        android:background="@drawable/tongxunlu"
        android:layout_weight="1"
        />
    <Button
        android:id="@+id/btn2"
        android:layout_width="wrap_content"
        android:layout_height="wrap_content"
        android:background="@drawable/faxian"
        android:layout_weight="1"
        />
    <Button
        android:id="@+id/btn3"
        android:layout_width="wrap_content"
        android:layout_height="wrap_content"
        android:background="@drawable/wo"
        android:layout_weight="1"
        />

</LinearLayout>
</LinearLayout>
package com.example.wechat1;

import androidx.appcompat.app.AppCompatActivity;

import android.content.Intent;
import android.os.Bundle;
import android.view.View;
import android.widget.Button;

public class MainActivity extends AppCompatActivity {
private Button btn1,btn2,btn3;
    @Override
    protected void onCreate(Bundle savedInstanceState) {
        super.onCreate(savedInstanceState);
        setContentView(R.layout.activity_main);
        btn1=findViewById(R.id.btn1);
        btn2=findViewById(R.id.btn2);
        btn3=findViewById(R.id.btn3);
        btn1.setOnClickListener(new View.OnClickListener() {
            @Override
            public void onClick(View view) {
                Intent intent=new Intent(MainActivity.this,Main2Activity.class);
                startActivity(intent);
            }
        });
        btn2.setOnClickListener(new View.OnClickListener() {
            @Override
            public void onClick(View view) {
                Intent intent=new Intent(MainActivity.this,Main3Activity.class);
                startActivity(intent);
            }
        });
        btn3.setOnClickListener(new View.OnClickListener() {
            @Override
            public void onClick(View view) {
                Intent intent=new Intent(MainActivity.this,Main4Activity.class);
                startActivity(intent);
            }
        });
    }
}
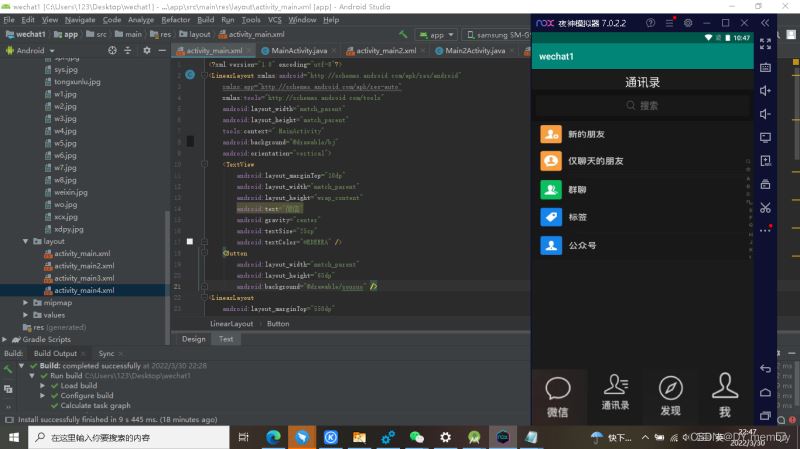
<?xml version="1.0" encoding="utf-8"?>
<LinearLayout xmlns:android="http://schemas.android.com/apk/res/android"
    xmlns:app="http://schemas.android.com/apk/res-auto"
    xmlns:tools="http://schemas.android.com/tools"
    android:layout_width="match_parent"
    android:layout_height="match_parent"
    tools:context=".Main2Activity"
    android:orientation="vertical"
    android:background="@drawable/bj"
    >

    <TextView
        android:textColor="#EDEEEA"
        android:layout_width="match_parent"
        android:layout_height="wrap_content"
        android:text="通讯录"
        android:gravity="center"
        android:layout_marginTop="10dp"
        android:textSize="25sp"
        />
    <Button
        android:layout_width="match_parent"
        android:layout_height="65dp"
        android:background="@drawable/sousuo"

        />
    <Button
        android:layout_width="match_parent"
        android:layout_height="60dp"
        android:background="@drawable/xdpy"
        />
    <Button
        android:layout_width="match_parent"
        android:layout_height="60dp"
        android:background="@drawable/jlt"
        />
    <Button
        android:layout_width="match_parent"
        android:layout_height="60dp"
        android:background="@drawable/ql"

        />
    <Button
        android:layout_width="match_parent"
        android:layout_height="60dp"
        android:background="@drawable/bq"
        />
    <Button
        android:layout_width="match_parent"
        android:layout_height="60dp"
        android:background="@drawable/gzh"
        />
    <LinearLayout
        android:layout_marginTop="240dp"
        android:layout_width="wrap_content"
        android:layout_height="wrap_content"
        android:orientation="horizontal">
        <Button
            android:id="@+id/btn1"
            android:layout_width="wrap_content"
            android:layout_height="wrap_content"
            android:background="@drawable/weixin"
            android:layout_weight="1"
            />
        <Button
            android:id="@+id/txl"
            android:layout_width="wrap_content"
            android:layout_height="wrap_content"
            android:background="@drawable/tongxunlu"
            android:layout_weight="1"
            />
        <Button
            android:id="@+id/btn2"
            android:layout_width="wrap_content"
            android:layout_height="wrap_content"
            android:background="@drawable/faxian"
            android:layout_weight="1"
            />
        <Button
            android:id="@+id/btn3"
            android:layout_width="wrap_content"
            android:layout_height="wrap_content"
            android:background="@drawable/wo"
            android:layout_weight="1"
            />

    </LinearLayout>
</LinearLayout>
package com.example.wechat1;

import androidx.appcompat.app.AppCompatActivity;

import android.content.Intent;
import android.os.Bundle;
import android.view.View;
import android.widget.Button;

public class Main2Activity extends AppCompatActivity {
private Button btn1,btn2,btn3;
    @Override
    protected void onCreate(Bundle savedInstanceState) {
        super.onCreate(savedInstanceState);
        setContentView(R.layout.activity_main2);
        btn1=findViewById(R.id.btn1);
        btn2=findViewById(R.id.btn2);
        btn3=findViewById(R.id.btn3);
        btn1.setOnClickListener(new View.OnClickListener() {
            @Override
            public void onClick(View view) {
                Intent intent=new Intent(Main2Activity.this,MainActivity.class);
                startActivity(intent);
            }
        });
        btn2.setOnClickListener(new View.OnClickListener() {
            @Override
            public void onClick(View view) {
                Intent intent=new Intent(Main2Activity.this,Main3Activity.class);
                startActivity(intent);
            }
        });
        btn3.setOnClickListener(new View.OnClickListener() {
            @Override
            public void onClick(View view) {
                Intent intent=new Intent(Main2Activity.this,Main4Activity.class);
                startActivity(intent);
            }
        });
    }
}
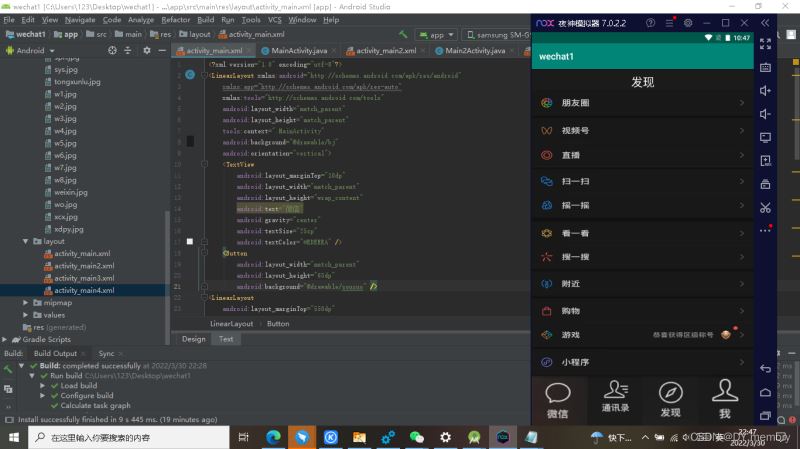
<?xml version="1.0" encoding="utf-8"?>
<LinearLayout xmlns:android="http://schemas.android.com/apk/res/android"
    xmlns:app="http://schemas.android.com/apk/res-auto"
    xmlns:tools="http://schemas.android.com/tools"
    android:layout_width="match_parent"
    android:layout_height="match_parent"
    tools:context=".Main3Activity"
    android:orientation="vertical"
    android:background="@drawable/bj"
    >
<TextView
    android:layout_width="match_parent"
    android:layout_height="wrap_content"
    android:text="发现"
    android:gravity="center"
    android:textSize="25sp"
    android:layout_marginTop="10dp"
    android:textColor="#EDEEEA"
    />
    <Button
        android:layout_width="match_parent"
        android:layout_height="60dp"
        android:background="@drawable/pyq"
        />
    <Button
        android:layout_width="match_parent"
        android:layout_height="110dp"
        android:background="@drawable/sph"
        />
    <Button
        android:layout_width="match_parent"
        android:layout_height="110dp"
        android:background="@drawable/sys"

        />
    <Button
        android:layout_width="match_parent"
        android:layout_height="110dp"
        android:background="@drawable/kyk"
        />
    <Button
        android:layout_width="match_parent"
        android:layout_height="60dp"
        android:background="@drawable/fj"
        />
    <Button
        android:layout_width="match_parent"
        android:layout_height="110dp"
        android:background="@drawable/gw"
        />
    <Button
        android:layout_width="match_parent"
        android:layout_height="60dp"
        android:background="@drawable/xcx"
        />
    <LinearLayout

        android:layout_width="wrap_content"
        android:layout_height="wrap_content"
        android:orientation="horizontal">
        <Button
            android:id="@+id/wx"
            android:layout_width="wrap_content"
            android:layout_height="wrap_content"
            android:background="@drawable/weixin"
            android:layout_weight="1"
            />
        <Button
            android:id="@+id/txl"
            android:layout_width="wrap_content"
            android:layout_height="wrap_content"
            android:background="@drawable/tongxunlu"
            android:layout_weight="1"
            />
        <Button
            android:id="@+id/fx"
            android:layout_width="wrap_content"
            android:layout_height="wrap_content"
            android:background="@drawable/faxian"
            android:layout_weight="1"
            />
        <Button
            android:id="@+id/w"
            android:layout_width="wrap_content"
            android:layout_height="wrap_content"
            android:background="@drawable/wo"
            android:layout_weight="1"
            />

    </LinearLayout>
</LinearLayout>
<?xml version="1.0" encoding="utf-8"?>
<LinearLayout xmlns:android="http://schemas.android.com/apk/res/android"
    xmlns:app="http://schemas.android.com/apk/res-auto"
    xmlns:tools="http://schemas.android.com/tools"
    android:layout_width="match_parent"
    android:layout_height="match_parent"
    tools:context=".Main4Activity"
    android:orientation="vertical"
    android:background="@drawable/bj"
    >

    <Button
        android:layout_marginTop="20dp"
        android:layout_width="wrap_content"
        android:layout_height="180dp"
        android:background="@drawable/w1"
        />
<Button
    android:layout_width="wrap_content"
    android:layout_height="60dp"
    android:background="@drawable/w2"

    />
    <Button
        android:layout_width="wrap_content"
        android:layout_height="60dp"
        android:background="@drawable/w3"

        />
    <Button
        android:layout_width="wrap_content"
        android:layout_height="60dp"
        android:background="@drawable/w4"

        />
    <Button
        android:layout_width="wrap_content"
        android:layout_height="60dp"
        android:background="@drawable/w5"

        />
    <Button
        android:layout_width="wrap_content"
        android:layout_height="60dp"
        android:background="@drawable/w6"
        />
    <Button
        android:layout_width="wrap_content"
        android:layout_height="60dp"
        android:background="@drawable/w7"
        />
    <Button
        android:layout_width="wrap_content"
        android:layout_height="60dp"
        android:background="@drawable/w8"
        />

</LinearLayout>

到此这篇关于Android仿微信布局的实现示例的文章就介绍到这了,更多相关Android 微信布局内容请搜索我们以前的文章或继续浏览下面的相关文章希望大家以后多多支持我们!
相关推荐
-

android LinearLayout和RelativeLayout组合实现精确布局方法介绍
先明确几个概念的区别: padding margin都是边距的含义,关键问题得明白是什么相对什么的边距. padding是控件的内容相对控件的边缘的边距. margin是控件边缘相对父空间的边距. android:gravity 属性是对该view 内容的限定.比如一个button 上面的text. 你可以设置该text 在view的靠左,靠右等位置.该属性就干了这个. android:layout_gravity是用来设置该view中的子view相对于父view的位置.比如一个button
-
Android制作漂亮自适布局键盘的方法
最近做了个自定义键盘,但面对不同分辨率的机型其中数字键盘不能根据界面大小自已铺满,但又不能每种机型都做一套吧,所以要做成自适应,那这里主讲思路. 这里最上面的titlebar高度固定,下面输入的金额高度也固定(当然也可以自适应),主要是中间的数字键盘,高度和宽度需要自适应.先来张效果图: 最常见的解决方案是用线性布局,自适应当然是按比例,但布局中无%的概念,那就要用到layout_weight了,该属性的作用是决定控件在其父布局中的显示权重(具体概念就不多说了). 这里用一个LinearLayo
-
android动态加载布局文件示例
一.布局文件part.xml: 复制代码 代码如下: <RelativeLayout xmlns:android="http://schemas.android.com/apk/res/android" xmlns:tools="http://schemas.android.com/tools" android:layout_width="match_parent" android:layout_height="
-
Android属性动画实现布局的下拉展开效果
在Android的3.0之后,google又提出了属性动画的这样一个框架,他可以更好的帮助我们实现更丰富的动画效果.所以为了跟上技术的步伐,今天就聊一聊属性动画. 这一次的需求是这样的:当点击一个View的时候,显示下面隐藏的一个View,要实现这个功能,需要将V iew的visibility属性设置gone为visible即可,但是这个过程是一瞬间的,并不能实现我们要的效果.所以,属性动画是个不错的方案. 先把效果贴上 第一个: 第二个: 前面的这个是隐藏着,后面这个是显示的.当点击这个箭头
-
android layout 按比例布局的代码
为了创建比例大小的子View,可以将LinearLayout的宽度和高度设为fill_parent, 而将子View的宽度或是高度设为0,然后为子View设置不同权重(weight) ,这样子View的大小就会权值成比例. 本例使用横向LinearLayout,LinearLayout的android:layout_width="match_parent",表示将使用整个屏幕宽度. 对于LinearLayout的几个子View,将它们的宽度都定义为0,android:layout_wi
-
基于Android在布局中动态添加view的两种方法(总结)
一.说明 添加视图文件的时候有两种方式:1.通过在xml文件定义layout:2.java代码编写 二.前言说明 1.构造xml文件 2.LayoutInflater 提到addview,首先要了解一下LayoutInflater类.这个类最主要的功能就是实现将xml表述的layout转化为View的功能.为了便于理解,我们可以将它与findViewById()作一比较,二者都是实例化某一对象,不同的是findViewById()是找xml布局文件下的具体widget控件实例化,而LayoutI
-
Android仿微信布局的实现示例
目前没有实现微信的功能,只是对微信的各个界面的调动以及对通讯录,发现和我中各个按钮的设置,同时如果你想尝试给微信中各个按钮背后添加功能时间可以用此作为模板哦,如拍照,朋友圈的添加都可以在此拓展哟,这个代码后期我会尽可能的添加对应的按钮的功能,希望对你们有所帮助,另外,这个代码的部分调用没有完成,不过我给部分的界面跳转做过例子了,照此方法即可完成,很容易的!另外我用的方法比较笨重,但是很容易理解,也算对我们初学者做个简单参考吧! 下面是代码部分: <?xml version="1.0&quo
-
Android仿微信发送语音消息的功能及示例代码
微信的发送语音是有一个向上取消的,我们使用onTouchListener来监听手势,然后做出相应的操作就行了. 直接上代码: //语音操作对象 private MediaPlayer mPlayer = null; private MediaRecorder mRecorder = null; //语音文件保存路径 private String FileName = null; FileName = Environment.getExternalStorageDirectory().getAbs
-
Android 仿微信底部渐变Tab效果
先来看一下效果图 除了第三个的发现Tab有所差别外,其他的基本还原了微信的底部Tab渐变效果 每个Tab都是一个自定义View,根据ImageView的tint属性来实现颜色渐变效果,tint属性的使用可以看我的上一篇文章 我将自定义View命名为ShadeView,包含四个自定义属性 意思分别为图标.背景色.底部文本.底部文本大小 <declare-styleable name="ShadeView"> <attr name="icon" for
-
Android仿微信底部菜单栏效果
前言 在市面上,大多数的APP都需要通过底部菜单栏来将程序的功能进行分类整理,通常都是分为3-5个大模块,从而正确有效地引导用户去使用我们的APP.实现底部菜单栏的方法也有很多种. 1.仿微信底部菜单栏(ViewPager+ImagerView+TextView) ......(其他方式后续会补充) 效果预览 首先来个开胃菜,看看实现效果: 先贴出项目所需的资源文件,这些可随个人自由更改颜色和文字 colors.xml <color name="bg_line_light_gray&quo
-
Android仿微信底部菜单栏功能显示未读消息数量
底部菜单栏很重要,我看了一下很多应用软件都是用了底部菜单栏,这里使用了tabhost做了一种通用的(就是可以像微信那样显示未读消息数量的,虽然之前也做过但是layout下的xml写的太臃肿,这里去掉了很多不必要的层,个人看起来还是不错的,所以贴出来方便以后使用). 先看一下做出来之后的效果: 以后使用的时候就可以换成自己项目的图片和字体了,主框架不用变哈哈, 首先是要布局layout下xml文件 main.xml: <?xml version="1.0" encoding=&qu
-
Android仿微信滑动弹出编辑、删除菜单效果、增加下拉刷新功能
如何为不同的list item呈现不同的菜单,本文实例就为大家介绍了Android仿微信或QQ滑动弹出编辑.删除菜单效果.增加下拉刷新等功能的实现,分享给大家供大家参考,具体内容如下 效果图: 1. 下载开源项目,并将其中的liberary导入到自己的项目中: 2. 使用SwipeMenuListView代替ListView,在页面中布局: <android.support.v4.widget.SwipeRefreshLayout android:id="@+id/swipeRefresh
-
Android实现简单底部导航栏 Android仿微信滑动切换效果
Android仿微信滑动切换最终实现效果: 大体思路: 1. 主要使用两个自定义View配合实现; 底部图标加文字为一个自定义view,底部导航栏为一个载体,根据需要来添加底部图标; 2. 底部导航栏的设置方法类似于TabLayout的关联,View需要创建关联方法,用来关联VIewPager; 3. 通过关联方法获取ViewPager实例后,根据ViewPager页面数创建底部导航栏的图标按钮; 代码实现: 1. 新建第一个自定义View, 图标 + 文字 的底部按钮; /** * 自定义控件
-
Android仿微信QQ设置图形头像裁剪功能
最近在做毕业设计,想有一个功能和QQ一样可以裁剪头像并设置圆形头像,额,这是设计狮的一种潮流. 而纵观现在主流的APP,只要有用户系统这个功能,这个需求一般都是在(bu)劫(de)难(bu)逃(xue)! 图片裁剪实现方式有两种,一种是利用系统自带的裁剪工具,一种是使用开源工具Cropper.本节就为大家带来如何使用系统自带的裁剪工具进行图片裁剪~ 还是先来个简单的运行图. 额,简单说下,我待会会把代码写成小demo分享给大家,在文章末尾会附上github链接,需要的可以自行下载~ 下面来简单分
-
Android仿微信通讯录列表侧边栏效果
先看Android仿微信通讯录列表侧边栏效果图 这是比较常见的效果了吧 列表根据首字符的拼音字母来排序,且可以通过侧边栏的字母索引来进行定位. 实现这样一个效果并不难,只要自定义一个索引View,然后引入一个可以对汉字进行拼音解析的jar包--pinyin4j-2.5.0即可 首先,先来定义侧边栏控件View,只要直接画出来即可. 字母选中项会变为红色,且滑动时背景会变色,此时SideBar并不包含居中的提示文本 public class SideBar extends View { priva
-
Android仿微信右滑返回功能的实例代码
先上效果图,如下: 先分析一下功能的主要技术点,右滑即手势判断,当滑到一直距离时才执行返回,并且手指按下的位置是在屏幕的最左边(这个也是有一定范围的), 这些可以实现onTouchEvent来实现. 接着就是返回时,有滑动效果,很显然这个是Acitivty切换动画实现的.好啦,分析完了就开干.下面上代码: @Override public boolean onTouchEvent(MotionEvent event) { switch (event.getAction()){ case Mot