实用的 vue tags 创建缓存导航的过程实现
需求
是要做一个tag,当切换页面的时候保留状态。
效果图:
思路
既然涉及了router跳转,那我们就去查api 发现keep-alive,巧了就用它吧。这里我们用到了include属性,该属性接受一个数组,当组件的name名称包含在inclue里的时候就会触发keep-alive。
import { Vue, Component, Watch, Mixins } from 'vue-property-decorator';

// 此处省略n行代码

// 这是个计算属性。(至于为什么这么写 这里就不介绍了。)
get cachedViews():string[] {
 return this.$store.state.tagsView.cachedViews;
}

// 此处省略n行代码

<keep-alive :include="cachedViews">
 <router-view :key="key"></router-view>
</keep-alive>
那我们接下来就处理cachedViews变量就好了。
vuex实现
import { Route } from 'vue-router'; // 检测规则

interface TagsState{
 visitedViews: Route[];
 cachedViews: string[];
}

const state = (): TagsState => ({
 visitedViews: [], // 展示的菜单
 cachedViews: [], // 缓存菜单 用来activeed
});

const mutations = {
 ADD_VISITED_VIEW: (state: TagsState, view: Route) => {
 if (state.visitedViews.some((v: any) => v.path === view.path)) { return; }
 state.visitedViews.push(
  Object.assign({}, view, {
  title: view.meta.title || 'no-name',
  }),
 );
 },
 ADD_CACHED_VIEW: (state: TagsState, view: Route) => {
 if (state.cachedViews.includes(view.meta.name)) { return; }
 if (!view.meta.noCache) {
  state.cachedViews.push(view.meta.name);
 }
 },

 DEL_VISITED_VIEW: (state: TagsState, view: Route) => {
 for (const [i, v] of state.visitedViews.entries()) {
  if (v.path === view.path) {
  state.visitedViews.splice(i, 1);
  break;
  }
 }
 },
 DEL_CACHED_VIEW: (state: TagsState, view: Route) => {
 const index = state.cachedViews.indexOf(view.meta.name);
 index > -1 && state.cachedViews.splice(index, 1);
 },

 DEL_OTHERS_VISITED_VIEWS: (state: TagsState, view: Route) => {
 state.visitedViews = state.visitedViews.filter((v: any) => {
  return v.meta.affix || v.path === view.path;
 });
 },
 DEL_OTHERS_CACHED_VIEWS: (state: TagsState, view: Route) => {
 const index = state.cachedViews.indexOf(view.meta.name);
 if (index > -1) {
  state.cachedViews = state.cachedViews.slice(index, index + 1);
 } else {
  // if index = -1, there is no cached tags
  state.cachedViews = [];
 }
 },

 DEL_ALL_VISITED_VIEWS: (state: TagsState) => {
 // keep affix tags
 const affixTags = state.visitedViews.filter((tag: any) => tag.meta.affix);
 state.visitedViews = affixTags;
 },
 DEL_ALL_CACHED_VIEWS: (state: TagsState) => {
 state.cachedViews = [];
 },

 UPDATE_VISITED_VIEW: (state: TagsState, view: Route) => {
 for (let v of state.visitedViews) {
  if (v.path === view.path) {
  v = Object.assign(v, view);
  break;
  }
 }
 },
};

const actions = {
 addView({ dispatch }: any, view: Route) {
 dispatch('addVisitedView', view);
 dispatch('addCachedView', view);
 },
 addVisitedView({ commit }: any, view: Route) {
 commit('ADD_VISITED_VIEW', view);
 },
 addCachedView({ commit }: any, view: Route) {
 commit('ADD_CACHED_VIEW', view);
 },

 delView({ dispatch, state }: any, view: Route) {
 return new Promise((resolve) => {
  dispatch('delVisitedView', view);
  dispatch('delCachedView', view);
  resolve({
  visitedViews: [...state.visitedViews],
  cachedViews: [...state.cachedViews],
  });
 });
 },
 delVisitedView({ commit, state }: any, view: Route) {
 return new Promise((resolve) => {
  commit('DEL_VISITED_VIEW', view);
  resolve([...state.visitedViews]);
 });
 },
 delCachedView({ commit, state }: any, view: Route) {
 return new Promise((resolve) => {
  commit('DEL_CACHED_VIEW', view);
  resolve([...state.cachedViews]);
 });
 },

 delOthersViews({ dispatch, state }: any, view: Route) {
 return new Promise((resolve) => {
  dispatch('delOthersVisitedViews', view);
  dispatch('delOthersCachedViews', view);
  resolve({
  visitedViews: [...state.visitedViews],
  cachedViews: [...state.cachedViews],
  });
 });
 },
 delOthersVisitedViews({ commit, state }: any, view: Route) {
 return new Promise((resolve) => {
  commit('DEL_OTHERS_VISITED_VIEWS', view);
  resolve([...state.visitedViews]);
 });
 },
 delOthersCachedViews({ commit, state }: any, view: Route) {
 return new Promise((resolve) => {
  commit('DEL_OTHERS_CACHED_VIEWS', view);
  resolve([...state.cachedViews]);
 });
 },

 delAllViews({ dispatch, state }: any, view: Route) {
 return new Promise((resolve) => {
  dispatch('delAllVisitedViews', view);
  dispatch('delAllCachedViews', view);
  resolve({
  visitedViews: [...state.visitedViews],
  cachedViews: [...state.cachedViews],
  });
 });
 },
 delAllVisitedViews({ commit, state }: any) {
 return new Promise((resolve) => {
  commit('DEL_ALL_VISITED_VIEWS');
  resolve([...state.visitedViews]);
 });
 },
 delAllCachedViews({ commit, state }: any) {
 return new Promise((resolve) => {
  commit('DEL_ALL_CACHED_VIEWS');
  resolve([...state.cachedViews]);
 });
 },

 updateVisitedView({ commit }: any, view: Route) {
 commit('UPDATE_VISITED_VIEW', view);
 },
};

export default {
 namespaced: true,
 state,
 mutations,
 actions,
};
上面代码,我们定义了一系列的对标签的操作。
组件实现
组件解构如图
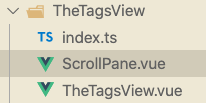
TheTagsView.vue
<script lang="ts">
/**
 * @author leo
 * @description #15638 【test_tabs 组件】tab组件
 */
import { Component, Vue, Prop, Watch, Mixins } from 'vue-property-decorator';
import ScrollPane from './ScrollPane.vue';
import path from 'path';

@Component({
 components: {
 ScrollPane,
 },
})
export default class TheTagsView extends Vue {
 get visitedViews() {
 return this.$store.state.tagsView.visitedViews; // 点开过的视图
 }
 get routes() {
 return this.$store.state.permission.routes;
 }

 public visible: boolean = false; // 标签右键列表显示隐藏
 public top: number = 0; // transform定位
 public left: number = 0; // transform定位
 public selectedTag: any = {}; // 当前活跃的标签
 public affixTags: any[] = []; // 所有标签

 @Watch('$route')
 public watchRoute() {
 this.addTags(); // 新增当前标签
 this.moveToCurrentTag(); // 删除原活动标签
 }

 @Watch('visible')
 public watchVisible(value: any) {
 if (value) {
  document.body.addEventListener('click', this.closeMenu);
  } else {
  document.body.removeEventListener('click', this.closeMenu);
  }
 }

 public isActive(route: any) { // 是否当前活动
 return route.path === this.$route.path;
 }

 public isAffix(tag: any) { // 是否固定
 return tag.meta && tag.meta.affix;
 }

 // 过滤当前标签于路由
 public filterAffixTags(routes: any, basePath = '/') {
 let tags: any = [];
 routes.forEach((route: any) => {
  if (route.meta && route.meta.affix) {
  const tagPath = path.resolve(basePath, route.path);
  tags.push({
   fullPath: tagPath,
   path: tagPath,
   name: route.name,
   meta: { ...route.meta },
  });
  }
  if (route.children) {
  const tempTags = this.filterAffixTags(route.children, route.path);
  if (tempTags.length >= 1) {
   tags = [...tags, ...tempTags];
  }
  }
 });
 return tags;
 }

 public addTags() {
 const { name } = this.$route;
 if (name) {
  this.$store.dispatch('tagsView/addView', this.$route);
 }
 return false;
 }

 public moveToCurrentTag() {
 const tags: any = this.$refs.tag;
 this.$nextTick(() => {
  if (tags) {
  for (const tag of tags) {
   if (tag.to.path === this.$route.path) {
   (this.$refs.scrollPane as any).moveToTarget(tag);
   // when query is different then update
   if (tag.to.fullPath !== this.$route.fullPath) {
    this.$store.dispatch('tagsView/updateVisitedView', this.$route);
   }
   break;
   }
  }
  }
 });
 }
 public refreshSelectedTag(view: any) {
 this.$store.dispatch('tagsView/delCachedView', view).then(() => {
  const { fullPath } = view;
  this.$nextTick(() => {
  this.$router.replace({
   path: '/redirect' + fullPath,
  });
  });
  });
 }

 public closeSelectedTag(view: any) {
 this.$store.dispatch('tagsView/delView', view).then(({ visitedViews }) => {
  if (this.isActive(view)) {
  this.toLastView(visitedViews, view);
  }
 });
 }

 public closeOthersTags() {
 this.$router.push(this.selectedTag);
 this.$store.dispatch('tagsView/delOthersViews', this.selectedTag).then(() => {
  this.moveToCurrentTag();
 });
 }

 public closeAllTags(view: any) {
 this.$store.dispatch('tagsView/delAllViews').then(({ visitedViews }) => {
  if (this.affixTags.some((tag) => tag.path === view.path)) {
  return;
  }
  this.toLastView(visitedViews, view);
 });
 }

 public toLastView(visitedViews: any , view: any) {
 const latestView = visitedViews.slice(-1)[0];
 if (latestView) {
  this.$router.push(latestView.fullPath);
 } else {
  // now the default is to redirect to the home page if there is no tags-view,
  // you can adjust it according to your needs.
  if (view.name === 'Dashboard') {
  // to reload home page
  this.$router.replace({ path: '/redirect' + view.fullPath });
  } else {
  this.$router.push('/');
  }
 }
 }
 public openMenu(tag: any , e: any) {
 const menuMinWidth = 105;
 const offsetLeft = this.$el.getBoundingClientRect().left; // container margin left
 const offsetWidth = this.$el.offsetWidth; // container width
 const maxLeft = offsetWidth - menuMinWidth; // left boundary
 const left = e.clientX - offsetLeft + 15 + 160; // 15: margin right

 if (left > maxLeft) {
  this.left = maxLeft;
 } else {
  this.left = left;
 }

 this.top = e.clientY;
 this.visible = true;
 this.selectedTag = tag;
 }

 public closeMenu() {
 this.visible = false;
 }

 public mounted() {
 this.initTags();
 this.addTags(); // 添加当前页面tag
 }
}
</script>

<template>
 <div id="tags-view-container" class="tags-view-container">
 <scroll-pane ref="scrollPane" class="tags-view-wrapper">
  <router-link
  v-for="(tag, index) in visitedViews"
  ref="tag"
  :key="tag.path"
  :class="isActive(tag)?'active':''"
  :to="{ path: tag.path, query: tag.query, fullPath: tag.fullPath }"
  tag="span"
  class="tags-view-item"
  @click.middle.native="!isAffix(tag)?closeSelectedTag(tag):''"
  @contextmenu.prevent.native="openMenu(tag,$event)"
  >
  {{ tag.title }}
  <!-- <span v-if="!isAffix(tag)" class="el-icon-close" @click.prevent.stop="closeSelectedTag(tag)" /> -->
  <span class="tab-border" v-if="index!==visitedViews.length-1"></span>
  </router-link>
 </scroll-pane>
 <ul v-show="visible" :style="{left:left+'px',top:top+'px'}" class="contextmenu">
  <li @click="refreshSelectedTag(selectedTag)">刷新</li>
  <li v-if="!isAffix(selectedTag)" @click="closeSelectedTag(selectedTag)">关闭当前标签</li>
  <li @click="closeOthersTags">关闭其他标签</li>
  <li @click="closeAllTags(selectedTag)">关闭所有</li>
 </ul>
 </div>
</template>

<style lang="less" scoped>
.tags-view-container {
 height: 46px;
 width: 100%;
 background: #fff;
 .tags-view-wrapper {
 position: relative;
 .tags-view-item {
  display: inline-block;
  position: relative;
  cursor: pointer;
  height: 46px;
  line-height: 46px;
  // border: 1px solid #d8dce5;
  color: #495060;
  background: #fff;
  padding: 0 4px;
  font-size: 14px;
  .tab-border {
  display: inline-block;
  height: 10px;
  width: 1px;
  background: #f1f1f1;
  margin-left: 4px;
  }
  &:hover {
  border-bottom: 2px solid #666;
  }
  &.active {
  // background-color: #1F1A16;
  border-bottom: 2px solid #1F1A16;
  color: #333;
  // border-color: #1F1A16;
  // &::before {
  // content: '';
  // background: #fff;
  // display: inline-block;
  // width: 8px;
  // height: 8px;
  // border-radius: 50%;
  // position: relative;
  // margin-right: 2px;
  // }
  }
 }
 }
 .contextmenu {
 margin: 0;
 background: #fff;
 z-index: 3000;
 position: absolute;
 list-style-type: none;
 padding: 5px 0;
 border-radius: 4px;
 font-size: 12px;
 font-weight: 400;
 color: #333;
 box-shadow: 2px 2px 3px 0 rgba(0, 0, 0, .3);
 li {
  margin: 0;
  padding: 7px 16px;
  cursor: pointer;
  &:hover {
  background: #eee;
  }
 }
 }
}
</style>

<style lang="less">
//reset element css of el-icon-close
.tags-view-wrapper {
 .tags-view-item {
 .el-icon-close {
  width: 16px;
  height: 16px;
  vertical-align: 3px;
  border-radius: 50%;
  text-align: center;
  transition: all .3s cubic-bezier(.645, .045, .355, 1);
  transform-origin: 100% 50%;
  &:before {
  transform: scale(.6);
  display: inline-block;
  vertical-align: -3px;
  }
  &:hover {
  background-color: #b4bccc;
  color: #fff;
  }
 }
 }
 .el-scrollbar__bar{
 pointer-events: none;
 opacity: 0;
 }
}
</style>
ScrollPane.vue
<script lang="ts">
/**
 * @author leo
 * @description #15638 【test_tabs 组件】tab组件
 */
import { Component, Vue, Prop, Watch, Mixins } from 'vue-property-decorator';

const tagAndTagSpacing = 4; // tagAndTagSpacing

@Component({
 components: {
 ScrollPane,
 },
})
export default class ScrollPane extends Vue {
 get scrollWrapper() {
 return (this.$refs.scrollContainer as any).$refs.wrap;
 }

 public left: number = 0;

 public handleScroll(e: any) {
 const eventDelta = e.wheelDelta || -e.deltaY * 40;
 const $scrollWrapper = this.scrollWrapper;
 $scrollWrapper.scrollLeft = $scrollWrapper.scrollLeft + eventDelta / 4;
 }

 public moveToTarget(currentTag: any) {
 const $container = (this.$refs.scrollContainer as any).$el;
 const $containerWidth = $container.offsetWidth;
 const $scrollWrapper = this.scrollWrapper;
 const tagList: any = this.$parent.$refs.tag;

 let firstTag = null;
 let lastTag = null;

 // find first tag and last tag
 if (tagList.length > 0) {
  firstTag = tagList[0];
  lastTag = tagList[tagList.length - 1];
 }

 if (firstTag === currentTag) {
  $scrollWrapper.scrollLeft = 0;
 } else if (lastTag === currentTag) {
  $scrollWrapper.scrollLeft = $scrollWrapper.scrollWidth - $containerWidth;
 } else {
  // find preTag and nextTag
  const currentIndex = tagList.findIndex((item: any) => item === currentTag);
  const prevTag = tagList[currentIndex - 1];
  const nextTag = tagList[currentIndex + 1];

  // the tag's offsetLeft after of nextTag
  const afterNextTagOffsetLeft = nextTag.$el.offsetLeft + nextTag.$el.offsetWidth + tagAndTagSpacing;

  // the tag's offsetLeft before of prevTag
  const beforePrevTagOffsetLeft = prevTag.$el.offsetLeft - tagAndTagSpacing;

  if (afterNextTagOffsetLeft > $scrollWrapper.scrollLeft + $containerWidth) {
  $scrollWrapper.scrollLeft = afterNextTagOffsetLeft - $containerWidth;
  } else if (beforePrevTagOffsetLeft < $scrollWrapper.scrollLeft) {
  $scrollWrapper.scrollLeft = beforePrevTagOffsetLeft;
  }
 }
 }
}
</script>

<template>
 <el-scrollbar ref="scrollContainer" :vertical="false" class="scroll-container" @wheel.native.prevent="handleScroll">
 <slot />
 </el-scrollbar>
</template>

<style lang="less" scoped>
.scroll-container {
 white-space: nowrap;
 position: relative;
 overflow: hidden;
 width: 100%;
 .el-scrollbar__bar {
 bottom: 0px;
 }
 .el-scrollbar__wrap {
 height: 49px;
 }
}
</style>
index.ts
import TheTagsView from './TheTagsView.vue';
export default TheTagsView;
这样我们的组件就写完啦,有哪里有问题的小伙伴可以留言哦。
组件调用
因为是全局的,所以放在全局下直接调用就好了
总结
这样我们一个简单的能实现alive 页面的tag功能就实现了。大家赶紧尝试一下吧~
兄台,请留步。这里有几点要注意一下哦~
问题1: 开发环境缓存住了,线上环境不好用了
我们是根据组件name值是否是include里包含的来判断的。但是你会发现生产的的时候 class后面的名在线上被打包后变了。 什么?!这岂不是缓存不住了???是的。 所以解决办法如图。一般人我不告诉他0.o

问题2: tags的显示名字我在哪定义呢
tags显示的名字我怎么定义呢,好问题。小兄弟肯定没有仔细读代码
ADD_VISITED_VIEW: (state: TagsState, view: Route) => {
 if (state.visitedViews.some((v: any) => v.path === view.path)) { return; }
 state.visitedViews.push(
  Object.assign({}, view, {
  title: view.meta.title || 'no-name', /// 我在这里!!!!!
  }),
 );
 },
由上图我们可知,我是在路由的配置里mate标签里的tile里配置的。至于你,随你哦~
{
 	path: 'index', // 入口
 name: 'common-home-index-index',
 component: () => import(/* webpackChunkName: "auth" */ '@/views/home/index.vue'),
 meta: {
  title: '首页', // 看见了么,我就是你要显示的名字
  name: 'CommonHome', // 记住,我要跟你的上面name页面组件名字一样
 },
}
问题3:我有的页面,跳路由后想刷新了怎么办
那我们页面缓存住了,我怎么让页面刷新呢,比如我新增页面,新增完了需要关闭当前页面跳回列表页面的,我们的思路就是,关闭标签,url参数添加refresh参数
this.$store
   .dispatch('tagsView/delView', this.$route)
   .then(({ visitedViews }) => {
    EventBus.$emit('gotoOwnerDeliveryOrderIndex', {
    refresh: true,
    });
   });
然后在activated钩子里判断下是否有这个参数,
this.$route.query.refresh && this.fetchData();
记得处理完结果后吧refresh删了,不然每次进来都刷新了,我们是在拉去数据的混合里删的
if ( this.$route.query.refresh ) {
 this.$route.query.refresh = '';
}
问题4:有没有彩蛋啊
有的,请看图。 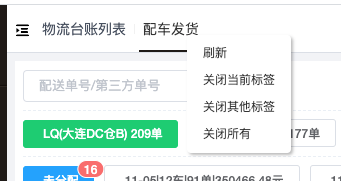 我的哥乖乖,怎么实现的呢。这个留给你们研究吧。上面代码已经实现了。只不过你需要在加一个页面,跟路由。其实就是跳转到一个新空页面路由。重新跳回来一下~
redirect/index.vue
<script lang="ts">
import { Component, Vue, Prop, Watch, Mixins } from 'vue-property-decorator';

@Component
export default class Redirect extends Vue {
 public created() {
 const { params, query } = this.$route;
 const { path } = params;
 // debugger;
 this.$router.replace({ path: '/' + path, query });
 }
}
</script>
<template>
</template>
/**
 * 刷新跳转路由
 */
export const redirectRouter: any = {
 path: '/redirect',
 name: 'redirect',
 component: RouterView,
 children: [
 {
  path: '/redirect/:path*',
  component: () => import(/* webpackChunkName: "redirect" */ '@/views/redirect/index.vue'),
  meta: {
  title: 'title',
  },
 },
 ],
};
参考
https://github.com/PanJiaChen/vue-element-admin
到此这篇关于实用的 vue tags 创建缓存导航的过程的文章就介绍到这了,更多相关实用的 vue tags 创建缓存导航的过程内容请搜索我们以前的文章或继续浏览下面的相关文章希望大家以后多多支持我们!
相关推荐
-
非常实用的vue导航钩子
导航钩子 (译者:『导航』表示路由正在发生改变.) 正如其名,vue-router 提供的导航钩子主要用来拦截导航,让它完成跳转或取消.有多种方式可以在路由导航发生时执行钩子:全局的, 单个路由独享的, 或者组件级的. 全局钩子 你可以使用 router.beforeEach 注册一个全局的 before 钩子: const router = new VueRouter({ ... }) router.beforeEach((to, from, next) => { // ... }) 当一个导
-

vue2.0实现导航菜单切换效果
本文实例为大家分享了vue2.0实现导航菜单切换的具体代码,供大家参考,具体内容如下 css *{ margin:0; padding: 0; } ul li{ list-style: none; } .navul{ margin:100px auto 20px; overflow: hidden; } .navul li{ background-color: #5597b4; padding:18px 30px; float:left; color: #fff; font-size: 18px
-
vue使用ElementUI时导航栏默认展开功能的实现
本文主要参考: http://element.eleme.io/#/zh-CN/component/menu 在使用elementUI的时候发现,能够展开的导航栏是不能展开的,效果这里先不演示了.可以在上边的网站上看到. 现在有这样的需求,就是说,默认的时候需要展开这些导航,就是一打开界面的时候就能够显示导航里面的菜单内容. 具体操作是这样的: <script src="//unpkg.com/vue/dist/vue.js"></script> <scr
-
详解Vue的钩子函数(路由导航守卫、keep-alive、生命周期钩子)
前言 说到Vue的钩子函数,可能很多人只停留在一些很简单常用的钩子(created,mounted),而且对于里面的区别,什么时候该用什么钩子,并没有仔细的去研究过,且Vue的生命周期在面试中也算是比较高频的考点,那么该如何回答这类问题,让人有眼前一亮的感觉呢... Vue-Router导航守卫: 有的时候,我们需要通过路由来进行一些操作,比如最常见的登录权限验证,当用户满足条件时,才让其进入导航,否则就取消跳转,并跳到登录页面让其登录. 为此我们有很多种方法可以植入路由的导航过程:全局的, 单
-
vue实现nav导航栏的方法
每一个网页项目都少不了导航栏,通过原始的方法基本上都是可以写出来的.但是要写出代码量少,冗余度低的代码就要动脑子思考一下了. 最近写了一个百度地图的项目,要求底部有一个导航栏.具体如下图: 首先,拿到了底部导航栏的所有图标图片,图片都有两种.灰色的代表未选中,选中的用带样色的图片替换. 先看一下,组件中 html结构:通过vue提供的v-for方法,进行遍历显示footNav这个数组.数组里边存放着{title:"银行",url:" ",url1:" &q
-
VueRouter导航守卫用法详解
简介 主要用来通过跳转或取消的方式守卫导航. 例如判断登录信息:没登录全部跳到登录页.判断必要操作是否进行没进行的话中断跳转. 分为三大类:全局守卫.路由守卫.组件守卫 全局守卫 beforeEach beforeResolve afterEach 路由守卫 beforeEnter 组件守卫 beforeRouteEnter // 在渲染该组件的对应路由被 confirm 前调用 // 不!能!获取组件实例 `this` // 因为当守卫执行前,组件实例还没被创建 虽然无法直接获取组件实力 但是
-
vue实现侧边栏导航效果
本文实例为大家分享了vue侧边栏导航的具体代码,供大家参考,具体内容如下 最终效果 点击下一个导航,上一个导航自动收回 实现代码 1.下载vue-router npm install vue-router --save-dev 2.在main.js中引入 import Vue from 'vue' import Router from 'vue-router' Vue.use(Router) // 引入路由 3.在components中新建组件 3.1 agencySearch.vue组件 代码
-
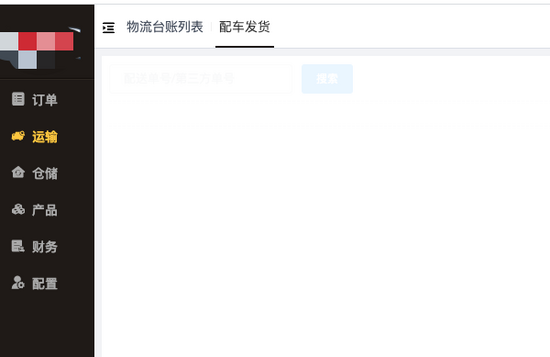
详解使用Vue Router导航钩子与Vuex来实现后退状态保存
不好意思,标题比较啰嗦,因为这次的流水账确实属于一个比较细节的小东西,下面详细讲: 1需求 最近在使用electron-vue开发一个跨平台的桌面端软件,刚上手写了几个页面,遇到一个问题:桌面端软件通常会有导航需求,类似下图 导航按钮 点击返回按钮,返回上一页,并且显示上页内容.其实不止App,即使普通的网页中也会有此类需求,尤其是使用vue写SPA时. 项目中的导航几乎都是采用router.push({name: 'xxx', params: {xxx:123...}})这种方式.这种方式导致
-
vue+elementUI动态生成面包屑导航教程
效果如下所示: 项目需要动态生成面包屑导航,并且首页可以点击.其余为路径显示 <el-menu :unique-opened="true" router :default-active="$route.path" @select="handleSelect"> <div class="user-menu-box" v-for="menu in menus" :key="menu.
-
实用的 vue tags 创建缓存导航的过程实现
需求 是要做一个tag,当切换页面的时候保留状态. 效果图: 思路 既然涉及了router跳转,那我们就去查api 发现keep-alive,巧了就用它吧.这里我们用到了include属性,该属性接受一个数组,当组件的name名称包含在inclue里的时候就会触发keep-alive. import { Vue, Component, Watch, Mixins } from 'vue-property-decorator'; // 此处省略n行代码 // 这是个计算属性.(至于为什么这么写 这
-
一步步教你用Vue.js创建一个组件(附代码示例)
目录 前言 到底什么是组件? 为什么你一定要使用组件 在Vue中创建一个组件 模板部分 脚本部分 选项API:旧的方式 合成API:现在和未来 风格部分 总结 前言 Vue.js是一个渐进式框架,旨在以一种非常简单.直接的方式构建用户界面.它被设计成易于使用,并且足够灵活,可以处理各种各样的应用. 在本教程中,我们将向你展示如何用Vue.js创建一个简单的组件.我们还将介绍一些在使用组件时需要知道的基本概念. 我们将介绍在Vue中创建一个组件的基本语法,以及一些关于组件用途的理论.在这篇文章的最
-
浅谈Vue页面级缓存解决方案feb-alive(上)
feb-alive github地址 体验链接 使用理由 开发者无需因为动态路由或者普通路由的差异而将数据初始化逻辑写在不同的钩子里beforeRouteUpdate或者activated 开发者无需手动缓存页面状态,例如通过localStorage或者sessionStorage缓存当前页面的数据 feb-alive会帮你处理路由meta信息的存储与恢复 为什么开发feb-laive? 当我们通过Vue开发项目时候,是否会有以下场景需求? /a跳转到/b 后退到/a时候,希望从缓存中恢复页面
-
浅谈Vue页面级缓存解决方案feb-alive (下)
feb-alive github地址 体验链接 Vue页面级缓存解决方案feb-alive (上) 在剖析feb-alive实现之前,希望大家对以下基本知识有一定的了解. keep-alive实现原理 history api vue渲染原理 vue虚拟dom原理 feb-alive与keep-alive差异性 1. 针对activated钩子差异性 keep-alive配合vue-router在动态路由切换的情况下不会触发activated钩子,因为切换的时候组件没有变化,所以只能通过befor
-
Vue 实现创建全局组件,并且使用Vue.use() 载入方式
自定义vue组件,一般是局部引用的方式载入,使用的时候,在应用的组件中使用 import moduleName from 'module' 导入,在components中注册 <template> <div class="app-NewsInfo"> <h3>{{info.title}}</h3> <!-- 新闻评论子组件. --> <comment :id="id"></comment&
-
8个非常实用的Vue自定义指令
本文在github做了收录 github.com/Michael-lzg- demo源码地址 github.com/Michael-lzg- 在 Vue,除了核心功能默认内置的指令 ( v-model 和 v-show ),Vue 也允许注册自定义指令.它的作用价值在于当开发人员在某些场景下需要对普通 DOM 元素进行操作. Vue 自定义指令有全局注册和局部注册两种方式.先来看看注册全局指令的方式,通过 Vue.directive( id, [definition] ) 方式注册全局指令.然后
-
如何管理Vue中的缓存页面
<keep-alive> <router-view /> </keep-alive> Vue中内置的<keep-alive>组件可以帮助我们在开发SPA应用时,通过把全部路由页面进行缓存(当然也可以有针对性的缓存部分页面),显著提高页面二次访问速度,但是也给我们在某些场景带来了困扰,其中包含两个主要矛盾: 缓存页面如何在合适的时机被销毁 (keep-alive组件提供了三个参数来动态配置缓存状态,但是作用有限,后面分析) 同一个路径如何缓存多个不同的页面(同
-
vue+element-ui实现头部导航栏组件
本文实例为大家分享了vue+element-ui实现头部导航栏组件具体代码,供大家参考,具体内容如下 话不多说,先上一张效果图: 这是一个头部导航栏,网站最常见的一个功能,鼠标点击切换不同界面,样式跟随. 首先就是下载element-ui框架 npm install element-ui 在main.js文件里面全局引入这个ui框架 然后就是在app.vue文件里面注册这个top组件 这是用vue和"饿了么"来实现的头部导航栏,看一下代码: <template> <d
-
vue实现页面缓存功能
本文实例为大家分享了vue实现页面缓存功能的具体代码,供大家参考,具体内容如下 主要利用keep-alive实现从列表页跳转到详情页,然后点击返回时,页面缓存不用重新请求资源. 一.在router里配置路由 在meta里定义页面是否需要缓存 import Vue from "vue"; import Router from "vue-router"; // 避免到当前位置的冗余导航 const originalPush = Router.prototype.push
-
详解vue computed的缓存实现原理
目录 初始化 computed 依赖收集 派发更新 总结一下 本文围绕下面这个例子,讲解一下computed初始化及更新时的流程,来看看计算属性是怎么实现的缓存,及依赖是怎么被收集的. <div id="app"> <span @click="change">{{sum}}</span> </div> <script src="./vue2.6.js"></script> &