Keras搭建自编码器操作
简介:
传统机器学习任务任务很大程度上依赖于好的特征工程,但是特征工程往往耗时耗力,在视频、语音和视频中提取到有效特征就更难了,工程师必须在这些领域有非常深入的理解,并且需要使用专业算法提取这些数据的特征。深度学习则可以解决人工难以提取有效特征的问题,大大缓解机器学习模型对特征工程的依赖。
深度学习在早期一度被认为是一种无监督的特征学习过程,模仿人脑对特征逐层抽象的过程。这其中两点很重要:一是无监督学习;二是逐层训练。例如在图像识别问题中,假定我们有许多汽车图片,要如何利用计算机进行识别任务呢?如果从像素级开始进行训练分类器,那么绝大多数算法很难工作。如果我们提取高阶特征,比如汽车的车轮、汽车的车窗、车身等。那么就可以使用这些高阶特征非常准确的对图像进行分类。不过高阶特征都是由底层特征组成,这便是深度学习训练过程中所做的特征学习。
早年有学者发现,可以使用少量的基本特征进行组合拼装得到更高层抽象的特征,这其实就是我们常说的特征的稀疏表达。对图像任务来说,一张原始图片可以由较少的图片碎片组合得到。对语音识别任务来讲,绝大多数的声音也可以由一些基本的结构线性组合得到。对人脸识别任务来说,根据不同的器官,如:鼻子、嘴、眉毛、眼睛瞪,这些器官可以向上拼出不同样式的人脸,最后模型通过在图片中匹配这些不同样式的人脸来进行识别。在深度神经网络中,对每一层神经网络来说前一层的输出都是未加工的像素,而这一层则是对像素进行加工组织成更高阶的特征的过程(即前面提到过的图片碎片进行线性组合加工的过程)。
根据上述基本概念的描述,特征是可以不断抽象转为高一层特征的,那我们如何找到这些基本结构,然后如何抽象?这里引出无监督的自编码器来提取特征。自编码器--顾名思义,可以使用自身高阶特征编码自己。它的输入和输出是一致的。因此,它的基本思想是使用稀疏一些高阶特征重新组合来重构自己。自编码器的刚开始提出是Hinton在Science上发表文章,用来解决数据降维问题。此外,Hinton还提出了基于深度信念网络的无监督逐层训练的贪心算法,为训练很深的网络提供了一个可行的方案。深度信念网络的提出是使用逐层训练的方式提取特征,使得在有监督学习任务之前,使得网络权重初始化到一个比较好的位置。其思想与自编码器的非常相似。在此基础上,国内外学者又提出了自编码器的各种版本,如:稀疏自编码器、去噪自编码器等。
本文使用Keras深度学习开发库,在MNIST数据集上实现了简单自编码器、深度稀疏自编码器和卷积自编码器。
自编码器用途:
目前自编码器的应用主要有两个方面,第一是数据去噪,第二是为进行可视化而降维。配合适当的维度和稀疏约束,自编码器可以学习到比PCA等技术更有意思的数据投影。此外,在数据共有特征建模方面,也有叫广泛的应用。
1、简单自编码器
简单自编码器
from keras.layers import Input, Dense
from keras.models import Model
from keras.datasets import mnist
import numpy as np
import matplotlib.pyplot as plt
(x_train, _), (x_test, _) = mnist.load_data()
x_train = x_train.astype('float32') / 255.
x_test = x_test.astype('float32') / 255.
x_train = x_train.reshape((len(x_train), np.prod(x_train.shape[1:])))
x_test = x_test.reshape((len(x_test), np.prod(x_test.shape[1:])))
print(x_train.shape)
print(x_test.shape)
encoding_dim = 32
input_img = Input(shape=(784,))
encoded = Dense(encoding_dim, activation='relu')(input_img)
decoded = Dense(784, activation='sigmoid')(encoded)
autoencoder = Model(inputs=input_img, outputs=decoded)
encoder = Model(inputs=input_img, outputs=encoded)
encoded_input = Input(shape=(encoding_dim,))
decoder_layer = autoencoder.layers[-1]
decoder = Model(inputs=encoded_input, outputs=decoder_layer(encoded_input))
autoencoder.compile(optimizer='adadelta', loss='binary_crossentropy')
autoencoder.fit(x_train, x_train, epochs=50, batch_size=256,
shuffle=True, validation_data=(x_test, x_test))
encoded_imgs = encoder.predict(x_test)
decoded_imgs = decoder.predict(encoded_imgs)
n = 10 # how many digits we will display
plt.figure(figsize=(20, 4))
for i in range(n):
ax = plt.subplot(2, n, i + 1)
plt.imshow(x_test[i].reshape(28, 28))
plt.gray()
ax.get_xaxis().set_visible(False)
ax.get_yaxis().set_visible(False)
ax = plt.subplot(2, n, i + 1 + n)
plt.imshow(decoded_imgs[i].reshape(28, 28))
plt.gray()
ax.get_xaxis().set_visible(False)
ax.get_yaxis().set_visible(False)
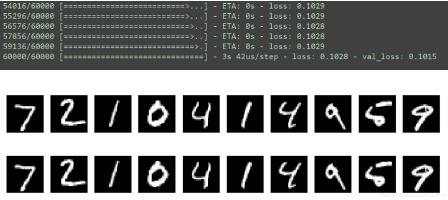
plt.show()
测试效果:

2、深度自编码器、稀疏自编码器
为解决自编码重构损失大的问题,使用多层网络搭建自编码器。对隐层单元施加稀疏性约束的话,会得到更为紧凑的表达,只有一小部分神经元会被激活。在Keras中,我们可以通过添加一个activity_regularizer达到对某层激活值进行约束的目的
import numpy as np
np.random.seed(1337) # for reproducibility

from keras.datasets import mnist
from keras.models import Model #泛型模型
from keras.layers import Dense, Input
import matplotlib.pyplot as plt

# X shape (60,000 28x28), y shape (10,000, )
(x_train, _), (x_test, y_test) = mnist.load_data()

# 数据预处理
x_train = x_train.astype('float32') / 255. # minmax_normalized
x_test = x_test.astype('float32') / 255. # minmax_normalized
x_train = x_train.reshape((x_train.shape[0], -1))
x_test = x_test.reshape((x_test.shape[0], -1))
print(x_train.shape)
print(x_test.shape)

# 压缩特征维度至2维
encoding_dim = 2

# this is our input placeholder
input_img = Input(shape=(784,))

# 编码层
encoded = Dense(128, activation='relu')(input_img)
encoded = Dense(64, activation='relu')(encoded)
encoded = Dense(10, activation='relu')(encoded)
encoder_output = Dense(encoding_dim)(encoded)

# 解码层
decoded = Dense(10, activation='relu')(encoder_output)
decoded = Dense(64, activation='relu')(decoded)
decoded = Dense(128, activation='relu')(decoded)
decoded = Dense(784, activation='tanh')(decoded)

# 构建自编码模型
autoencoder = Model(inputs=input_img, outputs=decoded)

# 构建编码模型
encoder = Model(inputs=input_img, outputs=encoder_output)

# compile autoencoder
autoencoder.compile(optimizer='adam', loss='mse')

autoencoder.summary()
encoder.summary()

# training
autoencoder.fit(x_train, x_train, epochs=10, batch_size=256, shuffle=True)

# plotting
encoded_imgs = encoder.predict(x_test)

plt.scatter(encoded_imgs[:, 0], encoded_imgs[:, 1], c=y_test,s=3)
plt.colorbar()
plt.show()

decoded_imgs = autoencoder.predict(x_test)
# use Matplotlib (don't ask)
import matplotlib.pyplot as plt

n = 10 # how many digits we will display
plt.figure(figsize=(20, 4))
for i in range(n):
 # display original
 ax = plt.subplot(2, n, i + 1)
 plt.imshow(x_test[i].reshape(28, 28))
 plt.gray()
 ax.get_xaxis().set_visible(False)
 ax.get_yaxis().set_visible(False)

 # display reconstruction
 ax = plt.subplot(2, n, i + 1 + n)
 plt.imshow(decoded_imgs[i].reshape(28, 28))
 plt.gray()
 ax.get_xaxis().set_visible(False)
 ax.get_yaxis().set_visible(False)
plt.show()
运行结果:
3、卷积自编码器
卷积自编码器的编码器部分由卷积层和MaxPooling层构成,MaxPooling负责空域下采样。而解码器由卷积层和上采样层构成。
from keras.layers import Input, Dense, Convolution2D, MaxPooling2D, UpSampling2D
from keras.models import Model
from keras.datasets import mnist
import numpy as np

(x_train, _), (x_test, _) = mnist.load_data()

x_train = x_train.astype('float32') / 255.
x_test = x_test.astype('float32') / 255.
print('---> x_train shape: ', x_train.shape)
x_train = np.reshape(x_train, (len(x_train), 28, 28, 1))
x_test = np.reshape(x_test, (len(x_test), 28, 28, 1))
print('---> xtrain shape: ', x_train.shape)
print('---> x_test shape: ', x_test.shape)
input_img = Input(shape=(28, 28, 1))

x = Convolution2D(16, (3, 3), activation='relu', padding='same')(input_img)
x = MaxPooling2D((2, 2), padding='same')(x)
x = Convolution2D(8, (3, 3), activation='relu', padding='same')(x)
x = MaxPooling2D((2, 2), padding='same')(x)
x = Convolution2D(8, (3, 3), activation='relu', padding='same')(x)
encoded = MaxPooling2D((2, 2), padding='same')(x)

x = Convolution2D(8, (3, 3), activation='relu', padding='same')(encoded)
x = UpSampling2D((2, 2))(x)
x = Convolution2D(8, (3, 3), activation='relu', padding='same')(x)
x = UpSampling2D((2, 2))(x)
x = Convolution2D(16, (3, 3), activation='relu')(x)
x = UpSampling2D((2, 2))(x)
decoded = Convolution2D(1, (3, 3), activation='sigmoid', padding='same')(x)

autoencoder = Model(inputs=input_img, outputs=decoded)
autoencoder.compile(optimizer='adadelta', loss='binary_crossentropy')

# 打开一个终端并启动TensorBoard,终端中输入 tensorboard --logdir=/autoencoder
autoencoder.fit(x_train, x_train, epochs=10, batch_size=256,
  shuffle=True, validation_data=(x_test, x_test))

decoded_imgs = autoencoder.predict(x_test)
import matplotlib.pyplot as plt
decoded_imgs = autoencoder.predict(x_test)

n = 10
plt.figure(figsize=(20, 4))
for i in range(1, n+1):
 # display original
 ax = plt.subplot(2, n, i)
 plt.imshow(x_test[i].reshape(28, 28))
 plt.gray()
 ax.get_xaxis().set_visible(False)
 ax.get_yaxis().set_visible(False)

 # display reconstruction
 ax = plt.subplot(2, n, i + n)
 plt.imshow(decoded_imgs[i].reshape(28, 28))
 plt.gray()
 ax.get_xaxis().set_visible(False)
 ax.get_yaxis().set_visible(False)
plt.show()
训练结果展示:

以上这篇Keras搭建自编码器操作就是小编分享给大家的全部内容了,希望能给大家一个参考,也希望大家多多支持我们。
相关推荐
-
分享一下Python数据分析常用的8款工具
Python是数据处理常用工具,可以处理数量级从几K至几T不等的数据,具有较高的开发效率和可维护性,还具有较强的通用性和跨平台性.Python可用于数据分析,但其单纯依赖Python本身自带的库进行数据分析还是具有一定的局限性的,需要安装第三方扩展库来增强分析和挖掘能力. Python数据分析需要安装的第三方扩展库有:Numpy.Pandas.SciPy.Matplotlib.Scikit-Learn.Keras.Gensim.Scrapy等,以下是千锋武汉Python培训老师对该第三方扩展库的
-
keras topN显示,自编写代码案例
对于使用已经训练好的模型,比如VGG,RESNET等,keras都自带了一个keras.applications.imagenet_utils.decode_predictions的方法,有很多限制: def decode_predictions(preds, top=5): """Decodes the prediction of an ImageNet model. # Arguments preds: Numpy tensor encoding a batch of p
-
keras实现基于孪生网络的图片相似度计算方式
我就废话不多说了,大家还是直接看代码吧! import keras from keras.layers import Input,Dense,Conv2D from keras.layers import MaxPooling2D,Flatten,Convolution2D from keras.models import Model import os import numpy as np from PIL import Image from keras.optimizers import S
-
Keras实现将两个模型连接到一起
神经网络玩得越久就越会尝试一些网络结构上的大改动. 先说意图 有两个模型:模型A和模型B.模型A的输出可以连接B的输入.将两个小模型连接成一个大模型,A-B,既可以同时训练又可以分离训练. 流行的算法里经常有这么关系的两个模型,对GAN来说,生成器和判别器就是这样子:对VAE来说,编码器和解码器就是这样子:对目标检测网络来说,backbone和整体也是可以拆分的.所以,应用范围还是挺广的. 实现方法 首先说明,我的实现方法不一定是最佳方法.也是实在没有借鉴到比较好的方法,所以才自己手动写了一个.
-
Keras搭建自编码器操作
简介: 传统机器学习任务任务很大程度上依赖于好的特征工程,但是特征工程往往耗时耗力,在视频.语音和视频中提取到有效特征就更难了,工程师必须在这些领域有非常深入的理解,并且需要使用专业算法提取这些数据的特征.深度学习则可以解决人工难以提取有效特征的问题,大大缓解机器学习模型对特征工程的依赖. 深度学习在早期一度被认为是一种无监督的特征学习过程,模仿人脑对特征逐层抽象的过程.这其中两点很重要:一是无监督学习:二是逐层训练.例如在图像识别问题中,假定我们有许多汽车图片,要如何利用计算机进行识别任务呢?
-
Keras实现DenseNet结构操作
DenseNet结构在16年由Huang Gao和Liu Zhuang等人提出,并且在CVRP2017中被评为最佳论文.网络的核心结构为如下所示的Dense块,在每一个Dense块中,存在多个Dense层,即下图所示的H1-H4.各Dense层之间彼此均相互连接,即H1的输入为x0,输出为x1,H2的输入即为[x0, x1],输出为x2,依次类推.最终Dense块的输出即为[x0, x1, x2, x3, x4].这种结构个人感觉非常类似生物学里边的神经元连接方式,应该能够比较有效的提高了网络中
-

Keras搭建Efficientdet目标检测平台的实现思路
学习前言 一起来看看Efficientdet的keras实现吧,顺便训练一下自己的数据. 什么是Efficientdet目标检测算法 最近,谷歌大脑 Mingxing Tan.Ruoming Pang 和 Quoc V. Le 提出新架构 EfficientDet,结合 EfficientNet(同样来自该团队)和新提出的 BiFPN,实现新的 SOTA 结果. 源码下载 https://github.com/bubbliiiing/efficientdet-keras 喜欢的可以点个star噢
-
Keras搭建分类网络平台VGG16 MobileNet ResNet50
目录 分类网络的常见形式 分类网络介绍 1.VGG16网络介绍 2.MobilenetV1网络介绍 3.ResNet50网络介绍 分类网络的训练 1.LOSS介绍 2.利用分类网络进行训练 才发现做了这么多的博客和视频,居然从来没有系统地做过分类网络,做一个科学的分类网络,对身体好. 源码下载 https://github.com/bubbliiiing/classification-keras 分类网络的常见形式 常见的分类网络都可以分为两部分,一部分是特征提取部分,另一部分是分类部分. 特征
-
Keras搭建Mask R-CNN实例分割平台实现源码
目录 什么是Mask R-CNN Mask R-CNN实现思路 一.预测部分 1.主干网络介绍 2.特征金字塔FPN的构建 3.获得Proposal建议框 4.Proposal建议框的解码 5.对Proposal建议框加以利用(Roi Align) 6.预测框的解码 7.mask语义分割信息的获取 二.训练部分 1.建议框网络的训练 2.Classiffier模型的训练 3.mask模型的训练 训练自己的Mask-RCNN模型 1.数据集准备 2.参数修改 3.模型训练 什么是Mask R-CN
-
Keras搭建M2Det目标检测平台示例
目录 什么是M2det目标检测算法 M2det实现思路 一.预测部分 1.主干网络介绍 2.FFM1特征初步融合 3.细化U型模块TUM 4.FFM2特征加强融合 5.注意力机制模块SFAM 6.从特征获取预测结果 7.预测结果的解码 8.在原图上进行绘制 二.训练部分 1.真实框的处理 2.利用处理完的真实框与对应图片的预测结果计算loss 训练自己的M2Det模型 一.数据集的准备 二.数据集的处理 三.开始网络训练 四.训练结果预测 什么是M2det目标检测算法 一起来看看M2det的ke
-
Python实现Keras搭建神经网络训练分类模型教程
我就废话不多说了,大家还是直接看代码吧~ 注释讲解版: # Classifier example import numpy as np # for reproducibility np.random.seed(1337) # from keras.datasets import mnist from keras.utils import np_utils from keras.models import Sequential from keras.layers import Dense, Act
-
pytorch快速搭建神经网络_Sequential操作
之前用Class类来搭建神经网络 class Neuro_net(torch.nn.Module): """神经网络""" def __init__(self, n_feature, n_hidden_layer, n_output): super(Neuro_net, self).__init__() self.hidden_layer = torch.nn.Linear(n_feature, n_hidden_layer) self.outp
-
在tensorflow以及keras安装目录查询操作(windows下)
安装anaconda后查询CPU版本时打开Anaconda Prompt输入 python 然后输入 import tensorflow as tf tf.__path__ 即可查询cpu版本tensorflow目录位置,需要注意的是此处path两侧均为双下划线. 查询GPU版本时打开Anaconda Prompt(tensorflow-gpu)输入 python 然后输入 import tensorflow as tf tf.__path__ 即可 至于keras的目录 输入 from ten
-
vue项目环境搭建 启动 移植操作示例及目录结构分析
目录 项目搭建 项目创建 项目启动停止 项目目录结构分析 全局脚本配置 index.html详细介绍 main.js入口文件详细 App.vue跟组件介绍 router-index.js 路由介绍 项目搭建 下载node 官网下载安装包,傻瓜式安装:https://nodejs.org/zh-cn/ 安装cnpm,用淘宝源: npm install -g cnpm --registry=https://registry.npm.taobao.org 检测是否安装成功:cnpm -version