Pytorch mask-rcnn 实现细节分享
DataLoader
Dataset不能满足需求需自定义继承torch.utils.data.Dataset时需要override __init__, __getitem__, __len__ ,否则DataLoader导入自定义Dataset时缺少上述函数会导致NotImplementedError错误
Numpy 广播机制:
让所有输入数组都向其中shape最长的数组看齐,shape中不足的部分都通过在前面加1补齐
输出数组的shape是输入数组shape的各个轴上的最大值
如果输入数组的某个轴和输出数组的对应轴的长度相同或者其长度为1时,这个数组能够用来计算,否则出错
当输入数组的某个轴的长度为1时,沿着此轴运算时都用此轴上的第一组值
CUDA在pytorch中的扩展:
torch.utils.ffi中使用create_extension扩充:
 def create_extension(name, headers, sources, verbose=True, with_cuda=False,
      package=False, relative_to='.', **kwargs):
 """Creates and configures a cffi.FFI object, that builds PyTorch extension.

 Arguments:
  name (str): package name. Can be a nested module e.g. ``.ext.my_lib``.
  headers (str or List[str]): list of headers, that contain only exported
   functions
  sources (List[str]): list of sources to compile.
  verbose (bool, optional): if set to ``False``, no output will be printed
   (default: True).
  with_cuda (bool, optional): set to ``True`` to compile with CUDA headers
   (default: False)
  package (bool, optional): set to ``True`` to build in package mode (for modules
   meant to be installed as pip packages) (default: False).
  relative_to (str, optional): path of the build file. Required when
   ``package is True``. It's best to use ``__file__`` for this argument.
  kwargs: additional arguments that are passed to ffi to declare the
   extension. See `Extension API reference`_ for details.

 .. _`Extension API reference`: https://docs.python.org/3/distutils/apiref.html#distutils.core.Extension
 """
 base_path = os.path.abspath(os.path.dirname(relative_to))
 name_suffix, target_dir = _create_module_dir(base_path, name)
 if not package:
  cffi_wrapper_name = '_' + name_suffix
 else:
  cffi_wrapper_name = (name.rpartition('.')[0] +
        '.{0}._{0}'.format(name_suffix))

 wrapper_source, include_dirs = _setup_wrapper(with_cuda)
 include_dirs.extend(kwargs.pop('include_dirs', []))

 if os.sys.platform == 'win32':
  library_dirs = glob.glob(os.getenv('CUDA_PATH', '') + '/lib/x64')
  library_dirs += glob.glob(os.getenv('NVTOOLSEXT_PATH', '') + '/lib/x64')

  here = os.path.abspath(os.path.dirname(__file__))
  lib_dir = os.path.join(here, '..', '..', 'lib')

  library_dirs.append(os.path.join(lib_dir))
 else:
  library_dirs = []
 library_dirs.extend(kwargs.pop('library_dirs', []))

 if isinstance(headers, str):
  headers = [headers]
 all_headers_source = ''
 for header in headers:
  with open(os.path.join(base_path, header), 'r') as f:
   all_headers_source += f.read() + '\n\n'

 ffi = cffi.FFI()
 sources = [os.path.join(base_path, src) for src in sources]
 # NB: TH headers are C99 now
 kwargs['extra_compile_args'] = ['-std=c99'] + kwargs.get('extra_compile_args', [])
 ffi.set_source(cffi_wrapper_name, wrapper_source + all_headers_source,
     sources=sources,
     include_dirs=include_dirs,
     library_dirs=library_dirs, **kwargs)
 ffi.cdef(_typedefs + all_headers_source)

 _make_python_wrapper(name_suffix, '_' + name_suffix, target_dir)

 def build():
  _build_extension(ffi, cffi_wrapper_name, target_dir, verbose)
 ffi.build = build
 return ffi
补充知识:maskrcnn-benchmark 代码详解之 resnet.py
1Resnet 结构
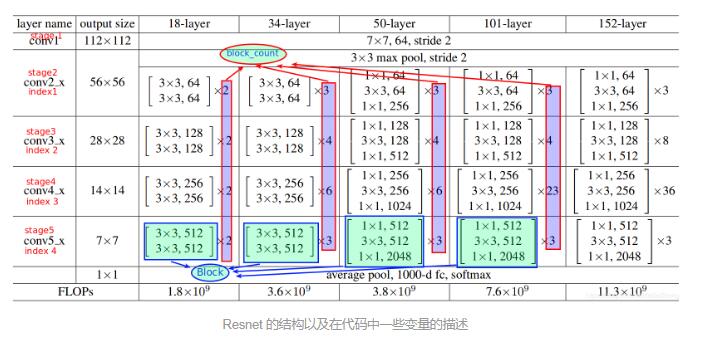
Resnet 一般分为5个卷积(conv)层,每一层为一个stage。其中每一个stage中由不同数量的相同的block(区块)构成,这些区块的个数就是block_count, 第一个stage跟其他几个stage结构完全不同,也可以看做是由单独的区块构成的,因此由区块不停堆叠构成的第二层到第5层(即stage2-stage5或conv2-conv5),分别定义为index1-index4.就像搭积木一样,这四个层可有基本的区块搭成。下图为resnet的基本结构:

以下代码通过控制区块的多少,搭建出不同的Resnet(包括Resnet50等):
# -----------------------------------------------------------------------------
# Standard ResNet models
# -----------------------------------------------------------------------------
# ResNet-50 (包括所有的阶段)
# ResNet 分为5个阶段,但是第一个阶段都相同,变化是从第二个阶段开始的,所以下面的index是从第二个阶段开始编号的。其中block_count为该阶段区块的个数
ResNet50StagesTo5 = tuple(
 StageSpec(index=i, block_count=c, return_features=r)
 for (i, c, r) in ((1, 3, False), (2, 4, False), (3, 6, False), (4, 3, True))
)
# ResNet-50 up to stage 4 (excludes stage 5)
ResNet50StagesTo4 = tuple(
 StageSpec(index=i, block_count=c, return_features=r)
 for (i, c, r) in ((1, 3, False), (2, 4, False), (3, 6, True))
)
# ResNet-101 (including all stages)
ResNet101StagesTo5 = tuple(
 StageSpec(index=i, block_count=c, return_features=r)
 for (i, c, r) in ((1, 3, False), (2, 4, False), (3, 23, False), (4, 3, True))
)
# ResNet-101 up to stage 4 (excludes stage 5)
ResNet101StagesTo4 = tuple(
 StageSpec(index=i, block_count=c, return_features=r)
 for (i, c, r) in ((1, 3, False), (2, 4, False), (3, 23, True))
)
# ResNet-50-FPN (including all stages)
ResNet50FPNStagesTo5 = tuple(
 StageSpec(index=i, block_count=c, return_features=r)
 for (i, c, r) in ((1, 3, True), (2, 4, True), (3, 6, True), (4, 3, True))
)
# ResNet-101-FPN (including all stages)
ResNet101FPNStagesTo5 = tuple(
 StageSpec(index=i, block_count=c, return_features=r)
 for (i, c, r) in ((1, 3, True), (2, 4, True), (3, 23, True), (4, 3, True))
)
# ResNet-152-FPN (including all stages)
ResNet152FPNStagesTo5 = tuple(
 StageSpec(index=i, block_count=c, return_features=r)
 for (i, c, r) in ((1, 3, True), (2, 8, True), (3, 36, True), (4, 3, True))
)
根据以上的不同组合方案,maskrcnn benchmark可以搭建起不同的backbone
def _make_stage(
 transformation_module,
 in_channels,
 bottleneck_channels,
 out_channels,
 block_count,
 num_groups,
 stride_in_1x1,
 first_stride,
 dilation=1,
 dcn_config={}
):
 blocks = []
 stride = first_stride
 # 根据不同的配置,构造不同的卷基层
 for _ in range(block_count):
  blocks.append(
   transformation_module(
    in_channels,
    bottleneck_channels,
    out_channels,
    num_groups,
    stride_in_1x1,
    stride,
    dilation=dilation,
    dcn_config=dcn_config
   )
  )
  stride = 1
  in_channels = out_channels
 return nn.Sequential(*blocks)
这几种不同的backbone之后被集成为一个统一的对象以便于调用,其代码为:
_STAGE_SPECS = Registry({
 "R-50-C4": ResNet50StagesTo4,
 "R-50-C5": ResNet50StagesTo5,
 "R-101-C4": ResNet101StagesTo4,
 "R-101-C5": ResNet101StagesTo5,
 "R-50-FPN": ResNet50FPNStagesTo5,
 "R-50-FPN-RETINANET": ResNet50FPNStagesTo5,
 "R-101-FPN": ResNet101FPNStagesTo5,
 "R-101-FPN-RETINANET": ResNet101FPNStagesTo5,
 "R-152-FPN": ResNet152FPNStagesTo5,
})
2区块(block)结构
2.1 Bottleneck结构
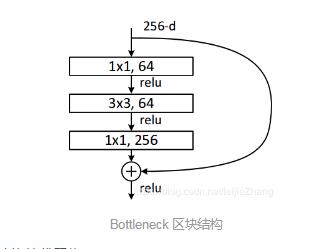
刚刚提到,在Resnet中,第一层卷基层可以看做一种区块,而第二层到第五层由不同的称之为Bottleneck的区块堆叠二层。第一层可以看做一个stem区块。其中Bottleneck的结构如下:

在maskrcnn benchmark中构造以上结构的代码为:
class Bottleneck(nn.Module):
 def __init__(
  self,
  in_channels,
  bottleneck_channels,
  out_channels,
  num_groups,
  stride_in_1x1,
  stride,
  dilation,
  norm_func,
  dcn_config
 ):
  super(Bottleneck, self).__init__()
  # 区块旁边的旁支
  self.downsample = None
  if in_channels != out_channels:
   # 获得卷积的步长 使用一个长度为1的卷积核对输入特征进行卷积,使得其输出通道数等于主体部分的输出通道数
   down_stride = stride if dilation == 1 else 1
   self.downsample = nn.Sequential(
    Conv2d(
     in_channels, out_channels,
     kernel_size=1, stride=down_stride, bias=False
    ),
    norm_func(out_channels),
   )
   for modules in [self.downsample,]:
    for l in modules.modules():
     if isinstance(l, Conv2d):
      nn.init.kaiming_uniform_(l.weight, a=1)

  if dilation > 1:
   stride = 1 # reset to be 1

  # The original MSRA ResNet models have stride in the first 1x1 conv
  # The subsequent fb.torch.resnet and Caffe2 ResNe[X]t implementations have
  # stride in the 3x3 conv
  # 步长
  stride_1x1, stride_3x3 = (stride, 1) if stride_in_1x1 else (1, stride)
  # 区块中主体部分,这一部分为固定结构
  # 使得特征经过长度大小为1的卷积核
  self.conv1 = Conv2d(
   in_channels,
   bottleneck_channels,
   kernel_size=1,
   stride=stride_1x1,
   bias=False,
  )
  self.bn1 = norm_func(bottleneck_channels)
  # TODO: specify init for the above
  with_dcn = dcn_config.get("stage_with_dcn", False)
  if with_dcn:
   # 使用dcn网络
   deformable_groups = dcn_config.get("deformable_groups", 1)
   with_modulated_dcn = dcn_config.get("with_modulated_dcn", False)
   self.conv2 = DFConv2d(
    bottleneck_channels,
    bottleneck_channels,
    defrost=with_modulated_dcn,
    kernel_size=3,
    stride=stride_3x3,
    groups=num_groups,
    dilation=dilation,
    deformable_groups=deformable_groups,
    bias=False
   )
  else:
   # 使得特征经过长度大小为3的卷积核
   self.conv2 = Conv2d(
    bottleneck_channels,
    bottleneck_channels,
    kernel_size=3,
    stride=stride_3x3,
    padding=dilation,
    bias=False,
    groups=num_groups,
    dilation=dilation
   )
   nn.init.kaiming_uniform_(self.conv2.weight, a=1)

  self.bn2 = norm_func(bottleneck_channels)

  self.conv3 = Conv2d(
   bottleneck_channels, out_channels, kernel_size=1, bias=False
  )
  self.bn3 = norm_func(out_channels)

  for l in [self.conv1, self.conv3,]:
   nn.init.kaiming_uniform_(l.weight, a=1)

 def forward(self, x):
  identity = x

  out = self.conv1(x)
  out = self.bn1(out)
  out = F.relu_(out)

  out = self.conv2(out)
  out = self.bn2(out)
  out = F.relu_(out)

  out0 = self.conv3(out)
  out = self.bn3(out0)

  if self.downsample is not None:
   identity = self.downsample(x)

  out += identity
  out = F.relu_(out)

  return out
2.2 Stem结构
刚刚提到Resnet的第一层可以看做是一个Stem结构,其结构的代码为:
class BaseStem(nn.Module):
 def __init__(self, cfg, norm_func):
  super(BaseStem, self).__init__()
  # 获取backbone的输出特征层的输出通道数,由用户自定义
  out_channels = cfg.MODEL.RESNETS.STEM_OUT_CHANNELS
  # 输入通道数为图像的三原色,输出为输出通道数,这一部分是固定的,又Resnet论文定义的
  self.conv1 = Conv2d(
   3, out_channels, kernel_size=7, stride=2, padding=3, bias=False
  )
  self.bn1 = norm_func(out_channels)

  for l in [self.conv1,]:
   nn.init.kaiming_uniform_(l.weight, a=1)

 def forward(self, x):
  x = self.conv1(x)
  x = self.bn1(x)
  x = F.relu_(x)
  x = F.max_pool2d(x, kernel_size=3, stride=2, padding=1)
  return x
2.3 两种结构的衍生与封装
在maskrcnn benchmark中,对上面提到的这两种block结构进行的衍生和封装,Bottleneck和Stem分别衍生出带有Batch Normalization 和 Group Normalizetion的封装类,分别为:BottleneckWithFixedBatchNorm, StemWithFixedBatchNorm, BottleneckWithGN, StemWithGN. 其代码过于简单,就不做注释:
class BottleneckWithFixedBatchNorm(Bottleneck):
 def __init__(
  self,
  in_channels,
  bottleneck_channels,
  out_channels,
  num_groups=1,
  stride_in_1x1=True,
  stride=1,
  dilation=1,
  dcn_config={}
 ):
  super(BottleneckWithFixedBatchNorm, self).__init__(
   in_channels=in_channels,
   bottleneck_channels=bottleneck_channels,
   out_channels=out_channels,
   num_groups=num_groups,
   stride_in_1x1=stride_in_1x1,
   stride=stride,
   dilation=dilation,
   norm_func=FrozenBatchNorm2d,
   dcn_config=dcn_config
  )

class StemWithFixedBatchNorm(BaseStem):
 def __init__(self, cfg):
  super(StemWithFixedBatchNorm, self).__init__(
   cfg, norm_func=FrozenBatchNorm2d
  )

class BottleneckWithGN(Bottleneck):
 def __init__(
  self,
  in_channels,
  bottleneck_channels,
  out_channels,
  num_groups=1,
  stride_in_1x1=True,
  stride=1,
  dilation=1,
  dcn_config={}
 ):
  super(BottleneckWithGN, self).__init__(
   in_channels=in_channels,
   bottleneck_channels=bottleneck_channels,
   out_channels=out_channels,
   num_groups=num_groups,
   stride_in_1x1=stride_in_1x1,
   stride=stride,
   dilation=dilation,
   norm_func=group_norm,
   dcn_config=dcn_config
  )

class StemWithGN(BaseStem):
 def __init__(self, cfg):
  super(StemWithGN, self).__init__(cfg, norm_func=group_norm)

_TRANSFORMATION_MODULES = Registry({
 "BottleneckWithFixedBatchNorm": BottleneckWithFixedBatchNorm,
 "BottleneckWithGN": BottleneckWithGN,
})
接着,这两种结构关于BN和GN的四种衍生类被封装起来,以便于调用。其封装为:
_TRANSFORMATION_MODULES = Registry({
 "BottleneckWithFixedBatchNorm": BottleneckWithFixedBatchNorm,
 "BottleneckWithGN": BottleneckWithGN,
})

_STEM_MODULES = Registry({
 "StemWithFixedBatchNorm": StemWithFixedBatchNorm,
 "StemWithGN": StemWithGN,
})
3 Resnet总体结构
3.1 Resnet结构
在以上的基础上,我们可以在以上结构上进一步搭建起真正的Resnet. 其中包括第一层卷基层,和其他四个阶段,代码为:
class ResNet(nn.Module):
 def __init__(self, cfg):
  super(ResNet, self).__init__()

  # If we want to use the cfg in forward(), then we should make a copy
  # of it and store it for later use:
  # self.cfg = cfg.clone()

  # Translate string names to implementations
  # 第一层conv层,也是第一阶段,以stem的形式展现
  stem_module = _STEM_MODULES[cfg.MODEL.RESNETS.STEM_FUNC]
  # 得到指定的backbone结构
  stage_specs = _STAGE_SPECS[cfg.MODEL.BACKBONE.CONV_BODY]
  #  得到具体bottleneck结构,也就是指出组成backbone基本模块的类型
  transformation_module = _TRANSFORMATION_MODULES[cfg.MODEL.RESNETS.TRANS_FUNC]

  # Construct the stem module
  self.stem = stem_module(cfg)

  # Constuct the specified ResNet stages
  # 用于group normalization设置的组数
  num_groups = cfg.MODEL.RESNETS.NUM_GROUPS
  # 指定每一组拥有的通道数
  width_per_group = cfg.MODEL.RESNETS.WIDTH_PER_GROUP
  # stem是第一层的结构,它的输出也就是第二层一下的组合结构的输入通道数,内部通道数是可以自由定义的
  in_channels = cfg.MODEL.RESNETS.STEM_OUT_CHANNELS
  # 使用group的数目和每一组的通道数来得出组成backbone基本模块的内部通道数
  stage2_bottleneck_channels = num_groups * width_per_group
  # 第二阶段的输出通道数
  stage2_out_channels = cfg.MODEL.RESNETS.RES2_OUT_CHANNELS
  self.stages = []
  self.return_features = {}
  for stage_spec in stage_specs:
   name = "layer" + str(stage_spec.index)
   # 以下每一阶段的输入输出层的通道数都可以由stage2层的得到,即2倍关系
   stage2_relative_factor = 2 ** (stage_spec.index - 1)
   bottleneck_channels = stage2_bottleneck_channels * stage2_relative_factor
   out_channels = stage2_out_channels * stage2_relative_factor
   stage_with_dcn = cfg.MODEL.RESNETS.STAGE_WITH_DCN[stage_spec.index -1]
   # 得到每一阶段的卷积结构
   module = _make_stage(
    transformation_module,
    in_channels,
    bottleneck_channels,
    out_channels,
    stage_spec.block_count,
    num_groups,
    cfg.MODEL.RESNETS.STRIDE_IN_1X1,
    first_stride=int(stage_spec.index > 1) + 1,
    dcn_config={
     "stage_with_dcn": stage_with_dcn,
     "with_modulated_dcn": cfg.MODEL.RESNETS.WITH_MODULATED_DCN,
     "deformable_groups": cfg.MODEL.RESNETS.DEFORMABLE_GROUPS,
    }
   )
   in_channels = out_channels
   self.add_module(name, module)
   self.stages.append(name)
   self.return_features[name] = stage_spec.return_features

  # Optionally freeze (requires_grad=False) parts of the backbone
  self._freeze_backbone(cfg.MODEL.BACKBONE.FREEZE_CONV_BODY_AT)

#   固定某一层的参数不再更新
 def _freeze_backbone(self, freeze_at):
  if freeze_at < 0:
   return
  for stage_index in range(freeze_at):
   if stage_index == 0:
    m = self.stem # stage 0 is the stem
   else:
    m = getattr(self, "layer" + str(stage_index))
   for p in m.parameters():
    p.requires_grad = False

 def forward(self, x):
  outputs = []
  x = self.stem(x)
  for stage_name in self.stages:
   x = getattr(self, stage_name)(x)
   if self.return_features[stage_name]:
    outputs.append(x)
  return outputs
3.2 Resnet head结构
Head,在我理解看来就是完成某种功能的网络结构,Resnet head就是指使用Bottleneck块堆叠成不同的用于构成Resnet的功能网络结构,它内部结构相似,完成某种功能。在此不做过多介绍,因为是上面的Resnet子结构
class ResNetHead(nn.Module):
 def __init__(
  self,
  block_module,
  stages,
  num_groups=1,
  width_per_group=64,
  stride_in_1x1=True,
  stride_init=None,
  res2_out_channels=256,
  dilation=1,
  dcn_config={}
 ):
  super(ResNetHead, self).__init__()

  stage2_relative_factor = 2 ** (stages[0].index - 1)
  stage2_bottleneck_channels = num_groups * width_per_group
  out_channels = res2_out_channels * stage2_relative_factor
  in_channels = out_channels // 2
  bottleneck_channels = stage2_bottleneck_channels * stage2_relative_factor

  block_module = _TRANSFORMATION_MODULES[block_module]

  self.stages = []
  stride = stride_init
  for stage in stages:
   name = "layer" + str(stage.index)
   if not stride:
    stride = int(stage.index > 1) + 1
   module = _make_stage(
    block_module,
    in_channels,
    bottleneck_channels,
    out_channels,
    stage.block_count,
    num_groups,
    stride_in_1x1,
    first_stride=stride,
    dilation=dilation,
    dcn_config=dcn_config
   )
   stride = None
   self.add_module(name, module)
   self.stages.append(name)
  self.out_channels = out_channels

 def forward(self, x):
  for stage in self.stages:
   x = getattr(self, stage)(x)
  return x
以上这篇Pytorch mask-rcnn 实现细节分享就是小编分享给大家的全部内容了,希望能给大家一个参考,也希望大家多多支持我们。

