SpringBoot与SpringCache概念用法大全
目录
- 1.SpringCache的概念
- 2.SpringCache用法(redis版)
- 2.1 .SpringCache基本用法
- 2.2 .SpringCache自定义缓存key
- 2.3 .SpringCache更新缓存
- 2.4 .SpringCache清空缓存
- 2.5 .SpringCache其他用法
- 3.SpringCache用法(EhCache版)
1.SpringCache的概念
首先我们知道jpa,jdbc这些东西都是一些规范,比如jdbc,要要连接到数据库,都是需要用到数据库连接,预处理,结果集这三个对象,无论是连接到mysql还是oracle都是需要用到这个三个对象的,这是一种规范,而SpringCache是一种作为缓存的规范,具体实现有redis,EhCahe等
2.SpringCache用法(redis版)
2.1 .SpringCache基本用法
1.pom.xml
<?xml version="1.0" encoding="UTF-8"?>
<project xmlns="http://maven.apache.org/POM/4.0.0" xmlns:xsi="http://www.w3.org/2001/XMLSchema-instance"
         xsi:schemaLocation="http://maven.apache.org/POM/4.0.0 https://maven.apache.org/xsd/maven-4.0.0.xsd">
    <modelVersion>4.0.0</modelVersion>
    <parent>
        <groupId>org.springframework.boot</groupId>
        <artifactId>spring-boot-starter-parent</artifactId>
        <version>2.6.3</version>
        <relativePath/> <!-- lookup parent from repository -->
    </parent>
    <groupId>com.yl</groupId>
    <artifactId>cache_redis</artifactId>
    <version>0.0.1-SNAPSHOT</version>
    <name>cache_redis</name>
    <description>Demo project for Spring Boot</description>
    <properties>
        <java.version>11</java.version>
    </properties>
    <dependencies>
        <dependency>
            <groupId>org.springframework.boot</groupId>
            <artifactId>spring-boot-starter-cache</artifactId>
        </dependency>
            <artifactId>spring-boot-starter-data-redis</artifactId>
            <artifactId>spring-boot-starter-web</artifactId>

            <artifactId>spring-boot-starter-test</artifactId>
            <scope>test</scope>
    </dependencies>
    <build>
        <plugins>
            <plugin>
                <groupId>org.springframework.boot</groupId>
                <artifactId>spring-boot-maven-plugin</artifactId>
            </plugin>
        </plugins>
    </build>
</project>
2.application.properties
# redis的配置
spring.redis.host=192.168.244.135
spring.redis.port=6379
spring.redis.password=root123
3.实体类
package com.yl.cache_redis.domain;
import java.io.Serializable;
public class User implements Serializable {
    private Integer id;
    private String username;
    private String password;
    public Integer getId() {
        return id;
    }
    public void setId(Integer id) {
        this.id = id;
    }
    public String getUsername() {
        return username;
    }
    public void setUsername(String username) {
        this.username = username;
    }
    public String getPassword() {
        return password;
    }
    public void setPassword(String password) {
        this.password = password;
    }
    @Override
    public String toString() {
        return "User{" +
                "id=" + id +
                ", username='" + username + '\'' +
                ", password='" + password + '\'' +
                '}';
    }
}
4.service
package com.yl.cache_redis;

import com.yl.cache_redis.domain.User;
import org.springframework.cache.annotation.Cacheable;
import org.springframework.stereotype.Service;
@Service
public class UserService {
    @Cacheable(cacheNames = "u1") //这个注解作用就是将方法的返回值存到缓存中
    public User getUserById(Integer id) {
        System.out.println("getUserById:" + id);
        User user = new User();
        user.setId(id);
        user.setUsername("root");
        user.setPassword("root");
        return user;
    }
}
5.主程序,加上开启缓存的注解
package com.yl.cache_redis;

import org.springframework.boot.SpringApplication;
import org.springframework.boot.autoconfigure.SpringBootApplication;
import org.springframework.cache.annotation.EnableCaching;
@SpringBootApplication
@EnableCaching //开启缓存功能
public class CacheRedisApplication {
    public static void main(String[] args) {
        SpringApplication.run(CacheRedisApplication.class, args);
    }
}
6.测试
6.1)userservice没加@Cacheable注解时

6.2)userservice加@Cacheable注解后,发现sevice中的方法只调用了一次
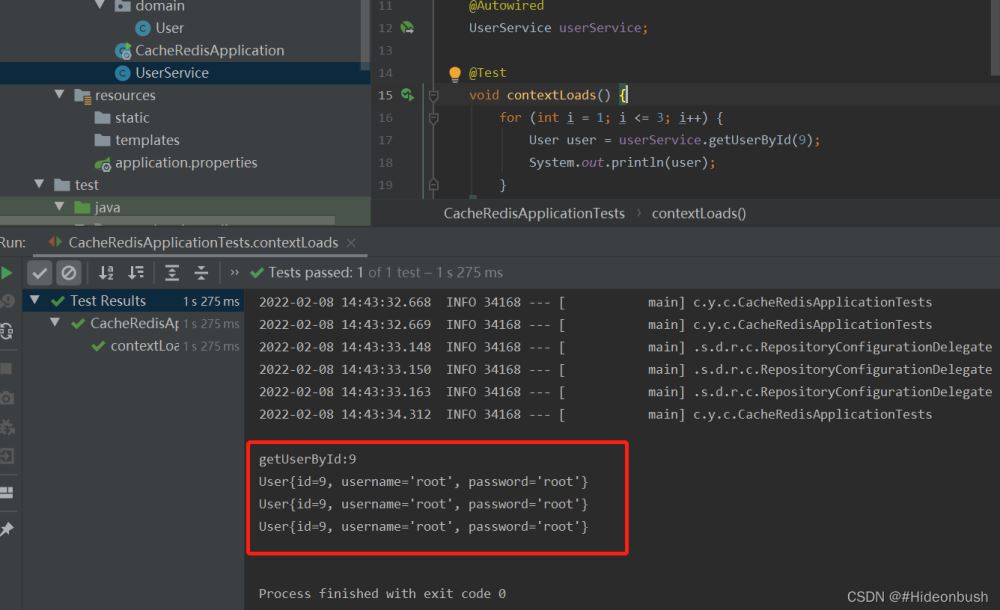
6.3)在redis中也可以看到缓存中有数据,key为定义好的cacheNames+::+方法的参数

2.2 .SpringCache自定义缓存key
1.SpringCache默认使用cacheNames和方法中的参数结合组成key的,那么如果有多个参数呢?它又是如何组成key的呢?我们可以指定key吗?


2.如何自定义key呢?
1)自定义key
package com.yl.cache_redis;

import org.springframework.cache.interceptor.KeyGenerator;
import org.springframework.stereotype.Component;
import java.lang.reflect.Method;
import java.util.Arrays;
@Component
public class MyKeyGenerator implements KeyGenerator {
    @Override
    public Object generate(Object target, Method method, Object... params) {
        return target.toString() + ":" + method.getName() + ":" + Arrays.toString(params);
    }
}
2)测试


2.3 .SpringCache更新缓存
1.使用@CachePut注解来更新,注意:@CachePut中的key要和@Cacheable中的key一样,否则更新不了!


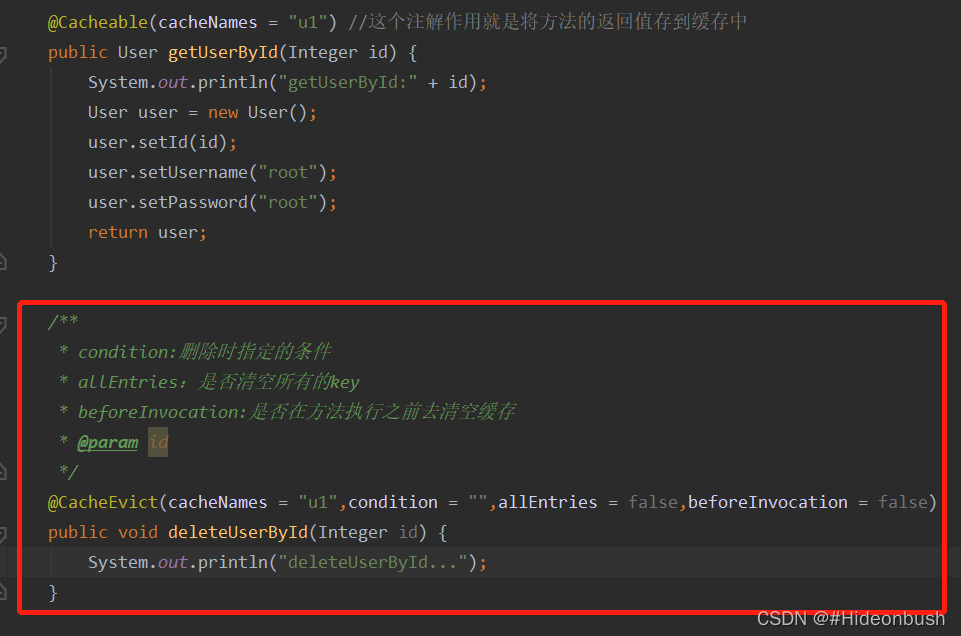
2.4 .SpringCache清空缓存
1.使用@CacheEvict注解,主要key和要@Cacheable中的key一致
2.测试

2.5 .SpringCache其他用法
1.@Caching注解,可以组合多个注解

2.@CacheConfig注解

3.SpringCache用法(EhCache版)
1.pom.xml
<?xml version="1.0" encoding="UTF-8"?>
<project xmlns="http://maven.apache.org/POM/4.0.0" xmlns:xsi="http://www.w3.org/2001/XMLSchema-instance"
         xsi:schemaLocation="http://maven.apache.org/POM/4.0.0 https://maven.apache.org/xsd/maven-4.0.0.xsd">
    <modelVersion>4.0.0</modelVersion>
    <parent>
        <groupId>org.springframework.boot</groupId>
        <artifactId>spring-boot-starter-parent</artifactId>
        <version>2.6.3</version>
        <relativePath/> <!-- lookup parent from repository -->
    </parent>
    <groupId>com.yl</groupId>
    <artifactId>ehcache</artifactId>
    <version>0.0.1-SNAPSHOT</version>
    <name>ehcache</name>
    <description>Demo project for Spring Boot</description>
    <properties>
        <java.version>11</java.version>
    </properties>
    <dependencies>
        <dependency>
            <groupId>org.springframework.boot</groupId>
            <artifactId>spring-boot-starter-cache</artifactId>
        </dependency>
            <artifactId>spring-boot-starter-web</artifactId>

            <artifactId>spring-boot-starter-test</artifactId>
            <scope>test</scope>
            <groupId>net.sf.ehcache</groupId>
            <artifactId>ehcache</artifactId>
            <version>2.10.6</version>
    </dependencies>
    <build>
        <plugins>
            <plugin>
                <groupId>org.springframework.boot</groupId>
                <artifactId>spring-boot-maven-plugin</artifactId>
            </plugin>
        </plugins>
    </build>
</project>
2.实体类
package com.yl.ehcache.model;
import java.io.Serializable;
public class User implements Serializable {
    private Integer id;
    private String username;
    private String password;
    public Integer getId() {
        return id;
    }
    public void setId(Integer id) {
        this.id = id;
    }
    public String getUsername() {
        return username;
    }
    public void setUsername(String username) {
        this.username = username;
    }
    public String getPassword() {
        return password;
    }
    public void setPassword(String password) {
        this.password = password;
    }
    @Override
    public String toString() {
        return "User{" +
                "id=" + id +
                ", username='" + username + '\'' +
                ", password='" + password + '\'' +
                '}';
    }
}
3.service
package com.yl.ehcache.service;

import com.yl.ehcache.model.User;
import org.springframework.cache.annotation.CacheEvict;
import org.springframework.cache.annotation.Cacheable;
import org.springframework.stereotype.Service;
@Service
public class UserService {
    @Cacheable(cacheNames = "user")
    public User getUserById(Integer id) {
        System.out.println("getUserById()...");
        User user = new User();
        user.setId(id);
        user.setUsername("root");
        user.setPassword("root");
        return user;
    }
    @CacheEvict(cacheNames = "user")
    public void delete(Integer id) {
        System.out.println("delete");
}
4.主程序
package com.yl.ehcache;

import org.springframework.boot.SpringApplication;
import org.springframework.boot.autoconfigure.SpringBootApplication;
import org.springframework.cache.annotation.EnableCaching;
@SpringBootApplication
@EnableCaching
public class EhcacheApplication {
    public static void main(String[] args) {
        SpringApplication.run(EhcacheApplication.class, args);
    }
}
5.ehcache.xml
<ehcache>
    <diskStore path="java.io.tmpdir/shiro-spring-sample"/>
    <defaultCache
            maxElementsInMemory = "1000"
            eternal = "false"
            timeToIdleSeconds = "120"
            timeToLiveSeconds = "120"
            overflowToDisk = "false"
            diskPersistent = "false"
            diskExpiryThreadIntervalSeconds = "120"/>
    <cache name = "user"
           maxElementsInMemory = "1000"
           eternal = "false"
           overflowToDisk = "true"
           diskPersistent = "true"
           diskExpiryThreadIntervalSeconds = "600"/>
</ehcache>
6.测试

到此这篇关于SpringBoot与SpringCache的文章就介绍到这了,更多相关SpringBoot与SpringCache内容请搜索我们以前的文章或继续浏览下面的相关文章希望大家以后多多支持我们!
相关推荐
-
使用SpringCache加Redis做缓存
目录 Redis + SpringCache 1. 添加依赖 <!-- redis --><dependency> <groupId>org.springframework.boot</groupId> <artifactId>spring-boot-starter-data-redis</artifactId></dependency><!-- spring2.X集成redis所需common-pool2-->
-

SpringCache的简介和使用教程
目录 1.简介 2.整合SpringCache简化缓存开发 3.SpringCache的原理和不足 1.简介 Spring 从 3.1 开始定义了 org.springframework.cache.Cache 和 org.springframework.cache.CacheManager 接口来统一不同的缓存技术: 并支持使用 JCache(JSR-107)注解简化我们开发 Cache 接口为缓存的组件规范定义,包含缓存的各种操作集合: Cache 接 口 下 Spring 提 供 了 各
-
SpringBoot+SpringCache实现两级缓存(Redis+Caffeine)
1. 缓存.两级缓存 1.1 内容说明 Spring cache:主要包含spring cache定义的接口方法说明和注解中的属性说明 springboot+spring cache:rediscache实现中的缺陷 caffeine简介 spring boot+spring cache实现两级缓存 使用缓存时的流程图 1.2 Sping Cache spring cache是spring-context包中提供的基于注解方式使用的缓存组件,定义了一些标准接口,通过实现这些接口,就可以通过在方法
-
SpringBoot与SpringCache概念用法大全
目录 1.SpringCache的概念 2.SpringCache用法(redis版) 2.1 .SpringCache基本用法 2.2 .SpringCache自定义缓存key 2.3 .SpringCache更新缓存 2.4 .SpringCache清空缓存 2.5 .SpringCache其他用法 3.SpringCache用法(EhCache版) 1.SpringCache的概念 首先我们知道jpa,jdbc这些东西都是一些规范,比如jdbc,要要连接到数据库,都是需要用到数据库连接,预
-
redisson分布式锁的用法大全
Redisson是Redis官方推荐的Java版的Redis客户端.它提供的功能非常多,此处我们只用它的分布式锁功能. 以springboot整合Redisson项目为例 添加springboot maven依赖 <dependency> <groupId>org.redisson</groupId> <artifactId>redisson-spring-boot-starter</artifactId> <version>3.15
-
python中的import语句用法大全
import语句有什么用?import语句用来导入其他python文件(称为模块module),使用该模块里定义的类.方法或者变量,从而达到代码复用的目的. import 语句官方文档https://docs.python.org/zh-cn/3/reference/simple_stmts.html#the-import-statement 不太好懂,解读一下: 格式一: import 模块名1 [as 别名1], 模块名2 [as 别名2],- 说明:1)将整个模块导入:2)[as 别名]部
-
c++中的const_cast用法大全
const_cast是一种C++运算符,主要是用来去除复合类型中const和volatile属性(没有真正去除). const_cast:作用: 指针或引用的转换符,用来移除变量的const或volatile限定符. 先来看c中不严谨的地方: const int ca = 30; int* q = &ca;//C中是可以编译的,最多会得到一个warning,随后就可以对ca里的数据进行操作了. 疑问:那const几乎是失效的. 在c++编译中就会报错: error: invalid conve
-
JQuery validate插件Remote用法大全
jquery.validate是jquery旗下的一个验证框架,借助jquery的优势,我们可以迅速验证一些常见的输入,还可以自己扩充自己的验证方法,并且对国际化也有很好的支 JQuery.validate.js 在表单验证中经常使用,初学,对于其中Remote的使用说明一下. . 基本解释 JQuery主要用于DOM树和CSS树的检索和后面的操作的一套方法,JQuery.validate.js是对JQuery的一个插件,可以认为是对JQuery在某个特殊场景下的扩展,而Validate就是对表
-
SpringBoot中的Thymeleaf用法
Thymeleaf Thymeleaf是最近SpringBoot推荐支持的模板框架,官网在thymeleaf.org这里. 我们为什么要用Thymeleaf来作为模板引擎呢?官网给了我们一个非常令人信服的解释: Thymeleaf is a modern server-side Java template engine for both web and standalone environments.> 基本写法就像下面这样: <table> <thead> <tr&g
-
PHP htmlspecialchars() 函数实例代码及用法大全
实例 把预定义的字符 "<" (小于)和 ">" (大于)转换为 HTML 实体: <?php $str = "This is some <b>bold</b> text."; echo htmlspecialchars($str); ?> 以上代码的 HTML 输出如下(查看源代码): <!DOCTYPE html> <html> <body> This is
-
C++中SetConsoleCursorPosition()移动光标函数的用法大全
SetConsoleCursorPosition()来自于文件"windows.h",使用时记得引用此头文件. 首先说一下,这个函数的功能即是字面意思,即移动命令行中光标的位置.这里要注意的是,每次调用这个函数都是默认从左上角开始偏移,而与当前光标停留的位置无关. 然后我们剖析下这个函数,我们查看定义发现,调用这个函数需要传入两个参数,都是自定义类型,分别为 HANDLE 和 COORD. SetConsoleCursorPosition( _In_ HANDLE hConsoleOu
-
Python input()函数用法大全
input()函数获取用户输入数据,实现用户交互 语法格式: 变量 = input("提示信息") input()返回的是字符串,无论输入的是数字还是字符串,默认的输入结束键是回车键 input()函数有一些特殊的用法 用法1:通过if判断或iter()函数的哨兵值用法让input()遇到回车键也能持续输入 txt = '' while True: k = input() if k == 'quit': break txt += k + '\n' print('*****以下是输出内容
-
python 中yaml文件用法大全
yaml简单介绍 YAML是一种标记语言,它使用空白符号缩进和大量依赖外观的特色,特别适合用来表达或编辑数据结构.各种配置文件.倾印调试内容.文件大纲. 大小写敏感 使用缩进表示层级关系 缩进不允许使用tab,只允许空格 缩进的空格数不重要,只要相同层级的元素左对齐即可 '#'表示注释 yaml数组 yaml语音数组很简单,使用短横线 '-' 作为数组的开始标志. 一维数组 import yaml #三个双引号的作用是字符换行不需要加换行符 y = """ - 111 - 2