Python利用pangu模块实现文本格式化小工具
其实使用pangu做文本格式标准化的业务代码在之前就实现了,主要能够将中文文本文档中的文字、标点符号等进行标准化。
但是为了方便起来我们这里使用了Qt5将其做成了一个可以操作的页面应用,这样不熟悉python的朋友就可以不用写代码直接双击运行使用就OK了。

为了使文本格式的美化过程不影响主线程的使用,特地采用QThread子线程来专门的运行文本文档美化的业务过程,接下来还是采用pip的方式将所有需要的非标准模块安装一下。
pip install -i https://pypi.tuna.tsinghua.edu.cn/simple pangu

pip install -i https://pypi.tuna.tsinghua.edu.cn/simple PyQt5
将我们使用到的pyqt5应用制作模块以及业务模块pangu导入到我们的代码块中。
# It imports all the classes, attributes, and methods of the PyQt5.QtCore module into the global symbol table.
from PyQt5.QtCore import *

# It imports all the classes, attributes, and methods of the PyQt5.QtWidgets module into the global symbol table.
from PyQt5.QtWidgets import QApplication, QWidget, QHBoxLayout, QVBoxLayout, QTextBrowser, QLineEdit, QPushButton, \
    QFormLayout, QFileDialog

# It imports all the classes, attributes, and methods of the PyQt5.QtGui module into the global symbol table.
from PyQt5.QtGui import QIcon, QFont, QTextCursor

# It imports the pangu module.
import pangu

# It imports the sys module.
import sys

# It imports the os module.
import os
为了减少python模块在打包时资源占用过多,打的exe应用程序的占用空间过大的情况,这次我们只导入了能够使用到的相关python类,这个小细节大家注意一下。
下面创建一个名称为PanGuUI的python类来实现对整个应用页面的开发,将页面的布局以及组件相关的部分写到这个类中。并且给页面组件绑定好相应的槽函数从而实现页面的'点击'等功能。
# It creates a class called PanGuUI that inherits from QWidget.
class PanGuUI(QWidget):
    def __init__(self):
        """
        A constructor. It is called when an object is created from a class and it allows the class to initialize the
        attributes of a class.
        """
        super(PanGuUI, self).__init__()
        self.init_ui()

    def init_ui(self):
        """
        This function initializes the UI.
        """
        self.setWindowTitle('文本文档美化器 公众号:Python 集中营')
        self.setWindowIcon(QIcon('txt.ico'))

        self.brower = QTextBrowser()
        self.brower.setFont(QFont('宋体', 8))
        self.brower.setReadOnly(True)
        self.brower.setPlaceholderText('处理进程展示区域...')
        self.brower.ensureCursorVisible()

        self.txt_file_path = QLineEdit()
        self.txt_file_path.setPlaceholderText('源文本文档路径')
        self.txt_file_path.setReadOnly(True)

        self.txt_file_path_btn = QPushButton()
        self.txt_file_path_btn.setText('导入')
        self.txt_file_path_btn.clicked.connect(self.txt_file_path_btn_click)

        self.new_txt_file_path = QLineEdit()
        self.new_txt_file_path.setPlaceholderText('新文本文档路径')
        self.new_txt_file_path.setReadOnly(True)

        self.new_txt_file_path_btn = QPushButton()
        self.new_txt_file_path_btn.setText('路径')
        self.new_txt_file_path_btn.clicked.connect(self.new_txt_file_path_btn_click)

        self.start_btn = QPushButton()
        self.start_btn.setText('开始导入')
        self.start_btn.clicked.connect(self.start_btn_click)

        hbox = QHBoxLayout()
        hbox.addWidget(self.brower)

        fbox = QFormLayout()
        fbox.addRow(self.txt_file_path, self.txt_file_path_btn)
        fbox.addRow(self.new_txt_file_path, self.new_txt_file_path_btn)

        v_vbox = QVBoxLayout()
        v_vbox.addWidget(self.start_btn)

        vbox = QVBoxLayout()
        vbox.addLayout(fbox)
        vbox.addLayout(v_vbox)

        hbox.addLayout(vbox)

        self.thread_ = PanGuThread(self)
        self.thread_.message.connect(self.show_message)
        self.thread_.finished.connect(self.finshed)

        self.setLayout(hbox)

    def show_message(self, text):
        """
        It shows a message

        :param text: The text to be displayed
        """
        cursor = self.brower.textCursor()
        cursor.movePosition(QTextCursor.End)
        self.brower.append(text)
        self.brower.setTextCursor(cursor)
        self.brower.ensureCursorVisible()

    def txt_file_path_btn_click(self):
        """
        It opens a file dialog box and allows the user to select a file.
        """
        txt_file = QFileDialog.getOpenFileName(self, os.getcwd(), '打开文本文档',
                                               'Text File(*.txt)')
        self.txt_file_path.setText(txt_file[0])

    def new_txt_file_path_btn_click(self):
        """
        This function opens a file dialog box and allows the user to select a file to save the output to.
        """
        new_txt_file = QFileDialog.getOpenFileName(self, os.getcwd(), '打开文本文档',
                                                   'Text File(*.txt)')
        self.new_txt_file_path.setText(new_txt_file[0])

    def start_btn_click(self):
        """
        A function that is called when the start button is clicked.
        """
        self.thread_.start()
        self.start_btn.setEnabled(False)

    def finshed(self, finished):
        """
        :param finished: A boolean value that is True if the download is finished, False otherwise
        """
        if finished is True:
            self.start_btn.setEnabled(True)
创建名称为PanGuThread的子线程,将具体实现美化格式化文本字符串的业务代码块写入到子线程中。子线程继承的是QThread的PyQt5的线程类,通过创建子线程并且将子线程的信号信息传递到主线程中,在主线程的文本浏览器中进行展示达到实时跟踪执行结果的效果。
# This class is a subclass of QThread, and it's used to split the text into words
class PanGuThread(QThread):
    message = pyqtSignal(str)
    finished = pyqtSignal(bool)

    def __init__(self, parent=None):
        """
        A constructor that initializes the class.

        :param parent: The parent widget
        """
        super(PanGuThread, self).__init__(parent)
        self.working = True
        self.parent = parent

    def __del__(self):
        """
        A destructor. It is called when the object is destroyed.
        """
        self.working = True
        self.wait()

    def run(self) -> None:
        """
        > This function runs the program
        """
        try:

            txt_file_path = self.parent.txt_file_path.text().strip()
            self.message.emit('源文件路径信息读取正常!')
            new_txt_file_path = self.parent.new_txt_file_path.text().strip()
            self.message.emit('新文件路径信息读取正常!')
            list_ = []
            with open(txt_file_path, encoding='utf-8') as f:
                lines_ = f.readlines()
                self.message.emit('源文件内容读取完成!')
                n = 1
                for line_ in lines_:
                    text = pangu.spacing_text(line_)
                    self.message.emit('第{0}行文档内容格式化完成!'.format(n))
                    list_.append(text)
                    n = n + 1
                self.message.emit('源文件路径信息格式化完成!')

            self.message.emit('即将开始将格式化内容写入新文件!')
            with open(new_txt_file_path, 'a') as f:
                for line_ in list_:
                    f.write(line_ + '\n')
            self.message.emit('新文件内容写入完成!')
            self.finished.emit(True)

        except Exception as e:
            self.message.emit('文件内容读取或格式化发生异常!')

if __name__ == '__main__':
    app = QApplication(sys.argv)
    main = PanGuUI()
    main.show()
    sys.exit(app.exec_())
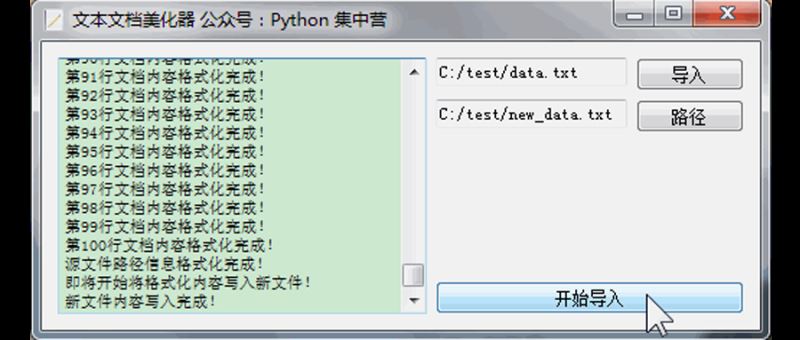
完成了开发开始测试一下效果如何,创建了两个文本文件data.txt、new_data.txt,点击'开始运行'之后会调起整个的业务子线程实现文本格式化,结果完美运行来看一下执行过程展示。

到此这篇关于Python利用pangu模块实现文本格式化小工具的文章就介绍到这了,更多相关Python pangu文本格式化内容请搜索我们以前的文章或继续浏览下面的相关文章希望大家以后多多支持我们!
赞 (0)

