基于d3.js/neovis.js/neod3.js实现链接neo4j图形数据库的图像化显示功能
目录
- 一、使用d3.js
- 二、 neo4jd3.js
- 三、neovis.js
一、基于D3.js (自由度高,写起来麻烦)
二、基于neovis.js (基于d3库,简洁,但样式固定,自由度低。)
三、基于neo4jd3.js (融合neovis与d3,数据格式可用d3\neo4j的,或根据需求自己重写方法) https://github.com/eisman/neo4jd3
Svg 不推荐在HTML4和XHTML中使用(但在HTML5允许)
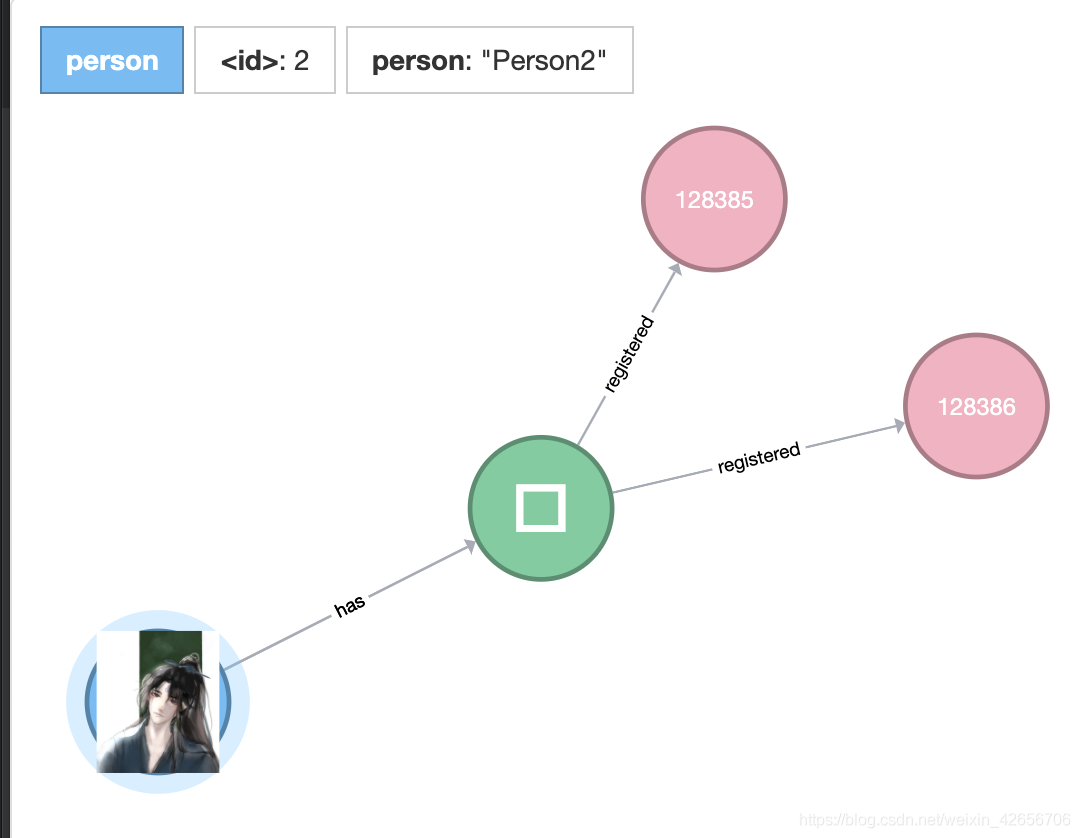
一、使用d3.js
效果:

1.引入官方js

定义背景/图片大小
用svg绘制背景、节点、线条、箭头。
1.请求json 数据(处理成可用等d3格式{node:{ },relaton:{source: ,target: ,type: })
2. d3默认按索引链接结点,要强制改为通过id链接它们(myerror: 注意 === 与 == 的不同,数据类型会导致错误)
3.构造力导向布局
力布局使用:https://github.com/d3/d3/wiki/%E5%8A%9B%E5%B8%83%E5%B1%80
D3.layout.force( )构造力导向布局,force.start( ) 启动模拟;
force.tick触发仿真第一步(如更新节点的x和y属性);
force.drag( )交互式拖动;
4.Select元素,并操作select,据需求自定义样式属性()。
选择器使用参考:https://github.com/d3/d3/wiki/%E9%80%89%E6%8B%A9%E5%99%A8#append
https://github.com/d3/d3/wiki/%E9%80%89%E6%8B%A9%E5%99%A8
【D3中,select 返回第一个匹配的元素,selectAll遍历次序中所有匹配的元素。】
代码:
<html>
<head>
    <meta charset="utf-8">
    <title>Force</title>
    <style>

        .nodetext {
            font-size: 12px ;
            font-family: SimSun;//字体
            fill:#000000;
        }
        .linetext {
            /*font-family: SimSun;*/
            fill:#1f77b4;
            fill-opacity:0.0;
        .circleImg {
            stroke: #ff7f0e;
            stroke-width: 1.5px;
    </style></head>
<body>
<script src="http://d3js.org/d3.v3.min.js" charset="utf-8"></script>
<script src="https://cdnjs.cloudflare.com/ajax/libs/d3/3.5.5/d3.min.js"></script>
<script src="https://code.jquery.com/jquery-3.2.1.min.js"></script>
<script>
    var width = 900;
    var height = 800;
    var img_w = 77;
    var img_h = 80;
    var radius = 30;	//圆形半径
    var svg = d3.select("body")
        .append("svg")
        .attr("width",width)
        .attr("height",height);
    var edges = [];
    d3.json("my.json",function(error,root){
        if( error ){
            return console.log(error);
        console.log(root);
//默认按索引链接结点,我强制改成通过id链接它们。
        root.edges.forEach(function (e) {
                var sourceNode = root.nodes.filter(function (n) {
                        return n.id === e.source;
                    })[0],
                    targetNode = root.nodes.filter(function (n) {
                        return n.id === e.target;
                    })[0];
                edges.push({
                 source: sourceNode,
                 target: targetNode,
                 relation: e.type
                })
        });
console.log(edges)
        //D3力导向布局
        var force = d3.layout.force()
            .nodes(root.nodes)
            .links(edges)
            .size([width,height])
            .linkDistance(200)
            .charge(-1500)
            .start();
        var defs = svg.append("defs");
        var arrowMarker = defs.append("marker")
            .attr("id","arrow")
            .attr("markerUnits","strokeWidth")//图最前端大小
            .attr("markerWidth","15")//标识长宽
            .attr("markerHeight","15")
            .attr("viewBox","0 0 12 12")//坐标系区域
            .attr("refX","17")
            .attr("refY","6")
            .attr("orient","auto");//方向
        var arrow_path = "M2,2 L10,6 L2,10 L6,6 L2,2";
        arrowMarker.append("path")
            .attr("d",arrow_path)
            .attr("fill","#ccc");
        //边
        var edges_line =svg.selectAll("line")
            .data(edges)
            .enter()
            .append("line")
            .attr("class","line")
            .style("stroke","#ddd")
            .style("linewidth",2)
            .attr("marker-end","url(#arrow)")
            .style("stroke-width",3);
        //边上的文字(人物之间的关系)
        var edges_text = svg.selectAll(".linetext")
            .append("text")
            .attr("class","linetext")
            .text(function(d){
                return d.relation;
            })
            .style("fill-opacity",1.0);//不透明度
        // 圆形图片节点(人物头像)
        var nodes_img = svg.selectAll("image")
            .data(root.nodes)
            .append("circle")
            .attr("class", "circleImg")
            .attr("r", radius)
            .attr("fill", function(d, i){
                //创建圆形图片
                var defs = svg.append("defs").attr("id", "imgdefs")
                var catpattern = defs.append("pattern")
                    .attr("id", "catpattern" + i)
                    .attr("height", 1)
                    .attr("width", 1)
                catpattern.append("image")
                    .attr("x", - (img_w / 2 - radius))
                    .attr("y", - (img_h / 2 - radius))
                    .attr("width", img_w)
                    .attr("height", img_h)
                    .attr("xlink:href", d.labels)
                return "url(#catpattern" + i + ")";
            // .on("mouseover",function(d,i){
            //     //显示连接线上的文字
            //     edges_text.style("fill-opacity",function(edge){
            //         if( parseInt(edge.source) === d || parseInt(edge.target) === d ){
            //             return 1.0;
            //         }
            //     });
            // })
            // .on("mouseout",function(d,i){
            //     //隐去连接线上的文字
            //         if( edge.source === d || edge.target === d ){
            //             return 0.0;
            .call(force.drag);
        var text_dx = -20;
        var text_dy = 20;
        var nodes_text = svg.selectAll(".nodetext")
            .style("stroke","#ff7f0e")
            .attr("class","nodetext")
            .attr("dx",text_dx)
            .attr("dy",text_dy)
                var uservalue = d.properties.username;
                var personvalue = d.properties.person;
                var phonevalue = d.properties.phone;
                if ( uservalue == undefined ){
                    uservalue = "";
                }
                if(personvalue == undefined){
                    personvalue = "";
                if (phonevalue == undefined){
                    phonevalue = "";
                return uservalue + phonevalue + personvalue;
            });
        force.on("tick", function(){
            //限制结点的边界
            root.nodes.forEach(function(d,i){
                d.x = d.x - img_w/2 < 0     ? img_w/2 : d.x ;
                d.x = d.x + img_w/2 > width ? width - img_w/2 : d.x ;
                d.y = d.y - img_h/2 < 0      ? img_h/2 : d.y ;
                d.y = d.y + img_h/2 + text_dy > height ? height - img_h/2 - text_dy : d.y ;
            //更新连接线的位置
            edges_line.attr("x1",function(d){ return d.source.x; });
            edges_line.attr("y1",function(d){ return d.source.y; });
            edges_line.attr("x2",function(d){ return d.target.x; });
            edges_line.attr("y2",function(d){ return d.target.y; });
            //更新连接线上文字的位置
            edges_text.attr("x",function(d){ return (d.source.x + d.target.x) / 2 ; });
            edges_text.attr("y",function(d){ return (d.source.y + d.target.y) / 2 ; });
            //更新结点图片和文字
            nodes_img.attr("cx",function(d){ return d.x });
            nodes_img.attr("cy",function(d){ return d.y });
            nodes_text.attr("x",function(d){ return d.x });
            nodes_text.attr("y",function(d){ return d.y + img_w/2; });
    });
</script>
</body>
</html>
mydata.json
{
        "nodes": [{
          "id": "2",
          "labels": "./image/wode.png",
          "properties": {
            "person": "Person2"
          }
        }, {
          "id": "58688",
            "phone": "85266978333"
          "id": "128386",
            "username": "Samuel_lee"
        }],
  "edges": [{
          "id": "23943",
          "type": "has",
          "startNode": "2",
          "endNode": "58688",
          "properties": {},
          "source": "2",
          "target": "58688"
          "id": "94198",
          "type": "registered",
          "startNode": "58688",
          "endNode": "128386",
          "source": "58688",
          "target": "128386"
        }]
      }
二、 neo4jd3.js
https://github.com/eisman/neo4jd3
效果:
与neovis.js类似,根据d3/neo4j的数据格式,将数据传入,根据需求渲染结点图像关系,但样式固定。
可以重写js中的数据与方法。
在这里,出现了问题:我在js中修改的方法无法被使用。
根据排查,最后发现在代码末尾有一行注释:

源映射是用来为压缩后的代码调试提供方便的,为了提高性能,很多站点都会先压缩 JavaScript 代码然后上线,
但如果代码运行时出现错误,浏览器只会显示在已压缩的代码中的位置,很难确定真正的源码错误位置。
要更改js记得将这行注释删除。
<!doctype html>
<html>
    <head>
        <meta charset="utf-8">
        <meta http-equiv="X-UA-Compatible" content="IE=edge,chrome=1">
        <meta name="description" content="">
        <meta name="viewport" content="width=device-width">
        <title>neo4jd3.js</title>
        <link rel="stylesheet" href="css/bootstrap.min.css" rel="external nofollow" >
        <link rel="stylesheet" href="css/font-awesome.min.css" rel="external nofollow" >
        <link rel="stylesheet" href="css/neo4jd3.min.css?v=0.0.1" rel="external nofollow" >
        <script src="js/d3.min.js"></script>
        <script src="js/2.js?v=0.0.2"></script>
        <style>
            body,
            html,
            .neo4jd3 {
                height: 100%;
                overflow: hidden;
            }
        </style>
    </head>
    <body>
        <div id="neo4jd33"></div>
        <!-- Scripts -->
        <script type="text/javascript" >

            function init() {

                var neo4jd3 = new Neo4jd3('#neo4jd33', {
                    icons: {
                    },
                    images: {
                         'person': 'img/twemoji/wode.png',
                    minCollision: 50,
                    neo4jDataUrl:'./json/mydata.json',
                    nodeRadius: 30,
                    zoomFit: false
                });
            window.onload = init;
        </script>
        <script>
    </body>
</html>
三、neovis.js

详细使用文档见:
https://www.npmjs.com/package/neovis.js
https://github.com/neo4j-contrib/neovis.js#readme
Neovis.js 需要链接 neo4j 的bolt地址,并书写cypher语句获取查询结果。
创建一个div,在其中制定οnlοad=“draw( )”,然后自己定义draw( )。
使用简单,但模板样式固定。
function draw() {

            var config = {
                container_id: "viz",
                server_url:"bolt://xxxxxxxx",
                server_user: "",
                server_password: "",
                labels: {
                    "person": {
                        "caption": "person",
                },
                    "phone":{
                        "caption": "phone",
                    },
                    "zello":{
                        "caption": "username",

                    }
                relationships: {
                    "has": {
                        "thickness": 0.003,
                        "caption": true
                    ,"registered":{
                 initial_cypher: "MATCH (n) RETURN n LIMIT 25",
              arrows: true
            };
            viz = new NeoVis.default(config);
            console.log(viz);
            viz.render();
        }
到此这篇关于基于d3.js/neovis.js/neod3.js实现链接neo4j图形数据库的图像化显示功能的文章就介绍到这了,更多相关neo4j图像化显示内容请搜索我们以前的文章或继续浏览下面的相关文章希望大家以后多多支持我们!
相关推荐
-

vue使用neovis操作neo4j图形数据库及优缺点
1.前言: 由于项目需要在前端展示关系图,常规的做法是,后端操作数据库返回Json数据,前端使用d3或者echarts进行展示,奈何因为后端不给力(说是无法获取最核心的关系id),所以前端借助neovis.js插件直接操作数据库,进行展示. 2.优缺点 优点: 相比于常规做法,简单方便直接,而且neo4j数据库在处理复杂关系数据方面有优势. 缺点: 暴露账号密码,通过f12控制台直接就能看到数据的账号和密码.对此的解决方法是,使用企业版neo4j注册只读账号,或者后端直接限制数据库查询语言,既只
-
基于d3.js/neovis.js/neod3.js实现链接neo4j图形数据库的图像化显示功能
目录 一.使用d3.js 二. neo4jd3.js 三.neovis.js 一.基于D3.js (自由度高,写起来麻烦)二.基于neovis.js (基于d3库,简洁,但样式固定,自由度低.)三.基于neo4jd3.js (融合neovis与d3,数据格式可用d3\neo4j的,或根据需求自己重写方法) https://github.com/eisman/neo4jd3 Svg 不推荐在HTML4和XHTML中使用(但在HTML5允许) 一.使用d3.js 效果: 1.引入官方js 定义背景/
-
基于 D3.js 绘制动态进度条的实例详解
D3 是什么 D3 的全称是(Data-Driven Documents),顾名思义可以知道是一个被数据驱动的文档.听名字有点抽象,说简单一点,其实就是一个 JavaScript 的函数库,使用它主要是用来做数据可视化的.如果你不知道什么是 JavaScript ,请先学习一下 JavaScript,推荐阮一峰老师的教程. JavaScript 文件的后缀名通常为 .js,故 D3 也常使用 D3.js 称呼.D3 提供了各种简单易用的函数,大大简化了 JavaScript 操作数据的难度.由于
-
基于touch.js手势库+zepto.js插件开发图片查看器(滑动、缩放、双击缩放)
最近由于公司项目需要图片查看器,网上搜了一圈,感觉资料很少,所以决定基于百度的touch.js手势库+zepto.js自己写了一个小插件,实现了左右滑动,双指缩放,双击缩放功能,基本使用还行,但是有时候还是不太顺畅,后续会慢慢完善:写的不好的地方望各位能够给出好的建议,谢谢! 源码地址:https://github.com/GLwen/molong_photoSwipe.git 演示:http://runjs.cn/detail/iceaaogh molong.css *{padding:0;m
-
基于AngularJS拖拽插件ngDraggable.js实现拖拽排序功能
ngDraggable.js是一款比较简单实用的angularJS拖拽插件,借助于封装好的一些自定义指令,能够快速的进行一些拖拽应用开发.首先先介绍一些基本的概念; •ng-drop:是否允许放入拖拽元素 •ng-drop-success($data, $event):拖拽元素放入的回调;$data:放入元素数据:$event拖拽事件对象 •ng-drag:元素是否允许拖拽 •ng-drag-success($data, $event):$data:拖拽元素数据,$event拖拽元素事件对象 •
-
JS框架之vue.js(深入三:组件1)
这个要单独写,原文是这么描述vue的组件的:组件(Component)是 Vue.js 最强大的功能之一.组件可以扩展 HTML 元素,封装可重用的代码.在较高层面上,组件是自定义元素,Vue.js 的编译器为它添加特殊功能.在有些情况下,组件也可以是原生 HTML 元素的形式,以 is 特性扩展. 这个特性我感觉比较难理解,一步步来,看看组件到底是个什么东西? 1.举个栗子 //model层: // 通过extend方式定义一个Vue组件 var MyComponent = Vue.exten
-
require.js深入了解 require.js特性介绍
现在,Require.js是我最喜欢的Javascript编程方式.它可以使代码化整为零,并易于管理.而Require.js Optimizer能帮助我们将一个较大的应用分散成多个较小的应用,并通过依赖串联起来,最后在编译打包时合并起来.这些原因促使我们使用require.js. 那么,让我们来看看require.js有什么牛逼的特性吧! 与CommonJS兼容 AMD (异步模块定义规范) 出现自CommonJS工作组.CommonJS旨在创造Javascript的生态系统. CommonJS
-
JS库之Three.js 简易入门教程(详解之一)
开场白 webGL可以让我们在canvas上实现3D效果.而three.js是一款webGL框架,由于其易用性被广泛应用.如果你要学习webGL,抛弃那些复杂的原生接口从这款框架入手是一个不错的选择. 博主目前也在学习three.js,发现相关资料非常稀少,甚至官方的api文档也非常粗糙,很多效果需要自己慢慢敲代码摸索.所以我写这个教程的目的一是自己总结,二是与大家分享. 本篇是系列教程的第一篇:入门篇.在这篇文章中,我将以一个简单的demo为例,阐述three.js的基本配置方法.学完这篇文章
-
js实现鼠标滑过文字链接色彩变化的效果
本文实例讲述了js实现鼠标滑过文字链接色彩变化效果的方法.分享给大家供大家参考.具体实现方法如下: <!DOCTYPE html PUBLIC "-//W3C//DTD XHTML 1.0 Transitional//EN" "http://www.w3.org/TR/xhtml1/DTD/xhtml1-transitional.dtd"> <html xmlns="http://www.w3.org/1999/xhtml"&g
-
JS 动态加载js文件和css文件 同步/异步的两种简单方式
/*动态添加js或css,URL:文件路径,FileType:文件类型(js/css)*/ function AddJsFiles(URL,FileType){ var oHead = document.getElementsByTagName('HEAD').item(0); var addheadfile; if(FileType=="js"){ addheadfile= document.createElement("script"); addheadfile
-
JS库之Highlight.js的用法详解
官网:https://highlightjs.org/ 下载地址:https://highlightjs.org/download/ 下载到本地后,新建个页面测试 1.在head中加入css和js的引用 <head> <title>highlight</title> <meta http-equiv="content-type" content="text/html;charset=utf-8"> <link r