Tensorflow深度学习使用CNN分类英文文本
目录
- 前言
- 源码与数据
- 源码
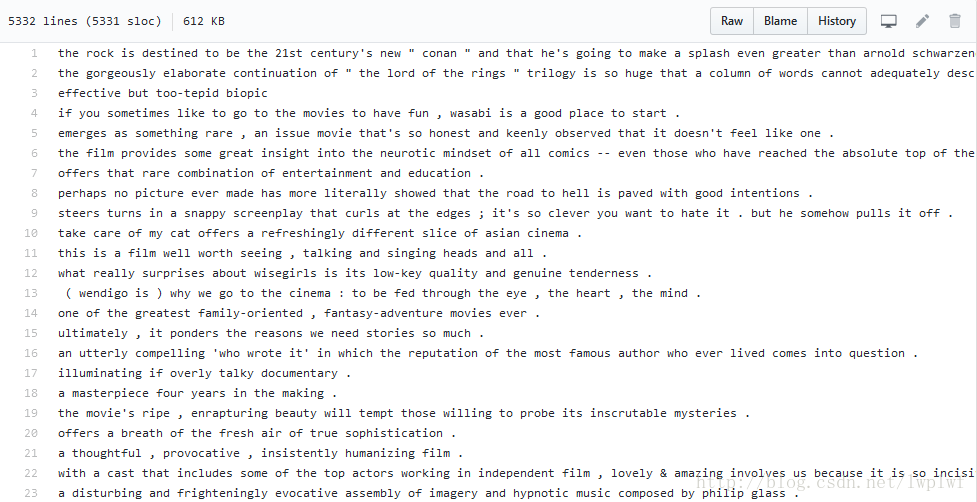
- 数据
- train.py 源码及分析
- data_helpers.py 源码及分析
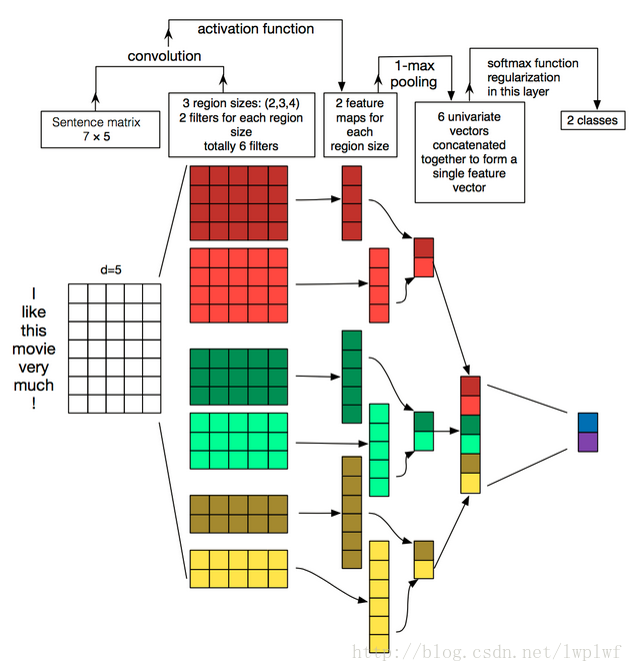
- text_cnn.py 源码及分析
前言
本文同时也是学习唐宇迪老师深度学习课程的一些理解与记录。
文中代码是实现在TensorFlow下使用卷积神经网络(CNN)做英文文本的分类任务(本次是垃圾邮件的二分类任务),当然垃圾邮件分类是一种应用环境,模型方法也可以推广到其它应用场景,如电商商品好评差评分类、正负面新闻等。

源码与数据
源码
- data_helpers.py
- train.py
- text_cnn.py
- eval.py(Save the evaluations to a csv, in case the user wants to inspect,analyze, or otherwise use the classifications generated by the neural net)
数据
- rt-polarity.neg
- rt-polarity.pos


train.py 源码及分析
import tensorflow as tf
import numpy as np
import os
import time
import datetime
import data_helpers
from text_cnn import TextCNN
from tensorflow.contrib import learn
# Parameters
# ==================================================
# Data loading params
# 语料文件路径定义
tf.flags.DEFINE_float("dev_sample_percentage", .1, "Percentage of the training data to use for validation")
tf.flags.DEFINE_string("positive_data_file", "./data/rt-polaritydata/rt-polarity.pos", "Data source for the positive data.")
tf.flags.DEFINE_string("negative_data_file", "./data/rt-polaritydata/rt-polarity.neg", "Data source for the negative data.")

# Model Hyperparameters
# 定义网络超参数
tf.flags.DEFINE_integer("embedding_dim", 128, "Dimensionality of character embedding (default: 128)")
tf.flags.DEFINE_string("filter_sizes", "3,4,5", "Comma-separated filter sizes (default: '3,4,5')")
tf.flags.DEFINE_integer("num_filters", 128, "Number of filters per filter size (default: 128)")
tf.flags.DEFINE_float("dropout_keep_prob", 0.5, "Dropout keep probability (default: 0.5)")
tf.flags.DEFINE_float("l2_reg_lambda", 0.0, "L2 regularization lambda (default: 0.0)")

# Training parameters
# 训练参数
tf.flags.DEFINE_integer("batch_size", 32, "Batch Size (default: 32)")
tf.flags.DEFINE_integer("num_epochs", 200, "Number of training epochs (default: 200)") # 总训练次数
tf.flags.DEFINE_integer("evaluate_every", 100, "Evaluate model on dev set after this many steps (default: 100)") # 每训练100次测试一下
tf.flags.DEFINE_integer("checkpoint_every", 100, "Save model after this many steps (default: 100)") # 保存一次模型
tf.flags.DEFINE_integer("num_checkpoints", 5, "Number of checkpoints to store (default: 5)")
# Misc Parameters
tf.flags.DEFINE_boolean("allow_soft_placement", True, "Allow device soft device placement") # 加上一个布尔类型的参数,要不要自动分配
tf.flags.DEFINE_boolean("log_device_placement", False, "Log placement of ops on devices") # 加上一个布尔类型的参数,要不要打印日志

# 打印一下相关初始参数
FLAGS = tf.flags.FLAGS
FLAGS._parse_flags()
print("\nParameters:")
for attr, value in sorted(FLAGS.__flags.items()):
    print("{}={}".format(attr.upper(), value))
print("")

# Data Preparation
# ==================================================
# Load data
print("Loading data...")
x_text, y = data_helpers.load_data_and_labels(FLAGS.positive_data_file, FLAGS.negative_data_file)
# Build vocabulary
max_document_length = max([len(x.split(" ")) for x in x_text]) # 计算最长邮件
vocab_processor = learn.preprocessing.VocabularyProcessor(max_document_length) # tensorflow提供的工具,将数据填充为最大长度,默认0填充
x = np.array(list(vocab_processor.fit_transform(x_text)))

# Randomly shuffle data
# 数据洗牌
np.random.seed(10)
# np.arange生成随机序列
shuffle_indices = np.random.permutation(np.arange(len(y)))
x_shuffled = x[shuffle_indices]
y_shuffled = y[shuffle_indices]

# 将数据按训练train和测试dev分块
# Split train/test set
# TODO: This is very crude, should use cross-validation
dev_sample_index = -1 * int(FLAGS.dev_sample_percentage * float(len(y)))
x_train, x_dev = x_shuffled[:dev_sample_index], x_shuffled[dev_sample_index:]
y_train, y_dev = y_shuffled[:dev_sample_index], y_shuffled[dev_sample_index:]
print("Vocabulary Size: {:d}".format(len(vocab_processor.vocabulary_)))
print("Train/Dev split: {:d}/{:d}".format(len(y_train), len(y_dev))) # 打印切分的比例
# Training
# ==================================================
with tf.Graph().as_default():
    session_conf = tf.ConfigProto(
        allow_soft_placement=FLAGS.allow_soft_placement,
        log_device_placement=FLAGS.log_device_placement)
    sess = tf.Session(config=session_conf)
    with sess.as_default():
        # 卷积池化网络导入
        cnn = TextCNN(
            sequence_length=x_train.shape[1],
            num_classes=y_train.shape[1], # 分几类
            vocab_size=len(vocab_processor.vocabulary_),
            embedding_size=FLAGS.embedding_dim,
            filter_sizes=list(map(int, FLAGS.filter_sizes.split(","))), # 上面定义的filter_sizes拿过来,"3,4,5"按","分割
            num_filters=FLAGS.num_filters, # 一共有几个filter
            l2_reg_lambda=FLAGS.l2_reg_lambda) # l2正则化项

        # Define Training procedure
        global_step = tf.Variable(0, name="global_step", trainable=False)
        optimizer = tf.train.AdamOptimizer(1e-3) # 定义优化器
        grads_and_vars = optimizer.compute_gradients(cnn.loss)
        train_op = optimizer.apply_gradients(grads_and_vars, global_step=global_step)

        # Keep track of gradient values and sparsity (optional)
        grad_summaries = []
        for g, v in grads_and_vars:
            if g is not None:
                grad_hist_summary = tf.summary.histogram("{}/grad/hist".format(v.name), g)
                sparsity_summary = tf.summary.scalar("{}/grad/sparsity".format(v.name), tf.nn.zero_fraction(g))
                grad_summaries.append(grad_hist_summary)
                grad_summaries.append(sparsity_summary)
        grad_summaries_merged = tf.summary.merge(grad_summaries)

        # Output directory for models and summaries
        timestamp = str(int(time.time()))
        out_dir = os.path.abspath(os.path.join(os.path.curdir, "runs", timestamp))
        print("Writing to {}\n".format(out_dir))

        # Summaries for loss and accuracy
        # 损失函数和准确率的参数保存
        loss_summary = tf.summary.scalar("loss", cnn.loss)
        acc_summary = tf.summary.scalar("accuracy", cnn.accuracy)

        # Train Summaries
        # 训练数据保存
        train_summary_op = tf.summary.merge([loss_summary, acc_summary, grad_summaries_merged])
        train_summary_dir = os.path.join(out_dir, "summaries", "train")
        train_summary_writer = tf.summary.FileWriter(train_summary_dir, sess.graph)

        # Dev summaries
        # 测试数据保存
        dev_summary_op = tf.summary.merge([loss_summary, acc_summary])
        dev_summary_dir = os.path.join(out_dir, "summaries", "dev")
        dev_summary_writer = tf.summary.FileWriter(dev_summary_dir, sess.graph)

        # Checkpoint directory. Tensorflow assumes this directory already exists so we need to create it
        checkpoint_dir = os.path.abspath(os.path.join(out_dir, "checkpoints"))
        checkpoint_prefix = os.path.join(checkpoint_dir, "model")
        if not os.path.exists(checkpoint_dir):
            os.makedirs(checkpoint_dir)

        saver = tf.train.Saver(tf.global_variables(), max_to_keep=FLAGS.num_checkpoints) # 前面定义好参数num_checkpoints

        # Write vocabulary
        vocab_processor.save(os.path.join(out_dir, "vocab"))

        # Initialize all variables
        sess.run(tf.global_variables_initializer()) # 初始化所有变量

        # 定义训练函数
        def train_step(x_batch, y_batch):
            """
            A single training step
            """
            feed_dict = {
              cnn.input_x: x_batch,
              cnn.input_y: y_batch,
              cnn.dropout_keep_prob: FLAGS.dropout_keep_prob # 参数在前面有定义
            }
            _, step, summaries, loss, accuracy = sess.run(
                [train_op, global_step, train_summary_op, cnn.loss, cnn.accuracy], feed_dict)
            time_str = datetime.datetime.now().isoformat() # 取当前时间,python的函数
            print("{}: step {}, loss {:g}, acc {:g}".format(time_str, step, loss, accuracy))
            train_summary_writer.add_summary(summaries, step)

        # 定义测试函数
        def dev_step(x_batch, y_batch, writer=None):
            """
            Evaluates model on a dev set
            """
            feed_dict = {
              cnn.input_x: x_batch,
              cnn.input_y: y_batch,
              cnn.dropout_keep_prob: 1.0 # 神经元全部保留
            }
            step, summaries, loss, accuracy = sess.run(
                [global_step, dev_summary_op, cnn.loss, cnn.accuracy], feed_dict)
            time_str = datetime.datetime.now().isoformat()
            print("{}: step {}, loss {:g}, acc {:g}".format(time_str, step, loss, accuracy))
            if writer:
                writer.add_summary(summaries, step)

        # Generate batches
        batches = data_helpers.batch_iter(list(zip(x_train, y_train)), FLAGS.batch_size, FLAGS.num_epochs)
        # Training loop. For each batch...
        # 训练部分
        for batch in batches:
            x_batch, y_batch = zip(*batch) # 按batch把数据拿进来
            train_step(x_batch, y_batch)
            current_step = tf.train.global_step(sess, global_step) # 将Session和global_step值传进来
            if current_step % FLAGS.evaluate_every == 0: # 每FLAGS.evaluate_every次每100执行一次测试
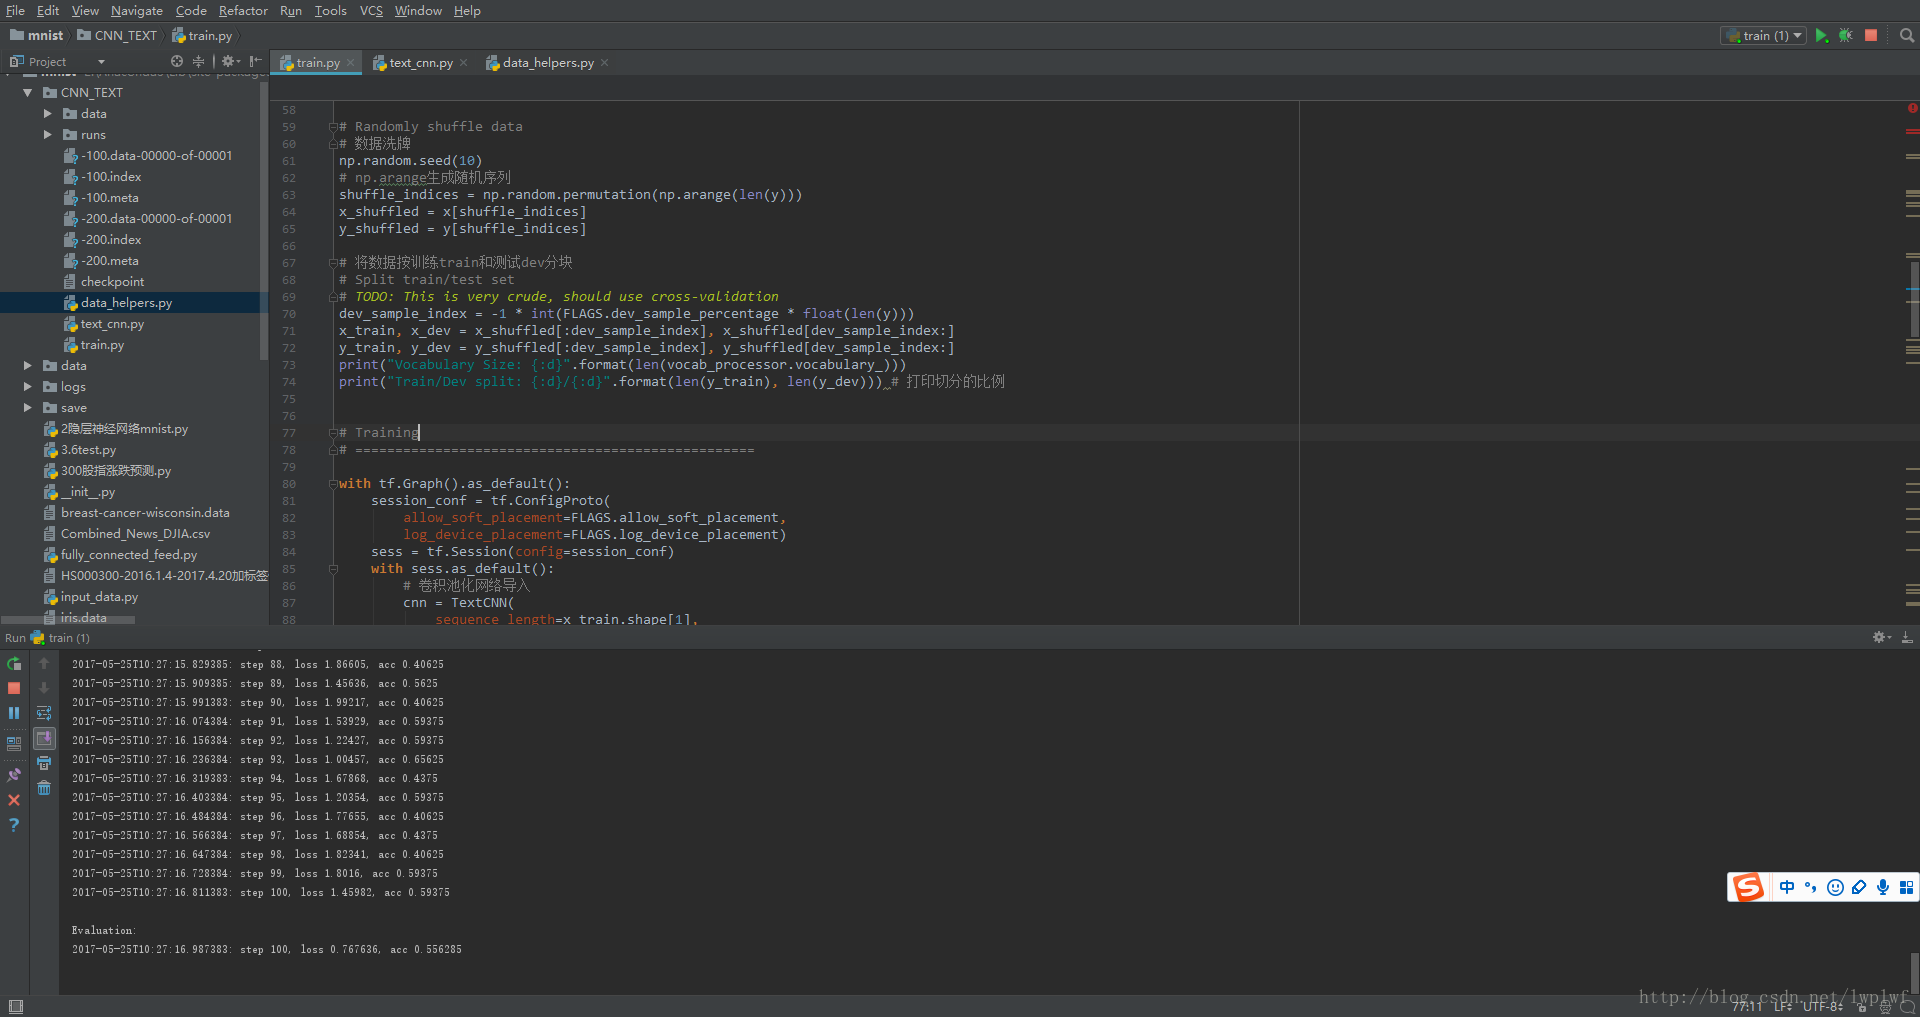
                print("\nEvaluation:")
                dev_step(x_dev, y_dev, writer=dev_summary_writer)
                print("")
            if current_step % FLAGS.checkpoint_every == 0: # 每checkpoint_every次执行一次保存模型
                path = saver.save(sess, './', global_step=current_step) # 定义模型保存路径
                print("Saved model checkpoint to {}\n".format(path))
data_helpers.py 源码及分析
import numpy as np
import re
import itertools
from collections import Counter

def clean_str(string):
    """
    Tokenization/string cleaning for all datasets except for SST.
    Original taken from https://github.com/yoonkim/CNN_sentence/blob/master/process_data.py
    """
    # 清理数据替换掉无词义的符号
    string = re.sub(r"[^A-Za-z0-9(),!?\'\`]", " ", string)
    string = re.sub(r"\'s", " \'s", string)
    string = re.sub(r"\'ve", " \'ve", string)
    string = re.sub(r"n\'t", " n\'t", string)
    string = re.sub(r"\'re", " \'re", string)
    string = re.sub(r"\'d", " \'d", string)
    string = re.sub(r"\'ll", " \'ll", string)
    string = re.sub(r",", " , ", string)
    string = re.sub(r"!", " ! ", string)
    string = re.sub(r"\(", " \( ", string)
    string = re.sub(r"\)", " \) ", string)
    string = re.sub(r"\?", " \? ", string)
    string = re.sub(r"\s{2,}", " ", string)
    return string.strip().lower()
def load_data_and_labels(positive_data_file, negative_data_file):
    """
    Loads MR polarity data from files, splits the data into words and generates labels.
    Returns split sentences and labels.
    """
    # Load data from files
    positive = open(positive_data_file, "rb").read().decode('utf-8')
    negative = open(negative_data_file, "rb").read().decode('utf-8')

    # 按回车分割样本
    positive_examples = positive.split('\n')[:-1]
    negative_examples = negative.split('\n')[:-1]

    # 去空格
    positive_examples = [s.strip() for s in positive_examples]
    negative_examples = [s.strip() for s in negative_examples]

    #positive_examples = list(open(positive_data_file, "rb").read().decode('utf-8'))
    #positive_examples = [s.strip() for s in positive_examples]
    #negative_examples = list(open(negative_data_file, "rb").read().decode('utf-8'))
    #negative_examples = [s.strip() for s in negative_examples]
    # Split by words
    x_text = positive_examples + negative_examples
    x_text = [clean_str(sent) for sent in x_text] # 字符过滤,实现函数见clean_str()
    # Generate labels
    positive_labels = [[0, 1] for _ in positive_examples]
    negative_labels = [[1, 0] for _ in negative_examples]
    y = np.concatenate([positive_labels, negative_labels], 0) # 将两种label连在一起
    return [x_text, y]

# 创建batch迭代模块
def batch_iter(data, batch_size, num_epochs, shuffle=True): # shuffle=True洗牌
    """
    Generates a batch iterator for a dataset.
    """
    # 每次只输出shuffled_data[start_index:end_index]这么多
    data = np.array(data)
    data_size = len(data)
    num_batches_per_epoch = int((len(data)-1)/batch_size) + 1 # 每一个epoch有多少个batch_size
    for epoch in range(num_epochs):
        # Shuffle the data at each epoch
        if shuffle:
            shuffle_indices = np.random.permutation(np.arange(data_size)) # 洗牌
            shuffled_data = data[shuffle_indices]
        else:
            shuffled_data = data
        for batch_num in range(num_batches_per_epoch):
            start_index = batch_num * batch_size # 当前batch的索引开始
            end_index = min((batch_num + 1) * batch_size, data_size) # 判断下一个batch是不是超过最后一个数据了
            yield shuffled_data[start_index:end_index]
text_cnn.py 源码及分析
import tensorflow as tf
import numpy as np
# 定义CNN网络实现的类
class TextCNN(object):
    """
    A CNN for text classification.
    Uses an embedding layer, followed by a convolutional, max-pooling and softmax layer.
    """
    def __init__(self, sequence_length, num_classes, vocab_size,
                 embedding_size, filter_sizes, num_filters, l2_reg_lambda=0.0): # 把train.py中TextCNN里定义的参数传进来

        # Placeholders for input, output and dropout
        self.input_x = tf.placeholder(tf.int32, [None, sequence_length], name="input_x") # input_x输入语料,待训练的内容,维度是sequence_length,"N个词构成的N维向量"
        self.input_y = tf.placeholder(tf.float32, [None, num_classes], name="input_y") # input_y输入语料,待训练的内容标签,维度是num_classes,"正面 || 负面"
        self.dropout_keep_prob = tf.placeholder(tf.float32, name="dropout_keep_prob") # dropout_keep_prob dropout参数,防止过拟合,训练时用
        # Keeping track of l2 regularization loss (optional)
        l2_loss = tf.constant(0.0) # 先不用,写0
        # Embedding layer
        # 指定运算结构的运行位置在cpu非gpu,因为"embedding"无法运行在gpu
        # 通过tf.name_scope指定"embedding"
        with tf.device('/cpu:0'), tf.name_scope("embedding"): # 指定cpu
            self.W = tf.Variable(tf.random_uniform([vocab_size, embedding_size], -1.0, 1.0), name="W") # 定义W并初始化
            self.embedded_chars = tf.nn.embedding_lookup(self.W, self.input_x)
            self.embedded_chars_expanded = tf.expand_dims(self.embedded_chars, -1) # 加一个维度,转换为4维的格式
        # Create a convolution + maxpool layer for each filter size
        pooled_outputs = []
        # filter_sizes卷积核尺寸,枚举后遍历
        for i, filter_size in enumerate(filter_sizes):
            with tf.name_scope("conv-maxpool-%s" % filter_size):
                # Convolution Layer
                filter_shape = [filter_size, embedding_size, 1, num_filters] # 4个参数分别为filter_size高h,embedding_size宽w,channel为1,filter个数
                W = tf.Variable(tf.truncated_normal(filter_shape, stddev=0.1), name="W") # W进行高斯初始化
                b = tf.Variable(tf.constant(0.1, shape=[num_filters]), name="b") # b给初始化为一个常量
                conv = tf.nn.conv2d(
                    self.embedded_chars_expanded,
                    W,
                    strides=[1, 1, 1, 1],
                    padding="VALID", # 这里不需要padding
                    name="conv")
                # Apply nonlinearity 激活函数
                # 可以理解为,正面或者负面评价有一些标志词汇,这些词汇概率被增强,即一旦出现这些词汇,倾向性分类进正或负面评价,
                # 该激励函数可加快学习进度,增加稀疏性,因为让确定的事情更确定,噪声的影响就降到了最低。
                h = tf.nn.relu(tf.nn.bias_add(conv, b), name="relu")
                # Maxpooling over the outputs
                # 池化
                pooled = tf.nn.max_pool(
                    h,
                    ksize=[1, sequence_length - filter_size + 1, 1, 1], # (h-filter+2padding)/strides+1=h-f+1
                    strides=[1, 1, 1, 1],
                    padding='VALID', # 这里不需要padding
                    name="pool")
                pooled_outputs.append(pooled)

        # Combine all the pooled features
        num_filters_total = num_filters * len(filter_sizes)
        self.h_pool = tf.concat(3, pooled_outputs)
        self.h_pool_flat = tf.reshape(self.h_pool, [-1, num_filters_total]) # 扁平化数据,跟全连接层相连
        # Add dropout
        # drop层,防止过拟合,参数为dropout_keep_prob
        # 过拟合的本质是采样失真,噪声权重影响了判断,如果采样足够多,足够充分,噪声的影响可以被量化到趋近事实,也就无从过拟合。
        # 即数据越大,drop和正则化就越不需要。
        with tf.name_scope("dropout"):
            self.h_drop = tf.nn.dropout(self.h_pool_flat, self.dropout_keep_prob)

        # Final (unnormalized) scores and predictions
        # 输出层
        with tf.name_scope("output"):
            W = tf.get_variable(
                "W",
                shape=[num_filters_total, num_classes], #前面连扁平化后的池化操作
                initializer=tf.contrib.layers.xavier_initializer()) # 定义初始化方式
            b = tf.Variable(tf.constant(0.1, shape=[num_classes]), name="b")
            # 损失函数导入
            l2_loss += tf.nn.l2_loss(W)
            l2_loss += tf.nn.l2_loss(b)
            # xw+b
            self.scores = tf.nn.xw_plus_b(self.h_drop, W, b, name="scores") # 得分函数
            self.predictions = tf.argmax(self.scores, 1, name="predictions") # 预测结果

        # CalculateMean cross-entropy loss
        with tf.name_scope("loss"):
            # loss,交叉熵损失函数
            losses = tf.nn.softmax_cross_entropy_with_logits(logits=self.scores, labels=self.input_y)
            self.loss = tf.reduce_mean(losses) + l2_reg_lambda * l2_loss

        # Accuracy
        with tf.name_scope("accuracy"):
            # 准确率,求和计算算数平均值
            correct_predictions = tf.equal(self.predictions, tf.argmax(self.input_y, 1))
            self.accuracy = tf.reduce_mean(tf.cast(correct_predictions, "float"), name="accuracy")

以上就是Tensorflow深度学习CNN实现英文文本分类的详细内容,更多关于Tensorflow实现CNN分类英文文本的资料请关注我们其它相关文章!
赞 (0)

