springboot简单接入websocket的操作方法
序
最近一个项目又重启了,之前支付了要手动点击已付款,所以这次想把这个不友好体验干掉。另外以后的扫码登录什么的都需要这个服务支持。之前扫码登录这块用的mqtt,时间上是直接把mqtt的连接信息返回给前端。前端连接mqtt服务,消费信息。这次不想这样弄了,准备接入websocket。
一、环境说明
我这里是springBoot2.4.5 + springCloud2020.1.2,这里先从springBoot对接开始,逐步再增加深度,不过可能时间不够,就简单接入能满足现在业务场景就stop。没办法,从入职就开始的一个项目到现在,要死不活的,没有客户就不投入,有客户就催命,真不知道还能坚持多久。。。。。。
二、引包
<!-- websocket支持 -->
<dependency>
   <groupId>org.springframework.boot</groupId>
   <artifactId>spring-boot-starter-websocket</artifactId>
</dependency>
现在springboot对接websocket就值需要这么简单的一个包了。
三、配置类
import lombok.extern.slf4j.Slf4j;
import org.springframework.beans.factory.annotation.Value;
import org.springframework.context.annotation.Bean;
import org.springframework.context.annotation.Configuration;
import org.springframework.web.socket.server.standard.ServerEndpointExporter;

/**
 * websocket配置类
 *
 * @author zhengwen
 **/
@Slf4j
@Configuration
public class WebSocketConfig {
    @Bean
    public ServerEndpointExporter serverEndpointExporter(){
        return new ServerEndpointExporter();
    }
}
就这一个,里面的bean是用来扫描Endpoint注解的类的。
配置文件都没什么好说的,简单对接用不上,也不用什么调优。
四、websocketServer
import com.alibaba.fastjson.JSON;
import com.alibaba.fastjson.JSONObject;
import lombok.extern.slf4j.Slf4j;
import org.apache.commons.lang3.StringUtils;
import org.springframework.stereotype.Component;

import javax.websocket.*;
import javax.websocket.server.PathParam;
import javax.websocket.server.ServerEndpoint;
import java.io.IOException;
import java.util.concurrent.ConcurrentHashMap;

/**
 * @author zhengwen
 **/
@Slf4j
@Component
@ServerEndpoint("/wsPushMessage/{wsUserId}")
public class MyWebSocketSever {
    /**
     * 静态变量,用来记录当前在线连接数。应该把它设计成线程安全的。
     */
    private static int onlineCount = 0;
    /**
     * concurrent包的线程安全Set,用来存放每个客户端对应的WebSocket对象。
     */
    private static ConcurrentHashMap<String, MyWebSocketSever> webSocketMap = new ConcurrentHashMap<>();
    /**
     * 与某个客户端的连接会话,需要通过它来给客户端发送数据
     */
    private Session session;
    /**
     * 接收wsUserId
     */
    private String wsUserId = "";

    /**
     * 连接建立成
     * 功调用的方法
     */
    @OnOpen
    public void onOpen(Session session, @PathParam("wsUserId") String userId) {
        this.session = session;
        this.wsUserId = userId;
        if (webSocketMap.containsKey(userId)) {
            webSocketMap.remove(userId);
            //加入set中
            webSocketMap.put(userId, this);
        } else {
            //加入set中
            webSocketMap.put(userId, this);
            //在线数加1
            addOnlineCount();
        }
        log.info("用户连接:" + userId + ",当前在线人数为:" + getOnlineCount());
        sendMessage("连接成功");
    }

    /**
     * 连接关闭
     * 调用的方法
     */
    @OnClose
    public void onClose() {
        if (webSocketMap.containsKey(wsUserId)) {
            webSocketMap.remove(wsUserId);
            //从set中删除
            subOnlineCount();
        }
        log.info("用户退出:" + wsUserId + ",当前在线人数为:" + getOnlineCount());
    }

    /**
     * 收到客户端消
     * 息后调用的方法
     *
     * @param message 客户端发送过来的消息
     **/
    @OnMessage
    public void onMessage(String message, Session session) {
        log.info("用户消息:" + wsUserId + ",报文:" + message);
        //可以群发消息
        //消息保存到数据库、redis
        if (StringUtils.isNotBlank(message)) {
            try {
                //解析发送的报文
                JSONObject jsonObject = JSON.parseObject(message);
                //追加发送人(防止串改)
                jsonObject.put("fromUserId", this.wsUserId);
                String toUserId = jsonObject.getString("toUserId");
                //传送给对应toUserId用户的websocket
                if (StringUtils.isNotBlank(toUserId) && webSocketMap.containsKey(toUserId)) {
                    webSocketMap.get(toUserId).sendMessage(message);
                } else {
                    //否则不在这个服务器上,发送到mysql或者redis
                    log.error("请求的userId:" + toUserId + "不在该服务器上");
                }
            } catch (Exception e) {
                e.printStackTrace();
            }
        }
    }

    /**
     * @param session
     * @param error
     */
    @OnError
    public void onError(Session session, Throwable error) {

        log.error("用户错误:" + this.wsUserId + ",原因:" + error.getMessage());
        error.printStackTrace();
    }

}
核心方法就这么几个,这里面的细节可以自行根据业务场景处理,比如给信息增加一个类型,然后搞个公用方法,根据信息类型走不同业务逻辑,存库等等都可以的。
五、前端测试js
<!DOCTYPE html>
<html>
<head>
    <meta charset="utf-8">
    <title>websocket通讯</title>
</head>
<script src="https://cdn.bootcss.com/jquery/3.3.1/jquery.js"></script>
<script>
    let socket;
    function openSocket() {

        const socketUrl = "ws://localhost:8810/wsPushMessage/" + $("#userId").val();
        console.log(socketUrl);
        if(socket!=null){
            socket.close();
            socket=null;
        }
        socket = new WebSocket(socketUrl);
        //打开事件
        socket.onopen = function() {
            console.log("websocket已打开");
        };
        //获得消息事件
        socket.onmessage = function(msg) {
            console.log(msg.data);
            //发现消息进入,开始处理前端触发逻辑
        };
        //关闭事件
        socket.onclose = function() {
            console.log("websocket已关闭");
        };
        //发生了错误事件
        socket.onerror = function() {
            console.log("websocket发生了错误");
        }
    }
    function sendMessage() {

        socket.send('{"toUserId":"'+$("#toUserId").val()+'","contentText":"'+$("#contentText").val()+'"}');
        console.log('{"toUserId":"'+$("#toUserId").val()+'","contentText":"'+$("#contentText").val()+'"}');
    }
	function closeSocket(){
		socket.close();
	}
</script>
<body>
<p>【socket开启者的ID信息】:<div><input id="userId" name="userId" type="text" value="10"></div>
<p>【客户端向服务器发送的内容】:<div><input id="toUserId" name="toUserId" type="text" value="20">
    <input id="contentText" name="contentText" type="text" value="hello websocket"></div>
<p>【开启连接】:<div><a onclick="openSocket()">开启socket</a></div>
<p>【发送信息】:<div><a onclick="sendMessage()">发送消息</a></div>
<p>【关闭连接】:<div><a onclick="closeSocket()">关闭socket</a></div>
</body>

</html>
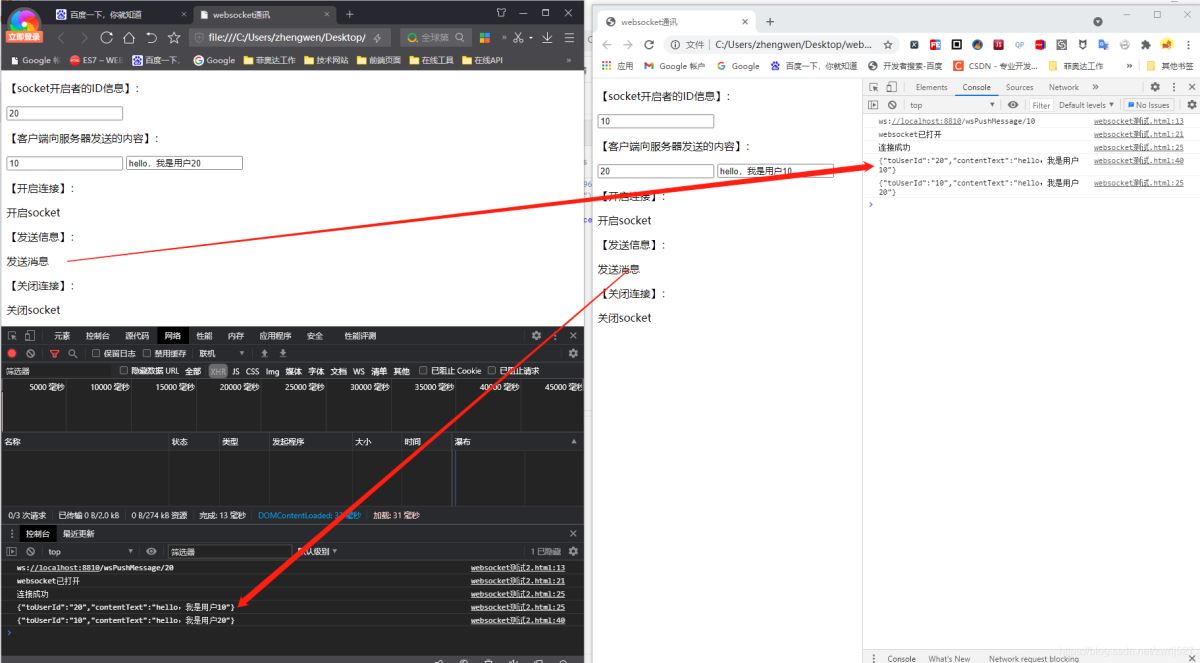
六、测试效果

到此就结束了,基本上就是这么简单,我这边发送,另一个网页上能收到,而且发送的信息都经过了websocket服务,里面可以做差异化处理哦。要存储发送记录,记录是否消费,后面再通过自动任务扫描这种未被消费(发送失败)的信息,等用户上线再次发送,实现推送信息等等。
到此这篇关于springboot简单接入websocket的方法的文章就介绍到这了,更多相关springboot接入websocket内容请搜索我们以前的文章或继续浏览下面的相关文章希望大家以后多多支持我们!
赞 (0)

