iOS自定义可展示、交互的scrollView滚动条
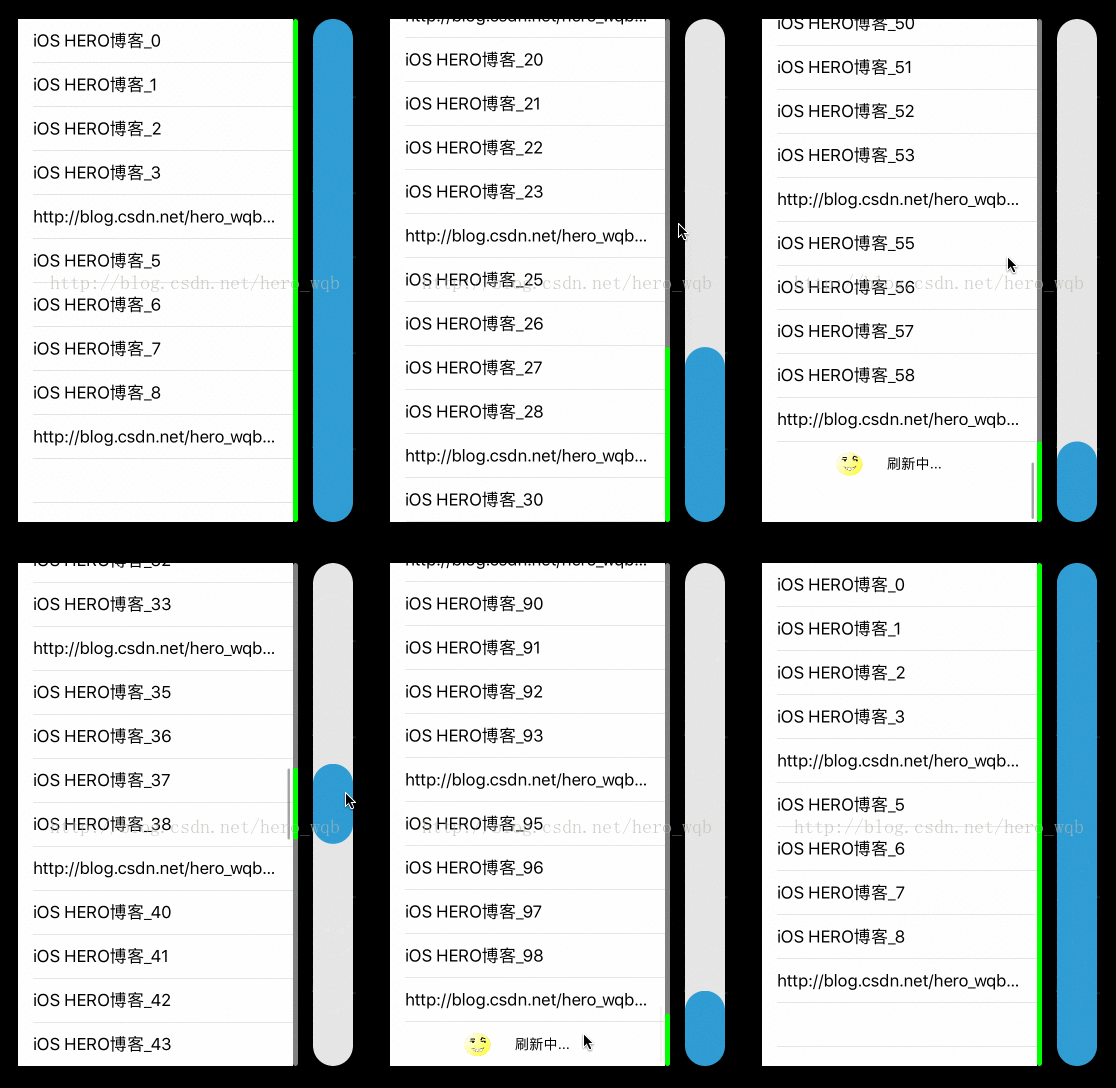
上一篇简述了封装上拉、下拉刷新控件,本篇在此基础上添加了一个自定义的scrollView滚动条,可展示、交互,首先看一下效果图:

简单阐述一下实现逻辑:自定义滚动条视图继承UIView,添加滚动条滑动事件、其他区域点击事件,通过代理方法与列表关联。在列表刷新完成及scrollView代理方法中更新滚动条。

简单说一下计算逻辑,如上图(原谅博主的图)所示,其中b、c、d是已知的。首先计算滚动条的高度a,理想情况下它与整个滚动区域b的比值应该等于scrollView的展示区域b与scrollView的内容高度d的比值,就是 a/b = b/d,即 a = b*b/d,也是就代码中的“_scrollBar.barHeight = pow(tableView.bounds.size.height,2) / tableView.contentSize.height;”这句话。
既然是理想情况,就有特殊情况,首先如果内容高度d小于展示区域b,就是说不需要滑动时,这里可以有两种处理,第一种是隐藏滚动条,第二种是将滚动条高度设为与滚动区域一致,方便观察,这里使用后一种。还有一种特殊情况就是,如果内容区域d无限增大,则滚动条高度a无限减小,所以需要给定一个最小高度限制。
好了,上面计算出滚动条高度a,然后计算滚动条Y向位置x,很容易看出来 x/b = c/d,正常情况下这是没有问题的,但是当滚动条高度非常小,小于我们设定的最小高度时就会有误差,那么换另一种写法 x/(b-a) = c/(d-b),即 x = (b-a)*c/(d-b),代码中“_scrollBar.yPosition = (_scrollBar.bounds.size.height - _scrollBar.barHeight) *_tableView.contentOffset.y / (_tableView.contentSize.height -_scrollBar.bounds.size.height);”这句话。那么在scrollView代理方法中更新这两项就实现了滚动条高度根据scrollView内容增减,并根据scrollView滑动而移动。
最后在我们自定义滚动条的代理方法中设置scrollView的contentOffset,即可实现scrollView随着滚动条的点击滑动而移动。计算方法与上面一致 x/(b-a) = c/(d-b),区别是这次动条Y向位置x是已知的,scrollView的Y向偏移量c是未知的,即 c = (d-b)*x/(b-a),代码中“[_tableViewsetContentOffset:CGPointMake(0, (_tableView.contentSize.height -_scrollBar.bounds.size.height) * scrollBar.yPosition / (_scrollBar.bounds.size.height - _scrollBar.barHeight))];”这句话。
下面贴上相关代码:
控制器ViewController:
#import <UIKit/UIKit.h>

@interface ViewController : UIViewController

@end

/*** ---------------分割线--------------- ***/

#import "ViewController.h"
#import "HWRefresh.h"
#import "HWScrollBar.h"

@interface ViewController ()<UITableViewDataSource, UITableViewDelegate, HWScrollBarDelegate>

@property (nonatomic, strong) NSMutableArray *array;
@property (nonatomic, strong) UITableView *tableView;
@property (nonatomic, weak) HWScrollBar *scrollBar;
@property (nonatomic, weak) HWScrollBar *tableBar;
@property (nonatomic, assign) NSInteger page;

@end

@implementation ViewController

- (NSMutableArray *)array
{
 if (!_array) {
 _array = [NSMutableArray array];
 }

 return _array;
}

- (void)viewDidLoad {
 [super viewDidLoad];

 self.view.backgroundColor = [UIColor blackColor];
 self.page = 1;

 //模拟获取信息
 [self getInfo];

 //创建控件
 [self creatControl];

 //添加头部刷新
 [self addHeaderRefresh];

 //添加尾部刷新
 [self addFooterRefresh];
}

- (void)getInfo
{
 NSArray *array = @[@"iOS HERO博客", @"iOS HERO博客", @"iOS HERO博客", @"iOS HERO博客", @"http://blog.csdn.net/hero_wqb", @"iOS HERO博客", @"iOS HERO博客", @"iOS HERO博客", @"iOS HERO博客", @"http://blog.csdn.net/hero_wqb"];
 dispatch_after(dispatch_time(DISPATCH_TIME_NOW, (int64_t)(1.0f * NSEC_PER_SEC)), dispatch_get_main_queue(), ^{
 if (self.page == 1) {
 self.array = [NSMutableArray arrayWithArray:array];
 }else{
 [self.array addObjectsFromArray:array];
 }
 [_tableView reloadData];
 [_tableView headerEndRefreshing];
 [_tableView footerEndRefreshing];
 NSLog(@"已经刷新好了");
 });
}

- (void)creatControl
{
 //列表视图
 _tableView = [[UITableView alloc] initWithFrame:CGRectMake(20, 64, [[UIScreen mainScreen] bounds].size.width - 100, [[UIScreen mainScreen] bounds].size.height - 164) style:UITableViewStylePlain];
 _tableView.dataSource = self;
 _tableView.delegate = self;
 [self.view addSubview:_tableView];

 //滚动展示条
 HWScrollBar *tableBar = [[HWScrollBar alloc] initWithFrame:CGRectMake(CGRectGetMaxX(_tableView.frame), CGRectGetMinY(_tableView.frame), 5, _tableView.bounds.size.height)];
 tableBar.foreColor = [UIColor greenColor];
 tableBar.backColor = [UIColor grayColor];
 tableBar.userInteractionEnabled = NO;
 [self.view addSubview:tableBar];
 _tableBar = tableBar;

 //滚动条
 HWScrollBar *scrollBar = [[HWScrollBar alloc] initWithFrame:CGRectMake(CGRectGetMaxX(_tableView.frame) + 20, CGRectGetMinY(_tableView.frame), 40, _tableView.bounds.size.height)];
 scrollBar.delegate = self;
 scrollBar.minBarHeight = 80;
 [self.view addSubview:scrollBar];
 _scrollBar = scrollBar;
}

- (void)addHeaderRefresh
{
 __weak typeof(self) weakSelf = self;
 [_tableView addHeaderRefreshWithCallback:^{
 __strong typeof(weakSelf) strongSelf = weakSelf;
 strongSelf.page = 1;
 [strongSelf getInfo];
 }];
}

- (void)addFooterRefresh
{
 __weak typeof(self) weakSelf = self;
 [_tableView addFooterRefreshWithCallback:^{
 __strong typeof(weakSelf) strongSelf = weakSelf;
 strongSelf.page ++;
 [strongSelf getInfo];
 }];
}

#pragma mark - UITableViewDataSource
- (NSInteger)tableView:(UITableView *)tableView numberOfRowsInSection:(NSInteger)section
{
 return self.array.count;
}

- (UITableViewCell *)tableView:(UITableView *)tableView cellForRowAtIndexPath:(NSIndexPath *)indexPath
{
 static NSString *identifier = @"refreshTest";
 UITableViewCell *cell = [tableView dequeueReusableCellWithIdentifier:identifier];
 if (!cell) {
 cell = [[UITableViewCell alloc] initWithStyle:UITableViewCellStyleDefault reuseIdentifier:identifier];
 }
 cell.textLabel.text = [_array[indexPath.row] stringByAppendingString:[NSString stringWithFormat:@"_%ld", indexPath.row]];

 return cell;
}

- (void)tableView:(UITableView *)tableView willDisplayCell:(UITableViewCell *)cell forRowAtIndexPath:(NSIndexPath *)indexPath
{
 dispatch_after(dispatch_time(DISPATCH_TIME_NOW, (int64_t)(0.1f * NSEC_PER_SEC)), dispatch_get_main_queue(), ^{
 //更新滚动条高度
 if (tableView.contentSize.height <= tableView.bounds.size.height) {
 _scrollBar.barHeight = tableView.bounds.size.height;
 _tableBar.barHeight = tableView.bounds.size.height;
 }else {
 _scrollBar.barHeight = pow(tableView.bounds.size.height, 2) / tableView.contentSize.height;
 _tableBar.barHeight = pow(tableView.bounds.size.height, 2) / tableView.contentSize.height;
 }

 //更新滚动条Y向位置
 _scrollBar.yPosition = (_scrollBar.bounds.size.height - _scrollBar.barHeight) * _tableView.contentOffset.y / (_tableView.contentSize.height - _scrollBar.bounds.size.height);
 _tableBar.yPosition = (_tableBar.bounds.size.height - _tableBar.barHeight) * _tableView.contentOffset.y / (_tableView.contentSize.height - _tableBar.bounds.size.height);
 });
}

- (void)scrollViewDidScroll:(UIScrollView *)scrollView
{
 //滑动到底部自动刷新
 if (_tableView.contentSize.height > _tableView.frame.size.height && _tableView.contentOffset.y + _tableView.frame.size.height > _tableView.contentSize.height - 40 && _page < 50) {
 [_tableView footerBeginRefreshing];
 }

 //更新滚动条位置
 _scrollBar.yPosition = (_scrollBar.bounds.size.height - _scrollBar.barHeight) * scrollView.contentOffset.y / (scrollView.contentSize.height - _scrollBar.bounds.size.height);
 _tableBar.yPosition = (_tableBar.bounds.size.height - _tableBar.barHeight) * scrollView.contentOffset.y / (scrollView.contentSize.height - _tableBar.bounds.size.height);
}

#pragma mark - SXScrollBarDelegate
- (void)scrollBarDidScroll:(HWScrollBar *)scrollBar
{
 [_tableView setContentOffset:CGPointMake(0, (_tableView.contentSize.height - _scrollBar.bounds.size.height) * scrollBar.yPosition / (_scrollBar.bounds.size.height - _scrollBar.barHeight))];
}

- (void)scrollBarTouchAction:(HWScrollBar *)scrollBar
{
 [UIView animateWithDuration:scrollBar.barMoveDuration animations:^{
 [_tableView setContentOffset:CGPointMake(0, (_tableView.contentSize.height - _scrollBar.bounds.size.height) * scrollBar.yPosition / (_scrollBar.bounds.size.height - _scrollBar.barHeight))];
 }];
}

@end
自定义滚动条HWScrollBar:
#import <UIKit/UIKit.h>

@class HWScrollBar;

@protocol HWScrollBarDelegate <NSObject>

//滚动条滑动代理事件
- (void)scrollBarDidScroll:(HWScrollBar *)scrollBar;

//滚动条点击代理事件
- (void)scrollBarTouchAction:(HWScrollBar *)scrollBar;

@end

@interface HWScrollBar : UIView

//背景色
@property (nonatomic, strong) UIColor *backColor;

//前景色
@property (nonatomic, strong) UIColor *foreColor;

//滚动动画时长
@property (nonatomic, assign) CGFloat barMoveDuration;

//限制滚动条最小高度
@property (nonatomic, assign) CGFloat minBarHeight;

//滚动条实际高度
@property (nonatomic, assign) CGFloat barHeight;

//滚动条Y向位置
@property (nonatomic, assign) CGFloat yPosition;

//代理
@property (nonatomic, weak) id<HWScrollBarDelegate> delegate;

@end

/*** ---------------分割线--------------- ***/

#import "HWScrollBar.h"
#import "UIColor+HW.h"

@interface HWScrollBar ()

@property (nonatomic, weak) UIView *scrollBar;
@property (nonatomic, weak) UIView *backView;

@end

@implementation HWScrollBar

- (instancetype)initWithFrame:(CGRect)frame
{
 if (self = [super initWithFrame:frame]) {
 //初始化设置
 [self initInfo];

 //创建控件
 [self creatControl];

 //添加手势
 [self addSwipeGesture];
 }

 return self;
}

- (void)initInfo
{
 _minBarHeight = 40.0f;
 _barMoveDuration = 0.25f;
 _foreColor = [UIColor colorWithHexString:@"#2f9cd4"];
 _backColor = [UIColor colorWithHexString:@"#e6e6e6"];

 self.layer.cornerRadius = self.bounds.size.width * 0.5;
 self.layer.masksToBounds = YES;
 self.backgroundColor = _backColor;
}

- (void)creatControl
{
 //背景视图
 UIView *backView = [[UIView alloc] initWithFrame:self.bounds];
 [self addSubview:backView];
 _backView = backView;

 //滚动条
 UIView *scrollBar = [[UIView alloc] initWithFrame:CGRectMake(0, 0, self.bounds.size.width, self.bounds.size.height)];
 scrollBar.backgroundColor = _foreColor;
 scrollBar.layer.cornerRadius = self.bounds.size.width * 0.5;
 scrollBar.layer.masksToBounds = YES;
 [self addSubview:scrollBar];
 _scrollBar = scrollBar;
}

- (void)addSwipeGesture
{
 //添加点击手势
 UITapGestureRecognizer *tap = [[UITapGestureRecognizer alloc] initWithTarget:self action:@selector(handleTap:)];
 [_backView addGestureRecognizer:tap];

 //添加滚动条滑动手势
 UIPanGestureRecognizer *pan = [[UIPanGestureRecognizer alloc] initWithTarget:self action:@selector(handlePan:)];
 [_scrollBar addGestureRecognizer:pan];
}

- (void)setForeColor:(UIColor *)foreColor
{
 _foreColor = foreColor;

 _scrollBar.backgroundColor = _foreColor;
}

- (void)setBackColor:(UIColor *)backColor
{
 _backColor = backColor;

 self.backgroundColor = backColor;
}

- (void)setBarHeight:(CGFloat)barHeight
{
 _barHeight = barHeight > _minBarHeight ? barHeight : _minBarHeight;

 CGRect temFrame = _scrollBar.frame;
 temFrame.size.height = _barHeight;
 _scrollBar.frame = temFrame;
}

- (void)setYPosition:(CGFloat)yPosition
{
 _yPosition = yPosition;

 CGRect temFrame = _scrollBar.frame;
 temFrame.origin.y = yPosition;
 _scrollBar.frame = temFrame;
}

- (void)handlePan:(UIPanGestureRecognizer *)sender
{
 //获取偏移量
 CGFloat moveY = [sender translationInView:self].y;

 //重置偏移量,避免下次获取到的是原基础的增量
 [sender setTranslation:CGPointMake(0, 0) inView:self];

 //在顶部上滑或底部下滑直接返回
 if ((_yPosition <= 0 && moveY <= 0) || (_yPosition >= self.bounds.size.height - _barHeight && moveY >= 0)) return;

 //赋值
 self.yPosition += moveY;

 //防止瞬间大偏移量滑动影响显示效果
 if (_yPosition < 0) self.yPosition = 0;
 if (_yPosition > self.bounds.size.height - _barHeight && moveY >= 0) self.yPosition = self.bounds.size.height - _barHeight;

 //代理
 if (_delegate && [_delegate respondsToSelector:@selector(scrollBarDidScroll:)]) {
 [_delegate scrollBarDidScroll:self];
 }
}

- (void)handleTap:(UITapGestureRecognizer *)sender
{
 //点击滚动条返回
 if (sender.view == _scrollBar) return;

 //获取点击的位置
 CGFloat positionY = [sender locationInView:self].y;

 //赋值
 [UIView animateWithDuration:_barMoveDuration animations:^{
 self.yPosition = positionY > _yPosition ? positionY - _barHeight : positionY;
 }];

 //代理
 if (_delegate && [_delegate respondsToSelector:@selector(scrollBarTouchAction:)]) {
 [_delegate scrollBarTouchAction:self];
 }
}

@end
Demo 下载链接
猜你喜欢:自定义水平滚动条、进度条。
以上就是本文的全部内容,希望对大家的学习有所帮助,也希望大家多多支持我们。

