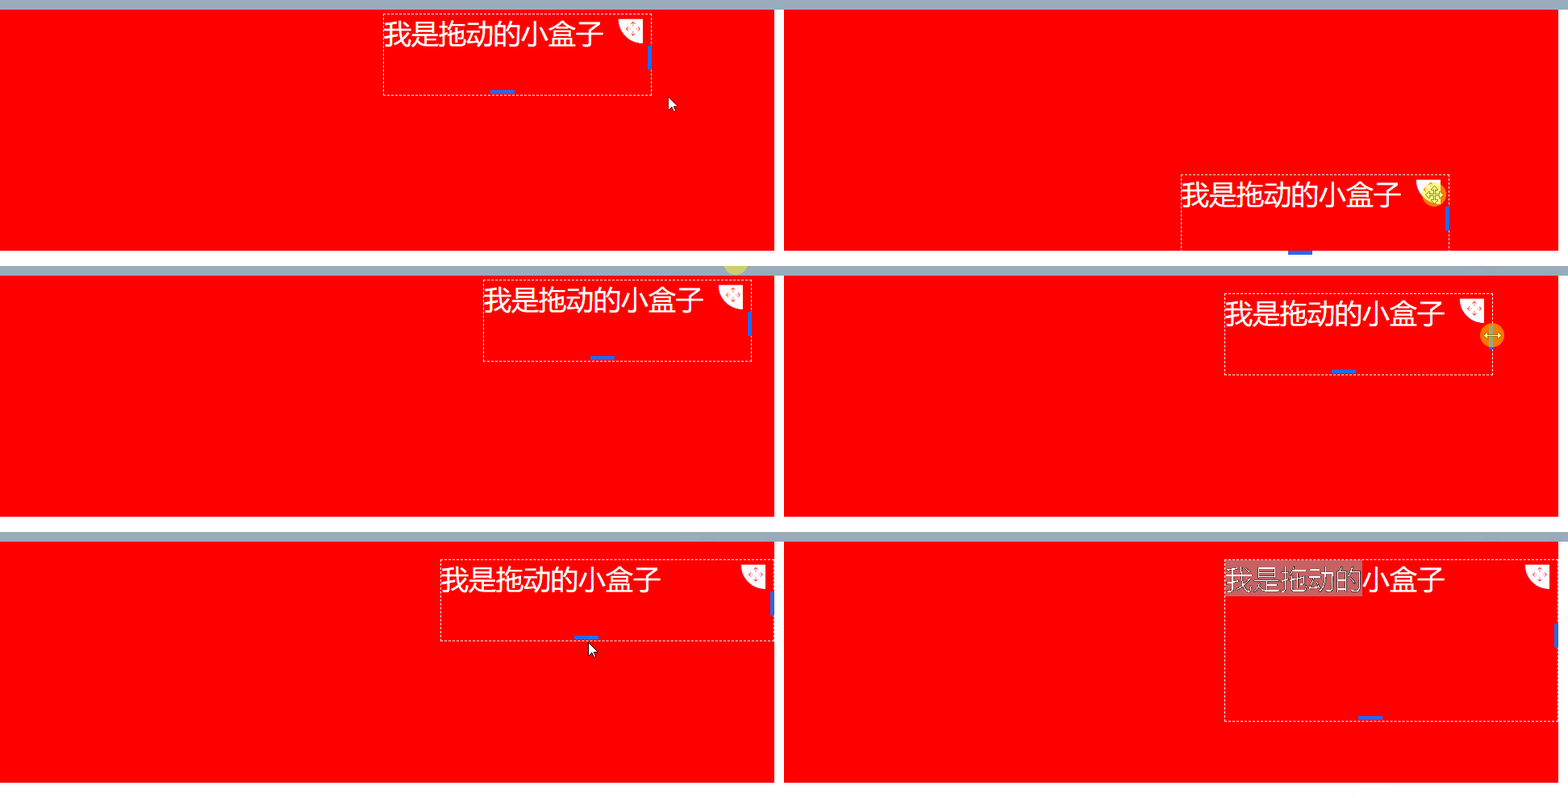
vue实现div可拖动位置也可改变盒子大小的原理
以下是效果图:实现了div盒子在固定区域的拖动,也可改变盒子的高度和宽度,当超出边距后无法继续改变大小

这里说一下大致原理:拖动和改变大小是分开来操作的,接下来分别说一下
盒子拖动
这里用到了js的三个鼠标事件,分别是onmousedown(鼠标按下)、onmousemove(鼠标移动)以及onmouseup(鼠标松开),大致流程就是鼠标按下拖动图标进行拖动时,动态获取当前div的left和top再重新赋值给当前div的top、left值,当鼠标松开再清除事件,至于固定在某个区域内拖动,在赋值的时候判断当前top及left值是否超过限制区域的值,如果超过给最大值最小值
盒子改变大小
这里用到的也是盒子拖动的三个事件,当鼠标移入盒子左边框触发mousemove事件,动态计算盒子宽度重新赋值,鼠标松开注销mousrmove事件,我将宽度和高度改变分别封装了组件,用的时候直接调用就好
博主用的vue写的,这里展示的也是铜鼓vue书写的,其他都是大同小异,知道原理就好
// index.vue
<template>
 <!-- demo -->
 <div class="demo" id="maxBoxId">
  <div
   :id="moveInfo.dragId"
   :style="
    'width:' +
    moveInfo.width +
    'px; left:' +
    moveInfo.coordinate.x +
    'px; top:' +
    moveInfo.coordinate.y +
    'px; height:' +
    moveInfo.height +
    'px'
   "
   class="drag-class"
  >
   <div class="drag-content">
    <div class="content-text">
     <!-- 拖拽图标 -->
     <div class="drag-icon">
      <i
       class="iconfont icon-tuodong1 down-dragger"
       @mousedown.stop="dragDiv($event)"
       @mouseup.stop="dragUp($event)"
      ></i>
     </div>
     {{ moveInfo.text }}
    </div>
    <!-- 宽度改变组件 -->
    <ChangeWidth :moveId="moveInfo.moveId" index="0" @widthChange="changeWidth" @clearEvent="clearEvent" />
    <!-- 高度改变组件 -->
    <ChangeHeight :moveId="moveInfo.moveId" index="1" @heightChange="heightChange" @clearEvent="clearEvent" />
   </div>
  </div>
 </div>
</template>

<script>
import ChangeWidth from '../component/ChangeWidth'
import ChangeHeight from '../component/ChangeHeight'
export default {
 components: { ChangeWidth, ChangeHeight },
 name: 'demo',
 data() {
  return {
   moveInfo: {
    dragId: 'smallDragBoxId',
    moveId: 'smallMoveBoxId',
    text: '我是拖动的小盒子',
    width: 400,
    height: 100,
    // 上边距和左边距
    coordinate: {
     x: 180,
     y: 10
    }
   }
  }
 },
 methods: {
  // 区块拖动
  dragDiv(el, index) {
   // dragId: 可拖动区域唯一标识
   // moveId: 改变宽度组件唯一标识
   const { dragId, coordinate } = this.moveInfo
   let obig = document.getElementById('maxBoxId')
   let osmall = document.getElementById(dragId)
   // 用于保存小的div拖拽前的坐标
   osmall.startX = el.clientX - osmall.offsetLeft
   osmall.startY = el.clientY - osmall.offsetTop
   document.onmousemove = e => {
    let left, top
    left = e.clientX - osmall.startX
    top = e.clientY - osmall.startY
    osmall.style.left = left + 'px'
    osmall.style.top = top + 'px'
    coordinate.x = left
    coordinate.y = top
    if (left <= 0) {
     osmall.style.left = 0 + 'px'
     coordinate.x = 0
    }
    if (top <= 0) {
     osmall.style.top = 0 + 'px'
     coordinate.y = 0
    }
    if (left >= obig.offsetWidth - osmall.offsetWidth) {
     osmall.style.left = obig.offsetWidth - osmall.offsetWidth + 'px'
     coordinate.x = obig.offsetWidth - osmall.offsetWidth
    }
    if (top >= obig.offsetHeight - osmall.offsetHeight) {
     osmall.style.top = obig.offsetHeight - osmall.offsetHeight + 'px'
     coordinate.y = obig.offsetHeight - osmall.offsetHeight
    }
   }
  },
  dragUp(el) {
   document.onmousemove = null
   document.onmouseup = null
   // 调用接口保存数据
  },
  // 改变drag宽度尺寸
  changeWidth(params) {
   const { index, width } = params
   let left
   const { dragId } = this.moveInfo
   // let obig = document.getElementById('maxBoxId')

   let osmall = document.getElementById(dragId)
   let boxWidth = document.getElementById('maxBoxId').offsetWidth
   left = osmall.style.left
   const newWidth = this.moveInfo.width + width
   // outWidth拖动宽度时超出box的宽度
   const outWidth = Number(left.slice(0, left.length - 2)) + Number(newWidth) - Number(boxWidth)
   // 如果超出box将截取留下的
   if (outWidth >= 0) {
    this.moveInfo.width = Number(boxWidth) - Number(left.slice(0, left.length - 2))
   } else {
    this.moveInfo.width = newWidth
   }
   // 设置div的最小宽度和最大宽度
   if (this.moveInfo.width < 200) {
    this.moveInfo.width = 200
   }
   if (this.moveInfo.width > 900) {
    this.moveInfo.width = 900
   }
  },
  // 改变drag高度
  heightChange(params) {
   const { index, height } = params
   let top
   let osmall = document.getElementById(this.moveInfo.dragId)
   let boxHeight = document.getElementById('maxBoxId').offsetHeight
   top = osmall.style.top
   const newHeight = this.moveInfo.height + height
   // outHeight拖动宽度时超出box的高度
   const outHeight = Number(top.slice(0, top.length - 2)) + Number(newHeight) - Number(boxHeight)
   // 如果超出box将截取留下的
   if (outHeight >= 0) {
    this.moveInfo.height = Number(boxHeight) - Number(top.slice(0, top.length - 2))
   } else {
    this.moveInfo.height = newHeight
   }
   // 设置div的最小宽度和最大宽度
   if (this.moveInfo.height < 100) {
    this.moveInfo.height = 100
   }
   if (this.moveInfo.height > 200) {
    this.moveInfo.height = 200
   }
  },
  // 清除鼠标事件
  clearEvent() {
   document.onmousemove = null
   document.onmouseup = null
  }
 }
}
</script>
<style lang="scss" scoped>
.demo {
 position: relative;
 width: 100%;
 z-index: 10;
 width: 1200px;
 background: red;
 height: 300px;
 margin-bottom: 1000px;
 margin-left: 100px;
 .drag-class {
  background: rgba(255, 255, 255, 0);
  position: absolute;
  .drag-content {
   position: relative;
   height: 100%;
   .content-text {
    border: 1px dashed #ffffff;
    font-size: 34px;
    color: #ffffff;
    margin-top: 5px;
    position: relative;
    height: 100%;
    .drag-icon {
     position: absolute;
     right: 10px;
     top: 5px;
     float: left;
     // margin-right: 10px;
     .down-dragger {
      cursor: move;
      font-size: 30px;
      color: #dbdce0;
      color: #ffffff;
     }
    }
   }
  }
 }
}
</style>
以下是改变大小的组件
<template>
 <!-- 拖动右边距改变div宽度 -->
 <div :id="`width${moveId}`" class="x-handle" @mousedown="mouseDown"></div>
</template>

<script>
export default {
 name: 'ChangeWidth',
 props: ['index', 'moveId'],
 data() {
  return {
   lastX: ''
  }
 },

 created() {
  document.addEventListener('mouseup', this.mouseUp)
 },

 destroyed() {
  document.removeEventListener('mouseup', this.mouseUp)
 },

 methods: {
  mouseDown(event) {
   document.addEventListener('mousemove', this.mouseMove)
   this.lastX = event.screenX
  },
  mouseMove(e) {
   this.$emit('widthChange', { width: e.screenX - this.lastX, index: this.index })
   this.lastX = e.screenX
  },
  mouseUp() {
   this.lastX = ''
   document.removeEventListener('mousemove', this.mouseMove)
   this.$emit('clearEvent')
  }
 }
}
</script>
<style lang="less" scoped>
.x-handle {
 width: 5px;
 cursor: e-resize;
 background: #2866f0;
 height: 30px;
 position: absolute;
 right: 0;
 top: 40%;
}
</style>
改变高度的组件原理和宽度一样,避免代码重复就不上传了
上面就是大致流程和源码。
总结
到此这篇关于vue实现div可拖动位置也可改变盒子大小的文章就介绍到这了,更多相关vue 实现div拖动位置内容请搜索我们以前的文章或继续浏览下面的相关文章希望大家以后多多支持我们!
赞 (0)

