Android本地实现搜索历史记录
本文实例为大家分享了Android本地实现搜索历史记录的具体代码,供大家参考,具体内容如下
一.自定义搜索历史记录
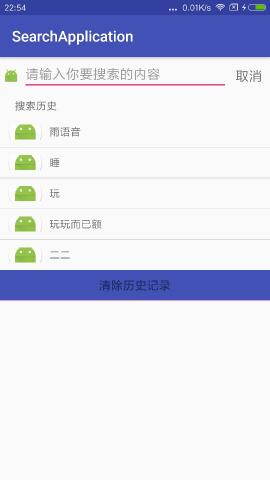
本地实现搜索历史记录有很多种方法,下面不多说了,我们来用SQLite来实现此功能,直接上完整代码:点击下载源码
效果一:


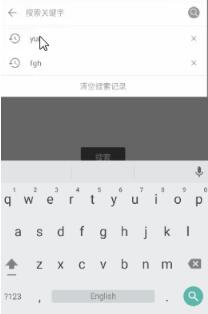
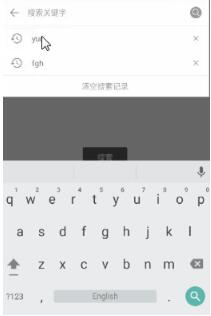
效果二:

1.MainActivity主函数
package com.example.administrator.searchapplication;

import android.support.v7.app.AppCompatActivity;
import android.os.Bundle;
import android.text.Editable;
import android.text.TextWatcher;
import android.view.KeyEvent;
import android.view.LayoutInflater;
import android.view.View;
import android.view.inputmethod.EditorInfo;
import android.widget.AdapterView;
import android.widget.EditText;
import android.widget.LinearLayout;
import android.widget.ListView;
import android.widget.TextView;
import android.widget.Toast;

import java.util.ArrayList;
import java.util.List;

public class MainActivity extends AppCompatActivity implements View.OnClickListener{

 private EditText searchContentEt;
 private SearchRecordsAdapter recordsAdapter;
 private View recordsHistoryView;
 private ListView recordsListLv;
 private TextView clearAllRecordsTv;
 private LinearLayout searchRecordsLl;

 private List<String> searchRecordsList;
 private List<String> tempList;
 private RecordsDao recordsDao;
 private TextView tv_history;

 @Override
 protected void onCreate(Bundle savedInstanceState) {
 super.onCreate(savedInstanceState);
 setContentView(R.layout.activity_main);
 initView();
 initData();
 bindAdapter();
 initListener();
 }
 private void initView() {
// setHideHeader();
 initRecordsView();

 searchRecordsLl = (LinearLayout) findViewById(R.id.search_content_show_ll);
 searchContentEt = (EditText) findViewById(R.id.input_search_content_et);
 tv_history = (TextView) findViewById(R.id.tv_history);

 //添加搜索view
 searchRecordsLl.addView(recordsHistoryView);

 }

 //初始化搜索历史记录View
 private void initRecordsView() {
 recordsHistoryView = LayoutInflater.from(this).inflate(R.layout.search_lishi, null);
 //显示历史记录lv
 recordsListLv = (ListView) recordsHistoryView.findViewById(R.id.search_records_lv);
 //清除搜索历史记录
 clearAllRecordsTv = (TextView) recordsHistoryView.findViewById(R.id.clear_all_records_tv);
 }

 private void initData() {
 recordsDao = new RecordsDao(this);
 searchRecordsList = new ArrayList<>();
 tempList = new ArrayList<>();
 tempList.addAll(recordsDao.getRecordsList());

 reversedList();
 //第一次进入判断数据库中是否有历史记录,没有则不显示
 checkRecordsSize();
 }

 private void bindAdapter() {
 recordsAdapter = new SearchRecordsAdapter(this, searchRecordsList);
 recordsListLv.setAdapter(recordsAdapter);
 }

 private void initListener() {
 clearAllRecordsTv.setOnClickListener(this);
 searchContentEt.setOnEditorActionListener(new TextView.OnEditorActionListener() {

  @Override
  public boolean onEditorAction(TextView v, int actionId, KeyEvent event) {
  if (actionId == EditorInfo.IME_ACTION_SEARCH) {
   if (searchContentEt.getText().toString().length() > 0) {

   String record = searchContentEt.getText().toString();

   //判断数据库中是否存在该记录
//   if (!recordsDao.isHasRecord(record)) {
//    tempList.add(record);
//   }
   //将搜索记录保存至数据库中
   recordsDao.addRecords(record);
//   reversedList();
//   checkRecordsSize();
//   recordsAdapter.notifyDataSetChanged();
   Toast.makeText(MainActivity.this, "11",Toast.LENGTH_SHORT).show();
   //根据关键词去搜索

   } else {
   Toast.makeText(MainActivity.this, "搜索内容不能为空",Toast.LENGTH_SHORT).show();
   }
  }
  return false;
  }
 });

 //根据输入的信息去模糊搜索
 searchContentEt.addTextChangedListener(new TextWatcher() {
  @Override
  public void beforeTextChanged(CharSequence s, int start, int count, int after) {

  }

  @Override
  public void onTextChanged(CharSequence s, int start, int before, int count) {

  }

  @Override
  public void afterTextChanged(Editable s) {
  if (s.toString().trim().length() == 0) {
   tv_history.setText("搜索历史");
  } else {
   tv_history.setText("搜索结果");
  }
  String tempName = searchContentEt.getText().toString();
  tempList.clear();
  tempList.addAll(recordsDao.querySimlarRecord(tempName));
  reversedList();
  checkRecordsSize();
  recordsAdapter.notifyDataSetChanged();
  }
 });
 //历史记录点击事件
 recordsListLv.setOnItemClickListener(new AdapterView.OnItemClickListener() {
  @Override
  public void onItemClick(AdapterView<?> parent, View view, int position, long id) {
  //将获取到的字符串传到搜索结果界面
  //点击后搜索对应条目内容
//  searchContentEt.setText(searchRecordsList.get(position));
  Toast.makeText(MainActivity.this,searchRecordsList.get(position)+"",Toast.LENGTH_SHORT).show();
  searchContentEt.setSelection(searchContentEt.length());
  }
 });
 }

 //当没有匹配的搜索数据的时候不显示历史记录栏
 private void checkRecordsSize(){
 if(searchRecordsList.size() == 0){
  searchRecordsLl.setVisibility(View.GONE);
 }else{
  searchRecordsLl.setVisibility(View.VISIBLE);
 }
 }

 @Override
 public void onClick(View v) {
 switch (v.getId()){
  //清空所有历史数据
  case R.id.clear_all_records_tv:
  tempList.clear();
  reversedList();
  recordsDao.deleteAllRecords();
  recordsAdapter.notifyDataSetChanged();
  searchRecordsLl.setVisibility(View.GONE);
  searchContentEt.setHint("请输入你要搜索的内容");
  break;
 }
 }

 //颠倒list顺序,用户输入的信息会从上依次往下显示
 private void reversedList(){
 searchRecordsList.clear();
 for(int i = tempList.size() - 1 ; i >= 0 ; i --) {
  searchRecordsList.add(tempList.get(i));
 }
 }
}
2.SearchRecordsAdapter适配器
package com.example.administrator.searchapplication;

/**
 * Created by Administrator on 2018/2/11.
 */

import android.content.Context;
import android.view.LayoutInflater;
import android.view.View;
import android.view.ViewGroup;
import android.widget.BaseAdapter;
import android.widget.TextView;

import java.util.List;

/**
 * Created by 05 on 2016/7/27.
 */
public class SearchRecordsAdapter extends BaseAdapter {

 private Context context;
 private List<String> searchRecordsList;
 private LayoutInflater inflater;

 public SearchRecordsAdapter(Context context, List<String> searchRecordsList) {
 this.context = context;
 this.searchRecordsList = searchRecordsList;
 inflater = LayoutInflater.from(context);
 }

 @Override
 public int getCount() {
 //设置listView的显示条目数量为5
 return searchRecordsList.size() > 5 ? 5 : searchRecordsList.size();
 }

 @Override
 public Object getItem(int position) {
 return searchRecordsList.size() == 0 ? null : searchRecordsList.get(position);
 }

 @Override
 public long getItemId(int position) {
 return position;
 }

 @Override
 public View getView(int position, View convertView, ViewGroup parent) {
 ViewHolder viewHolder;
 if(null == convertView){
  viewHolder = new ViewHolder();
  convertView = inflater.inflate(R.layout.list_item,null);
  viewHolder.recordTv = (TextView) convertView.findViewById(R.id.search_content_tv);

  convertView.setTag(viewHolder);
 }else{
  viewHolder = (ViewHolder) convertView.getTag();
 }

 String content = searchRecordsList.get(position);
 viewHolder.recordTv.setText(content);

 return convertView;
 }

 private class ViewHolder {
 TextView recordTv;
 }
}
3.RecordSQLiteOpenHelper
package com.example.administrator.searchapplication;

/**
 * Created by Administrator on 2018/2/11.
 */

import android.content.Context;
import android.database.sqlite.SQLiteDatabase;
import android.database.sqlite.SQLiteOpenHelper;

/**
 * 搜索记录帮助类
 * Created by 05 on 2016/7/27.
 */
public class RecordSQLiteOpenHelper extends SQLiteOpenHelper {

 private final static String DB_NAME = "temp.db";
 private final static int DB_VERSION = 1;

 public RecordSQLiteOpenHelper(Context context) {
 super(context, DB_NAME, null, DB_VERSION);
 }

 @Override
 public void onCreate(SQLiteDatabase db) {
 String sqlStr = "CREATE TABLE IF NOT EXISTS records (_id INTEGER PRIMARY KEY AUTOINCREMENT, name TEXT);";
 db.execSQL(sqlStr);
 }

 @Override
 public void onUpgrade(SQLiteDatabase db, int oldVersion, int newVersion) {

 }
}
4.RecordsDao
package com.example.administrator.searchapplication;

/**
 * Created by Administrator on 2018/2/11.
 */

import android.content.ContentValues;
import android.content.Context;
import android.database.Cursor;
import android.database.sqlite.SQLiteDatabase;

import java.util.ArrayList;
import java.util.List;

/**
 * 搜索记录操作类
 * Created by 05 on 2016/7/27.
 */
public class RecordsDao {
 RecordSQLiteOpenHelper recordHelper;

 SQLiteDatabase recordsDb;

 public RecordsDao(Context context) {
 recordHelper = new RecordSQLiteOpenHelper(context);
 }

 //添加搜索记录
 public void addRecords(String record) {

 if (!isHasRecord(record)) {
  recordsDb = recordHelper.getReadableDatabase();
  ContentValues values = new ContentValues();
  values.put("name", record);
  //添加
  recordsDb.insert("records", null, values);
  //关闭
  recordsDb.close();
 }
 }

 //判断是否含有该搜索记录
 public boolean isHasRecord(String record) {
 boolean isHasRecord = false;
 recordsDb = recordHelper.getReadableDatabase();
 Cursor cursor = recordsDb.query("records", null, null, null, null, null, null);
 while (cursor.moveToNext()) {
  if (record.equals(cursor.getString(cursor.getColumnIndexOrThrow("name")))) {
  isHasRecord = true;
  }
 }
 //关闭数据库
 recordsDb.close();
 cursor.close();
 return isHasRecord;
 }

 //获取全部搜索记录
 public List<String> getRecordsList() {
 List<String> recordsList = new ArrayList<>();
 recordsDb = recordHelper.getReadableDatabase();
 Cursor cursor = recordsDb.query("records", null, null, null, null, null, null);
 while (cursor.moveToNext()) {
  String name = cursor.getString(cursor.getColumnIndexOrThrow("name"));
  recordsList.add(name);
 }
 //关闭数据库
 recordsDb.close();
 cursor.close();
 return recordsList;
 }

 //模糊查询
 public List<String> querySimlarRecord(String record){
 String queryStr = "select * from records where name like '%" + record + "%' order by name ";
 List<String> similarRecords = new ArrayList<>();
 Cursor cursor= recordHelper.getReadableDatabase().rawQuery(queryStr,null);

 while (cursor.moveToNext()) {
  String name = cursor.getString(cursor.getColumnIndexOrThrow("name"));
  similarRecords.add(name);
 }

 cursor.close();
 return similarRecords;
 }

 //清空搜索记录
 public void deleteAllRecords() {
 recordsDb = recordHelper.getWritableDatabase();
 recordsDb.execSQL("delete from records");

 recordsDb.close();
 }
 // 删除
 public int delete(int _id) {

 SQLiteDatabase db = recordHelper.getWritableDatabase();
 int d = db.delete("records", "_id=?", new String[] { _id + "" });

 db.close();
 return d;

 }

}
5.主函数布局
<LinearLayout xmlns:android="http://schemas.android.com/apk/res/android"
 android:layout_width="match_parent"
 android:layout_height="match_parent"
 android:orientation="vertical">

 <LinearLayout
 android:layout_width="match_parent"
 android:layout_height="50dp">

 <LinearLayout
  android:layout_width="0dp"
  android:layout_height="match_parent"
  android:layout_weight="1">

  <ImageView
  android:layout_width="30dp"
  android:layout_height="match_parent"
  android:layout_gravity="center_vertical"
  android:padding="5dp"
  android:src="@mipmap/ic_launcher" />

  <EditText
  android:id="@+id/input_search_content_et"
  android:layout_width="match_parent"
  android:layout_height="wrap_content"
  android:hint="请输入你要搜索的内容"
  android:imeOptions="actionSearch"
  android:singleLine="true"
  />

  <!-- 以上的singleLine和imeOptions属性代码是将弹出的软键盘的回车键替换成搜索键的关键,当然也可以换成发送键 等等,可以去查一下该属性 -->

 </LinearLayout>

 <TextView
  android:id="@+id/search_content_cancel_tv"
  android:layout_width="wrap_content"
  android:layout_height="match_parent"
  android:layout_gravity="center_vertical"
  android:gravity="center"
  android:padding="10dp"
  android:text="取消"
  android:textSize="18sp" />

 </LinearLayout>
 <LinearLayout
 android:layout_width="match_parent"
 android:orientation="vertical"
 android:gravity="center|left"
 android:layout_height="30dp">
 <TextView
  android:id="@+id/tv_history"
  android:layout_width="wrap_content"
  android:layout_marginLeft="20dp"
  android:text="搜索历史"
  android:layout_height="wrap_content" />
 </LinearLayout>

 <RelativeLayout
 android:layout_width="match_parent"
 android:layout_height="match_parent">

 <LinearLayout
  android:id="@+id/search_content_show_ll"
  android:layout_width="match_parent"
  android:layout_height="wrap_content"
  android:orientation="vertical"></LinearLayout>

 </RelativeLayout>

</LinearLayout>
6.适配器布局
<?xml version="1.0" encoding="utf-8"?>
<LinearLayout xmlns:android="http://schemas.android.com/apk/res/android"
 android:orientation="vertical" android:layout_width="match_parent"
 android:layout_height="match_parent">

 <LinearLayout
 android:orientation="horizontal"
 android:layout_width="match_parent"
 android:layout_height="40dp">

 <TextView
  android:id="@+id/search_content_tv"
  android:layout_width="match_parent"
  android:layout_height="wrap_content"
  android:drawableLeft="@mipmap/ic_launcher_round"
  android:drawablePadding="8dp"
  android:layout_margin="10dp"
  android:layout_gravity="center_vertical"
  />

 </LinearLayout>

</LinearLayout>
7.搜索布局
<?xml version="1.0" encoding="utf-8"?>
<LinearLayout xmlns:android="http://schemas.android.com/apk/res/android"
 android:orientation="vertical" android:layout_width="match_parent"
 android:layout_height="match_parent">

 <LinearLayout
 android:orientation="vertical"
 android:layout_width="match_parent"
 android:layout_height="wrap_content">

 <ListView
  android:id="@+id/search_records_lv"
  android:layout_width="match_parent"
  android:layout_height="wrap_content"/>

 <View
  android:layout_width="match_parent"
  android:layout_height="0.1dp"
  android:background="@color/colorAccent"/>

 <TextView
  android:background="@color/colorPrimary"
  android:id="@+id/clear_all_records_tv"
  android:layout_width="match_parent"
  android:layout_height="40dp"
  android:textSize="16sp"
  android:gravity="center"
  android:text="清除历史记录"/>

 <View
  android:layout_width="match_parent"
  android:layout_height="0.1dp"
  android:background="@color/colorAccent"/>

 </LinearLayout>

</LinearLayout>
ok,demo资源里有
二.仿bilibili搜索框效果(三句代码实现)

1.添加依赖:
apply plugin: 'com.android.application'

android {
 compileOptions {
 sourceCompatibility JavaVersion.VERSION_1_8
 targetCompatibility JavaVersion.VERSION_1_8
 }
 compileSdkVersion 29
 buildToolsVersion "29.0.2"
 defaultConfig {
 applicationId "com.example.mysgfceshicase"
 minSdkVersion 15
 targetSdkVersion 29
 versionCode 1
 versionName "1.0"
 testInstrumentationRunner "androidx.test.runner.AndroidJUnitRunner"
 }
 buildTypes {
 release {
  minifyEnabled false
  proguardFiles getDefaultProguardFile('proguard-android-optimize.txt'), 'proguard-rules.pro'
 }
 }
 packagingOptions {
 //解决编译时com.android.builder.merge.DuplicateRelativeFileException: More than one file was found with OS independent path 'META-INF/rxjava.properties'这个错误
 exclude 'META-INF/rxjava.properties'
 }
}

dependencies {
 implementation fileTree(dir: 'libs', include: ['*.jar'])
 implementation 'androidx.appcompat:appcompat:1.0.2'
 implementation 'androidx.constraintlayout:constraintlayout:1.1.3'
 testImplementation 'junit:junit:4.12'
 androidTestImplementation 'androidx.test.ext:junit:1.1.0'
 androidTestImplementation 'androidx.test.espresso:espresso-core:3.1.1'
 //noinspection GradleCompatible
 implementation 'com.android.support:recyclerview-v7:26.0.0-beta2'
 implementation 'com.android.support:cardview' +
  '-v7:26.0.0-beta2'
 testImplementation 'junit:junit:4.12'
 //仿转转轮播图BAnner
 implementation 'com.tokiii:reveal-banner:1.0.1'
 //下拉刷新、上拉加载、二级刷新、淘宝二楼、RefreshLayout、OverScroll,Android智能下拉刷新框架,支持越界回弹、越界拖动,
 // 具有极强的扩展性,集成了几十种炫酷的Header和 Footer
 implementation 'com.scwang.smartrefresh:SmartRefreshLayout:1.1.0' //1.0.5及以前版本的老用户升级需谨慎,API改动过大
 implementation 'com.scwang.smartrefresh:SmartRefreshHeader:1.1.0' //没有使用特殊Header,可以不加这行
 //炫酷的輪播圖效果
 implementation 'com.github.ulez:dropindicator:0.0.2'
 //搜索历史记录
 implementation 'com.wenwenwen888:searchbox:1.0.1'
 implementation 'com.jakewharton:butterknife:10.0.0'
 annotationProcessor 'com.jakewharton:butterknife-compiler:10.0.0'
 //noinspection GradleCompatible
 implementation 'com.android.support:design:28.0.0'
 implementation 'io.reactivex:rxandroid:1.1.0'
 implementation 'io.reactivex:rxjava:1.1.0'
// implementation 'com.trello.rxlifecycle2:rxlifecycle:2.2.1'
// implementation 'com.trello.rxlifecycle2:rxlifecycle-android:2.2.1'
// implementation 'com.trello.rxlifecycle2:rxlifecycle-components:2.2.1'
 implementation 'com.trello:rxlifecycle-components:0.6.1'
 implementation 'com.jakewharton.rxbinding:rxbinding:0.3.0'
 implementation 'com.jakewharton.rxbinding:rxbinding-appcompat-v7:0.3.0'
 implementation 'com.jakewharton.rxbinding:rxbinding-design:0.3.0'
 implementation 'com.github.bumptech.glide:glide:3.7.0'
 //gradle
 api ('com.alibaba.android:ultraviewpager:1.0.7.7@aar') {
 transitive = true
 }
 //首先引入gson库
 compile 'com.google.code.gson:gson:2.8.1'

}
 //搜索历史记录
 implementation 'com.wenwenwen888:searchbox:1.0.1'
2.主要实现:
//第一句 , 实例化:
SearchFragment searchFragment = SearchFragment.newInstance();

//第二句 , 设置回调:
searchFragment.setOnSearchClickListener(new IOnSearchClickListener() {
  @Override
  public void OnSearchClick(String keyword) {
  //这里处理逻辑
  Toast.makeText(ToolBarActivity.this, keyword, Toast.LENGTH_SHORT).show();
  }
 });
//第三句 , 显示搜索框:
searchFragment.showFragment(getSupportFragmentManager(),SearchFragment.TAG);
3.全部代码:
import android.os.Bundle;
import android.view.Menu;
import android.view.MenuItem;
import android.widget.TextView;

import com.example.mysgfceshicase.R;
import com.wyt.searchbox.SearchFragment;
import com.wyt.searchbox.custom.IOnSearchClickListener;

import androidx.appcompat.app.AppCompatActivity;
import androidx.appcompat.widget.Toolbar;
import butterknife.BindView;
import butterknife.ButterKnife;

public class SearchActivity extends AppCompatActivity implements Toolbar.OnMenuItemClickListener, IOnSearchClickListener {

 @BindView(R.id.toolbar)
 Toolbar toolbar;
 @BindView(R.id.search_info)
 TextView searchInfo;

 private SearchFragment searchFragment;
 @Override
 protected void onCreate(Bundle savedInstanceState) {
 super.onCreate(savedInstanceState);
 setContentView(R.layout.activity_search);
 ButterKnife.bind(this);

 toolbar.setTitle("SearchDialog");//标题
 setSupportActionBar(toolbar);

 searchFragment = SearchFragment.newInstance();

 toolbar.setOnMenuItemClickListener(this);

 searchFragment.setOnSearchClickListener(this);
 }

 @Override
 public boolean onCreateOptionsMenu(Menu menu) {
 //加载菜单文件
 getMenuInflater().inflate(R.menu.menu_main, menu);
 return true;
 }
 @Override
 public boolean onMenuItemClick(MenuItem item) {
 switch (item.getItemId()) {
  case R.id.action_search://点击搜索
  searchFragment.showFragment(getSupportFragmentManager(), SearchFragment.TAG);
  break;
 }
 return true;
 }

 @Override
 public void OnSearchClick(String keyword) {
 searchInfo.setText(keyword);
 }
}
<?xml version="1.0" encoding="utf-8"?>
<RelativeLayout xmlns:android="http://schemas.android.com/apk/res/android"
 xmlns:app="http://schemas.android.com/apk/res-auto"
 android:layout_width="match_parent"
 android:layout_height="match_parent">

 <androidx.appcompat.widget.Toolbar
 android:id="@+id/toolbar"
 android:layout_width="match_parent"
 android:layout_height="wrap_content"
 android:background="@color/colorPrimary"
 app:layout_scrollFlags="scroll|enterAlways" />

 <TextView
 android:id="@+id/search_info"
 android:layout_width="match_parent"
 android:layout_height="match_parent"
 android:layout_below="@id/toolbar"
 android:gravity="center"
 android:text="Hello Android!"
 android:textSize="20sp" />
</RelativeLayout>
源码:搜索历史记录
以上就是本文的全部内容,希望对大家的学习有所帮助,也希望大家多多支持我们。
赞 (0)

