python数据可视化自制职位分析生成岗位分析数据报表
目录
- 前言
- 1. 核心功能设计
- 可视化展示岗位表格数据
- 分析岗位薪资情况
- 分析岗位公司情况
- 数据分析导出
- 2. GUI设计与实现
- 3. 功能实现
- 3.1 职位数据爬虫
- 3.2 数据预处理
- 3.3 岗位数据展示
- 3.4 薪资图表可视化
- 3.5 岗位公司情况统计
- 3.6 预览保存
前言
为什么要进行职位分析?职位分析是人力资源开发和管理的基础与核心,是企业人力资源规划、招聘、培训、薪酬制定、绩效评估、考核激励等各项人力资源管理工作的依据。其次我们可以根据不同岗位的职位分析,可视化展示各岗位的数据分析报告。
首先我们来看看分析展示的效果:
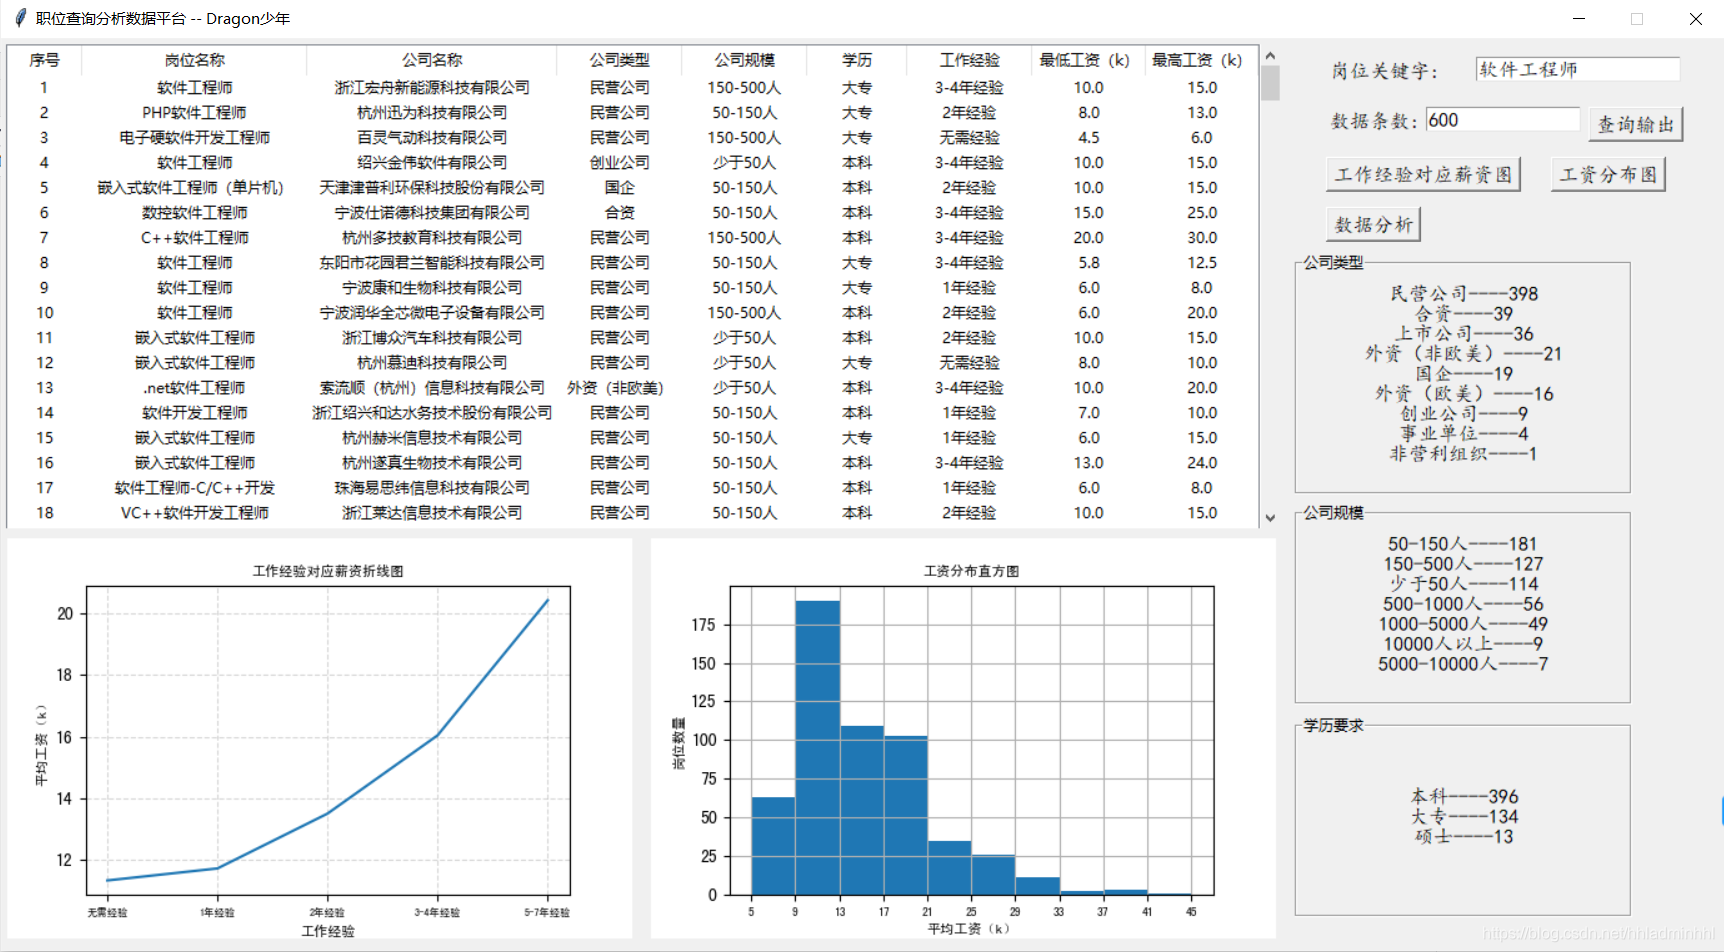
下面,我们开始介绍这个小工具的制作过程。
1. 核心功能设计
总体来说,我们的这款职位分析器可以通过输入岗位关键字和岗位条数,自动爬取相关岗位的数据,并对爬虫的岗位可视化表格展示。然后分析这些岗位数据的公司类型规模,对学历要求,薪资分布等。
拆解需求,大致可以整理出核心功能如下:
可视化展示岗位表格数据
通过输入的岗位关键字和获取条数,自动爬取职位数据对爬虫的职位原始数据进行清洗读取展示清洗后的职位数据
分析岗位薪资情况
根据工作年限及对应平均薪资,绘制工作经验年限和薪资折线图统计汇总薪资分布区间,了解该岗位薪资情况,展示薪资分布直方图
分析岗位公司情况
展示岗位中公司类型分布情况,包含民营企业、合资、上市、外企等等展示公司规模人数分布情况,包含少于50人,50-150,150-500等等统计岗位对于学历的要求
数据分析导出
对于可视化数据进行弹窗预览,并将数据导出保存
基本的核心功能确定,下面我们我们首先开始GUI设计。
2. GUI设计与实现
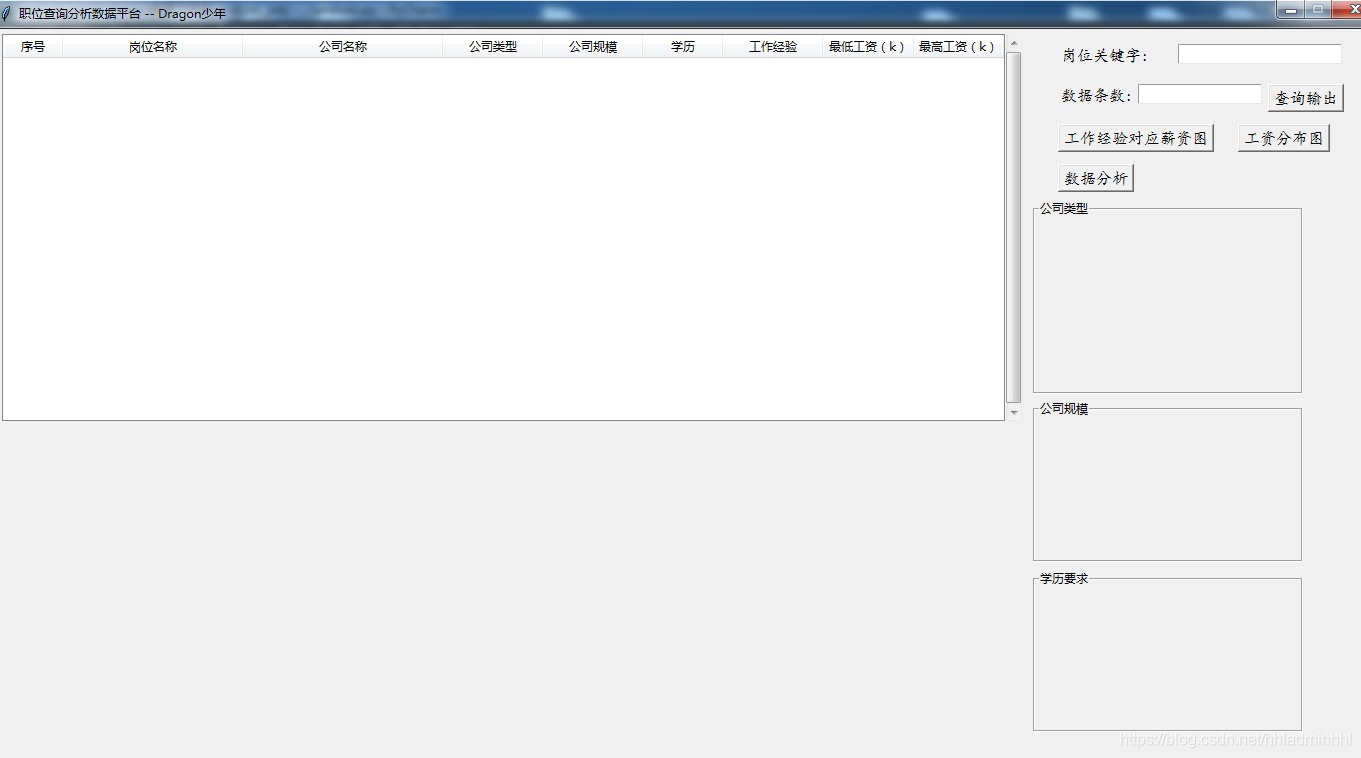
基于功能点,我们可以先考虑进行简单的UE布局设计,然后再通过GUI开发库进行设计,这里采用的是tkinker,主要是简单方便。
基于UI设计,我们gui设计编码如下:
# 创建主窗口
root = Tk()
root.title('职位查询分析数据平台 -- Dragon少年')
# 设置窗口大小
root.minsize(1380, 730)
root.resizable(False, False)
#得到屏幕宽度
sw = root.winfo_screenwidth()
#得到屏幕高度
sh = root.winfo_screenheight()
ww = 1380
wh = 730
x = (sw-ww) / 2
y = (sh-wh) / 2
root.geometry("%dx%d+%d+%d" %(ww,wh,x,y))
frame_left_top = Frame(width=1050, height=400)
frame_right_top = Frame(width=320, height=400)
# 定义列表区域
tree = ttk.Treeview(frame_left_top, show="headings", height=18,
                    columns=("n", "a", "b", "c", "d", "e", "f", "g", "h"))
vbar = ttk.Scrollbar(frame_left_top, orient=VERTICAL, command=tree.yview)
# 定义树形结构与滚动条
tree.configure(yscrollcommand=vbar.set)
# 表格的标题
tree.column("n", width=60, anchor="center")
tree.column("a", width=180, anchor="center")
tree.column("b", width=200, anchor="center")
tree.column("c", width=100, anchor="center")
tree.column("d", width=100, anchor="center")
tree.column("e", width=80, anchor="center")
tree.column("f", width=100, anchor="center")
tree.column("g", width=90, anchor="center")
tree.column("h", width=90, anchor="center")
tree.heading("n", text="序号")
tree.heading("a", text="岗位名称")
tree.heading("b", text="公司名称")
tree.heading("c", text="公司类型")
tree.heading("d", text="公司规模")
tree.heading("e", text="学历")
tree.heading("f", text="工作经验")
tree.heading("g", text="最低工资(k)")
tree.heading("h", text="最高工资(k)")
tree.grid(row=0, column=0, sticky=NSEW)
vbar.grid(row=0, column=1, sticky=NS)
# 整体区域定位
frame_left_top.grid(row=0, column=0, padx=4, pady=5)
frame_right_top.grid(row=0, column=1, padx=2, pady=2)
frame_left_top.grid_propagate(0)
frame_right_top.grid_propagate(0)
type_str=StringVar()
#设置滚动窗口文本
habits = tk.LabelFrame(root, text="公司类型", padx=10, pady=4 )  # 水平,垂直方向上的边距均为 10
habits.place(x=1035, y=170)
habits_Window = Label(habits, textvariable=type_str, width=30, height=10,  font=('楷体', 12))
habits_Window.grid()
size_str=StringVar()
#设置滚动窗口文本
company_size = tk.LabelFrame(root, text="公司规模", padx=10, pady=4 )  # 水平,垂直方向上的边距均为 10
company_size.place(x=1035, y=370)
company_size_Window = Label(company_size, textvariable=size_str, width=30, height=8,  font=('楷体', 12))
company_size_Window.grid()
edu_str=StringVar()
#设置滚动窗口文本
company_edu = tk.LabelFrame(root, text="学历要求", padx=10, pady=4 )  # 水平,垂直方向上的边距均为 10
company_edu.place(x=1035, y=540)
company_edu_Window = Label(company_edu, textvariable=edu_str, width=30, height=8,  font=('楷体', 12))
company_edu_Window.grid()
# 打开文件
# right_top_button = Button(frame_right_top, text="打开文件", command=lambda :openFile(), font=('楷体', 12))
input_name = Label(frame_right_top, text='岗位关键字:', font=('楷体', 12)).place(x=0, y=10)
label = StringVar()
entry = Entry(frame_right_top, bg='#ffffff', width=20, textvariable=label, font=('楷体', 12)).place(x=120, y=10)
input_num = Label(frame_right_top, text='数据条数:', font=('楷体', 12)).place(x=0, y=50)
label_num = StringVar()
entry_num = Entry(frame_right_top, bg='#ffffff', width=15, textvariable=label_num, font=('楷体', 12)).place(x=80, y=50)
btn_search = Button(frame_right_top, text="查询输出", command=lambda :openFile(label, label_num), font=('楷体', 12)).place(x=210, y=50)
right_pic_button = Button(frame_right_top, text="工作经验对应薪资图", command=lambda: show_plot(), font=('楷体', 12)).place(x=0, y=90)
right_hist_button = Button(frame_right_top, text="工资分布图", command=lambda: show_hist(), font=('楷体', 12)).place(x=180, y=90)
right_data_button = Button(frame_right_top, text="数据分析", command=lambda: show_data(), font=('楷体', 12)).place(x=0, y=130)
主界面中各个控件创建,主要包含label-文本,Entry-文本输入框,Treeview-表格树,LabelFrame-控件容器等等。
效果如下:
3. 功能实现
我们明确功能点以及有了GUI布局后,可以正式开始实现功能逻辑。
3.1 职位数据爬虫
关于职位数据爬取,我们爬取的是51job的数据,编写一个函数。按照核心功能要求,这个函数通过参数职位关键字及数据条数,自动爬取并将数据保存。
首先我可以通过对51job职位搜索页面进行分析,获取一个列表页,代码如下:
# 获取一个列表页
def geturl(url):
    headers = {
        'User-Agent': 'User-Agent: Mozilla/5.0 (Windows NT 10.0; Win64; x64) AppleWebKit/537.36 '
                      '(KHTML, like Gecko) Chrome/87.0.4280.88 Safari/537.36'
    }
    # 使用通用爬虫对url进行一页进行爬取
    page_text = requests.get(url=url, headers=headers).text       # 每一页源码用text
    # print(page_text)
    return page_text
其次通过对具体职位页面数据分析,获取列表页的所有岗位信息。主要包含岗位名称、公司名称、薪资水平、公司类型、招聘条件、福利待遇等等。代码如下:
# 获取列表页的所有岗位信息
def get_data(page_text):
    # 正则表达式提取岗位信息
    job_href = '"job_href":"(.*?)"'              # 岗位链接
    job_name = '"job_name":"(.*?)"'              # 岗位名称
    com_href = '"company_href":"(.*?)"'          # 公司链接
    com_name = '"company_name":"(.*?)"'          # 公司名称
    salary = '"providesalary_text":"(.*?)"'     # 薪资水平
    company_type = '"companytype_text":"(.*?)"'  # 公司类型
    attribute = '"attribute_text":\[(.*?)\]'     # 招聘条件
    work_area = '"workarea_text":"(.*?)"'        # 工作地点
    company_size = '"companysize_text":"(.*?)"'  # 公司规模
    company_ind = '"companyind_text":"(.*?)"'    # 主要业务
    job_welf = '"jobwelf":"(.*?)"'               # 福利待遇
    # 第一个参数是规则,第二个参数是被检索内容,第三个参数re.S是单行匹配
    jobName_list = re.findall(job_name, page_text, re.S)
    comName_list = re.findall(com_name, page_text, re.S)
    salary_list = re.findall(salary, page_text, re.S)
    companytype_list = re.findall(company_type, page_text, re.S)
    attribute_list = re.findall(attribute, page_text, re.S)
    workarea_list = re.findall(work_area, page_text, re.S)
    companysize_list = re.findall(company_size, page_text, re.S)
    companyind_list = re.findall(company_ind, page_text, re.S)
    jobwelf_list = re.findall(job_welf, page_text, re.S)
    all_list = [jobName_list, comName_list, salary_list,
                companytype_list, attribute_list, workarea_list, companysize_list,
                companyind_list, jobwelf_list]
    return all_list
最后将获取岗位数据保存至csv文件中,方便后面对这些数据进行清洗。主要代码如下:
# 主函数
def main(kw, num):
    # 关键字二次转译
    # kw = input("请输入你要搜索的岗位关键字:")
    keyword = parse.quote(parse.quote(kw))
    page_num = 0
    col = ["岗位名称", "公司名称", "薪资水平", "公司类型", "招聘条件", "工作地点", '公司规模', '主要业务', '福利待遇']
    csv_file = open("51job.csv", "w+", encoding='utf-8', newline='')
    try:
        writer = csv.writer(csv_file)
        writer.writerow(col)
        for i1 in range(0, num):  # 爬取前3页数据
            page_num += 1
            url = "https://search.51job.com/list/080000,000000,0000,00,9,99," + keyword + ",2," + str(
                page_num) + ".html"
            page_text = geturl(url)
            all_list = get_data(page_text)
            if len(all_list[0]) == 0:
                print('没有搜索到职位信息')
                break
            else:
                print('正在爬取第%d页' % page_num)
                save_data(all_list, writer, search_num=len(all_list[0]))
    finally:
        csv_file.close()
3.2 数据预处理
我们通过爬虫已经拿到了原始数据,接下来我们需要将这些数据清洗,去除异常值、缺失值,转换我们要的数据格式。
首先我们可以对工作地点进行整理,我们爬取的数据,默认都是浙江省,我们按照浙江省各个地级市进行工作地点转换,代码如下:
job = pd.read_csv("51job.csv", encoding='utf-8')
df = pd.DataFrame(job)
dict_city = {'杭州': 0, '湖州': 0, '绍兴': 0, '宁波': 0, '嘉兴': 0, '丽水': 0, '台州': 0, '温州': 0, '金华': 0, '衢州': 0, '舟山': 0}
city = df.loc[:, "工作地点"]
print(city.shape[0])
for i in range(city.shape[0]):
    # print(city[i])
    for k, v in dict_city.items():
        # print(k, v)
        if k in city[i]:
            dict_city[k] = dict_city[k] + 1
            df.loc[i, "城市"] = k
            break
# print(list(dict_city.keys()))
# print(list(dict_city.values()))
city_df = df["城市"]
if np.any(pd.notnull(df["城市"])):
    df["城市"].fillna("其他", inplace=True)
# print(df["城市"].value_counts())

接着我们需要将原始数据得到的工资进行格式转换,转换成 k/月固定格式,并将整理的薪资数据单独存储保存下来。主要代码如下:
def get_salary(salary):
    if '-' in salary:  # 针对1-2万/月或者10-20万/年的情况,包含-
        low_salary = re.findall(re.compile('(\d*\.?\d+)'), salary)[0]
        high_salary = re.findall(re.compile('(\d?\.?\d+)'), salary)[1]
        if u'万' in salary and u'年' in salary:  # 单位统一成千/月的形式
            low_salary = round(float(low_salary) / 12 * 10, 1)
            high_salary = round(float(high_salary) / 12 * 10, 1)
        elif u'万' in salary and u'月' in salary:
            low_salary = float(low_salary) * 10
            high_salary = float(high_salary) * 10
    else:  # 针对20万以上/年和100元/天这种情况,不包含-,取最低工资,没有最高工资
        low_salary = re.findall(re.compile('(\d*\.?\d+)'), salary)[0]
        if u'万' in salary and u'年' in salary:  # 单位统一成千/月的形式
            low_salary = round(float(low_salary) / 12 * 10, 1)
        elif u'万' in salary and u'月' in salary:
            low_salary = float(low_salary) * 10
        elif u'元' in salary and u'天' in salary:
            low_salary = round(float(low_salary) / 1000 * 21, 1)   # 每月工作日21天
        elif u'元' in salary and u'小时' in salary:
            low_salary = round(float(low_salary) / 1000 * 8 * 21, 1)   # 每天8小时,每月工作日21天
        high_salary = low_salary
    return low_salary, high_salary
job = pd.read_csv("51job_pre.csv", encoding='utf-8')
job_df = job.drop("福利待遇", axis=1)
job_df = job_df.dropna(axis=0, how="any")
for index, row in job_df.iterrows():
    salary = row["薪资水平"]
    if salary:  # 如果待遇这栏不为空,计算最低最高待遇
        getsalary = get_salary(salary)
        low_salary = getsalary[0]
        high_salary = getsalary[1]
    else:
        low_salary = high_salary = "0"
    job_df.loc[index, "最低工资(k)"] = low_salary
    job_df.loc[index, "最高工资(k)"] = high_salary
    job_df.loc[index, "平均工资(k)"] = round((float(low_salary) + float(high_salary)) / 2, 1)
job_df.to_csv("./51job_pre2.csv", index=False)
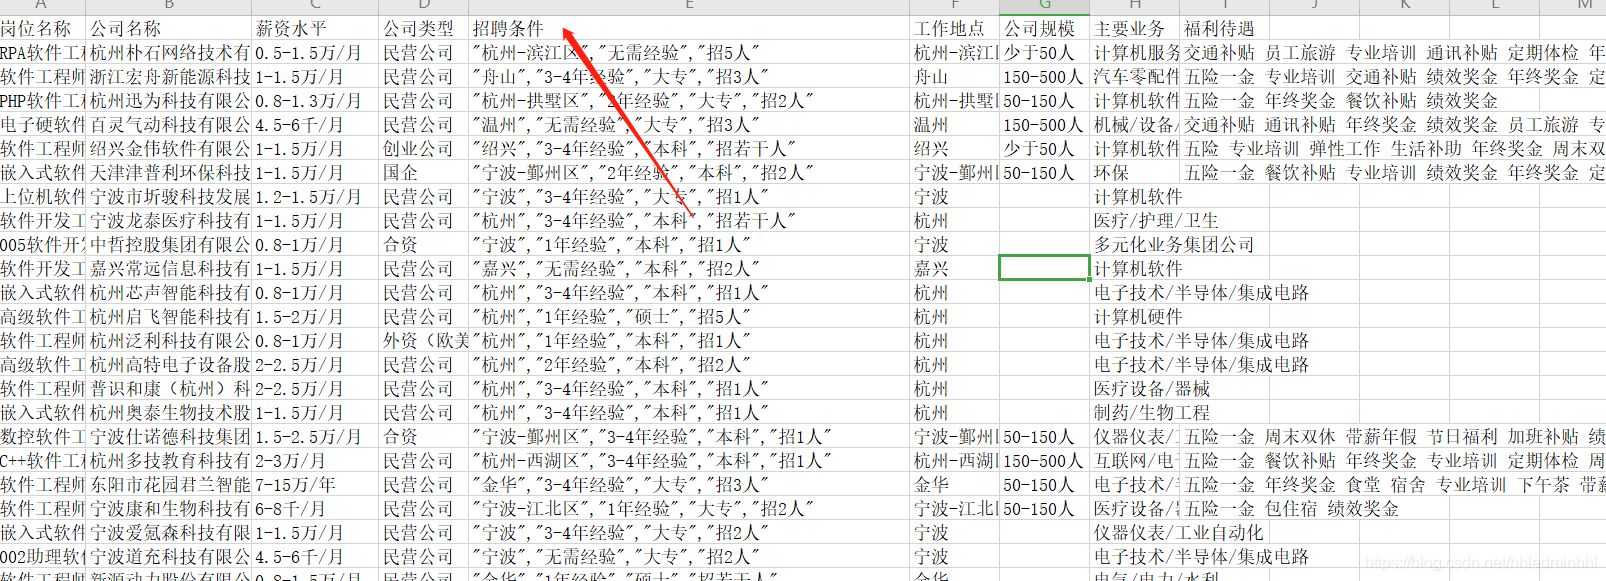
薪资整理结束之后,我们通过观察可以看到招聘条件列中有我们需要的学历和工作经验等数据,我们需要提取出单独的学历,工作经验等数据。代码如下:
job_df.to_csv("./51job_pre2.csv", index=False)
job_df = pd.read_csv("51job_pre2.csv", encoding='utf-8')
job_df["学历"] = job_df["招聘条件"].apply(lambda x: re.findall("本科|大专|高中|中专|硕士|博士|初中及以下", x))
job_df["工作经验"] = job_df["招聘条件"].apply(lambda x: re.findall(r',".*经验"|,"在校生/应届生"', x))
job_df["学历"] = job_df["学历"].apply(func)
job_df["工作经验"] = job_df["工作经验"].apply(func2)
# 薪资水平,公司类型,招聘条件,工作地点,公司规模,主要业务,城市,最低工资(k),最高工资(k),平均工资(k)
job_df = job_df.drop(["薪资水平", "招聘条件", "工作地点", "主要业务", "城市"], axis=1)
job_df = job_df.dropna(axis=0, how="any")
job_df.to_csv("./51job_analysis.csv", index=False)
原始数据清洗整理完毕,我们就可以继续编写GUI的数据展示了。
3.3 岗位数据展示
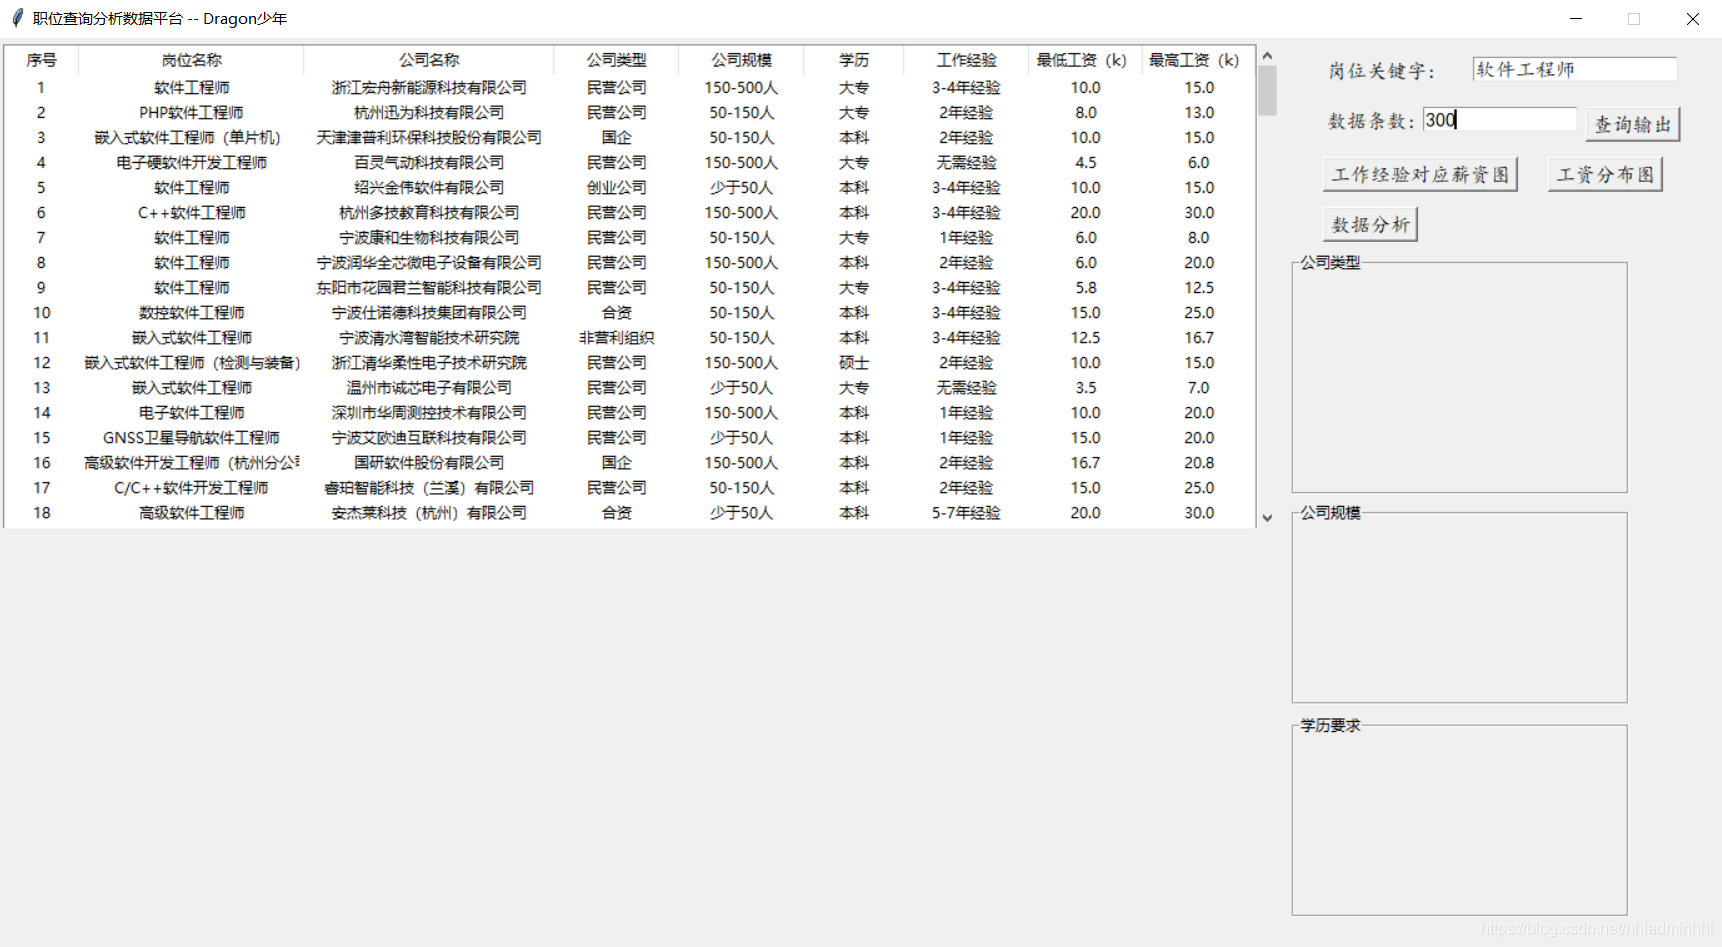
上面我们已经拿到了需要的数据,首先我们可以通过读取保存的数据表格,可视化展示岗位数据表格。代码主要如下:
def read_csv_define(csv_path):
    x = tree.get_children()
    for item in x:
        tree.delete(item)
    global job_df
    job_df = pd.read_csv(csv_path, encoding='utf-8')
    # print(job_df.shape[0])
    for i in range(job_df.shape[0]):
        tree.insert("", "end",
                    values=(i+1, job_df.loc[job_df.index[i], "岗位名称"], job_df.loc[job_df.index[i], "公司名称"],\
                            job_df.loc[job_df.index[i], "公司类型"], job_df.loc[job_df.index[i], "公司规模"], \
                             job_df.loc[job_df.index[i], "学历"],job_df.loc[job_df.index[i], "工作经验"], \
                            job_df.loc[job_df.index[i], "最低工资(k)"], job_df.loc[job_df.index[i], "最高工资(k)"]))
def openFile(label, label_num):
    sname = label.get()
    num_str = label_num.get()
    num = int(num_str)
    rep.main(sname, int(num/50))
    pre.main()
    Filepath = "./51job_analysis.csv"
    # 打开文件选择对话框
    # Filepath = filedialog.askopenfilename(filetypes=[('表格', '*.xls;*.csv')]) #过滤文件后缀类型
    # print(os.path.split(Filepath))
    (filepath, tempfilename) = os.path.split(Filepath)  # 右侧的值是元组类型
    try:
        # Filepath 当路径存在的时候继续
        if Filepath:
            # 传输excel表格的路径
            # 调用读取数据的函数,趁着用户正在查看查询条件的时候 将数据注入到全局变量中 减少查询等待
            # 由于两种表格文件的读取模块不同,需要做处理判断属于哪种文件类型,故采用下边的方式进行判断
            # 从文件名中分离出后缀
            (filename, extension) = os.path.splitext(tempfilename)
            if extension == '.xls' or extension == '.XLS':
                read_xls(Filepath)
            elif extension == '.csv':
                read_csv_define(Filepath)
        else:
            print('未选择任何文件!')
            # exit_program()
    except Exception as e:
        global job_df
        job_df = pd.DataFrame()
        tkinter.messagebox.showwarning('警告', '文件读取异常,请检查!')
        print("ex:", e)
    finally:
        size_str.set("")
        type_str.set("")
        edu_str.set("")
        canvas_spice.get_tk_widget().destroy()
        canvas_spice_hist.get_tk_widget().destroy()
效果如下:
3.4 薪资图表可视化
接下来我们可以对不同工作经验年限对应的薪资统计,绘制缩略折线图。代码如下:
def show_plot():
    global canvas_spice
    canvas_spice.get_tk_widget().destroy()
    # 图像及画布
    fig, ax = plt.subplots(figsize=(5, 3.2), dpi=100)  # 图像比例
    canvas_spice = FigureCanvasTkAgg(fig, root)
    canvas_spice.get_tk_widget().place(x=5, y=400)  # 放置位置
    work_experience = round(job_df.groupby(by='工作经验')['平均工资(k)'].mean(), 2)
    experience_list = ["无需经验", "1年经验", "2年经验", "3-4年经验", "5-7年经验"]
    experience_val = [work_experience[i] for i in experience_list]
    x = range(len(experience_list))
    y = experience_val
    plt.plot(x, y)
    plt.xticks(x, experience_list, fontsize=6)
    plt.grid(True, linestyle="--", alpha=0.5)
    plt.xlabel("工作经验", fontsize=8)
    plt.ylabel("平均工资(k)", fontsize=8)
    plt.title("工作经验对应薪资折线图", fontsize=8)
    canvas_spice.draw()
    canvas_spice.get_tk_widget().bind("<Double-Button-1>", xFunc1)
通过统计岗位数据中平均薪资数据,绘制出薪资分布直方图,展示该职位的平均薪资分布情况。代码如下:
def show_hist():
    global canvas_spice_hist
    canvas_spice_hist.get_tk_widget().destroy()
    # 图像及画布
    fig_hist, ax_hist = plt.subplots(figsize=(5, 3.2), dpi=100)  # 图像比例
    canvas_spice_hist = FigureCanvasTkAgg(fig_hist, root)
    canvas_spice_hist.get_tk_widget().place(x=520, y=400)  # 放置位置
    plt.hist(job_df["平均工资(k)"].values, bins=10)
    # 求出最小值
    max_ = job_df["平均工资(k)"].max()
    min_ = job_df["平均工资(k)"].min()
    # 修改刻度
    plt.xticks(np.linspace(min_, max_, num=11),fontsize=7)
    # 添加网格
    plt.grid()
    plt.xlabel("平均工资(k)", fontsize=8)
    plt.ylabel("岗位数量", fontsize=8)
    plt.title("工资分布直方图", fontsize=8)
    canvas_spice_hist.draw()
    canvas_spice_hist.get_tk_widget().bind("<Double-Button-1>", xFunc2)
效果如下:
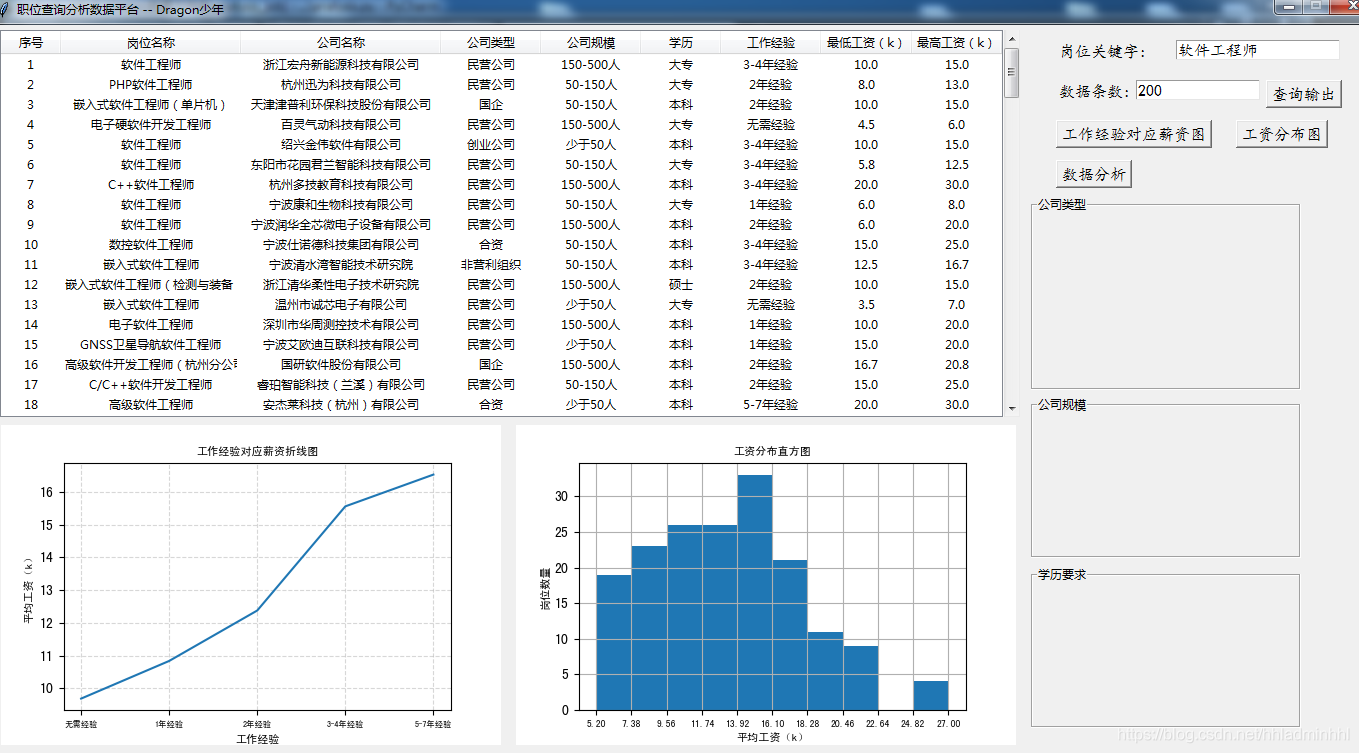
除了主界面之外,我们在绘制完图表之后希望能直接弹窗预览展示,因此也需要一个用于浏览图片的界面与功能,这部分整体会放在后续预览保存模块讲解。
3.5 岗位公司情况统计
我们还可以对不同的公司规模、类型、对岗位学历要求等进行数据分析展示:
def show_data():
    company = job_df.loc[:, "公司类型"].value_counts()
    type_name = list(company.index)
    x = range(len(type_name))
    content = ""
    for item in x:
        content += type_name[item] + '----' + str(company[item]) + '\n'
    type_str.set(content)
    company = job_df.loc[:, "公司规模"].value_counts()
    company_scale = company.index.to_list()
    z = range(len(company_scale))
    size_content = ""
    for item in z:
        size_content += company_scale[item] + '----' + str(company[item]) + '\n'
    size_str.set(size_content)
    education = job_df.loc[:, "学历"].value_counts()
    education_scale = education.index.to_list()
    y = range(len(education_scale))
    edu_content = ""
    for item in y:
        edu_content += education_scale[item] + '----' + str(education[item]) + '\n'
    edu_str.set(edu_content)
效果如下:
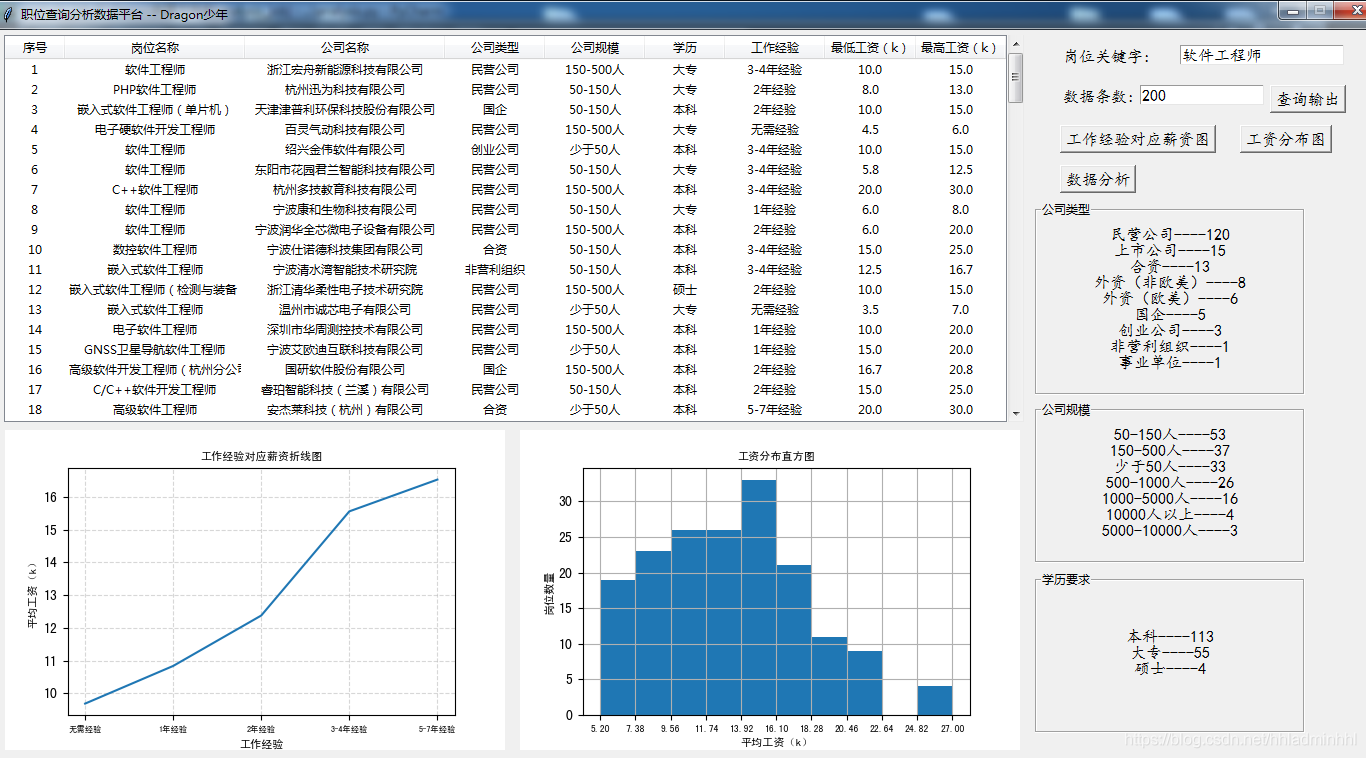
3.6 预览保存
我们在前面有提到,对于绘制好的图表,希望可以弹出预览保存,这里实现这个功能,采用的是画布绑定左键双击事件,弹出的子窗体同样可以绑定右键事件, 通过事件适配器传递图片参数。
def handlerAdaptor(fun, **kwds):
    return lambda event, fun= fun, kwds= kwds:fun(event, **kwds)
def xFunc2(event):
    top = Toplevel()
    top.title('图像导出')
    top.minsize(700, 450)
    top.resizable(False, False)
    # 得到屏幕宽度
    sw = root.winfo_screenwidth()
    # 得到屏幕高度
    sh = root.winfo_screenheight()
    ww = 700
    wh = 450
    x = (sw - ww) / 2
    y = (sh - wh) / 2
    top.geometry("%dx%d+%d+%d" % (ww, wh, x, y))
    top.transient(root)
    top.grab_set()
    # 图像及画布
    fig, ax = plt.subplots(figsize=(7, 4.5), dpi=100)  # 图像比例
    canvas_spice = FigureCanvasTkAgg(fig, top)
    canvas_spice.get_tk_widget().place(x=1, y=1)  # 放置位置
    plt.hist(job_df["平均工资(k)"].values, bins=10)
    # 求出最小值
    max_ = job_df["平均工资(k)"].max()
    min_ = job_df["平均工资(k)"].min()
    # 修改刻度
    plt.xticks(np.linspace(min_, max_, num=11), fontsize=10)
    # 添加网格
    plt.grid()
    plt.xlabel("平均工资(k)", fontsize=12)
    plt.ylabel("岗位数量", fontsize=12)
    plt.title("工资分布直方图", fontsize=15)
    plt.savefig("hist.png")
    canvas_spice.draw()
    canvas_spice.get_tk_widget().pack()
    img_pl = Image.open("hist.png").copy()
    os.remove("hist.png")
    canvas_spice.get_tk_widget().bind("<Button-3>", handlerAdaptor(saveimg, img=img_pl))
效果如下:

然后我们可以对预览的图片进行保存:
def saveimg(event, img):
    Filepath = filedialog.asksaveasfilename(filetypes=[('图像', '*.png;')])
    if Filepath:
        if not Filepath.endswith(('.png')):
            Filepath += '.png'
        # 保存获得的图像
        img.save(Filepath, 'png')
        tkinter.messagebox.showinfo("提示", "保存成功!")
        HWND = win32gui.GetFocus()  # 获取当前窗口句柄
        win32gui.PostMessage(HWND, win32con.WM_CLOSE, 0, 0)
至此,自制的职位分析器小工具就编码完成啦~
下面,我一键获取生成设计师职位的分析报告:
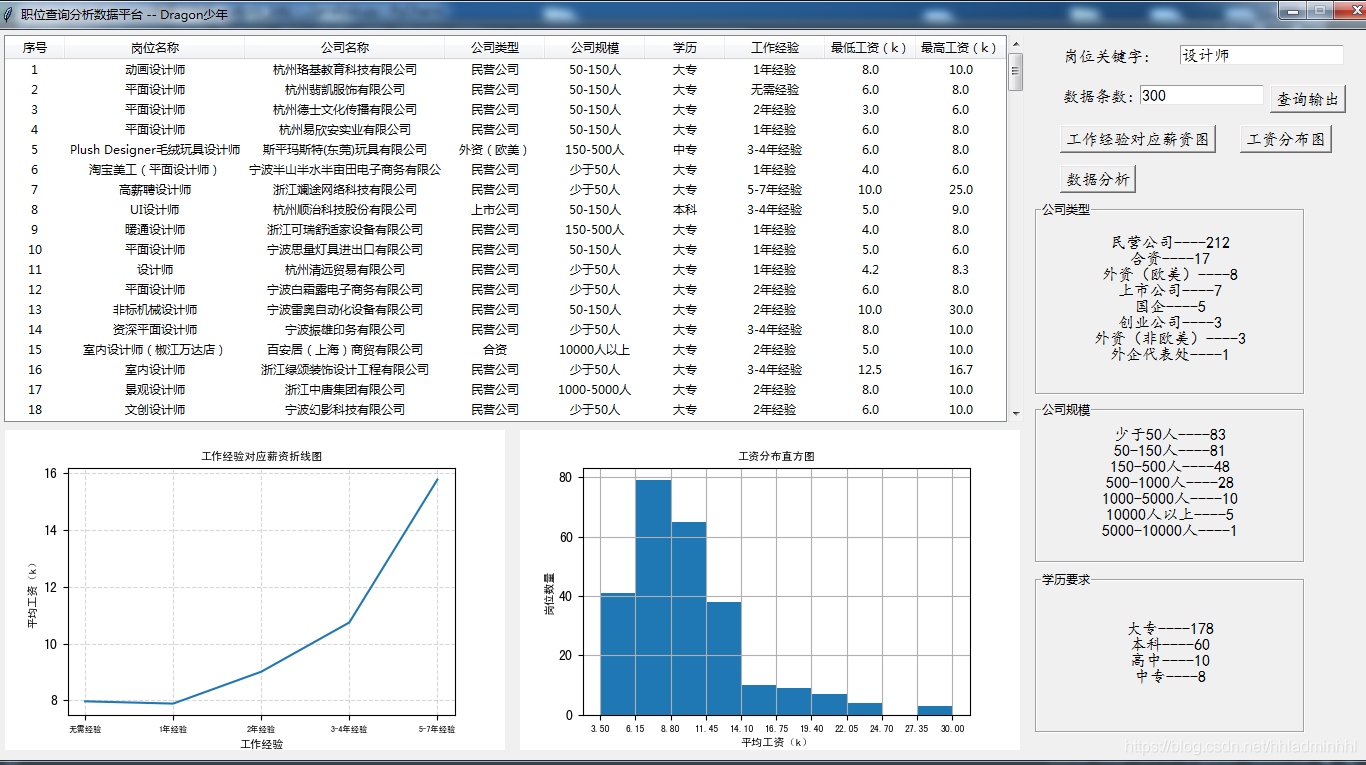
从上面的分析报告中,不难看出:
- 设计师职业的薪资水平在工作经验5年以上,薪资会有较大的涨幅。
- 行业的平均薪资分布主要在6k-14k左右。
- 设计行业的公司大部分是民营,公司人数在500人以下。
- 对于设计的学历要求大部分是大专及以上。
好了,今天就到这里,明天我们继续努力!
创作不易,白嫖不好,各位的支持和认可,就是我创作的最大动力,我们下篇文章见!
Dragon少年 | 文
如果本篇博客有任何错误,请批评指教,不胜感激 !
以上就是python数据可视化自制职位分析生成岗位分析数据报表的详细内容,更多关于python数据可视化生成职位分析数据报表的资料请关注我们其它相关文章!

