Proxy实现AOP切面编程案例
通过JDK的Proxy代理实现对业务类做简单的AOP实现
接口:UserService 包含的方法为切入点,会被代理拦截
类:UserServiceImpl 实现UserService接口
类:UserServiceFactory 工厂模式生成动态代理
类:MyAspect 切面类,实现对切入点的操作
UserService
public interface UserService {
  //切面: 需要被拦截的方法
  public void addUser();
  public void updateUser();
  public int deleteUser(int id);
}
UserServiceImpl
public class UserServiceImpl implements UserService {
  public void add() {
    System.out.println("UserServiceImpl.add()");
  }

  public void add(User user) {
    System.out.println("UserServiceImpl.add(" + user + ")");
  }

  //下面继承自UserService接口的方法会被拦截
  @Override
  public void addUser() {
    System.out.println("UserServiceImpl.addUser()");
  }

  @Override
  public void updateUser() {
    System.out.println("UserServiceImpl.updateUser()");
  }

  @Override
  public int deleteUser(int id) {
    System.out.println("UserServiceImpl.deleteUser(" + id + ")");
    return 1;
  }
}
UserServiceFactory
public class UserServiceFactory {
  public static UserService createUserService() {
    //1、创建目标对象target
    final UserService userService = new UserServiceImpl();
    //2、声明切面类对象
    final MyAspect myAspect = new MyAspect();
    //3、将切面类before()与after()方法应用到目标类
    //3.1、创建JDK代理(返回一个接口)
    /*
     newProxyInstance(
        ClassLoader loader,   //类加载器,写当前类
        Class<?>[] interfaces, //接口,接口中包含的方法执行时会被拦截
        InvocationHandler h)  //处理 调用切面类中的处理如:deforre()、after()
     */
    UserService serviceProxy = (UserService) Proxy.newProxyInstance(
        UserServiceFactory.class.getClassLoader(),
        userService.getClass().getInterfaces(),
        new InvocationHandler() {
          @Override
          public Object invoke(Object proxy, Method method, Object[] args) throws Throwable {
            //开启事务
            myAspect.before();

            //返回值是调用的业务方法的返回值
            Object obj = method.invoke(userService, args);

            //提交事务
            myAspect.after();

            return obj;
          }
        });
    return serviceProxy;
  }
}
MyAspect :(就是一些具体操作,如记录日志等)
public class MyAspect {
  public void before() {
    System.out.println("MyAspect.before()开启事务...");
  }

  public void after() {
    System.out.println("MyAspect.after()提交事务...");
  }
}
单元测试:
  @Test
  public void aop_test() {
    UserService userService = UserServiceFactory.createUserService();
    userService.addUser();
    userService.deleteUser(10);
    userService.updateUser();
  }
输出:
MyAspect.before()开启事务...
UserServiceImpl.addUser()
MyAspect.after()提交事务...
MyAspect.before()开启事务...
UserServiceImpl.deleteUser(10)
MyAspect.after()提交事务...
MyAspect.before()开启事务...
UserServiceImpl.updateUser()
MyAspect.after()提交事务...
补充知识:结合动态代理技术学习SpringAop实现切面编程
结合一个例子利用动态代理技术和SpringAop实现需求
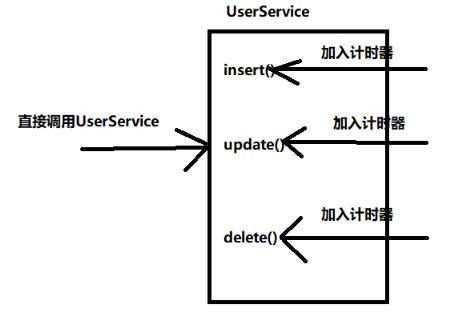
需求:为我的UserService类中的每一个方法加上一个计时器
最初的实现是为每一个类添加一段代码,这样看起来代码的冗余度特别大

静态代理实现
在使用JDK提供动态代理之前我们先利用静态代理技术实现这个需求

静态代理需要我们自己创建代理类具体代码如下:
创建UserService接口以及他的实现类及目标类UserServiceTarget
public interface UserService {

  public void insert();
  public void update();
  public void delete();
}

// 目标类
public class UserServiceTarget implements UserService {

  @Time
  public void insert() {
    System.out.println("插入用户");
  }

  public void update() {
    System.out.println("修改用户");
  }

  public void delete() {
    System.out.println("删除用户");
  }
}
创建TimeHandler类,将重复的计时器代码逻辑写入TimeHandler类中
public class TimeHandler {
  private UserServiceTarget userService = new UserServiceTarget();
  //需要加计时器的方法对应的对象 -- method
  public void invoke(Method method) {
    long start = System.nanoTime();
    // 反射调用: 方法.invoke(对象, 参数);
    try {
      method.invoke(userService);
    } catch (Exception e) {
      e.printStackTrace();
    }
    long end = System.nanoTime();
    Time time = method.getAnnotation(Time.class);
    if(time != null) {
      System.out.println("花费了: " + (end - start));
    }
  }
}
最后一步就是自己实现代理类UserServiceProxy,自己实现代理类被称作静态代理
public class UserServiceProxy implements UserService {

  public void insert() {
    try {
      TimeHandler timeHandler = new TimeHandler();
      Method a = UserServiceTarget.class.getMethod("insert");
      timeHandler.invoke(a);
    } catch (NoSuchMethodException e) {
      e.printStackTrace();
    }
  }

  public void update() {
    try {
      TimeHandler timeHandler = new TimeHandler();
      Method b = UserServiceTarget.class.getMethod("update");
      timeHandler.invoke(b);
    } catch (NoSuchMethodException e) {
      e.printStackTrace();
    }
  }

  public void delete() {
    try {
      TimeHandler timeHandler = new TimeHandler();
      Method c = UserServiceTarget.class.getMethod("delete");
      timeHandler.invoke(c);
    } catch (NoSuchMethodException e) {
      e.printStackTrace();
    }
  }
}
这样在无需改变UserService类和其实现类的情况下增加了代码的扩展性,降低了代码间的耦合度。
动态代理实现
动态代理就是不需要我们自己创建代理类和代理对象,JDK会在程序运行中为我们自动生成代理对象
动态代理的三个步骤
1、生成代理类的字节码
2、执行类加载将字节码加载进入JVM
3、创建代理类的实例对象
方式一
自己写代码生成需要代理类的字节码
1、获取代理类的字节码
byte[] bytes = ProxyGenerator.generateProxyClass("UserServiceProxy", new Class[]{UserService.class});
//这里第一个参数是自己为代理类起的类名,第二个参数是需要创建代理类的字节码数组
2、执行类加载
 ClassLoader cl = new ClassLoader() {
      @Override
      protected Class<?> findClass(String name) throws ClassNotFoundException {
        return defineClass(name, bytes, 0, bytes.length);
      }
    };
    Class c = cl.loadClass("UserServiceProxy"); // 进行类加载, 获得了 UserServiceProxy 类对象
3、 创建代理类实例对象--通过反射
 // 获取代理类的构造方法
    Constructor constructor = c.getConstructor(InvocationHandler.class);

    UserServiceTarget target = new UserServiceTarget();
    // 创建实例对象, 强制转换为它的接口类型
    UserService proxy = (UserService)constructor.newInstance(new InvocationHandler() {
      @Override
      public Object invoke(Object proxy, Method method, Object[] args) throws Throwable {
        long start = System.nanoTime();
        method.invoke(target, args);
        long end = System.nanoTime();
        System.out.println("花费了:" + (end - start));
        return null;
      }
    });
这里的InvocationHandler接口匿名实现类似于我们之前的TimeHandler类,只需要将重复代码逻辑写入其中在通过方法对象反射调用该方法即可实现动态代理。
//使用代理对象
proxy.insert();
方式二
利用Proxy类的newProxyInstance()方法实现动态代理,具体代码如下
public static void main(String[] args) {
    // 直接创建代理类的实例
    // 1. 获取类加载器
    ClassLoader cl = UserService.class.getClassLoader();
    // 2. 规定代理类要实现的接口
    Class[] interfaces = new Class[] {UserService.class};
    // 3. 给一个 InvocationHandler 对象, 包含要执行的重复逻辑
    UserServiceTarget target = new UserServiceTarget();
    InvocationHandler h = new InvocationHandler() {
      @Override
      public Object invoke(Object proxy, Method method, Object[] args) throws Throwable {
        long start = System.nanoTime();

        // 方法.invoke(目标, 参数);
        method.invoke(target, args);

        long end = System.nanoTime();
        System.out.println("花费了:" + (end - start));
        return null;
      }
    };
    UserService proxy = (UserService) Proxy.newProxyInstance(cl, interfaces, h);
    //4. 使用代理对象
    proxy.update();
  }
}
使用Spring框架AOP(面向切面编程)完成需求
Spring框架最最主要的两大特性就是IOC(控制反转)和AOP(面向切面编程)
IOC总结见我的博客SpringIOC总结
AOP (aspect oriented programming ) 即面向切面编程
切面 aspect = 通知 adivce + 切点 pointcut
通知:是一个方法,其中包含了重复的逻辑(例如我们今天需要实现的计时器需求,以及Spring事务管理的底层实现)
切点:是一种匹配条件, 与条件相符合的目标方法,才会应用通知方法,需要配合切点表达式
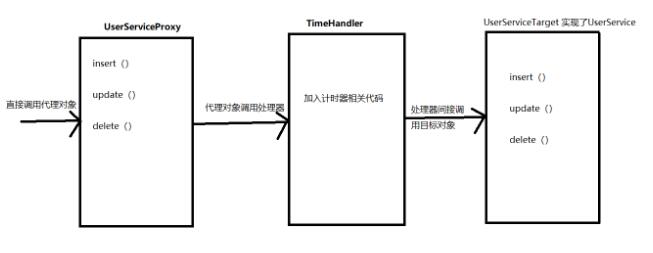
再来类比一下之前的图

图中的UserService就是SpringAOP技术中的代理,TimeHandler就是切面,UserServiceTarget在SpringAOP技术中被称作目标。
SpringAOP实现
首先需要添加maven依赖
<!--spring核心依赖-->
<dependency>
  <groupId>org.springframework</groupId>
  <artifactId>spring-context</artifactId>
  <version>4.3.22.RELEASE</version>
</dependency>
<!--切面相关依赖-->
<dependency>
  <groupId>org.aspectj</groupId>
  <artifactId>aspectjrt</artifactId>
  <version>1.8.13</version>
</dependency>
<dependency>
  <groupId>org.aspectj</groupId>
  <artifactId>aspectjweaver</artifactId>
  <version>1.8.13</version>
</dependency>
第二步,编写切面类
@Component
//将切面交给spring容器管理
@Aspect
//@Aspect 注解表示该类是一个切面类
//切面 = 通知 + 切点
public class UserAspect {
  //配置切点 @Around注解和切点表达式
  @Around("within(service.impl.*)")

  //配置通知方法
  //ProceedingJoinPoint参数用来调用目标方法
  public Object time(ProceedingJoinPoint proceedingJoinPoint) throws Throwable {
    long start = System.nanoTime();
    Object proceed = proceedingJoinPoint.proceed();//调用目标方法返回结果
    long end = System.nanoTime();
    System.out.println("springaop 方法耗时" + (end - start) + "纳秒");
    return proceed;
  }
}
UserService和UserServiceImpl代码如下
public interface UserService {
  void insert();
  void update();
  void delete();
}

@Service
public class UserServiceImpl implements UserService {
  @Override
  public void insert() {
    System.out.println("UserServiceImpl 增加用户信息");
}

  @Override
  public void update() {
    System.out.println("UserServiceImpl 修改用户信息");
  }

  @Override
  public void delete() {
    System.out.println("UserServiceImpl 删除用户信息");
  }
}
最后一步,配置Spring配置文件
<?xml version="1.0" encoding="UTF-8"?>
<beans xmlns="http://www.springframework.org/schema/beans"
    xmlns:context="http://www.springframework.org/schema/context"
    xmlns:aop="http://www.springframework.org/schema/aop"
    xmlns:xsi="http://www.w3.org/2001/XMLSchema-instance"
    xsi:schemaLocation="
    http://www.springframework.org/schema/beans http://www.springframework.org/schema/beans/spring-beans.xsd
    http://www.springframework.org/schema/context http://www.springframework.org/schema/context/spring-context.xsd
    http://www.springframework.org/schema/aop http://www.springframework.org/schema/aop/spring-aop.xsd"
>
  <!-- spring容器进行包扫描 配有@Componet @Service @Controller @Repository会交由spring容器管理-->
  <context:component-scan base-package="service,aspect"/>

  <!-- 启用切面编程的相关注解,例如: @Aspect, @Around, 还提供了自动产生代理类的功能-->
  <aop:aspectj-autoproxy/>
</beans>
编写测试类
public class TestSpringAopProgramming {
  public static void main(String[] args) {
    ClassPathXmlApplicationContext context =
        new ClassPathXmlApplicationContext("spring.xml");
    UserService userService = context.getBean(UserService.class);
    userService.insert();
    userService.update();
    userService.delete();
  }
}
彩蛋
这个时候上面的需求又发生了变法,不是给UserService中所有的方法加计时器,而是给指定方法加计时器,又该如何实现?
如果我们给需要加计时器的方法加上一个注解,当反射调用该方法的时候判断如果有该注解在通过动态代理的方式为其加计时器不就可以解决问题了。
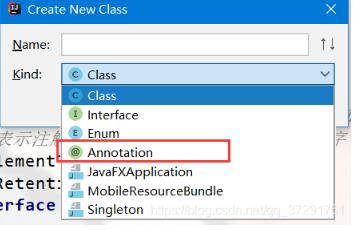
自定义注解

自定义注解需要添加两个注解 @Target @Retention
@Target 表示能够加在哪些位置
ElementType.TYPE 表示能够加在 类上
ElementType.METHOD 表示能够加在 方法上
ElementType.FIELD 表示能够加在 属性上
@Retention 表示注解的作用范围
Source 表示注解仅在 *.java 源码中有效
Class 表示注解在 *.java 源码 和 *.class 字节码中有效
Runtime 表示注解在 *.java 源码 和 *.class 字节码 和 运行期间都中有效
自定义注解类Time
@Target({ ElementType.METHOD } ) //该只需要加载方法上
@Retention(RetentionPolicy.RUNTIME)//需要在源码,字节码,以及运行中都有效
public @interface Time {
}
这个时候只需要在指定的方法上加@Time注解,然后在代理对象进行判断即可,示例代码如下:
public void insert() {
    try {
      TimeHandler timeHandler = new TimeHandler();
      Method a = UserServiceTarget.class.getMethod("insert");
      //通过getAnnotation()方法判断是否存在@Time注解
      if(method.getAnnotation(Time.class) !=null) {
        timeHandler.invoke(a);
      }
    } catch (NoSuchMethodException e) {
      e.printStackTrace();
    }
  }
以上这篇Proxy实现AOP切面编程案例就是小编分享给大家的全部内容了,希望能给大家一个参考,也希望大家多多支持我们。

