微信小程序canvas实现签名功能
在微信小程序项目中,开发模块涉及到手写签名功能,微信小程序canvas闪亮登场
前言
微信小程序canvas实现签名功能
核心内容简介:
(1)签名实现,开始,移动,结束
(2)重写
(3)完成
(4)上传
一、微信小程序canvas实现签名功能
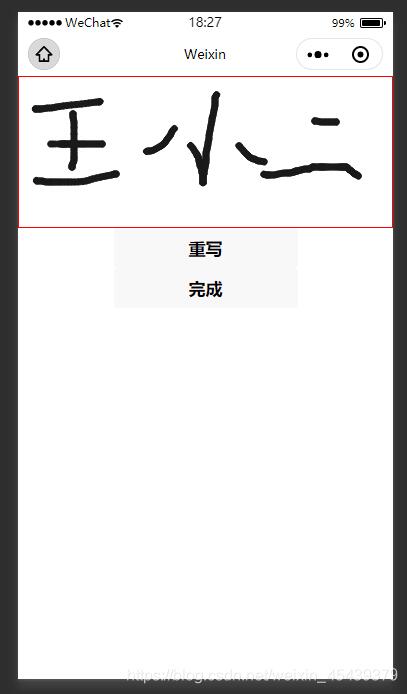
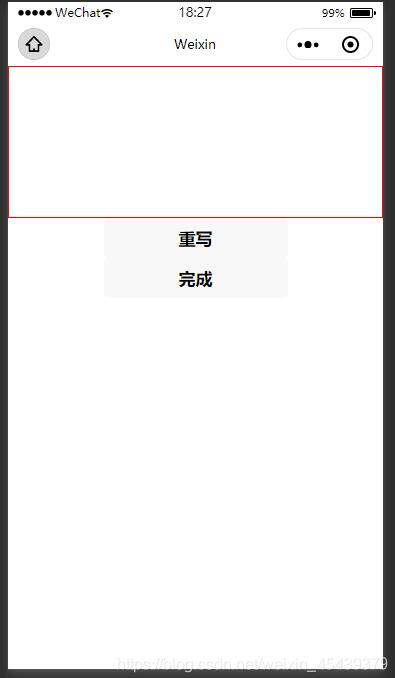
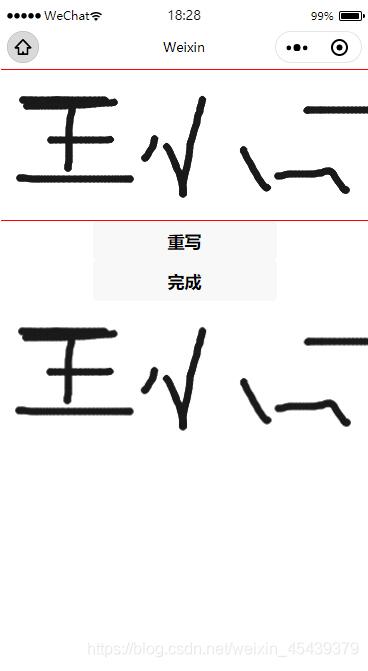
效果演示:
(1)签名实现

(2)重写

(3)完成

完成后将图片展示在相应的位置
(4)根据业务需求,可以将图片上传到后台,在需要的地方展示
二、上代码
1.全部演示
wxml
<!--pages/canvas-test/canvas-test.wxml-->

<view class="handCenter">

 <canvas class="handWriting" disable-scroll="true" bindtouchstart="uploadScaleStart" bindtouchmove="uploadScaleMove"
 bindtouchend="uploadScaleEnd" bindtap="mouseDown" canvas-id="handWriting">
 </canvas>

</view>

<view class="handBtn">
 <button catchtap="retDraw" class="delBtn">重写</button>
 <button catchtap="subCanvas" class="subBtn">完成</button>
</view>

<view class="preview">

 <image wx:if="{{tmpPath}}" style="width:100%;height:100%;" src="{{tmpPath}}"></image>

</view>
js
const app = getApp()
const api = require('../../utils/request.js'); //相对路径
const apiEev = require('../../config/config');
Page({
 data: {
 canvasName: 'handWriting',
 ctx: '',
 canvasWidth: 0,
 canvasHeight: 0,
 transparent: 1, // 透明度
 selectColor: 'black',
 lineColor: '#1A1A1A', // 颜色
 lineSize: 1.5, // 笔记倍数
 lineMin: 0.5, // 最小笔画半径
 lineMax: 4, // 最大笔画半径
 pressure: 1, // 默认压力
 smoothness: 60, //顺滑度,用60的距离来计算速度
 currentPoint: {},
 currentLine: [], // 当前线条
 firstTouch: true, // 第一次触发
 radius: 1, //画圆的半径
 cutArea: { top: 0, right: 0, bottom: 0, left: 0 }, //裁剪区域
 bethelPoint: [], //保存所有线条 生成的贝塞尔点;
 lastPoint: 0,
 chirography: [], //笔迹
 currentChirography: {}, //当前笔迹
 linePrack: [], //划线轨迹 , 生成线条的实际点
 tmpPath:''
 },
 // 笔迹开始
 uploadScaleStart (e) {
 if (e.type != 'touchstart') return false;
 let ctx = this.data.ctx;
 ctx.setFillStyle(this.data.lineColor); // 初始线条设置颜色
 ctx.setGlobalAlpha(this.data.transparent); // 设置半透明
 let currentPoint = {
 x: e.touches[0].x,
 y: e.touches[0].y
 }
 let currentLine = this.data.currentLine;
 currentLine.unshift({
 time: new Date().getTime(),
 dis: 0,
 x: currentPoint.x,
 y: currentPoint.y
 })
 this.setData({
 currentPoint,
 // currentLine
 })
 if (this.data.firstTouch) {
 this.setData({
 cutArea: { top: currentPoint.y, right: currentPoint.x, bottom: currentPoint.y, left: currentPoint.x },
 firstTouch: false
 })
 }
 this.pointToLine(currentLine);
 },
 // 笔迹移动
 uploadScaleMove (e) {
 if (e.type != 'touchmove') return false;
 if (e.cancelable) {
 // 判断默认行为是否已经被禁用
 if (!e.defaultPrevented) {
 e.preventDefault();
 }
 }
 let point = {
 x: e.touches[0].x,
 y: e.touches[0].y
 }

 //测试裁剪
 if (point.y < this.data.cutArea.top) {
 this.data.cutArea.top = point.y;
 }
 if (point.y < 0) this.data.cutArea.top = 0;

 if (point.x > this.data.cutArea.right) {
 this.data.cutArea.right = point.x;
 }
 if (this.data.canvasWidth - point.x <= 0) {
 this.data.cutArea.right = this.data.canvasWidth;
 }
 if (point.y > this.data.cutArea.bottom) {
 this.data.cutArea.bottom = point.y;
 }
 if (this.data.canvasHeight - point.y <= 0) {
 this.data.cutArea.bottom = this.data.canvasHeight;
 }
 if (point.x < this.data.cutArea.left) {
 this.data.cutArea.left = point.x;
 }
 if (point.x < 0) this.data.cutArea.left = 0;

 this.setData({
 lastPoint: this.data.currentPoint,
 currentPoint: point
 })
 let currentLine = this.data.currentLine
 currentLine.unshift({
 time: new Date().getTime(),
 dis: this.distance(this.data.currentPoint, this.data.lastPoint),
 x: point.x,
 y: point.y
 })
 // this.setData({
 // currentLine
 // })
 this.pointToLine(currentLine);
 },
 // 笔迹结束
 uploadScaleEnd (e) {
 if (e.type != 'touchend') return 0;
 let point = {
 x: e.changedTouches[0].x,
 y: e.changedTouches[0].y
 }
 this.setData({
 lastPoint: this.data.currentPoint,
 currentPoint: point
 })
 let currentLine = this.data.currentLine
 currentLine.unshift({
 time: new Date().getTime(),
 dis: this.distance(this.data.currentPoint, this.data.lastPoint),
 x: point.x,
 y: point.y
 })
 // this.setData({
 // currentLine
 // })
 if (currentLine.length > 2) {
 var info = (currentLine[0].time - currentLine[currentLine.length - 1].time) / currentLine.length;
 //$("#info").text(info.toFixed(2));
 }
 //一笔结束,保存笔迹的坐标点,清空,当前笔迹
 //增加判断是否在手写区域;
 this.pointToLine(currentLine);
 var currentChirography = {
 lineSize: this.data.lineSize,
 lineColor: this.data.lineColor
 };
 var chirography = this.data.chirography
 chirography.unshift(currentChirography);
 this.setData({
 chirography
 })
 var linePrack = this.data.linePrack
 linePrack.unshift(this.data.currentLine);
 this.setData({
 linePrack,
 currentLine: []
 })
 },
 onLoad () {
 let canvasName = this.data.canvasName
 let ctx = wx.createCanvasContext(canvasName)
 this.setData({
 ctx: ctx
 })
 var query = wx.createSelectorQuery();
 query.select('.handCenter').boundingClientRect(rect => {
 this.setData({
 canvasWidth: rect.width,
 canvasHeight: rect.height
 })
 }).exec();
 },

 subCanvas(){
 // 新增我的
 let that = this
 let ctx = this.data.ctx;
 ctx.draw(true,setTimeout(function(){ //我的新增定时器及回调
 wx.canvasToTempFilePath({
 x: 0,
 y: 0,
 width: 375,
 height: 152,
 canvasId: 'handWriting',
 fileType: 'png',
 success: function(res) {
 that.setData({
 tmpPath:res.tempFilePath
 })
 console.log(that.data.tmpPath,'看下是个啥玩意')
 that.upImgs(that.data.tmpPath,0)
 }
 }, ctx)
 },1000))
 },

// 新增将保存的图片路径上传到文件服务器
upImgs: function (imgurl, index) {
 console.log(imgurl,'看下路径是多少')
 var that = this;
 wx.uploadFile({
 url: apiEev.api + 'xxxx',//后台上传路径
 filePath: imgurl,
 name: 'file',
 header: {
 'content-type': 'multipart/form-data'
 },
 formData: null,
 success: function (res) {
 console.log(res) //接口返回网络路径
 var data = JSON.parse(res.data)
 console.log(data,'看下data是个啥')
 if (data.code == "success") {
 console.log('成功')
 }
 }
 })
},

 retDraw () {
 this.data.ctx.clearRect(0, 0, 700, 730)
 this.data.ctx.draw()
 this.setData({
 tmpPath:''
 })
 },

 //画两点之间的线条;参数为:line,会绘制最近的开始的两个点;
 pointToLine (line) {
 this.calcBethelLine(line);
 return;
 },
 //计算插值的方式;
 calcBethelLine (line) {
 if (line.length <= 1) {
 line[0].r = this.data.radius;
 return;
 }
 let x0, x1, x2, y0, y1, y2, r0, r1, r2, len, lastRadius, dis = 0, time = 0, curveValue = 0.5;
 if (line.length <= 2) {
 x0 = line[1].x
 y0 = line[1].y
 x2 = line[1].x + (line[0].x - line[1].x) * curveValue;
 y2 = line[1].y + (line[0].y - line[1].y) * curveValue;
 //x2 = line[1].x;
 //y2 = line[1].y;
 x1 = x0 + (x2 - x0) * curveValue;
 y1 = y0 + (y2 - y0) * curveValue;;

 } else {
 x0 = line[2].x + (line[1].x - line[2].x) * curveValue;
 y0 = line[2].y + (line[1].y - line[2].y) * curveValue;
 x1 = line[1].x;
 y1 = line[1].y;
 x2 = x1 + (line[0].x - x1) * curveValue;
 y2 = y1 + (line[0].y - y1) * curveValue;
 }
 //从计算公式看,三个点分别是(x0,y0),(x1,y1),(x2,y2) ;(x1,y1)这个是控制点,控制点不会落在曲线上;实际上,这个点还会手写获取的实际点,却落在曲线上
 len = this.distance({ x: x2, y: y2 }, { x: x0, y: y0 });
 lastRadius = this.data.radius;
 for (let n = 0; n < line.length - 1; n++) {
 dis += line[n].dis;
 time += line[n].time - line[n + 1].time;
 if (dis > this.data.smoothness) break;
 }
 this.setData({
 radius: Math.min(time / len * this.data.pressure + this.data.lineMin, this.data.lineMax) * this.data.lineSize
 });
 line[0].r = this.data.radius;
 //计算笔迹半径;
 if (line.length <= 2) {
 r0 = (lastRadius + this.data.radius) / 2;
 r1 = r0;
 r2 = r1;
 //return;
 } else {
 r0 = (line[2].r + line[1].r) / 2;
 r1 = line[1].r;
 r2 = (line[1].r + line[0].r) / 2;
 }
 let n = 5;
 let point = [];
 for (let i = 0; i < n; i++) {
 let t = i / (n - 1);
 let x = (1 - t) * (1 - t) * x0 + 2 * t * (1 - t) * x1 + t * t * x2;
 let y = (1 - t) * (1 - t) * y0 + 2 * t * (1 - t) * y1 + t * t * y2;
 let r = lastRadius + (this.data.radius - lastRadius) / n * i;
 point.push({ x: x, y: y, r: r });
 if (point.length == 3) {
 let a = this.ctaCalc(point[0].x, point[0].y, point[0].r, point[1].x, point[1].y, point[1].r, point[2].x, point[2].y, point[2].r);
 a[0].color = this.data.lineColor;
 // let bethelPoint = this.data.bethelPoint;
 // console.log(a)
 // console.log(this.data.bethelPoint)
 // bethelPoint = bethelPoint.push(a);
 this.bethelDraw(a, 1);
 point = [{ x: x, y: y, r: r }];
 }
 }
 this.setData({
 currentLine: line
 })
 },
 //求两点之间距离
 distance (a, b) {
 let x = b.x - a.x;
 let y = b.y - a.y;
 return Math.sqrt(x * x + y * y);
 },
 ctaCalc (x0, y0, r0, x1, y1, r1, x2, y2, r2) {
 let a = [], vx01, vy01, norm, n_x0, n_y0, vx21, vy21, n_x2, n_y2;
 vx01 = x1 - x0;
 vy01 = y1 - y0;
 norm = Math.sqrt(vx01 * vx01 + vy01 * vy01 + 0.0001) * 2;
 vx01 = vx01 / norm * r0;
 vy01 = vy01 / norm * r0;
 n_x0 = vy01;
 n_y0 = -vx01;
 vx21 = x1 - x2;
 vy21 = y1 - y2;
 norm = Math.sqrt(vx21 * vx21 + vy21 * vy21 + 0.0001) * 2;
 vx21 = vx21 / norm * r2;
 vy21 = vy21 / norm * r2;
 n_x2 = -vy21;
 n_y2 = vx21;
 a.push({ mx: x0 + n_x0, my: y0 + n_y0, color: "#1A1A1A" });
 a.push({ c1x: x1 + n_x0, c1y: y1 + n_y0, c2x: x1 + n_x2, c2y: y1 + n_y2, ex: x2 + n_x2, ey: y2 + n_y2 });
 a.push({ c1x: x2 + n_x2 - vx21, c1y: y2 + n_y2 - vy21, c2x: x2 - n_x2 - vx21, c2y: y2 - n_y2 - vy21, ex: x2 - n_x2, ey: y2 - n_y2 });
 a.push({ c1x: x1 - n_x2, c1y: y1 - n_y2, c2x: x1 - n_x0, c2y: y1 - n_y0, ex: x0 - n_x0, ey: y0 - n_y0 });
 a.push({ c1x: x0 - n_x0 - vx01, c1y: y0 - n_y0 - vy01, c2x: x0 + n_x0 - vx01, c2y: y0 + n_y0 - vy01, ex: x0 + n_x0, ey: y0 + n_y0 });
 a[0].mx = a[0].mx.toFixed(1);
 a[0].mx = parseFloat(a[0].mx);
 a[0].my = a[0].my.toFixed(1);
 a[0].my = parseFloat(a[0].my);
 for (let i = 1; i < a.length; i++) {
 a[i].c1x = a[i].c1x.toFixed(1);
 a[i].c1x = parseFloat(a[i].c1x);
 a[i].c1y = a[i].c1y.toFixed(1);
 a[i].c1y = parseFloat(a[i].c1y);
 a[i].c2x = a[i].c2x.toFixed(1);
 a[i].c2x = parseFloat(a[i].c2x);
 a[i].c2y = a[i].c2y.toFixed(1);
 a[i].c2y = parseFloat(a[i].c2y);
 a[i].ex = a[i].ex.toFixed(1);
 a[i].ex = parseFloat(a[i].ex);
 a[i].ey = a[i].ey.toFixed(1);
 a[i].ey = parseFloat(a[i].ey);
 }
 return a;
 },
 bethelDraw (point, is_fill, color) {
 // 新增我的
 let that = this
 let ctx = this.data.ctx;
 ctx.beginPath();
 ctx.moveTo(point[0].mx, point[0].my);
 if (undefined != color) {
 ctx.setFillStyle(color);
 ctx.setStrokeStyle(color);
 } else {
 ctx.setFillStyle(point[0].color);
 ctx.setStrokeStyle(point[0].color);
 }
 for (let i = 1; i < point.length; i++) {
 ctx.bezierCurveTo(point[i].c1x, point[i].c1y, point[i].c2x, point[i].c2y, point[i].ex, point[i].ey);
 }
 ctx.stroke();
 if (undefined != is_fill) {
 ctx.fill(); //填充图形 ( 后绘制的图形会覆盖前面的图形, 绘制时注意先后顺序 )
 }
 ctx.draw(true)
 },
 selectColorEvent (event) {
 console.log(event)
 var color = event.currentTarget.dataset.colorValue;
 var colorSelected = event.currentTarget.dataset.color;
 this.setData({
 selectColor: colorSelected,
 lineColor: color
 })
 }
})
/* pages/canvas-test2/canvas-test2.wxss */
.canvasId {
 position: absolute;
 left: 50%;
 top: 0;
 transform: translate(-50%);
 z-index: 1;
 border: 2px dashed #ccc;
 border-radius: 8px;
 margin-bottom: 66px;
}

.handCenter {
 border: 1px solid red;
}

.handWriting {
 width: 100%;
}

.preview {
 width: 375px;
 height: 152px;
}
2.重点部分分析
(1)签名基本实现,开始,移动,结束
// 笔迹开始
 uploadScaleStart (e) {
 if (e.type != 'touchstart') return false;
 let ctx = this.data.ctx;
 ctx.setFillStyle(this.data.lineColor); // 初始线条设置颜色
 ctx.setGlobalAlpha(this.data.transparent); // 设置半透明
 let currentPoint = {
 x: e.touches[0].x,
 y: e.touches[0].y
 }
 let currentLine = this.data.currentLine;
 currentLine.unshift({
 time: new Date().getTime(),
 dis: 0,
 x: currentPoint.x,
 y: currentPoint.y
 })
 this.setData({
 currentPoint,
 // currentLine
 })
 if (this.data.firstTouch) {
 this.setData({
 cutArea: { top: currentPoint.y, right: currentPoint.x, bottom: currentPoint.y, left: currentPoint.x },
 firstTouch: false
 })
 }
 this.pointToLine(currentLine);
 },
 // 笔迹移动
 uploadScaleMove (e) {
 if (e.type != 'touchmove') return false;
 if (e.cancelable) {
 // 判断默认行为是否已经被禁用
 if (!e.defaultPrevented) {
 e.preventDefault();
 }
 }
 let point = {
 x: e.touches[0].x,
 y: e.touches[0].y
 }

 //测试裁剪
 if (point.y < this.data.cutArea.top) {
 this.data.cutArea.top = point.y;
 }
 if (point.y < 0) this.data.cutArea.top = 0;

 if (point.x > this.data.cutArea.right) {
 this.data.cutArea.right = point.x;
 }
 if (this.data.canvasWidth - point.x <= 0) {
 this.data.cutArea.right = this.data.canvasWidth;
 }
 if (point.y > this.data.cutArea.bottom) {
 this.data.cutArea.bottom = point.y;
 }
 if (this.data.canvasHeight - point.y <= 0) {
 this.data.cutArea.bottom = this.data.canvasHeight;
 }
 if (point.x < this.data.cutArea.left) {
 this.data.cutArea.left = point.x;
 }
 if (point.x < 0) this.data.cutArea.left = 0;

 this.setData({
 lastPoint: this.data.currentPoint,
 currentPoint: point
 })
 let currentLine = this.data.currentLine
 currentLine.unshift({
 time: new Date().getTime(),
 dis: this.distance(this.data.currentPoint, this.data.lastPoint),
 x: point.x,
 y: point.y
 })
 // this.setData({
 // currentLine
 // })
 this.pointToLine(currentLine);
 },
 // 笔迹结束
 uploadScaleEnd (e) {
 if (e.type != 'touchend') return 0;
 let point = {
 x: e.changedTouches[0].x,
 y: e.changedTouches[0].y
 }
 this.setData({
 lastPoint: this.data.currentPoint,
 currentPoint: point
 })
 let currentLine = this.data.currentLine
 currentLine.unshift({
 time: new Date().getTime(),
 dis: this.distance(this.data.currentPoint, this.data.lastPoint),
 x: point.x,
 y: point.y
 })
 // this.setData({
 // currentLine
 // })
 if (currentLine.length > 2) {
 var info = (currentLine[0].time - currentLine[currentLine.length - 1].time) / currentLine.length;
 //$("#info").text(info.toFixed(2));
 }
 //一笔结束,保存笔迹的坐标点,清空,当前笔迹
 //增加判断是否在手写区域;
 this.pointToLine(currentLine);
 var currentChirography = {
 lineSize: this.data.lineSize,
 lineColor: this.data.lineColor
 };
 var chirography = this.data.chirography
 chirography.unshift(currentChirography);
 this.setData({
 chirography
 })
 var linePrack = this.data.linePrack
 linePrack.unshift(this.data.currentLine);
 this.setData({
 linePrack,
 currentLine: []
 })
},
记得要先在onload中初始化
代码拿走直接用
(2)重新签署
大白话就是清空画布
retDraw () {
 this.data.ctx.clearRect(0, 0, 700, 730)
 this.data.ctx.draw()
 this.setData({
 tmpPath:''
 })
},
(3)签署完成
subCanvas(){
 // 新增我的
 let that = this
 let ctx = this.data.ctx;
 ctx.draw(true,setTimeout(function(){ //我的新增定时器及回调
 wx.canvasToTempFilePath({
 x: 0,
 y: 0,
 width: 375,
 height: 152,
 canvasId: 'handWriting',
 fileType: 'png',
 success: function(res) {
 that.setData({
 tmpPath:res.tempFilePath
 })
 console.log(that.data.tmpPath,'看下是个啥玩意')
 that.upImgs(that.data.tmpPath,0)
 }
 }, ctx)
 },1000))
 },
里边的回调比较重要哦:
防止拿不到画布内容,可以设置延迟;
wx.canvasToTempFilePath方法获取到画布图片内容;
(4)根据业务需求,可以将图片上传到后台,在需要的地方展示
重点是如何上传到后台
// 新增将保存的图片路径上传到文件服务器
upImgs: function (imgurl, index) {
 console.log(imgurl,'看下路径是多少')
 var that = this;
 wx.uploadFile({
 url: apiEev.api + 'xxxx',//后台文件上传的路径接口
 filePath: imgurl,
 name: 'file',
 header: {
 'content-type': 'multipart/form-data'
 },
 formData: null,
 success: function (res) {
 console.log(res) //接口返回网络路径
 var data = JSON.parse(res.data)
 console.log(data,'看下data是个啥')
 if (data.code == "success") {
 console.log('成功')
 }
 }
 })
},
总结
微信小程序canvas实现签名功能。
特别提醒:在真机调试和体验版中可能会出现卡顿情况,有条件要发布至预发布中查看是否影响性能。
以上就是本文的全部内容,希望对大家的学习有所帮助,也希望大家多多支持我们。
赞 (0)

