Android RippleDrawable 水波纹/涟漪效果的实现
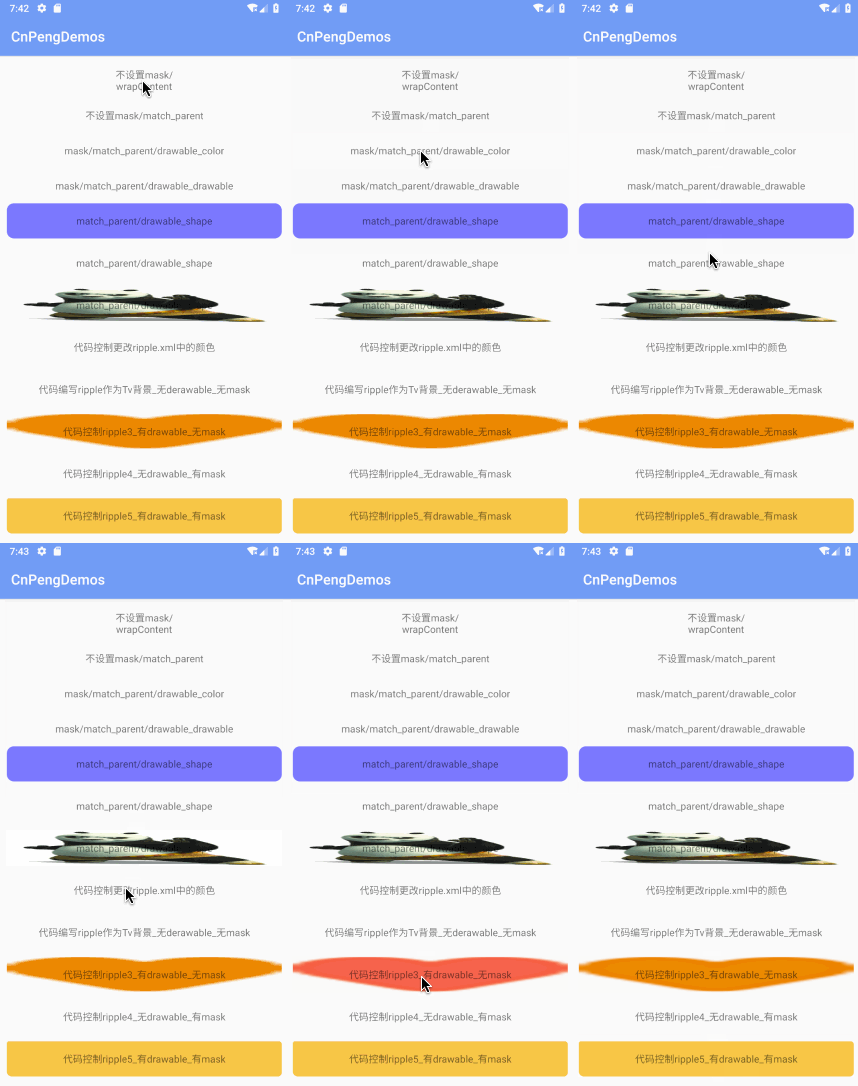
一、效果图

二、RippleDrawable基本概念介绍
(1)、RippleDrawable
RippleDrawable可以实现上面效果图中的水波纹效果,它是在API 21 中添加的,所以,低于21的版本中不可使用。它的继承关系如下:

根据上面的继承关系,我们可知,我们可以用它来做背景;RippleDrawable是有层级的——LayerDrawable的特性。
(2)、xml属性
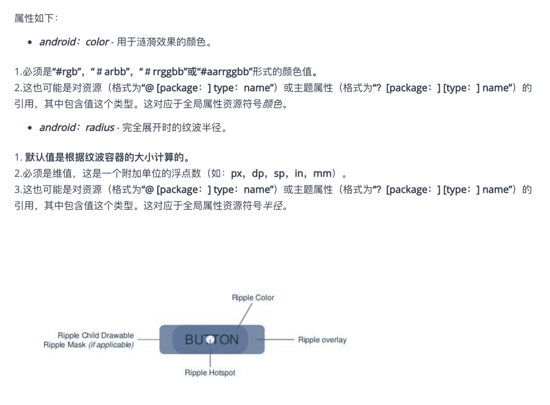
RippleDrawable在xml中对应的是 <ripple></ripple>,它只有两个属性——color、radius。具体可参考下图:

(3)、ripple的特性
A touch feedback drawable may contain multiple child layers, including a special mask layer that is not drawn to the screen. A single layer may be set as the mask from XML by specifying its android:id value as [R.id.mask](https://developer.android.com/reference/android/R.id.html#mask) . At run time, a single layer may be set as the mask using setId(..., android.R.id.mask) or an existing mask layer may be replaced using setDrawableByLayerId(android.R.id.mask, ...) .
ripple可以对触摸事件作出相应的反馈,它可以包含多个item。
其中id 为 mask 的item 在初始化界面时不会直接绘制出来,而是在发生触摸之后才会绘制。
mask 直译过来有遮罩的意思,它会限定水波纹的范围。
如果我们需要将 ripple 中的某个item设置为 mask , 在xml 中,直接为该item设置id属性即可—— android:id="@android:id/mask" ; 在Java代码中如果想替换现有的mask,可以通过 RippleDrawable中的 setDrawableByLayerId(android.R.id.mask, newDrawable) 来实现。
没有指定mask ,并且也没有指定radius 时,会以控件宽高中的较大值为直径绘制水波纹,这样就必然会超出控件的范围,所以,这种效果也叫做 无界水波纹效果。
指定mask 后 ,id 为 mask 的item 中指定的drawable 可以限定水波纹的范围。
三、代码示例:
(1)、xml 中定义 ripple
下列代码依次对应效果图中的前6个。
ripple_1.xml
<?xml version="1.0" encoding="utf-8"?>

<!--只有一个 ripple 节点-->
<ripple xmlns:android="http://schemas.android.com/apk/res/android"
  xmlns:tools="http://schemas.android.com/tools"
  android:color="@color/colorAccent"
  tools:targetApi="lollipop">

</ripple>
ripple_2.xml
<?xml version="1.0" encoding="utf-8"?>
<ripple xmlns:android="http://schemas.android.com/apk/res/android"
  xmlns:tools="http://schemas.android.com/tools"
  android:color="@color/colorAccent"
  tools:targetApi="lollipop">

  <!--为drawable 赋一个color 值,是不生效的-->
  <item
    android:id="@android:id/mask"
    android:drawable="@color/blue" />
</ripple>
ripple_3.xml
<?xml version="1.0" encoding="utf-8"?>
<ripple xmlns:android="http://schemas.android.com/apk/res/android"
  xmlns:tools="http://schemas.android.com/tools"
  android:color="@color/colorAccent"
  tools:targetApi="lollipop">

  <!--这里使用drawable时,并不是所有drawable都生效。需要带有透明边框.否则,图片不生效。而且,绘制出来之后会更改掉原图的色彩信息,
  图片的颜色值会变为 ripple 节点中的 color 值;ripple 只会在该图片区域内有效;图片会被拉伸-->
  <item
    android:id="@android:id/mask"
    android:drawable="@drawable/act_attentioned" />
  <!--android:drawable="@drawable/square_team_selected"/>-->
</ripple>
ripple_4.xml
<?xml version="1.0" encoding="utf-8"?>

<!--以此作为 backGround时,控件初始时使用 item 作为bg ; 按压时会有一个色值渐变效果,按住不松时会显示 ripple 和 item 中颜色的混合值;
松手的瞬间会显示 ripple 中色值,然后再渐变为item中的色值-->
<ripple xmlns:android="http://schemas.android.com/apk/res/android"
  xmlns:tools="http://schemas.android.com/tools"
  android:color="@color/colorAccent"
  tools:targetApi="lollipop">

  <item>
    <shape android:shape="rectangle">
      <solid android:color="@color/blue" />
      <corners android:radius="@dimen/dp10" />
    </shape>
  </item>

</ripple>
ripple_5.xml
<?xml version="1.0" encoding="utf-8"?>

<!--以此作为 backGround时,控件没有默认背景色;生效的只有ripple中的色值;此时,item 只要控制ripple 的范围-->
<ripple xmlns:android="http://schemas.android.com/apk/res/android"
  xmlns:tools="http://schemas.android.com/tools"
  android:color="@color/colorAccent"
  tools:targetApi="lollipop">

  <item android:id="@android:id/mask">
    <shape android:shape="rectangle">
      <solid android:color="@color/blue" />
      <corners android:radius="@dimen/dp10" />
    </shape>
  </item>

</ripple>
ripple_6.xml
<?xml version="1.0" encoding="utf-8"?>

<!--相当于 ripple 和 selector 的叠加-->
<ripple xmlns:android="http://schemas.android.com/apk/res/android"
  xmlns:tools="http://schemas.android.com/tools"
  android:color="@color/colorAccent"
  tools:targetApi="lollipop">

  <item>
    <selector>
      <item
        android:drawable="@drawable/daomeixiong"
        android:state_pressed="true" />

      <item android:drawable="@drawable/gongfuxiongmao" />
    </selector>
  </item>
</ripple>
(2)、java代码中定义ripple
下列代码依次对应效果图中的后五个
/**
 * 作者:CnPeng
 * 时间:2018/8/8
 * 功用:Ripple使用示例
 * 其他:
 */
public class RippleDrawableActivity extends AppCompatActivity {
  ActivityRippleBinding mBinding;

  @RequiresApi(api = Build.VERSION_CODES.LOLLIPOP)
  @Override
  protected void onCreate(@Nullable Bundle savedInstanceState) {
    super.onCreate(savedInstanceState);
    mBinding = DataBindingUtil.setContentView(this, R.layout.activity_ripple);

    initTv1RippleBG(R.color.f9cf87);
    initTv2RippleBG();
    initTv3RippleBG();
    initTv4RippleBG();
    initTv5RippleBG();
  }

  /**
   * 作者:CnPeng
   * 时间:2018/8/8 下午3:37
   * 功用:xml中已经设置背景为 ripple_1.xml 为背景,此处是更改ripple_1中的颜色
   * 说明:
   */
  @SuppressLint("ClickableViewAccessibility")
  @RequiresApi(api = Build.VERSION_CODES.LOLLIPOP)
  public void initTv1RippleBG(final int colorResId) {
    final RippleDrawable rippleDrawable = (RippleDrawable) mBinding.tvRippleBg1.getBackground();
    mBinding.tvRippleBg1.setOnTouchListener(new View.OnTouchListener() {
      @RequiresApi(api = Build.VERSION_CODES.M)
      @Override
      public boolean onTouch(View v, MotionEvent event) {
        rippleDrawable.setHotspot(event.getX(), event.getY());
        //如果radius小于控件的宽高中的大值,则,触摸超出radius的部分时,也只会在控件中心位置为起点以radius为半径绘制ripple
        rippleDrawable.setRadius(200);
        rippleDrawable.setColor(ColorStateList.valueOf(getResources().getColor(colorResId)));
        return false;
      }
    });
  }

  /**
   * 作者:CnPeng
   * 时间:2018/8/8 下午12:02
   * 功用:以代码的方式构建rippleDrawable为背景——没有设置mask
   * 说明:http://www.tothenew.com/blog/ripple-effect-in-android/
   * https://www.programcreek.com/java-api-examples/index.php?api=android.graphics.drawable.RippleDrawable
   */
  @RequiresApi(api = Build.VERSION_CODES.LOLLIPOP)
  private void initTv2RippleBG() {

    int[][] stateList = new int[][]{
        new int[]{android.R.attr.state_pressed},
        new int[]{android.R.attr.state_focused},
        new int[]{android.R.attr.state_activated},
        new int[]{}
    };

    //深蓝
    int normalColor = Color.parseColor("#303F9F");
    //玫瑰红
    int pressedColor = Color.parseColor("#FF4081");
    int[] stateColorList = new int[]{
        pressedColor,
        pressedColor,
        pressedColor,
        normalColor
    };
    ColorStateList colorStateList = new ColorStateList(stateList, stateColorList);

    RippleDrawable rippleDrawable = new RippleDrawable(colorStateList, null, null);
    mBinding.tvRippleBg2.setBackground(rippleDrawable);
  }

  /**
   * 作者:CnPeng
   * 时间:2018/8/8 下午12:02
   * 功用:以代码的方式构建rippleDrawable为背景——有drawable,但不设置mask
   * 说明:http://www.tothenew.com/blog/ripple-effect-in-android/
   * https://www.programcreek.com/java-api-examples/index.php?api=android.graphics.drawable.RippleDrawable
   */
  @RequiresApi(api = Build.VERSION_CODES.LOLLIPOP)
  private void initTv3RippleBG() {

    int[][] stateList = new int[][]{
        new int[]{android.R.attr.state_pressed},
        new int[]{android.R.attr.state_focused},
        new int[]{android.R.attr.state_activated},
        new int[]{}
    };

    //深蓝
    int normalColor = Color.parseColor("#303F9F");
    //玫瑰红
    int pressedColor = Color.parseColor("#FF4081");
    int[] stateColorList = new int[]{
        pressedColor,
        pressedColor,
        pressedColor,
        normalColor
    };
    ColorStateList colorStateList = new ColorStateList(stateList, stateColorList);

    Drawable drawable = getResources().getDrawable(R.drawable.act_attentioned);
    RippleDrawable rippleDrawable = new RippleDrawable(colorStateList, drawable, null);
    mBinding.tvRippleBg3.setBackground(rippleDrawable);
  }

  /**
   * 作者:CnPeng
   * 时间:2018/8/8 下午12:02
   * 功用:以代码的方式构建rippleDrawable为背景——无drawable,设置mask
   * 说明:http://www.tothenew.com/blog/ripple-effect-in-android/
   * https://www.programcreek.com/java-api-examples/index.php?api=android.graphics.drawable.RippleDrawable
   */
  @RequiresApi(api = Build.VERSION_CODES.LOLLIPOP)
  private void initTv4RippleBG() {

    int[][] stateList = new int[][]{
        new int[]{android.R.attr.state_pressed},
        new int[]{android.R.attr.state_focused},
        new int[]{android.R.attr.state_activated},
        new int[]{}
    };

    //深蓝
    int normalColor = Color.parseColor("#303F9F");
    //玫瑰红
    int pressedColor = Color.parseColor("#FF4081");
    int[] stateColorList = new int[]{
        pressedColor,
        pressedColor,
        pressedColor,
        normalColor
    };
    ColorStateList colorStateList = new ColorStateList(stateList, stateColorList);

    Drawable drawable = getResources().getDrawable(R.drawable.act_attentioned);
    RippleDrawable rippleDrawable = new RippleDrawable(colorStateList, null, drawable);
    mBinding.tvRippleBg4.setBackground(rippleDrawable);
  }

  /**
   * 作者:CnPeng
   * 时间:2018/8/8 下午12:02
   * 功用:以代码的方式构建rippleDrawable为背景——有drawable,设置mask
   * 说明:http://www.tothenew.com/blog/ripple-effect-in-android/
   * https://www.programcreek.com/java-api-examples/index.php?api=android.graphics.drawable.RippleDrawable
   */
  @RequiresApi(api = Build.VERSION_CODES.LOLLIPOP)
  private void initTv5RippleBG() {

    int[][] stateList = new int[][]{
        new int[]{android.R.attr.state_pressed},
        new int[]{android.R.attr.state_focused},
        new int[]{android.R.attr.state_activated},
        new int[]{}
    };

    //深蓝
    int normalColor = Color.parseColor("#303F9F");
    //玫瑰红
    int pressedColor = Color.parseColor("#FF4081");
    int[] stateColorList = new int[]{
        pressedColor,
        pressedColor,
        pressedColor,
        normalColor
    };
    ColorStateList colorStateList = new ColorStateList(stateList, stateColorList);

    float[] outRadius = new float[]{10, 10, 15, 15, 20, 20, 25, 25};
    RoundRectShape roundRectShape = new RoundRectShape(outRadius, null, null);
    ShapeDrawable maskDrawable = new ShapeDrawable();
    maskDrawable.setShape(roundRectShape);
    maskDrawable.getPaint().setColor(Color.parseColor("#000000"));
    maskDrawable.getPaint().setStyle(Paint.Style.FILL);

    ShapeDrawable contentDrawable = new ShapeDrawable();
    contentDrawable.setShape(roundRectShape);
    contentDrawable.getPaint().setColor(Color.parseColor("#f7c653"));
    contentDrawable.getPaint().setStyle(Paint.Style.FILL);

    //contentDrawable实际是默认初始化时展示的;maskDrawable 控制了rippleDrawable的范围
    RippleDrawable rippleDrawable = new RippleDrawable(colorStateList, contentDrawable, maskDrawable);
    mBinding.tvRippleBg5.setBackground(rippleDrawable);
  }
}
(3)、activity_ripple.xml
<?xml version="1.0" encoding="utf-8"?>
<layout>

  <ScrollView xmlns:android="http://schemas.android.com/apk/res/android"
    android:layout_width="match_parent"
    android:layout_height="match_parent"
    android:fillViewport="true"
    android:orientation="vertical">

    <LinearLayout
      android:layout_width="match_parent"
      android:layout_height="match_parent"
      android:gravity="center_horizontal"
      android:orientation="vertical"
      android:padding="@dimen/dp10">

      <!--无界水波纹效果,所谓无界,实际是以空间宽度或高度中的大值作为直径绘制一个园-->
      <TextView
        android:layout_width="150dp"
        android:layout_height="50dp"
        android:background="@drawable/ripple_1"
        android:clickable="true"
        android:gravity="center"
        android:text="不设置mask/wrapContent" />

      <TextView
        android:layout_width="match_parent"
        android:layout_height="50dp"
        android:background="@drawable/ripple_1"
        android:clickable="true"
        android:gravity="center"
        android:text="不设置mask/match_parent" />

      <!--有界水波纹效果。水波纹效果只在控件内绘制-->
      <TextView
        android:layout_width="match_parent"
        android:layout_height="50dp"
        android:background="@drawable/ripple_2"
        android:clickable="true"
        android:gravity="center"
        android:text="mask/match_parent/drawable_color" />

      <TextView
        android:layout_width="match_parent"
        android:layout_height="50dp"
        android:background="@drawable/ripple_3"
        android:clickable="true"
        android:gravity="center"
        android:text="mask/match_parent/drawable_drawable" />

      <TextView
        android:layout_width="match_parent"
        android:layout_height="50dp"
        android:background="@drawable/ripple_4"
        android:clickable="true"
        android:gravity="center"
        android:text="match_parent/drawable_shape" />

      <TextView
        android:layout_width="match_parent"
        android:layout_height="50dp"
        android:layout_marginTop="@dimen/dp10"
        android:background="@drawable/ripple_5"
        android:clickable="true"
        android:gravity="center"
        android:text="match_parent/drawable_shape" />

      <TextView
        android:layout_width="match_parent"
        android:layout_height="50dp"
        android:layout_marginTop="@dimen/dp10"
        android:background="@drawable/ripple_6"
        android:clickable="true"
        android:gravity="center"
        android:text="match_parent/drawable_shape" />

      <!--测试代码控制ripple颜色-->
      <TextView
        android:id="@+id/tv_rippleBg1"
        android:layout_width="match_parent"
        android:layout_height="50dp"
        android:layout_marginTop="@dimen/dp10"
        android:background="@drawable/ripple_1"
        android:clickable="true"
        android:gravity="center"
        android:text="代码控制更改ripple.xml中的颜色" />

      <!--测试代码控制ripple颜色-->
      <TextView
        android:id="@+id/tv_rippleBg2"
        android:layout_width="match_parent"
        android:layout_height="50dp"
        android:layout_marginTop="@dimen/dp10"
        android:clickable="true"
        android:gravity="center"
        android:text="代码编写ripple作为Tv背景_无derawable_无mask" />

      <!--测试代码控制ripple颜色-->
      <TextView
        android:id="@+id/tv_rippleBg3"
        android:layout_width="match_parent"
        android:layout_height="50dp"
        android:layout_marginTop="@dimen/dp10"
        android:clickable="true"
        android:gravity="center"
        android:text="代码控制ripple3_有drawable_无mask" />

      <!--测试代码控制ripple颜色-->
      <TextView
        android:id="@+id/tv_rippleBg4"
        android:layout_width="match_parent"
        android:layout_height="50dp"
        android:layout_marginTop="@dimen/dp10"
        android:clickable="true"
        android:gravity="center"
        android:text="代码控制ripple4_无drawable_有mask" />

      <!--测试代码控制ripple颜色-->
      <TextView
        android:id="@+id/tv_rippleBg5"
        android:layout_width="match_parent"
        android:layout_height="50dp"
        android:layout_marginTop="@dimen/dp10"
        android:clickable="true"
        android:gravity="center"
        android:text="代码控制ripple5_有drawable_有mask" />
    </LinearLayout>
  </ScrollView>
</layout>
四、总结
(1)、涟漪效果的应用现状
| 应用名称 | 是否应用涟漪效果 | 应用的位置 |
|---|---|---|
| 知乎 | 有 | 在底部导航和首页列表中有应用 |
| 无 | 无 | |
| 微信 | 无 | 无 |
| 简书 | 无 | 无 |
| 支付宝 | 无 | 无 |
| 口碑 | 无 | 无 |
| 微博 | 无 | 无 |
| 美团 | 无 | 无 |
| 淘宝 | 有 | 消息列表和Dialog中的按钮 |
在查看了我自己常用的几款软件之后,发现,只有知乎和淘宝在局部使用了这个涟漪效果,这。。。似乎有点尴尬啊
以上就是本文的全部内容,希望对大家的学习有所帮助,也希望大家多多支持我们。

