Android制作漂亮自适布局键盘的方法
最近做了个自定义键盘,但面对不同分辨率的机型其中数字键盘不能根据界面大小自已铺满,但又不能每种机型都做一套吧,所以要做成自适应,那这里主讲思路。
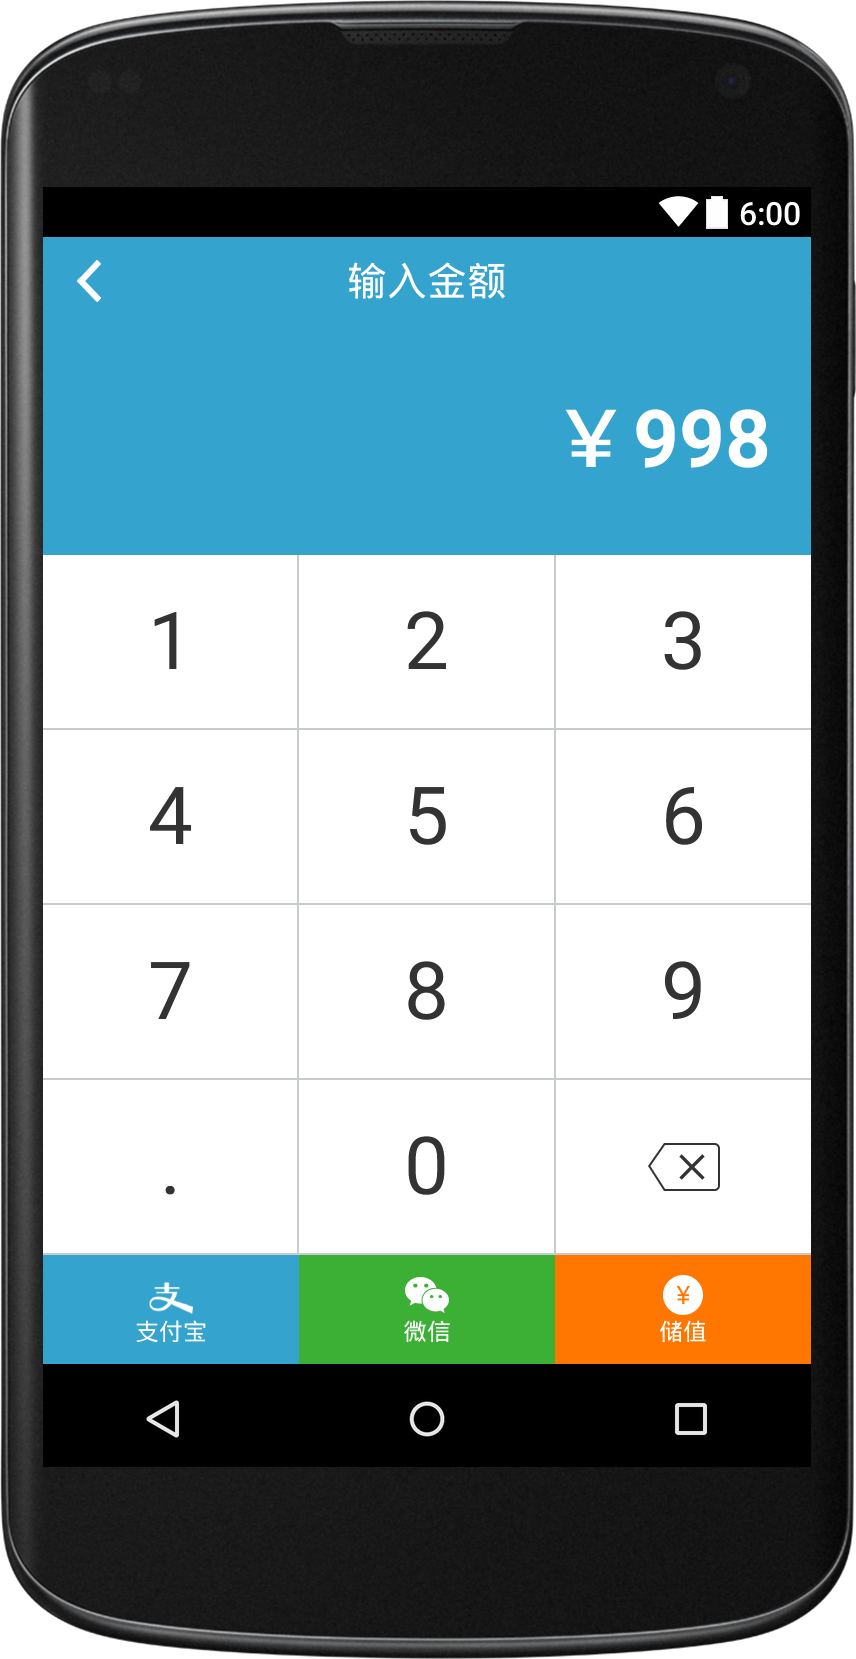
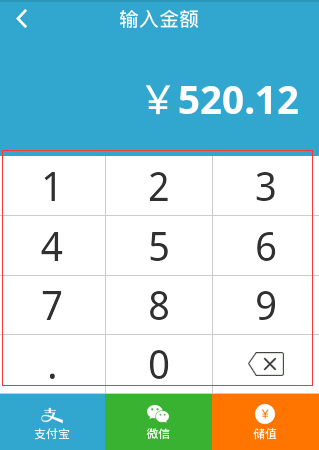
这里最上面的titlebar高度固定,下面输入的金额高度也固定(当然也可以自适应),主要是中间的数字键盘,高度和宽度需要自适应。先来张效果图:

最常见的解决方案是用线性布局,自适应当然是按比例,但布局中无%的概念,那就要用到layout_weight了,该属性的作用是决定控件在其父布局中的显示权重(具体概念就不多说了)。
这里用一个LinearLayout 将数字键盘与下面的支付类型进行包装,然后用一个大LinearLayout包住所有的数字键盘如下图,它与下面支付类型比例是6:1,这样数字键盘就会按屏幕大小高度与宽度进行变化,每一行数字键盘用一个LinearLayout,里面包3个数字显示Button按钮。

设置每行的LinearLayout的layout_height=0dp,layout_weight=1,具体设置如下:
 <style name="layout_input_amount_style">
  <item name="android:layout_width">match_parent</item>
  <item name="android:layout_height">0dp</item>
  <item name="android:layout_weight">1</item>
  <item name="android:layout_marginBottom">1dp</item>
  <item name="android:gravity">center</item>
  <item name="android:orientation">horizontal</item>
 </style>
这样就保证了上下自适应布局。然后行里面的Button也是平均分配,不过这里是横向布局:layout_width=0dp,layout_weight=1,具体设置如下:
<style name="btn_input_amount_style">
  <item name="android:layout_width">0dp</item>
  <item name="android:layout_height">match_parent</item>
  <item name="android:layout_weight">1</item>
  <item name="android:textSize">40sp</item>
  <item name="android:textColor">#333333</item>
  <item name="android:background">@color/white</item>
 </style>
这样就达到了上面的数字键盘的上下左右自适应了。现在的问题是其中的灰色边框怎么出来呢?TextView中没有设置border的属性,网上找的方法又很麻烦。
这里需要用到一个技巧,利用灰色背景,让两个按键间的margin=1,上下也是margin=1,但是最右边的3、6、9和最后一行不用加。
<Button
 android:id="@+id/btn_1"
 style="@style/btn_input_amount_style"
 android:layout_marginRight="1dp"
 android:text="1" />
为什么要设置layout_width=0dp?结合layout_weight,可以使控件成正比例显示,轻松解决了当前Android开发最为头疼的碎片化问题之一。如果设置成wrap_content,内容过长会导致上下无法对齐的情况。
下面为整个布局内容:
<?xml version="1.0" encoding="utf-8"?>
<RelativeLayout xmlns:android="http://schemas.android.com/apk/res/android"
 xmlns:tools="http://schemas.android.com/tools"
 android:layout_width="match_parent"
 android:layout_height="match_parent"
 android:orientation="vertical"
 tools:context="com.view.InputAmountActivity">
 <RelativeLayout
  android:id="@+id/bar_input"
  android:layout_width="match_parent"
  android:layout_height="@dimen/title_bar_height"
  android:background="@color/logo_background"
  android:orientation="horizontal">
  <TextView
   android:id="@+id/bar_back"
   android:layout_width="wrap_content"
   android:layout_height="match_parent"
   android:background="@color/transparent"
   android:drawableLeft="@drawable/btn_back_detail"
   android:paddingLeft="17dip"
   android:paddingRight="17dip" />
  <TextView
   android:id="@+id/bar_title"
   style="@style/title_text_style"
   android:layout_width="wrap_content"
   android:layout_height="wrap_content"
   android:layout_centerInParent="true"
   android:layout_marginLeft="50dp"
   android:layout_marginRight="50dp"
   android:singleLine="true"
   android:text="输入金额" />
 </RelativeLayout>
 <LinearLayout
  android:id="@+id/txt_amount"
  android:layout_width="match_parent"
  android:layout_height="wrap_content"
  android:layout_below="@id/bar_input"
  android:background="@color/logo_background">
  <TextView
   android:id="@+id/txt_pay_amount"
   android:layout_width="match_parent"
   android:layout_height="115dp"
   android:background="@color/transparent"
   android:gravity="right|center"
   android:paddingLeft="17dip"
   android:paddingRight="20dp"
   android:text="¥998"
   android:textColor="@color/white"
   android:textSize="40sp"
   android:textStyle="bold" />
 </LinearLayout>
 <LinearLayout
  android:layout_width="match_parent"
  android:layout_height="match_parent"
  android:layout_below="@id/txt_amount"
  android:orientation="vertical">
  <LinearLayout
   android:id="@+id/table_num"
   android:layout_width="match_parent"
   android:layout_height="match_parent"
   android:layout_weight="6"
   android:background="#c8cbcc"
   android:orientation="vertical">
   <LinearLayout style="@style/layout_input_amount_style">
    <Button
     android:id="@+id/btn_1"
     style="@style/btn_input_amount_style"
     android:layout_marginRight="1dp"
     android:text="1" />
    <Button
     android:id="@+id/btn_2"
     style="@style/btn_input_amount_style"
     android:layout_marginRight="1dp"
     android:text="2" />
    <Button
     android:id="@+id/btn_3"
     style="@style/btn_input_amount_style"
     android:text="3" />
   </LinearLayout>
   <LinearLayout style="@style/layout_input_amount_style">
    <Button
     android:id="@+id/btn_4"
     style="@style/btn_input_amount_style"
     android:layout_marginRight="1dp"
     android:text="4" />
    <Button
     android:id="@+id/btn_5"
     style="@style/btn_input_amount_style"
     android:layout_marginRight="1dp"
     android:text="5" />
    <Button
     android:id="@+id/btn_6"
     style="@style/btn_input_amount_style"
     android:text="6" />
   </LinearLayout>
   <LinearLayout style="@style/layout_input_amount_style">
    <Button
     android:id="@+id/btn_7"
     style="@style/btn_input_amount_style"
     android:layout_marginRight="1dp"
     android:text="7" />
    <Button
     android:id="@+id/btn_8"
     style="@style/btn_input_amount_style"
     android:layout_marginRight="1dp"
     android:text="8" />
    <Button
     android:id="@+id/btn_9"
     style="@style/btn_input_amount_style"
     android:text="9" />
   </LinearLayout>
   <LinearLayout style="@style/layout_input_amount_style">
    <Button
     android:id="@+id/btn_t"
     style="@style/btn_input_amount_style"
     android:layout_marginRight="1dp"
     android:text="." />
    <Button
     android:id="@+id/btn_0"
     style="@style/btn_input_amount_style"
     android:layout_marginRight="1dp"
     android:text="0" />
    <ImageButton
     android:id="@+id/btn_d"
     style="@style/btn_input_amount_style"
     android:src="@drawable/ico_del" />
   </LinearLayout>
  </LinearLayout>
  <LinearLayout
   android:layout_width="match_parent"
   android:layout_height="68dp"
   android:layout_weight="1"
   android:orientation="horizontal">
   <LinearLayout
    android:id="@+id/layout_zhifubao"
    android:layout_width="0dp"
    android:layout_height="wrap_content"
    android:layout_weight="1"
    android:background="@color/logo_background"
    android:gravity="center"
    android:orientation="vertical">
    <ImageView
     android:layout_width="wrap_content"
     android:layout_height="wrap_content"
     android:layout_marginTop="9dp"
     android:src="@drawable/ico_zhifubao" />
    <TextView
     android:layout_width="wrap_content"
     android:layout_height="wrap_content"
     android:layout_marginBottom="9dp"
     android:text="支付宝"
     android:textColor="@color/white"
     android:textSize="12sp" />
   </LinearLayout>
   <LinearLayout
    android:id="@+id/layout_wechat"
    android:layout_width="0dp"
    android:layout_height="wrap_content"
    android:layout_weight="1"
    android:background="#3cb034"
    android:gravity="center"
    android:orientation="vertical">
    <ImageView
     android:layout_width="wrap_content"
     android:layout_height="wrap_content"
     android:layout_marginTop="9dp"
     android:src="@drawable/ico_wechat" />
    <TextView
     android:layout_width="wrap_content"
     android:layout_height="wrap_content"
     android:layout_marginBottom="9dp"
     android:text="微信"
     android:textColor="@color/white"
     android:textSize="12sp" />
   </LinearLayout>
   <LinearLayout
    android:id="@+id/layout_pay"
    android:layout_width="0dp"
    android:layout_height="wrap_content"
    android:layout_weight="1"
    android:background="#ff7700"
    android:gravity="center"
    android:orientation="vertical">
    <ImageView
     android:layout_width="wrap_content"
     android:layout_height="wrap_content"
     android:layout_marginTop="9dp"
     android:src="@drawable/ico_pay" />
    <TextView
     android:layout_width="wrap_content"
     android:layout_height="wrap_content"
     android:layout_marginBottom="9dp"
     android:text="储值"
     android:textColor="@color/white"
     android:textSize="12sp" />
   </LinearLayout>
  </LinearLayout>
 </LinearLayout>
</RelativeLayout>
是不是很酷?
图标什么的自己上网找吧,这里就不贴出来了。
Android制作漂亮自适布局键盘的方法就先给大家介绍到这里,后续还会持续更新相关知识,希望大家继续关注我们网站,谢谢!

