vue3.0 搭建项目总结(详细步骤)
1.环境配置
项目中的不同开发环境有很多依赖配置,所以可以根据环境设置不同的配置,以免在不同环境经常修改文件
1 在根目录下创建 `.env.[环境]` 文件,可以在不同环境设置一些配置变量,如图


.env.dev 文件
2.eslint 配置
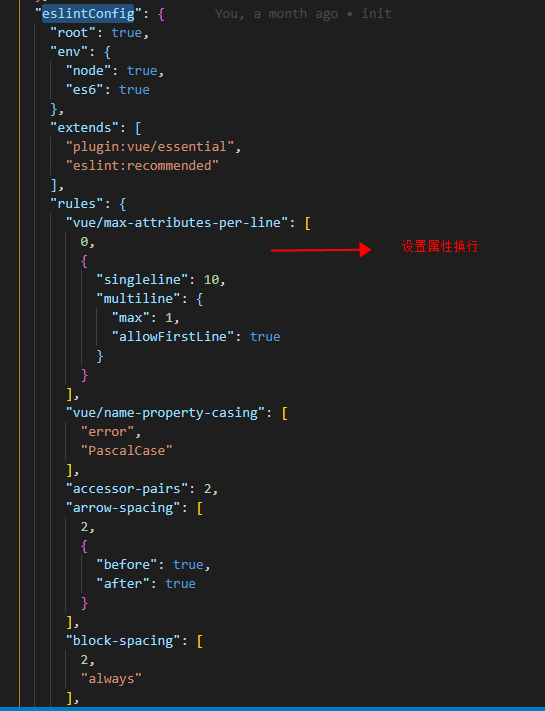
在package.json 文件里面有一个eslintConfig对象,可设置rules: 如图

3.配置svg
在vue.config.js 里面需在module.exports对象里面设置
chainWebpack: config => {
  config.module.rules.delete('svg') // 重点:删除默认配置中处理svg,//const svgRule = config.module.rule('svg') //svgRule.uses.clear()
  config.module
   .rule('svg-sprite-loader')
   .test(/\.svg$/)
   .use('svg-sprite-loader')
   .loader('svg-sprite-loader')
   .options({
    symbolId: 'icon-[name]'
   })
 }
svg component
<template>
 <svg :class="svgClass" aria-hidden="true">
  <use :xlink:href="iconName" rel="external nofollow" />
 </svg>
</template>

<script>
export default {
 name: 'SvgIcon',
 props: {
  iconClass: {
   type: String,
   required: true
  },
  className: {
   type: String,
   default: ''
  }
 },
 computed: {
  iconName() {
   return `#icon-${this.iconClass}`
  },
  svgClass() {
   if (this.className) {
    return 'svg-icon ' + this.className
   } else {
    return 'svg-icon'
   }
  }
 }
}
</script>

<style scoped>
.svg-icon {
 width: 1em;
 height: 1em;
 vertical-align: -0.15em;
 fill: currentColor;
 overflow: hidden;
}
</style>

```
使用svg组件
import SvgIcon from '@/components/SvgIcon.vue'
// 设置全局组件svgIcon
Vue.component('svg-icon', SvgIcon)
const req = require.context('./assets/svg', true, /\.svg$/) // 查询文件加下面的svg文件
const requireAll = requireContext => requireContext.keys().map(requireContext)
requireAll(req) // 全局导入svg文件
2.通用组件
级联(多选且可以选择全部)组件
安装插件 multi-cascader-base-ele
使用
import multiCascader from 'multi-cascader-base-ele'
Vue.use(multiCascader)
-- 支持选择全部
<template>
 <div>
  <MultiTestCascader v-model="selectedOptions" class="multi-cascader" :props="customProps" :options="options" multiple filterable select-children :show-all-levels="false" clearable only-out-put-leaf-node @change="cascaderChange" />
 </div>
</template>
<script>
export default {
 props: {
 // 传入级联列表数据
  options: {
   type: Array,
   default: () => []
  },
  // 传入选择数据
  list: {
   type: Array,
   default: () => []
  },
  // 自定义相关字段
  customProps: {
   type: Object,
   default: () => {
    return {
     label: 'label',
     value: 'value',
     children: 'children'
    }
   }
  },
  // 显示全部类型 1 全部二级/全部三级 2 全部二级分类/全部三级分类 3 全省/全市
  type: {
   type: String,
   default: () => '1'
  }
 },
 data() {
  return {
   selectedOptions: this.list,
   listStatus: true
  }
 },
 created() {

 },
 watch: {
  options(newValue, oldValue) {
   this.setListDisabled(newValue)
   this.addAllLabel(newValue)
  },
  list(newValue) {
   if (this.listStatus) {
    this.cascaderChange(newValue)
    this.listStatus = false
   }
  }
 },
 mounted() {
  this.setListDisabled(this.options)
  this.addAllLabel(this.options)
 },
 methods: {
  addAllLabel(list) {
   list.forEach(val => {
    if (val[this.customProps.children] && val[this.customProps.children].length > 0 && val[this.customProps.children][0][this.customProps.label] !== (this.type === '1' ? '全部一级' : (this.type === '2' ? '全部一级分类' : (this.type === '3' ? '全省' : '')))) {
     if (val[this.customProps.children].length > 1) {
      val[this.customProps.children].unshift({
       [this.customProps.label]: this.type === '1' ? '全部二级' : (this.type === '2' ? '全部二级分类' : (this.type === '3' ? '全省' : '')),
       [this.customProps.value]: val[this.customProps.value],
       [this.customProps.children]: null
      })
     }
     val[this.customProps.children].forEach(v => {
      if (v[this.customProps.children] && v[this.customProps.children].length > 1 && v[this.customProps.children][0][this.customProps.label] !== (this.type === '1' ? '全部二级' : (this.type === '2' ? '全部二级分类' : (this.type === '3' ? '全省' : '')))) {
       if (v[this.customProps.children].length > 1) {
        v[this.customProps.children].unshift({
         [this.customProps.label]: this.type === '1' ? '全部三级' : (this.type === '2' ? '全部三级分类' : (this.type === '3' ? '全市' : '')),
         [this.customProps.value]: v[this.customProps.value],
         [this.customProps.children]: null
        })
       }
      }
     })
    }
   })
  },
  setListDisabled(list) {
   const label = this.customProps.label
   const value = this.customProps.value
   const children = this.customProps.children
   list.forEach(val => {
    val.disabled = false
    if (val[children]) this.setListDisabled(val[children])
   })
  },
  cascaderChange(itemList) {
   if (!itemList || itemList.length === 0) {
    this.selectedOptions = []
   }
   this.setListDisabled(this.options)
   const label = this.customProps.label
   const value = this.customProps.value
   const children = this.customProps.children
   this.options.forEach((v, l) => {
    this.selectedOptions.forEach(val => {
     if (val[0] === '-1') {
      if (v[value] !== '-1') v.disabled = true
      else v.disabled = false
      if (v[children] && v[children].length > 0) {
       v[children].forEach(c => { c.disabled = true })
      }
     } else {
      if (v[value] === '-1') v.disabled = true
      else v.disabled = false
      if (v[children] && v[children].length > 0) {
       v[children].forEach(c => { c.disabled = false })
      }
     }
     if (val.length === 2 && v[value] === val[0] && v[children]) {
      v[children].forEach((item, num) => {
       item.disabled = false
       if (val[0] === val[1] && item[value] === val[1]) {
        item.disabled = false
       } else {
        if (val[0] === val[1] && num !== 0) {
         item.disabled = true
         if (item[children]) {
          item[children].forEach(i => {
           i.disabled = true
          })
         }
        }
        if (val[0] !== val[1] && num === 0 && v[children].length > 1) item.disabled = true
       }
       // this.options[l][children][0].disabled = true
      })
     }
     if (val.length === 3 && v[value] === val[0] && v[children]) {
      v[children].forEach((item, j) => {
       // let status = false
       if (item[children] && val[1] === item[value]) {
        item.disabled = false
        item[children].forEach((i, index) => {
         i.disabled = false
         if (i[value] === val[2]) status = true
         if (i[value] === val[2] && val[1] === val[2]) {
          i.disabled = false
         } else {
          if (val[1] !== val[2] && index === 0 && v[children].length > 1) i.disabled = true
          if (val[1] === val[2] && index !== 0) i.disabled = true
         }
        })
        // this.options[0].disabled = true
        this.options[l][children][0].disabled = true
        // return status
       }
      })
     }
    })
   })
   this.selectedOptions = this.selectedOptions.map(val => {
    if (val.length === 2 && val[0] === val[1]) return [val[0]]
    if (val.length === 1 && val[0] === '-1') return [val[0]]
    if (val.length === 3 && val[1] === val[2]) return [val[0], val[1]]
    return val
   })
   const item = this.selectedOptions[this.selectedOptions.length - 1]
   const length = this.selectedOptions.length
   let status = -1
   this.selectedOptions.some((val, index) => {
    if ((length - 1) === index) return true
    if (item.length === val.length) {
     if (item.join(',') === val.join(',')) {
      status = 1
      return true
     }
    }
    if (item.length > val.length) {
     if (item.join(',').includes(val.join(','))) {
      status = 2
      return true
     }
    }
    if (val.length > item.length) {
     if (val.join(',').includes(item.join(','))) {
      status = 3
      return true
     }
    }
   })
   if (status !== -1) {
    this.selectedOptions.splice(this.selectedOptions.length - 1, 1)
   }
   this.$emit('update:list', this.selectedOptions)
  }
 }
}
</script>
上传(支持图片/视频/裁剪图片/拖拽)
安装插件
vuedraggable axios vue-cropper
代码
<!-- -->
<template>
 <div class="image-draggable">
  <draggable v-model="draggableList" @end="onEnd">
   <!-- <transition-group> -->
   <div v-for="(item, index) in draggableList" :key="index" class="image-list">
    <template v-if="item.isImg">
     <img :src="item.displayUrl" alt="" srcset="" style="width: 148px; height: 148px;">
     <div class="icon">
      <span @click="viewImage(item.displayUrl)">
       <svg-icon icon-class="view" class="icon-size" style="margin-right: 10px;"></svg-icon>
      </span>
      <span @click="remove(index)">
       <svg-icon icon-class="delete" class="icon-size"></svg-icon>
      </span>
     </div>
    </template>
    <template v-if="!item.isImg">
     <video :src="item.displayUrl" :ref="item.id" :id="item.id" :poster="item.coverUrl" style="width: 148px; height: 148px;">
     </video>
     <div class="icon">
      <span v-if="item.isPlay" @click="play(item)" class="video-icon">
       <svg-icon icon-class="play" class="icon-size"></svg-icon>
      </span>
      <span v-if="!item.isPlay" @click="pause(item)" class="video-icon">
       <svg-icon icon-class="pause" class="icon-size"></svg-icon>
      </span>
      <span @click="fullPlay(item)" class="video-icon">
       <svg-icon icon-class="full" class="icon-size"></svg-icon>
      </span>
      <span @click="remove(index)">
       <svg-icon icon-class="delete" class="icon-size"></svg-icon>
      </span>
     </div>
    </template>
   </div>

   <!-- </transition-group> -->
  </draggable>
  <el-upload :id="uploadId" :disabled="isDiabled" :action="uploadUrl" class="image-upload" :headers="headers" :accept="accept" list-type="picture-card" :show-file-list="false" :on-preview="handlePictureCardPreview" :on-progress="handleProgress" :on-change="fileChange" :auto-upload="!isCropper" :on-remove="handleRemove" :on-success="imageSuccess" :before-upload="fileBeforeUpload">
   <i class="el-icon-plus"></i>
   <el-progress :percentage="percentage" v-if="isUpload && isLoading" :show-text="false"></el-progress>
  </el-upload>
  <el-dialog :visible.sync="dialogVisible">
   <img width="100%" :src="dialogImageUrl" alt="">
  </el-dialog>
  <el-dialog :visible.sync="modifyCropper">
   <div :style="{height: (autoCropHeight + 100) + 'px'}">
    <vueCropper ref="cropper" :img="imgSrc" :outputSize="option.size" :outputType="option.outputType" :info="true" :full="option.full" :canMove="option.canMove" :canMoveBox="option.canMoveBox" :original="option.original" :autoCrop="option.autoCrop" :autoCropHeight="autoCropHeight" :autoCropWidth="autoCropWidth" :fixedBox="option.fixedBox" @realTime="realTime" @imgLoad="imgLoad"></vueCropper>
   </div>
   <span slot="footer" class="dialog-footer">
    <el-button @click="modifyCropper = false">取 消</el-button>
    <el-button type="primary" @click="uploadCropperImage">确 定</el-button>
   </span>
  </el-dialog>
 </div>
</template>

<script>
// 拖拽
import draggable from 'vuedraggable'
// 裁剪
import { VueCropper } from 'vue-cropper'
// 上传地址
import { upload } from '@/api'
import { getToken } from '@/util/auth'
import axios from 'axios'

export default {
 name: '',
 data() {
  return {
   headers: {
    Authorization: getToken()
   },
   uploadUrl: upload,
   displayUrl: '',
   dialogImageUrl: '',
   dialogVisible: false,
   percentage: 0,
   accept: '',
   draggableList: [],
   isUpload: false,
   modifyCropper: false,
   isDiabled: false,
   cropperImage: {
   },
   uploadId: 'id' + Date.now(),
   imgSrc: '',
   option: {
    size: 0.5,
    full: true, // 输出原图比例截图 props名full
    outputType: 'png',
    canMove: true,
    original: true,
    canMoveBox: false,
    autoCrop: true,
    fixedBox: true
   }
  }
 },
 props: {
  // 已存在的文件
  fileList: {
   type: Array,
   default() {
    return [
    ]
   }
  },
  // 返回类型 Array 数组 Object 对象
  returnType: {
   type: String,
   default: 'Array'
  },
  // 自定义对象
  customObject: {
   type: Object,
   default: () => { }
  },
  // 上传的最大个数
  maxNum: {
   type: Number,
   required: true,
   default: 1
  },
  // 单位MB
  maxSize: {
   type: Number,
   default: 15
  },
  autoCropWidth: {
   type: Number,
   default: 180
  },
  autoCropHeight: {
   type: Number,
   default: 180
  },
  // 上传类型 All 图片/视频 image 图片 video视频
  acceptType: {
   type: String,
   default: 'All'
  },
  // 是否裁剪
  isCropper: {
   type: Boolean,
   default: false
  },
  // 是否显示加载条
  isLoading: {
   type: Boolean,
   default: true
  },

  outputSize: {
   type: Number,
   default: 1
  },
  outputType: {
   type: String,
   default: 'jpeg'
  }
 },
 components: {
  draggable,
  VueCropper
 },
 watch: {
  draggableList(newValue, oldValue) {
   this.getElement(this.draggableList.length)
  },
  fileList(newValue, oldValue) {
   this.draggableList = newValue
   this.initImage()
  }
 },

 computed: {},

 mounted() {
  if (this.acceptType === 'All') {
   this.accept = 'image/png, image/jpeg, image/gif, image/jpg, .mp4,.qlv,.qsv,.ogg,.flv,.avi,.wmv,.rmvb'
  }
  if (this.acceptType === 'image') {
   this.accept = 'image/png, image/jpeg, image/gif, image/jpg'
  }
  if (this.acceptType === 'video') {
   this.accept = '.mp4,.qlv,.qsv,.ogg,.flv,.avi,.wmv,.rmvb'
  }
  this.initImage()
 },
 methods: {
  // 获取五位数的随机数
  getRandom() {
   return (((Math.random() + Math.random()) * 10000) + '').substr(0, 5).replace('.', 0)
  },
  initImage() {
   const _this = this
   // console.log('file', this.fileList)
   if (this.fileList.length > 0) {
    this.draggableList = this.fileList.map(val => {
     let displayUrl = ''
     let coverUrl = ''
     let isImg = true
     const files = (val.url ? val.url : val).split(',')
     if (files.length === 3) {
      displayUrl = files[1]
      coverUrl = files[2]
      isImg = false
     } else if (files.length === 1) {
      displayUrl = (val.url ? val.url : val)
      isImg = true
     }
     const fileObj = Object.assign({}, {
      coverUrl: coverUrl,
      displayUrl: displayUrl,
      isImg: isImg,
      isPlay: true,
      name: Date.now(),
      url: (val.url ? val.url : val),
      id: val.id || Date.now() + _this.getRandom()
     })
     return fileObj
    }).filter(val => { return val.url })
   }
  },
  handleRemove(file, fileList) {
   this.getElement(fileList.length)
  },
  handlePictureCardPreview(file) {
   this.dialogImageUrl = file.url
   this.dialogVisible = true
  },
  handleProgress(event, file, fileList) {
   this.percentage = +file.percentage
  },
  fileBeforeUpload(file, event) {
   if (this.acceptType === 'image' && !file.type.includes('image/')) {
    this.$warning('请上传图片')
    return false
   }
   if (this.acceptType === 'video' && !file.type.includes('video/')) {
    this.$warning('请上传视频')
    return false
   }
   this.isUpload = true
   if (file.type.includes('image/') && (file.size > this.maxSize * 1024 * 1024)) {
    this.$warning(`请上传小于${this.maxSize}M的图片`)
    this.percentage = 0
    this.isLoading = false
    return false
   }
   if (file.type.includes('video/')) this.isDiabled = true
   if (this.isCropper) {
    return false
   }
  },
  fileChange(file, fileList) {
   if (file.percentage === 0 && this.isCropper) {
    if (file.raw.type.includes('video/')) {
     this.$warning('请上传图片')
     return
    }
    this.imgSrc = file.url
    this.modifyCropper = true
    this.cropperImage = {
     coverUrl: '',
     isImg: true,
     isPlay: true,
     name: file.name
    }
   }
  },
  // 实时预览函数
  realTime(data) {
   this.previews = data
  },
  imgLoad(data) {
  },
  // 裁剪后上传图片
  uploadCropperImage() {
   const _this = this
   this.$refs.cropper.getCropBlob((data) => {
    const config = {
     headers: {
      'Authorization': _this.headers.Authorization,
      'Content-Type': 'multipart/form-data'
     }
    }
    const formdata = new FormData()
    formdata.append('file', data)
    // this.uploadUrl 上传
    axios.post(this.uploadUrl, formdata, config).then(response => {
     _this.cropperImage = Object.assign({}, _this.cropperImage, {
      displayUrl: response.data.data,
      url: response.data.data,
      id: Date.now()
     })
     _this.draggableList.push(_this.cropperImage)
     _this.$emit('getImageList', _this.draggableList.map(val => {
      if (this.returnType === 'Array') {
       return val.url
      }
      if (this.returnType === 'Object') {
       return {
        url: val.url,
        uploadStatus: true
       }
      }
     }), _this.customObject)
     _this.modifyCropper = false
    }).catch(error => {
     console.log('err', error)
    })
   })
  },
  imageSuccess(response, file, fileList) {
   const _this = this
   try {
    this.getElement(fileList.length)
    let displayUrl = ''
    let coverUrl = ''
    let isImg = true
    const url = file.response.data || file.url
    this.isUpload = false
    const files = url.split(',')
    if (files.length === 3) {
     displayUrl = files[1]
     coverUrl = files[2]
     isImg = false
    } else if (files.length === 1) {
     displayUrl = url
     isImg = true
    }
    const id = Date.now()
    _this.draggableList.push({
     name: file.name,
     url: url,
     coverUrl: coverUrl,
     displayUrl: displayUrl,
     isImg: isImg,
     isPlay: true,
     id: id
    })
    if (isImg) {
     _this.percentage = 0
     _this.$emit('getImageList', _this.draggableList.map(val => {
      if (this.returnType === 'Array') {
       return val.url
      }
      if (this.returnType === 'Object') {
       return {
        url: val.url,
        uploadStatus: true
       }
      }
     }), _this.customObject)
     return
    }
    _this.$emit('getImageList', _this.draggableList.map(val => {
     if (this.returnType === 'Array') {
      return val.url
     }
     if (this.returnType === 'Object') {
      return {
       url: val.url,
       uploadStatus: false
      }
     }
    }), _this.customObject)
    setTimeout(() => {
     const keys = Object.keys(_this.$refs)
     const video = _this.$refs[`${keys[keys.length - 1]}`][0]
     const removeId = keys[keys.length - 1]
     const interval = setInterval(() => {
      if (video.readyState === 4) {
       const duration = video.duration
       this.isDiabled = false
       if (duration < 3 || duration > 60) {
        _this.$message.success('请上传大于三秒小于六十秒的视频')
        _this.percentage = 0
        // _this.remove(_this.draggableList.length - 1)
        _this.draggableList = _this.draggableList.filter(val => {
         return (val.id + '') !== (removeId + '')
        })
        _this.$emit('getImageList', _this.draggableList.map(val => {
         if (this.returnType === 'Array') {
          return val.url
         }
         if (this.returnType === 'Object') {
          return {
           url: val.url,
           uploadStatus: true
          }
         }
        }), _this.customObject)
        _this.getElement(_this.draggableList.length)
       }
       _this.percentage = 0
       _this.$emit('getImageList', _this.draggableList.map(val => {
        if (this.returnType === 'Array') {
         return val.url
        }
        if (this.returnType === 'Object') {
         return {
          url: val.url,
          uploadStatus: true
         }
        }
       }), _this.customObject)
       clearInterval(interval)
      }
      video.src = displayUrl
      video.poster = coverUrl
     }, 1000)
    }, 1000)
   } catch (error) {
    console.log('error', error)
   }
  },
  play(item) {
   const video = document.getElementById(item.id)
   video.play()
   item.isPlay = !item.isPlay
  },
  pause(item) {
   const video = document.getElementById(item.id)
   video.pause()
   item.isPlay = !item.isPlay
  },
  // 全屏播放
  fullPlay(item) {
   const video = document.getElementById(item.id)
   // w3c
   typeof video.requestFullScreen === 'function' && video.requestFullScreen()
   // webkit(谷歌)
   typeof video.webkitRequestFullScreen === 'function' && video.webkitRequestFullScreen()
   // 火狐
   typeof video.mozRequestFullScreen === 'function' && video.mozRequestFullScreen()
   // IE
   typeof video.msExitFullscreen === 'function' && video.msExitFullscreen()
  },
  viewImage(url) {
   this.dialogImageUrl = url
   this.dialogVisible = true
  },
  remove(index) {
   this.draggableList.splice(index, 1)
   this.$emit('getImageList', this.draggableList.map(val => {
    if (this.returnType === 'Array') {
     return val.url
    }
    if (this.returnType === 'Object') {
     return {
      url: val.url,
      uploadStatus: true
     }
    }
   }), this.customObject)
   this.getElement(this.draggableList.length)
  },
  onEnd(event) {
   this.$emit('getImageList', this.draggableList.map(val => {
    if (this.returnType === 'Array') {
     return val.url
    }
    if (this.returnType === 'Object') {
     return {
      url: val.url,
      uploadStatus: true
     }
    }
   }), this.customObject)
  },
  isImg(obj) {
   const item = obj.url
   if (item === '' || item === null || typeof item === 'undefined') {
    return false
   }
   const index = item.lastIndexOf('.')
   var ext = item.substr(index + 1)
   if (ext.includes('!')) ext = ext.split('!')[0]
   ext = ext.toLowerCase()
   var tps = ['jpg', 'jpeg', 'png']
   let ok = false
   for (let i = 0; i < tps.length; i++) {
    if (tps[i] === ext) {
     ok = true
     break
    }
   }
   return ok
  },
  getElement(length) {
   const _this = this
   if (length >= _this.maxNum) {
    document.querySelectorAll(`#${_this.uploadId} .el-upload--picture-card`).forEach(val => {
     if (val.firstElementChild.className === 'el-icon-plus') {
      val.style.display = 'none'
      return true
     }
    })
   } else {
    document.querySelectorAll(`#${_this.uploadId} .el-upload--picture-card`).forEach(val => {
     if (val.firstElementChild.className === 'el-icon-plus') {
      val.style.display = 'inline-block'
      return true
     }
    })
   }
  }
 }
}

</script>
<style lang='scss' scoped>
.image-draggable {
  display: flex;
  flex-wrap: wrap;
  .image-list {
    position: relative;

    display: inline-block;
    overflow: hidden;

    width: 148px;
    height: 148px;
    margin-right: 10px;

    cursor: pointer;
    &:hover {
      .icon {
        height: 20%;

        transition: all .5s;
        .video-icon {
          display: inline-block;

          margin-right: 10px;
        }
      }
    }
    .icon {
      position: absolute;
      bottom: 0;

      display: flex;
      justify-content: center;

      width: 100%;
      height: 0;

      background-color: rgba(215, 215, 215, 1);
      .icon-size {
        width: 2em;
        height: 2em;
      }
      .video-icon {
        display: none;
      }
    }
  }
}
</style>
<style lang="scss">
.image-draggable {
  .el-progress {
    top: -50%;
  }
}
</style>
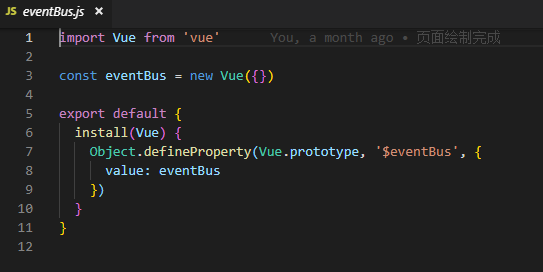
注册全局事件
创建eventBus.js

使用
import eventBus from './plugins/eventBus'
Vue.use(eventBus)
处理缓存
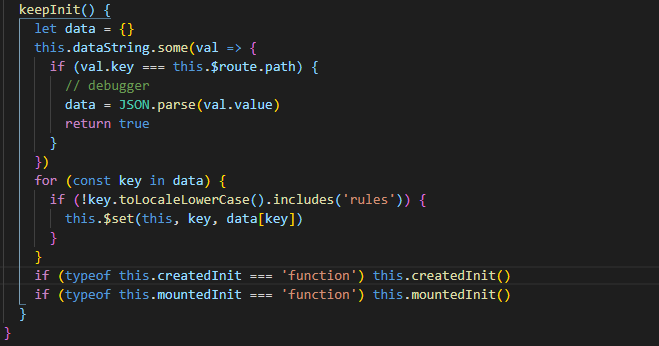
借用mounted, activated 事件处理数据
在某一次打开页面的时候进行数据初始化存储, 放置在vuex中,或者全局变量中,当需要初始化进行一个初始化,采取mixins引入


以上就是本文的全部内容,希望对大家的学习有所帮助,也希望大家多多支持我们。
赞 (0)

