基于vue与element实现创建试卷相关功能(实例代码)
由于最近在一个项目中需要实现创建试卷与预览试卷的功能,所以就自己动手写了一个,效果还不错,目前项目已经交付使用,今天就先和大家分享一下创建试卷。
创建试卷
先放一下效果图
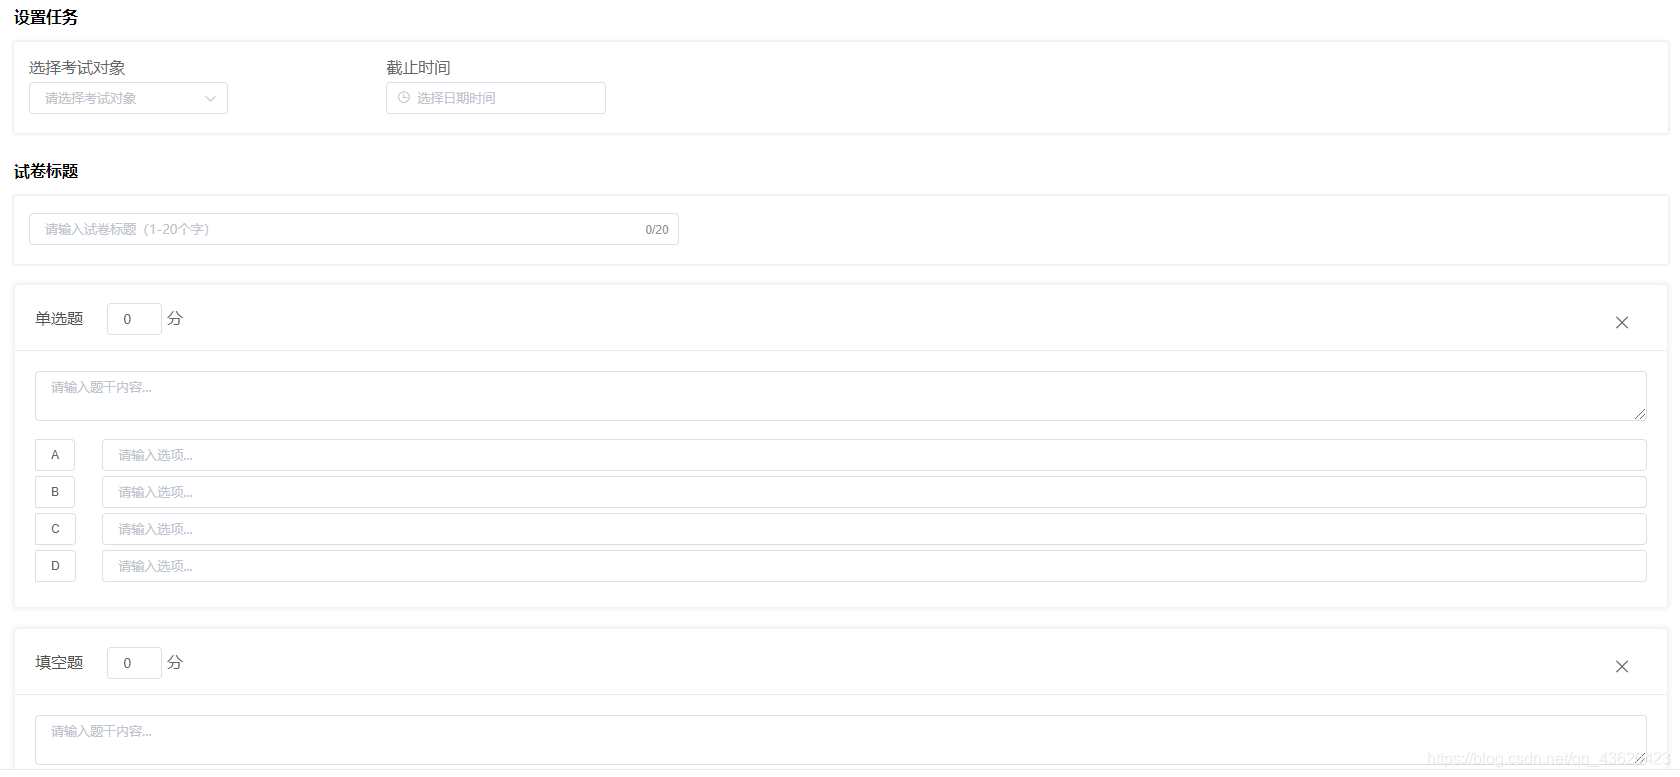
首先是试卷的相关设置
考试对象是通过接口返回的数据
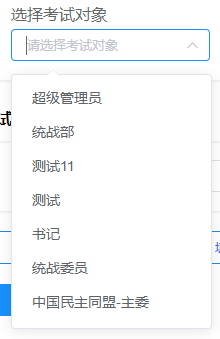
<span class="content-label">选择考试对象</span>
<el-form-item prop="roleList">
	<el-select
		v-model="form.roleList"
		multiple
		filterable
		allow-create
		default-first-option
		placeholder="请选择考试对象"
	>
		<el-option
			v-for="item in roles"
			:key="item.value"
			:label="item.label"
			:value="item.value"
		/>
	</el-select>
</el-form-item>
需要定义的data数据
roles: [], //考试对象选择列表(接口返回)
form: {
	title: '',
	roleList: [], // 考试对象
	deadline: '', // 截止时间
	questions: []
},
获取考试对象列表
getRoles() {
	crudRoles.getAll().then(res => {
		res.map((obj) => {
			const role = {
				value: obj.id,
				label: obj.name
			}
			this.roles.push(role)
		})
	})
},
截至时间使用的是element时间日期选择器
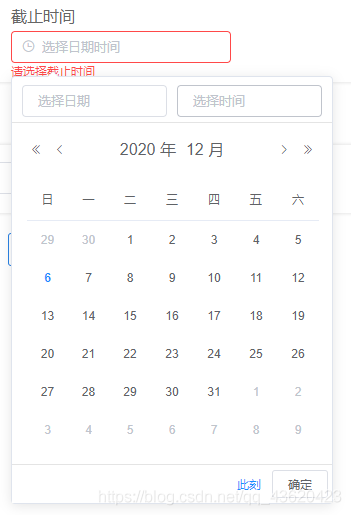
<span class="content-label">截止时间</span>
<el-form-item prop="deadline">
	<el-date-picker
	v-model="form.deadline"
	type="datetime"
	placeholder="选择日期时间"
	value-format="yyyy-MM-dd HH:mm:ss"
	/>
</el-form-item>
然后是添加试题
试题类型的相关数据也是通过接口返回的

data数据
questionType: [],
获取试题类型
getQuestionType() {
	crudExam.getQuestionType().then(res => {
		this.questionType = res
	})
},
<div class="question-type">
	<el-button
		v-for="item in questionType"
		:key="item.typeId"
		style="border-color: #2A82E4; color: #2A82E4"
		@click="addQuestion(item.typeId)"
	>
		<svg-icon :icon-class="item.icon" />
		{{ item.typeName }}
	</el-button>
</div>
addQuestion(typeId) {
	const question = {
		id: this.questionId,
    quesTypeId: typeId,
    title: '',
    score: 0,
    answer: [],
    content: []
	}
	this.form.questions.push(question)
	this.questionId++
},
对于添加的试题模板则是单独创建了一个question.vue
这里由于其他布局方法一直不太理想,所以采用了栅格布局,效果还算可以
<template>
 <el-card class="box-card">
  <div slot="header" class="clearfix" style="margin-bottom: -10px">
   <span
    class="type-name"
    v-text="question.quesTypeId < 3 ?
     question.quesTypeId === 1 ?
      '单选题' : '多选题'
     : question.quesTypeId < 5 ?
      question.quesTypeId === 3 ?
       '填空题' : '简答题'
      : '判断题'"
   >卡片名称</span>
   <el-input v-model="question.score" style="width: 55px" />
   <span>分</span>
   <el-button style="float: right; border: none; font-size: 20px" icon="el-icon-close" @click="removeQuestion" />
  </div>
  <el-form-item>
   <el-input
    v-model="question.title"
    type="textarea"
    placeholder="请输入题干内容..."
   />
  </el-form-item>
  <!--单选、多选-->
  <el-form-item v-if="question.quesTypeId === 1 || question.quesTypeId === 2" style="margin-bottom: 0px">
   <el-checkbox-group
    v-model="question.answer"
    :min="0"
    :max="question.quesTypeId === 1 ? 1 : 4"
   >
    <el-row
     v-for="(item, index) in ['A', 'B', 'C', 'D']"
     :key="item"
    >
     <el-col :span="1">
      <el-checkbox-button
       v-model="question.answer"
       :label="question.content[index]"
       border
      >
       {{ item }}
      </el-checkbox-button>
     </el-col>
     <el-col :span="23">
      <el-input
       v-model="question.content[index]"
       placeholder="请输入选项..."
       @input="contentChange(question)"
      />
     </el-col>
    </el-row>
   </el-checkbox-group>
  </el-form-item>
  <!--简答、填空-->
  <el-form-item v-if="question.quesTypeId === 3 || question.quesTypeId === 4" style="margin-bottom: 0px">
   <el-input
    v-model="question.answer[0]"
    type="textarea"
    placeholder="请输入参考答案"
   />
  </el-form-item>
  <!--判断-->
  <el-form-item v-if="question.quesTypeId === 5" style="margin-bottom: 0px">
   <el-checkbox-group
    v-model="question.answer"
    :min="0"
    :max="1"
   >
    <el-checkbox v-model="question.answer" label="对" border />
    <el-checkbox v-model="question.answer" label="错" border />
   </el-checkbox-group>
  </el-form-item>
 </el-card>
</template>

<script>
export default {
 props: {
  question: {
   type: Object,
   required: true
  }
 },
 methods: {
  removeQuestion() {
   this.$emit('removeQuestion', this.question.id)
  },
  contentChange(question) {
   question.answer.splice(0)
  }
 }
}
</script>

<style scoped>
.type-name {
 color: #505050;
 margin-right: 20px;
}
</style>
然后是删除试题
<question
	v-for="item in form.questions"
	:key="item.id"
	:question="item"
	class="question-content"
	@removeQuestion="removeQuestion"
/>
removeQuestion(id) {
	for (let i = 0; i < this.form.questions.length; i++) {
		if (this.form.questions[i].id === id) {
			this.form.questions.splice(i, 1)
		}
	}
},
最后提交方法中进行数据验证
这个在之前一篇博客中简单介绍过,感兴趣的朋友可以自行前去了解
Vue关于Element对表单的校验
最最后把create.vue的源码分享给大家方便大家进行参考,如有更好的建议也请大家不吝赐教
<template>
 <div class="app-container">
  <div>
   <el-form
    ref="form"
    :model="form"
    :rules="rules"
    class="form"
   >
    <h4 class="card-label">设置任务</h4>
    <div class="card-panel">
     <div class="settings-wrap" style="width: 18%">
      <span class="content-label">选择考试对象</span>
      <el-form-item prop="roleList">
       <el-select
        v-model="form.roleList"
        multiple
        filterable
        allow-create
        default-first-option
        placeholder="请选择考试对象"
       >
        <el-option
         v-for="item in roles"
         :key="item.value"
         :label="item.label"
         :value="item.value"
        />
       </el-select>
      </el-form-item>
     </div>
     <div class="settings-wrap" style="width: 18%">
      <span class="content-label">截止时间</span>
      <el-form-item prop="deadline">
       <el-date-picker
        v-model="form.deadline"
        type="datetime"
        placeholder="选择日期时间"
        value-format="yyyy-MM-dd HH:mm:ss"
       />
      </el-form-item>
     </div>
    </div>
    <h4 class="card-label">试卷标题</h4>
    <div class="card-panel">
     <div class="settings-wrap" style="width: 40%">
      <el-form-item prop="title">
       <el-input
        v-model="form.title"
        type="text"
        placeholder="请输入试卷标题(1-20个字)"
        maxlength="20"
        show-word-limit
       />
      </el-form-item>
     </div>
    </div>
    <question
     v-for="item in form.questions"
     :key="item.id"
     :question="item"
     class="question-content"
     @removeQuestion="removeQuestion"
    />
    <div class="question-type">
     <el-button
      v-for="item in questionType"
      :key="item.typeId"
      style="border-color: #2A82E4; color: #2A82E4"
      @click="addQuestion(item.typeId)"
     >
      <svg-icon :icon-class="item.icon" />
      {{ item.typeName }}
     </el-button>
    </div>
    <el-button
     type="primary"
     class="submit"
     :loading="loading"
     style="margin-top: 20px"
     @click="submit"
    >
     提交试卷
    </el-button>
   </el-form>
  </div>
 </div>
</template>

<script>
import crudRoles from '@/api/system/role'
import crudExam from '@/api/exam/exam'
import question from '@/views/exam/module/question'
import crudList from '@/api/exam/list'
export default {
 name: 'Create',
 components: {
  question
 },
 data() {
  return {
   roles: [],
   dialogVisible: false,
   loading: false,
   questionId: 0,
   form: {
    title: '',
    roleList: [], // 考试对象
    deadline: '', // 截止时间
    questions: []
   },
   questionType: [],
   rules: {
    roleList: [{
     required: true,
     message: '请选择考试对象',
     trigger: 'blur'
    }],
    deadline: [{
     required: true,
     message: '请选择截止时间',
     trigger: 'blur'
    }],
    title: [{
     required: true,
     message: '请输入试卷标题(1-20个字)',
     trigger: 'blur'
    }]
   }
  }
 },
 created() {
  this.getRoles()
  this.getQuestionType()
 },
 methods: {
  getRoles() {
   crudRoles.getAll().then(res => {
    res.map((obj) => {
     const role = {
      value: obj.id,
      label: obj.name
     }
     this.roles.push(role)
    })
   })
  },
  getQuestionType() {
   crudExam.getQuestionType().then(res => {
    this.questionType = res
   })
  },
  addQuestion(typeId) {
   const question = {
    id: this.questionId,
    quesTypeId: typeId,
    title: '',
    score: 0,
    answer: [],
    content: []
   }
   this.form.questions.push(question)
   this.questionId++
  },
  removeQuestion(id) {
   for (let i = 0; i < this.form.questions.length; i++) {
    if (this.form.questions[i].id === id) {
     this.form.questions.splice(i, 1)
    }
   }
  },
  submit() {
   if (this.form.questions.length === 0) {
    this.$notify({
     title: '警告',
     message: '请添加试题',
     type: 'warning'
    })
    return
   }
   const form = JSON.parse(JSON.stringify(this.form))
   let isSubmit = true
   let message = ''
   this.loading = true
   this.$refs['form'].validate(res => {
    if (!res) {
     this.loading = false
     return
    }
    for (let i = 0; i < form.questions.length; i++) {
     const question = form.questions[i]
     if (question.title === '') {
      isSubmit = false
      message = '请设置题目题干'
      break
     }
     if ((question.quesTypeId === 1 || question.quesTypeId === 2) && question.content.length === 0) {
      isSubmit = false
      message = '请设置选择题题答案'
      break
     }
     if ((question.quesTypeId === 1 || question.quesTypeId === 2 || question.quesTypeId === 5) && question.answer.length === 0) {
      isSubmit = false
      message = '请设置客观题选项'
      break
     }
    }
    if (!isSubmit) {
     this.$notify({
      title: '警告',
      message: message,
      type: 'warning'
     })
     this.loading = false
     return
    }
    form.questions.forEach(function(question) {
     question.answer = JSON.stringify(question.answer)
     question.content = JSON.stringify(question.content)
    })
    crudExam.add(form).then((res) => {
     this.loading = false
     const params = {
      type: 2,
      typeId: res,
      url: this.$frontUrl + '/answerOnline'
     }
     crudList.remind(params).then(() => {
      this.$message.success('提醒成功~')
     })
     this.$router.push('/exam/index')
    }).catch(() => {
     this.loading = false
    })
   })
  }
 }
}
</script>

<style rel="stylesheet/scss" lang="scss" scoped>
 .card-label {
  margin: 30px 0 15px;
 }
 .card-panel {
  display: flex;
  flex-direction: row;
  padding: 17px 15px 0;
  color: #666;
  box-shadow: 0 0 3px 1px #e7e7e7;
  border-color: #e7e7e7;

  .settings-wrap {
   margin-right: 4%;
  }
 }
 .content-label {
  display: block;
  padding-bottom: 5px;
 }
 .question-type {
  margin-top: 20px;
 }
 .question-content {
  margin-top: 20px;
  color: #666;
  box-shadow: 0 0 4px 2px rgba(0, 0, 0, .05);
  border-color: rgba(0, 0, 0, .05);
 }
</style>
到此这篇关于基于vue与element实现创建试卷相关功能的文章就介绍到这了,更多相关vue与element创建试卷功能内容请搜索我们以前的文章或继续浏览下面的相关文章希望大家以后多多支持我们!
相关推荐
-
vue+ElementUI 关闭对话框清空验证,清除form表单的操作
前面跟大家提到过 elementUI验证的问题,那么今天就来看看 点击对话框和关闭按钮 怎么清空验证,清空form表单,避免二次点击还会有 验证错误的提示 1.首先在你的对话框 取消按钮 加一个click事件,例如:(ps::callOf里面的addGroupData和ref一 一对应起来) <div slot="footer" class="dialog-footer"> <el-button @click="callOf('addGr
-
vue修改Element的el-table样式的4种方法
修改Element中的el-table样式,可以使用以下几种方法: 1. row-style 行的 style 的回调方法,也可以使用一个固定的 Object 为所有行设置一样的 Style. 2. cell-style 单元格的 style 的回调方法,也可以使用一个固定的 Object 为所有单元格设置一样的 Style. 3. header-row-style 表头行的 style 的回调方法,也可以使用一个固定的 Object 为所有表头行设置一样的 Style. 4. header-c
-
快速解决Vue、element-ui的resetFields()方法重置表单无效的问题
问题: 使用this.$ref['form'] .resetFields()无法重置表单项 原因: 1.没有给表单添加ref属性 <el-form ref="form"></el-form> 2.表单项el-form-item没有添加prop属性,prop属性需要与input框绑定的属性一致 <el-form ref="form" :model="sizeForm" label-width="80px&qu
-
vue+elementUI(el-upload)图片压缩,默认同比例压缩操作
如下所示: 这个需求针对用户上传手机拍摄照片等不便修改图片大小的情况,我们允许上传10M以内的图片由前端对图片进行压缩再传给后台存储,结合elementUI的el-upload组件实现图片上传功能(简单来说就是用户是老大) 1.提取出压缩方法,放在公共方法.js文件里 /** 图片压缩,默认同比例压缩 * @param {Object} fileObj * 图片对象 * 回调函数有一个参数,base64的字符串数据 */ export function compress(fileObj, cal
-
vue+element获取el-table某行的下标,根据下标操作数组对象方式
1.在vue中对数组中的某个对象进行操作时(替换.删除),都需要用到该对象在数组中的下标. 前端代码: scope.$index :获取当前行的下标 scope.row:获取当前行的对象 效果图: 思路:通过点击事件将该对象在数组中的下标传递到方法中,然后对数组进行操作 即可根据下标删除数组中对应的对象. 补充知识:vue-element-upload 文件上传打开选择文件弹框前进行提示或操作 在项目中使用文件上传功能时,需求是不能直接弹出弹框,要先二次确认或进行提示.引申开来,即可在打开选择文
-

基于vue与element实现创建试卷相关功能(实例代码)
由于最近在一个项目中需要实现创建试卷与预览试卷的功能,所以就自己动手写了一个,效果还不错,目前项目已经交付使用,今天就先和大家分享一下创建试卷. 创建试卷 先放一下效果图 首先是试卷的相关设置 考试对象是通过接口返回的数据 <span class="content-label">选择考试对象</span> <el-form-item prop="roleList"> <el-select v-model="form
-
基于Vue组件化的日期联动选择器功能的实现代码
我们的社区前端工程用的是element组件库,后台管理系统用的是iview,组件库都很棒,但是日期.时间选择器没有那种" 年份 - 月份 -天数 " 联动选择的组件.虽然两个组件库给出的相关组件也很棒,但是有时候确实不是太好用,不太明白为什么很多组件库都抛弃了日期联动选择.因此考虑自己动手做一个. 将时间戳转换成日期格式 // timestamp 为时间戳 new Date(timestamp) //获取到时间标砖对象,如:Sun Sep 02 2018 00:00:00 GMT+08
-
cropper js基于vue的图片裁剪上传功能的实现代码
前些日子做了一个项目关于vue项目需要头像裁剪上传功能,看了一篇文章,在此基础上做的修改完成了这个功能,与大家分享一下.原文:http://www.jb51.net/article/135719.htm 首先下载引入cropper js, npm install cropper js --save 在需要的页面引入:import Cropper from "cropper js" html的代码如下: <template> <div id="demo&quo
-
基于Vue的移动端图片裁剪组件功能
最近项目上要做一个车牌识别的功能.本来以为很简单,只需要将图片扔给后台就可以了,但是经测试后识别率只有20-40%.因此产品建议拍摄图片后,可以对图片进行拖拽和缩放,然后裁剪车牌部分上传给后台来提高识别率.刚开始的话还是百度了一下看看有没有现成的组件,但是找来找去都没有找到一个合适的,还好这个功能不是很着急,因此自己周末就在家里研究一下. Demo地址:https://vivialex.github.io/demo/imageClipper/index.html 下载地址:https://git
-
基于Vue实现可以拖拽的树形表格实例详解
因业务需求,需要一个树形表格,并且支持拖拽排序,任意未知插入,github搜了下,真不到合适的,大部分树形表格都没有拖拽功能,所以决定自己实现一个.这里分享一下实现过程,项目源代码请看github,插件已打包封装好,发布到npm上 本博文会分为两部分,第一部分为使用方式,第二部分为实现方式 安装方式 npm i drag-tree-table --save-dev 使用方式 import dragTreeTable from 'drag-tree-table' 模版写法 <dragTreeTa
-
基于Vue el-autocomplete 实现类似百度搜索框功能
效果图如下所示: 首先上代码 <template> <div class="assets-search height-all"> <div class="search-layout"> <div class="search-title">让数据触手可及</div> <div class="search-input-layout"> <!--<e
-
JavaWeb实现用户登录注册功能实例代码(基于Servlet+JSP+JavaBean模式)
下面通过通过图文并茂的方式给大家介绍JavaWeb实现用户登录注册功能实例代码,一起看看吧. 一.Servlet+JSP+JavaBean开发模式(MVC)介绍 Servlet+JSP+JavaBean模式(MVC)适合开发复杂的web应用,在这种模式下,servlet负责处理用户请求,jsp负责数据显示,javabean负责封装数据. Servlet+JSP+JavaBean模式程序各个模块之间层次清晰,web开发推荐采用此种模式. 这里以一个最常用的用户登录注册程序来讲解Servlet+JS
-
Android基于高德地图poi的仿微信获取位置功能实例代码
1.打开页面自动定位,同时搜索周边所有poi 2.点击搜索按钮,输入关键子,获取关键字搜索结果 3.选取listview中的一项即可定位到该位置,或者获取任何消息 4.文件类 1.MapActivity public class MapActivity extends Activity implements PoiSearch.OnPoiSearchListener { private MapView mMapView = null; private AMap aMap; private MyL
-
Vue实现Header渐隐渐现效果的实例代码
新建header.vue组件 引入到父组件Detail.vue中 header.vue 通过router-link标签设置to属性为地址,实现点击返回首页 tag标签设为div,就有了div的属性 <template> <div class="header"> <router-link tag="div" to="/" class="header-abs"> <div class=&q
-
vue中keep-alive内置组件缓存的实例代码
需求: home 组件中有一个 name 的 data 数据.这个数据修改之后,再切换到其他的组件.再切换到 home 组件,希望 home 中 name 这个值是之前修改过的值.希望组件有缓存. keep-alive 的使用方式: 将要缓存的组件使用 keep-alive 包裹住即可. keep-alive优点的介绍: 1. 切换组件时,当前组件不会触发销毁的生命周期钩子.也就是说不会销毁了. 2. 切换回来时,也不会重新创建.(既然都没有被销毁,哪里来的重新创建呢) 3. 会多出两个生命周期