QT quick-Popup弹出窗口自定义的实现
目录
- 1.Popup介绍
- 2.自定义Popup
1.Popup介绍
Popup是一个弹出窗口的控件
它的常用属性如下所示:
- anchors.centerIn : Object,用来设置居中在谁窗口中.
- closePolicy : enumeration,设置弹出窗口的关闭策略,默认值为默认值为Popup.CloseOnEscape|Popup.CloseOnPressOutside,取值有:
- Popup.NoAutoClose : 只有在手动调用close()后,弹出窗口才会关闭(比如加载进度时,不XIANG)。
- Popup.CloseOnPressOutside : 当鼠标按在弹出窗口外时,弹出窗口将关闭。
- Popup.CloseOnPressOutsideParent : 当鼠标按在其父项之外时,弹出窗口将关闭。
- Popup.CloseOnReleaseOutside : 当鼠标在弹出窗口外部松开按下时,弹出窗口将关闭。
- Popup.CloseOnReleaseOutsideParent : 当鼠标在其父项松开按下时,弹出窗口将关闭。
- Popup.CloseOnEscape : 当弹出窗口具有活动焦点时,按下ESC键时,弹出窗口将关闭。
- dim : bool,昏暗属性,默认为undefined,设置为false,则模态窗口弹出后的其它背景不会昏暗
- modal : bool,模态,默认为false(非模态,非阻塞调用,指出现该对话框时,也可以与父窗口进行交互,此时dim是无效果的)
- enter : Transition,进入弹出窗口时的动画过渡
- exit : Transition,退出弹出窗口时的动画过渡
它的信号如下所示:
- void aboutToHide(): 当弹出窗口即将隐藏时,会发出此信号。
- void aboutToShow(): 当弹出窗口即将显示时,会发出此信号。
- void closed(): 当弹出窗口关闭时发出此信号。
- void opened(): 打开弹出窗口时发出此信号。
它的方法如下所示:
- void close(): 关闭弹出窗口。
- forceActiveFocus(reason = Qt.OtherFocusReason): 强制设置焦点
- void open() : 打开弹出窗口。
然后我们来自定义实现一个带指标的popup弹出窗口.
2.自定义Popup
由于Popup的锚布局只有一个anchors.centerIn,假如们想让Popup位于某个控件的左上方时,必须得自定义一个.
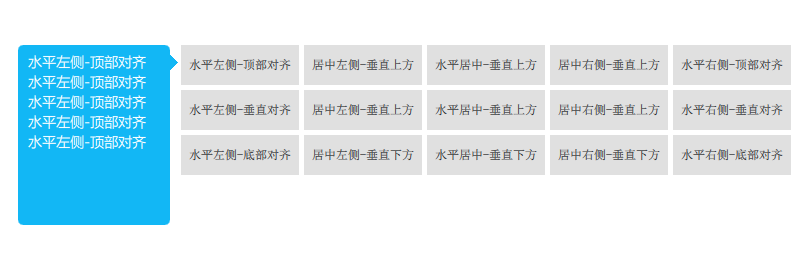
实现截图如下所示(已上传群里):
实现效果如下所示:
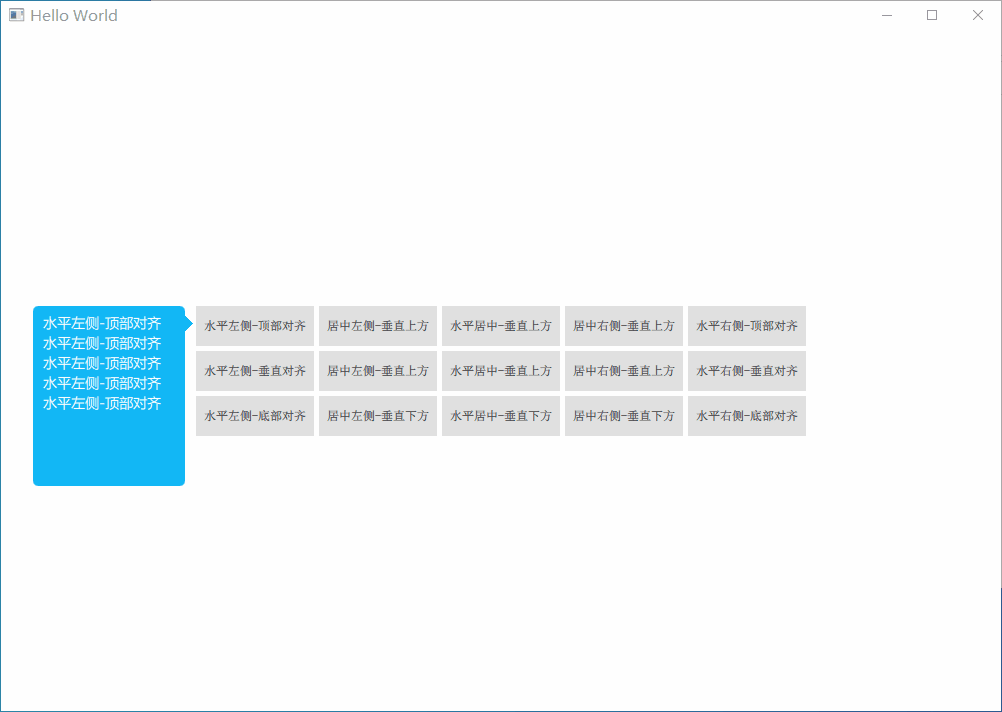
首先我们需要实现horizontalPosBase和verticalPosBase两个属性.来实现Popup位于目标对象的哪个方位.
- 一个是设置popup在目标对象的水平方向的位置
- 一个是popup在目标对象的垂直方向的位置.
由于我们已经知道了方位,那么指标的坐标也就可以自动计算出来了.
具体实现代码如下所示:
// 指示器方向,根据horizontalPosBase和verticalPosBase 自动计算
     enum IndicatorStyle {
         IndicatorLeft,
         IndicatorRight,
         IndicatorTop,
         IndicatorBottom
     }

     function updateIndicatorPos(indicatorStyle) {
          switch (indicatorStyle)
         {
             case IndicatorPopup.IndicatorLeft:
                 indicator.x = - indicator.width*0.4;
                 indicator.y =  back.height <= myTarget.height ? (back.height)/2-indicatorLen :
                                verticalPosBase === IndicatorPopup.TopAlign ? (myTarget.height)/2 -indicatorLen :
                                verticalPosBase === IndicatorPopup.VerticalAlign ? (back.height)/2 -indicatorLen :
                                back.height -  (myTarget.height)/2 -indicatorLen;

                 break;

             case IndicatorPopup.IndicatorRight:
                 indicator.x = width - indicator.width*1.2;
                 indicator.y =  back.height <= myTarget.height ? (back.height)/2-indicatorLen :
                                verticalPosBase === IndicatorPopup.TopAlign ? (myTarget.height)/2 -indicatorLen :
                                verticalPosBase === IndicatorPopup.VerticalAlign ? (back.height)/2 -indicatorLen :
                                back.height -  (myTarget.height)/2 -indicatorLen;
                 break;

             case IndicatorPopup.IndicatorTop:
                 indicator.x =  back.width <= myTarget.width ? (back.width)/2-indicatorLen :
                                horizontalPosBase === IndicatorPopup.PosBaseToRight ? (myTarget.width)/2 -indicatorLen :
                                horizontalPosBase === IndicatorPopup.PosBaseToHorizontal ? (back.width)/2 -indicatorLen :
                                back.width -  (myTarget.width)/2 -indicatorLen;
                 indicator.y =  - indicator.width*0.4;
                 break;
             case IndicatorPopup.IndicatorBottom:
                 indicator.x =  back.width <= myTarget.width ? (back.width)/2-indicatorLen :
                                horizontalPosBase === IndicatorPopup.PosBaseToRight ? (myTarget.width)/2 -indicatorLen :
                                horizontalPosBase === IndicatorPopup.PosBaseToHorizontal ? (back.width)/2 -indicatorLen :
                                back.width -  (myTarget.width)/2 -indicatorLen;
                 indicator.y =  height - indicator.height*1.2;
                 break;
         }
         console.log("indicator",indicator.x,indicator.y,indicator.width,indicator.height)
     }

     function updatePopupPos() {
        var indicatorStyle;

         switch (horizontalPosBase)
        {
            case IndicatorPopup.PosBaseToLeft:     // popup位于目标水平左侧

                x = myTarget.x - width - targetSpacing;
                y = verticalPosBase === IndicatorPopup.TopAlign ? myTarget.y :
                    verticalPosBase === IndicatorPopup.VerticalAlign ? myTarget.y + myTarget.height/2 - height/2 :
                    myTarget.y - height + myTarget.height
                indicatorStyle = IndicatorPopup.IndicatorRight;

                break;

            case IndicatorPopup.PosBaseToHorizontal: // popup水平中间
                x = myTarget.x + myTarget.width/2 - width/2;
                y = verticalPosBase === IndicatorPopup.PosBaseToTop ? myTarget.y - height - targetSpacing :
                    verticalPosBase === IndicatorPopup.PosBaseToBottom ? myTarget.y + myTarget.height + targetSpacing :
                    myTarget.y + myTarget.height + targetSpacing

                indicatorStyle = verticalPosBase === IndicatorPopup.PosBaseToTop ? IndicatorPopup.IndicatorBottom :
                                                                                   IndicatorPopup.IndicatorTop;

                break;

            case IndicatorPopup.PosBaseToRight:   // popup位于目标水平右侧

                x = myTarget.x + myTarget.width + targetSpacing;
                y = verticalPosBase === IndicatorPopup.TopAlign ? myTarget.y :
                    verticalPosBase === IndicatorPopup.VerticalAlign ? myTarget.y + myTarget.height/2 - height/2 :
                    myTarget.y - height + myTarget.height
                indicatorStyle = IndicatorPopup.IndicatorLeft
                console.log("PosBaseToRight",x,y,indicatorStyle);
                break;
        }

        back.anchors.leftMargin = indicatorStyle === IndicatorPopup.IndicatorLeft ? indicatorLen : 0
        back.anchors.rightMargin = indicatorStyle === IndicatorPopup.IndicatorRight ? indicatorLen : 0
        back.anchors.bottomMargin = indicatorStyle === IndicatorPopup.IndicatorBottom ? indicatorLen : 0
        back.anchors.topMargin = indicatorStyle === IndicatorPopup.IndicatorTop ? indicatorLen : 0

        leftPadding = indicatorStyle === IndicatorPopup.IndicatorLeft ? indicatorLen : 0
        rightPadding = indicatorStyle === IndicatorPopup.IndicatorRight ? indicatorLen : 0
        bottomPadding = indicatorStyle === IndicatorPopup.IndicatorBottom ? indicatorLen : 0
        topPadding = indicatorStyle === IndicatorPopup.IndicatorTop ? indicatorLen : 0

        console.log(x,y,indicatorStyle);

        updateIndicatorPos(indicatorStyle);

     }
比如我们想让这个popup位于目标的左侧,顶部对齐,就可以这样写(无需指定popup的X,Y坐标了):
Button {
        id: btn
        text: "水平左侧-顶部对齐"
        onClicked: {
            popup.backgroundColor = "#12B7F5"
            popup.horizontalPosBase = IndicatorPopup.PosBaseToLeft
            popup.verticalPosBase = IndicatorPopup.TopAlign
            popup.indicatorOpen(btn)
        }
    }

    IndicatorPopup {
        id: popup
        width : 180
        height: 200
        modal: false
        focus: true
        parent: Overlay.overlay // Overlay.overlay表示主窗口的意思,附加到任何的item、popup中,避免当前界面不是主界面的情况,无法显示弹出窗口

        TextArea {
            anchors.fill: parent
            text: "1234567890"
            color: "#FFF"
            font.pixelSize: 14
            font.family: "Microsoft Yahei"
            wrapMode: TextEdit.WrapAnywhere
        }

        closePolicy: Popup.CloseOnEscape | Popup.CloseOnPressOutside
}
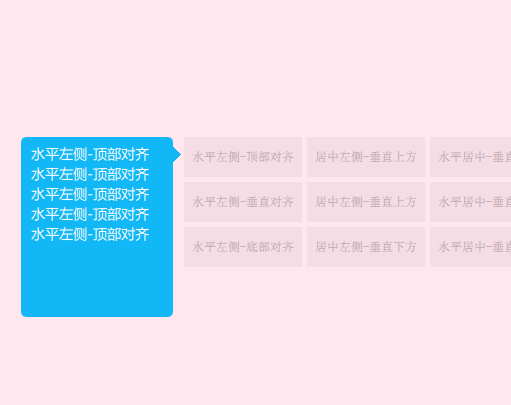
如果我们使用模态的弹出窗口,并且想设置弹出窗口外的背景色,可以设置Overlay.modal附加属性,比如设置为谈红色:
Overlay.modal: Rectangle {
    color: "#aaffdbe7"
}
效果如下所示:
到此这篇关于QT quick-Popup弹出窗口自定义的实现的文章就介绍到这了,更多相关QT quick-Popup弹出窗口内容请搜索我们以前的文章或继续浏览下面的相关文章希望大家以后多多支持我们!
相关推荐
-

Qt Quick QML-500行代码实现合成大西瓜游戏
"合成大西瓜"这个游戏在年前很火热,还上过微博热搜,最近便玩了一阵还挺有意思的,所以研究了一下小球碰撞原理,自己亲自手写碰撞算法来实现一个合成大西瓜游戏.并支持任意大小布局,你想玩多大面积,就拖多大面积,只要面积够大,认真玩下去,合100个大西瓜都可以.哈哈~~~ 1.游戏介绍 游戏里面总共有11个水果,两个相同水果的合成一个较大的水果,最终合成一个大西瓜便不能继续合下去了: 然而博主自己写的游戏,自己都合不出一个大西瓜来. 如果看起来很模糊,或者看不到视频,可以直接去https://
-
教你如何使用qt quick-PathView实现好看的home界面
PathView ,顾名思义,沿着特定的路径显示 Model 内的数据. Model 能够是 QML 内建的 ListModel . XmlListModel ,也能够是在 C++ 中实现的 QAbstractListModel 的派生类. PathView 恐怕是 Qt Quick 提供的 Model-View 类库中最复杂也最灵活的一个了. 要使用一个 PathView ,至少须要设置 model . delegate . path 三个属性. model . delegate 假设
-
使用qt quick-ListView仿微信好友列表和聊天列表的示例代码
1.视图模型介绍 在Qml中.常见的View视图有: ListView: 列表视图,视图中数据来自ListModel.XmlListModel或c++中继承自QAbstractItemModel或QAbstractListModel的自定义模型类 TableView: 和excel类似的视图 GridView: 网格视图,类似于home菜单那样,排列着一个个app小图标 PathView: 路径视图,可以根据用户自定义的path路径来显示不一样的视图效果 SwipeView: 滑动视图,使用一组
-
QT quick-Popup弹出窗口自定义的实现
目录 1.Popup介绍 2.自定义Popup 1.Popup介绍 Popup是一个弹出窗口的控件 它的常用属性如下所示: anchors.centerIn : Object,用来设置居中在谁窗口中. closePolicy : enumeration,设置弹出窗口的关闭策略,默认值为默认值为Popup.CloseOnEscape|Popup.CloseOnPressOutside,取值有: Popup.NoAutoClose : 只有在手动调用close()后,弹出窗口才会关闭(比如加载进度时
-
Android开发实现popupWindow弹出窗口自定义布局与位置控制方法
本文实例讲述了Android开发实现popupWindow弹出窗口自定义布局与位置控制方法.分享给大家供大家参考,具体如下: 布局文件: 主布局文件:activity_main: <?xml version="1.0" encoding="utf-8"?> <LinearLayout xmlns:android="http://schemas.android.com/apk/res/android" xmlns:tools=&q
-
android实现百度地图自定义弹出窗口功能
我们使用百度地图的时候,点击地图上的Marker,会弹出一个该地点详细信息的窗口,如下左图所示,有时候,我们希望自己定义这个弹出窗口的内容,或者,干脆用自己的数据来构造这样的弹出窗口,但是,在百度地图最新的Android SDK中,没有方便操作这种弹出窗口的类,虽然有一个PopupOverlay,但是它只支持将弹出内容转化为不多于三个Bitmap,如果这个弹出窗口里想有按钮来响应点击事件,用这个就不能满足要求了,于是,看了一遍百度地图覆盖物的API,我决定用自定义View的方法来实现类似的效果,
-
javascript+html5+css3自定义弹出窗口效果
本文实例为大家分享了js自定义弹出窗口效果展示的具体代码,供大家参考,具体内容如下 效果图: 源码: 1.demo.jsp <%@ page contentType="text/html;charset=UTF-8" language="java" %> <html> <head> <title>自定义弹出窗口</title> <script type="text/javascript&qu
-
Android自定义弹出窗口PopupWindow使用技巧
PopupWindow是Android上自定义弹出窗口,使用起来很方便. PopupWindow的构造函数为 复制代码 代码如下: public PopupWindow(View contentView, int width, int height, boolean focusable) contentView为要显示的view,width和height为宽和高,值为像素值,也可以是MATCHT_PARENT和WRAP_CONTENT. focusable为是否可以获得焦点,这是一个很重要的参数
-
23个Javascript弹出窗口特效整理
1. Lightview Lightview是一个基于Prototype与Script.aculo.us开发,用于创建可以覆盖整个页面的模式对话框.展示的内容不仅可以是图片.文字.网页.通过Ajax 调用的内容,还可以是Quicktime/Flash影片都能够以非常酷的效果展示. 2. ThickBox (演示地址) ThickBox是一个模式对话框UI控件.基于jQuery开发,可以用来展示单张或多张图片,内嵌的内容,iframed的内容,或通过Ajax获取的内容. 3. Fonshen JS
-
PyQt5笔记之弹出窗口大全
本文实现了PyQt5个各种弹出窗口:输入框.消息框.文件对话框.颜色对话框.字体对话框.自定义对话框 其中,为了实现自定义对话框的返回值,使用了信号/槽 本文基于 windows 7 + python 3.4 效果图: 取得弹出窗口的返回值 全部代码: from PyQt5.QtWidgets import * from PyQt5.QtCore import Qt, pyqtSignal, QTimer class MyWindow(QWidget): def __init__(self):
-
JS弹出窗口代码大全(详细整理)
如何利用网页弹出各种形式的窗口,我想大家大多都是知道些的,但那种多种多样的弹出式窗口是怎么搞出来的,我们今天就来学习一下: 1.弹启一个全屏窗口 复制代码 代码如下: <html> <body http://www.jb51.net','我们','fullscreen');">; <b>www.jb51.net</b> </body> </html> 2.弹启一个被F11化后的窗口 复制代码 代码如下: <html&g
-
Python tkinter模块弹出窗口及传值回到主窗口操作详解
本文实例讲述了Python tkinter模块弹出窗口及传值回到主窗口操作.分享给大家供大家参考,具体如下: 有些时候,我们需要使用弹出窗口,对程序的运行参数进行设置.有两种选择 一.标准窗口 如果只对一个参数进行设置(或者说从弹出窗口取回一个值),那么可以使用simpledialog,导入方法: from tkinter.simpledialog import askstring, askinteger, askfloat 完整例子 import tkinter as tk from tkin
-
超详细的JS弹出窗口代码大全
如何利用网页弹出各种形式的窗口,我想大家大多都是知道些的,但那种多种多样的弹出式窗口是怎么搞出来的,我们今天就来学习一下: 1.弹启一个全屏窗口 代码如下: <html> <body http://www.jb51.net','我们','fullscreen');">; <b>www.jb51.net</b> </body> </html> 2.弹启一个被F11化后的窗口 代码如下: <html> <bod